Infiniti QX56 (Z62). Manual - part 843


  Index      Infiniti     Infiniti QX56 (Z62) - service repair manual 2011 year


Search            


Content   ..  841  842  843  844   ..


Infiniti QX56 (Z62). Manual - part 843


INT-20

< REMOVAL AND INSTALLATION >

BODY SIDE TRIM

BODY SIDE WELT

BODY SIDE WELT : Removal and Installation

INFOID:0000000006220248

CAUTION:

Never damage the body.

REMOVAL

Front body side welt

1.

Remove front kicking plate inner and rear kicking plate inner. Refer to 

INT-20, "KICKING PLATE INNER :

Removal and Installation"

.

2.

Remove dash side finisher. Refer to 

INT-18, "DASH SIDE FINISHER : Removal and Installation"

.

3.

Slide front seat assembly to the frontmost position.

4.

Remove center pillar lower garnish. Refer to 

INT-22, "CENTER PILLAR LOWER GARNISH : Removal

and Installation"

.

5.

Remove front body side welt.

Rear body side welt

1.

Remove front kicking plate inner and rear kicking plate inner. Refer to 

INT-20, "KICKING PLATE INNER :

Removal and Installation"

.

2.

Slide front seat assembly to the frontmost position.

3.

Remove center pillar lower garnish. Refer to 

INT-22, "CENTER PILLAR LOWER GARNISH : Removal

and Installation"

.

4.

Remove luggage side lower finisher. Refer to 

INT-36, "LUGGAGE SIDE LOWER FINISHER : Removal

and Installation"

.

5.

Remove rear body side welt.

INSTALLATION

Install in the reverse order of removal.

KICKING PLATE INNER

KICKING PLATE INNER : Removal and Installation

INFOID:0000000006220249

CAUTION:

• When removing, always use a remover tool that is made of plastic.
• Never damage the body.

REMOVAL

Front kicking plate inner

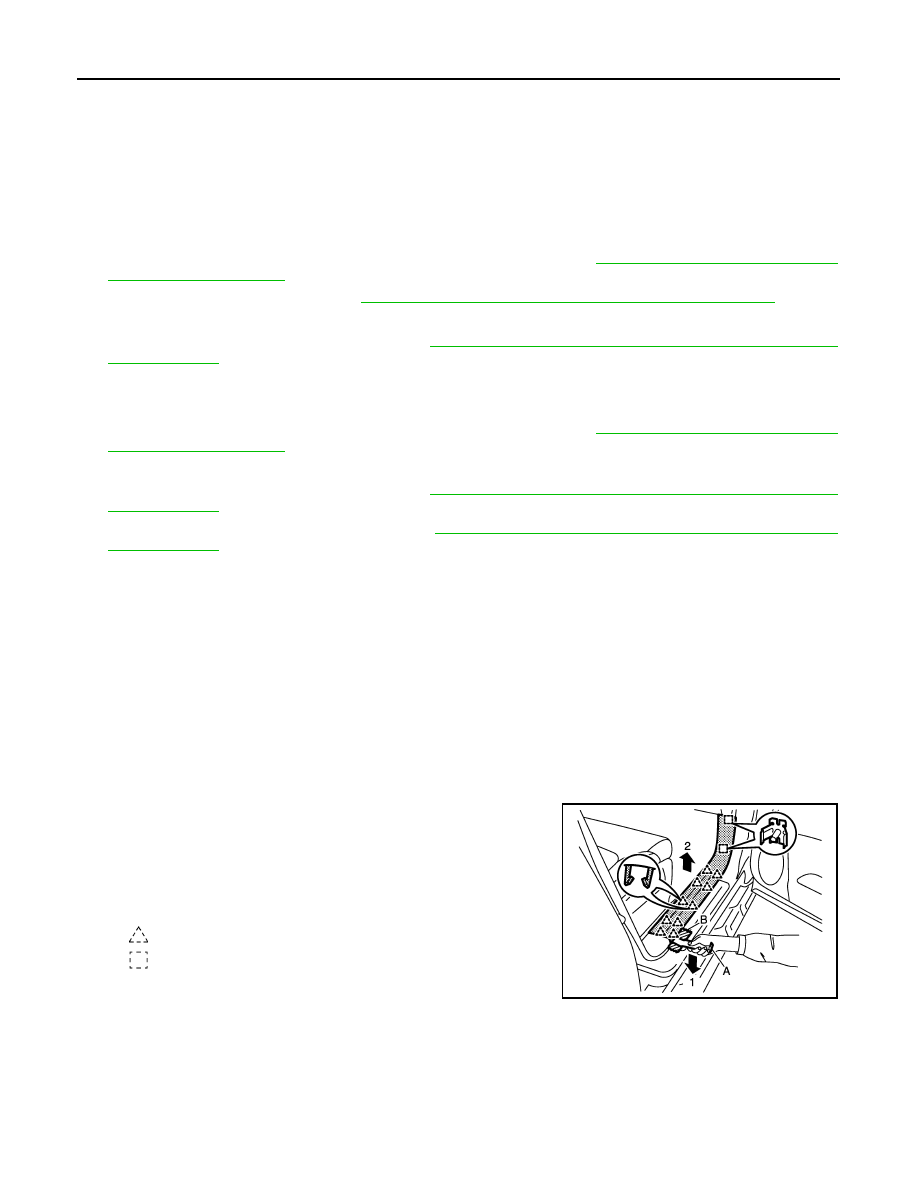
Disengage front kicking plate inner fixing pawls and metal clips using
a remover tool (A) as shown by the arrow in the figure, and then
remove front kicking plate inner.

CAUTION:

Apply protective tape (B) to the body panel to protect from dam-
age.

Rear kicking plate inner

1.

Disengage rear kicking plate inner fixing pawls using a remover tool (A) as shown by the arrow in the fig-
ure, and then remove rear kicking plate inner (1).

CAUTION:

: Pawl

: Metal clip

JMJIA4021ZZ

BODY SIDE TRIM

INT-21

< REMOVAL AND INSTALLATION >

C

D

E

F

G

H

I

K

L

M

A

B

INT

N

O

P

Apply protective tape (B) to the body panel to protect from damage.

2.

Remove rear side bracket.

INSTALLATION

Note the following items, and install in the reverse order of removal.

CAUTION:

• Visually check the pawls and metal clips for deformation and damage during installation. Replace

with new ones if necessary.

• When installing front kicking plate inner and rear kicking plate inner, check that pawls and metal

clips are securely fitted in body panel holes, and press them in.

KICKING PLATE OUTER

KICKING PLATE OUTER : Removal and Installation

INFOID:0000000006220250

CAUTION:

• When removing, always use a remover tool that is made of plastic.
• Never damage the body.

REMOVAL

Front kicking plate outer

Disengage front kicking plate outer fixing pawls using a remover tool
(A) as shown by the arrow in the figure, and then remove front kick-
ing plate outer (1).

CAUTION:

Apply protective tape (B) to the body panel to protect from dam-
age.

Rear kicking plate outer

Disengage rear kicking plate outer fixing pawls using a remover tool
(A) as shown by the arrow in the figure, and then remove rear kick-
ing plate outer (1).

CAUTION:

Apply protective tape (B) to the body panel to protect from dam-
age.

INSTALLATION

Note the following items, and then install in the reverse order of removal.

: Pawl

JMJIA4023ZZ

: Pawl

JMJIA4022ZZ

: Pawl

JMJIA4024ZZ

INT-22

< REMOVAL AND INSTALLATION >

BODY SIDE TRIM

CAUTION:

• Visually check the pawls for deformation and damage during installation. Replace with new ones if

necessary.

• When installing front kicking plate outer and rear kicking plate outer, check that pawls are securely

fitted in body panel holes, and press them in.

CENTER PILLAR LOWER GARNISH

CENTER PILLAR LOWER GARNISH : Removal and Installation

INFOID:0000000006220251

CAUTION:

Never damage the body.

REMOVAL

1.

Remove front kicking plate inner and rear kicking plate inner. Refer to 

INT-20, "KICKING PLATE INNER :

Removal and Installation"

.

2.

Slide front seat assembly to the frontmost position.

3.

Remove seat belt outer anchor. Refer to 

SB-6, "SEAT BELT RETRACTOR : Removal and Installation"

.

4.

Disengage center pillar lower garnish fixing clips.

5.

Remove center pillar lower garnish according to the order of the
arrows shown in the figure.

INSTALLATION

Note the following items, and install in the reverse order of removal.

CAUTION:

• Visually check the clips for deformation and damage during installation. Replace with new ones if

necessary.

• When installing center pillar lower garnish, check that clips are securely fitted in body panel holes,

and press them in.

CENTER PILLAR UPPER GARNISH

CENTER PILLAR UPPER GARNISH : Removal and Installation

INFOID:0000000006220252

CAUTION:

• When removing, always use a remover tool that is made of plastic.
• Never damage the body.

REMOVAL

1.

Remove front kicking plate inner and rear kicking plate inner. Refer to 

INT-20, "KICKING PLATE INNER :

Removal and Installation"

2.

Slide front seat assembly to the frontmost position.

3.

Remove center pillar lower garnish. Refer to 

INT-22, "CENTER PILLAR LOWER GARNISH : Removal

and Installation"

.

: Clip

JMJIA4025ZZ

BODY SIDE TRIM

INT-23

< REMOVAL AND INSTALLATION >

C

D

E

F

G

H

I

K

L

M

A

B

INT

N

O

P

4.

Disengage center pillar upper garnish lower side fixing clip using
a remover tool (A).

5.

Pull center pillar upper garnish (1) from inside passenger room, disengage center pillar upper garnish
upper side fixing pawl as shown in the following figure, and then remove center pillar upper garnish from
center pillar panel (2).

CAUTION:

Be careful not to apply excessive force when removing center pillar upper garnish. Otherwise,
pawl may be damaged and fragments may drop in panel holes on body.

6.

Remove assist grip mounting bolts, and then remove assist grip.

INSTALLATION

Note the following items, and install in the reverse order of removal.

CAUTION:

• Replace center pillar upper garnish with a new part after removal. Never reuse center pillar upper

garnish.

• Visually check the clip and pawl for deformation and damage during installation. Replace with new

ones if necessary.

• When installing center pillar upper garnish, check that clip and pawl are securely fitted in body panel

holes, and press them in.

: Clip

: Pawl

JMJIA4026ZZ

JMJIA1176ZZ


Content   ..  841  842  843  844   ..