Great Wall Florid. Manual - part 67


  Index      Great Wall     Great Wall Florid - service repair manual 2008 year


Search            copyright infringement  


Content   ..  65  66  67  68   ..


Great Wall Florid. Manual - part 67


GWFLORID Maintenance Manual

266

Front seat removal and installation

Removal

1.  Disconnect the seat belt terminal harness (seat bottom).

2.  Remove the rear foundation hoods 1 & 2 and mounting 

bolts 3 & 4.

3.  Remove the front foundation hoods 1 & 2 and mounting 

bolts 1 & 2.

4.  Remove the seat.

Installation

Special Note: Different metals making direct contact 

will accelerate corrosion. Make sure to use the correct 

fastening piece to avoid premature corrosion.

1.  Install the seat.

2.  Connect the seat belt terminal harness.

3.  Tighten the rear foundation bolt and install the rear 

foundation hood.

4.  Tighten the front foundation bolt and install the front 

foundation hood.

Remarks: Front seats are symmetrical.
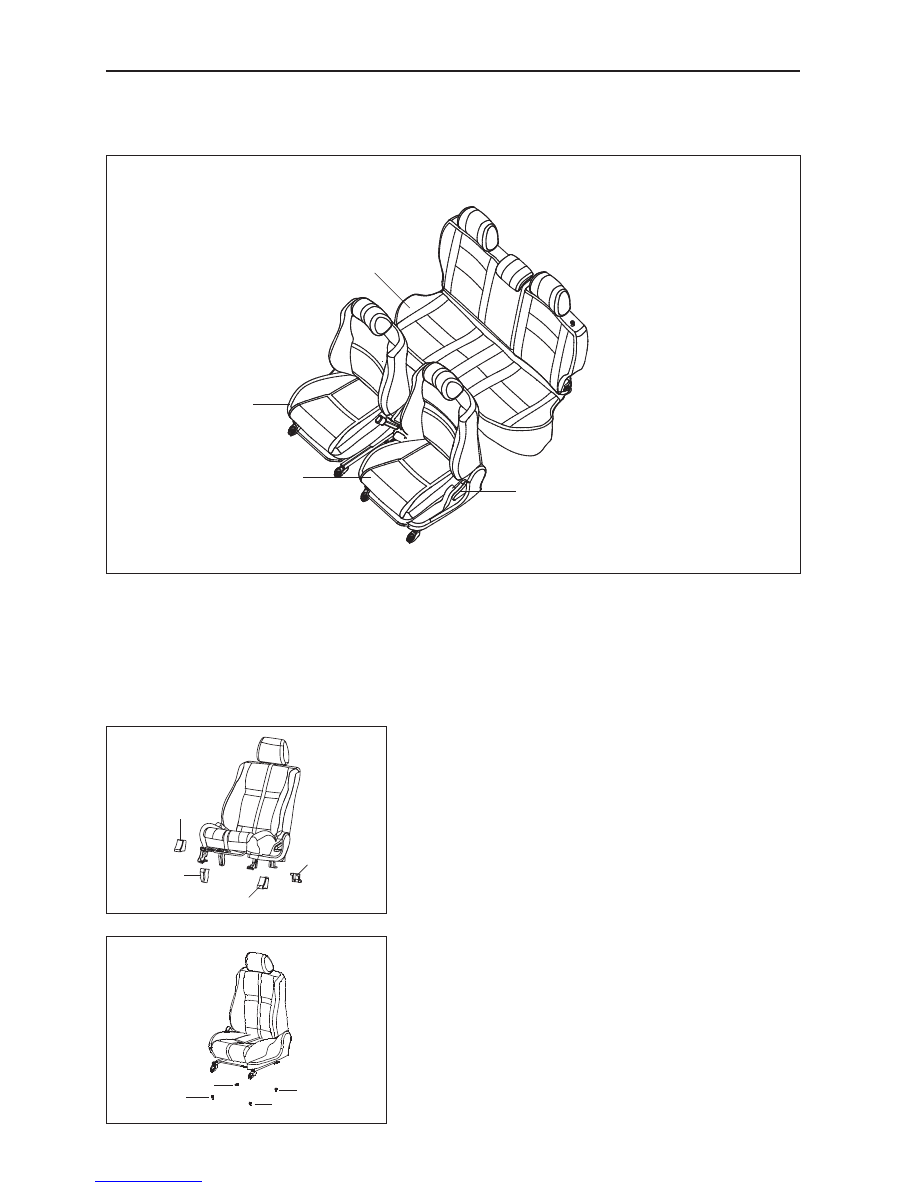
Seats

Components

Areas of Importance

1.  Pay attention to safety in the process of removal, transportation, and installation, as to avoid 

scratching or crushing injury caused by the seat.

2.  Take note to protect the inner decorative components in the process of installation and transporta-

tion, as to avoid scratching the side panels.

3.  After finishing installation, make sure to calibrate the tightening torque of mounting bolts.

Rear seat

Front passenger seat

  Driver seat

Backrest regulating lever

Rear foundation 

hood 1

Rear 

foundation 

hood 2

Front 

foundation 

hood 1

Front foundation hood 2

Mounting bolt 1

Mounting bolt 2

Mounting bolt 4

Mounting bolt 3

267

Vehicle Body

Rear seat removal and installation

Removal

1.  Remove the mounting bolts (5) on the 

40% of the rear seat backrest (3).

2.  Remove the mouting bolts (6) on the 

60% of the rear seat backrest (4).

3.  Lift the rear seat cushion up and make 

hook 11 slide out of clamping frame 9.

4.  Continue to lift the seat cushion up, and tilt it upwards 

to make hook 12 behind seat cushion slide out of the 

rear seat fixed cross member hook 13. Finally, remove 

the rear seat cushion.

Remarks: Mounting bolt (2) refers to the rear seat backrest (1) 

mounting bolt.

Installation

Special Note: Different metals making direct contact 

will accelerate corrosion. Make sure to use the correct 

fastening piece to avoid premature corrosion.

1.  Hang hook 12 behind the seat cushion on the fixed 

cross member hook 13, and then press the hook under 

the cushion into clamping frame 9.

2.  Install the rear fixed cross member (7) and mounting 

bolt (8) of the rear seat on the vehicle body.

3.  Install the mounting bolts (6) of the 60% rear seat 

backrest (4).

4.  Install the mounting bolts (5) of the 40% rear seat 

backrest (3).

1

2

3

4

5

6

7

8

9

10

9

2

1

5

6

8

8

11

12

GWFLORID Maintenance Manual

268

Sunroof Assembly

Components

N·m

: Specified torque

Sunroof panel

Sunroof window weatherstrip

Movable sun visor

Slider

Upper trim strip

Lower trim strip

Roof drip channel

Guide device latch hook

End piece

Guide rail assembly

Bolt

Spring

Wind guard

Bolt

Rear guide device

Air guide plate

Spacing tube

Drive device

4.5

3.5

269

Vehicle Body

Fault classification

Fault symptom

Fault diagnosis

Fault maintenance

Window panel 

motion failure 

Window panel (sunroof) 

cannot open, rise, or close 

from its initial position

Check if anything is blocking the guide rail 

for window panel movement. Check whether 

the mechanism moves smoothly or stiffly. 

Check whether the mechanism is broken. 

Check whether the guide rail is deformed. 

Check whether the motor works normally.

Replace the sunroof guide rail assem-

bly. Replace the motor.

The window panel can-

not close while half-

opened or half-tilted

Diagnosis: Check whether there are oddities 

impeding the window panel's movement .

Check whether the wind guard or rear roof 

drip channel is arched or deformed.

Clean the objects and close the sun-

roof by force when the jam protection 

function is started, then open it again 

for operation. Replace the wind guard 

and rear roof drip channel.

Sun visor push/pull 

fault 

Sun visor cannot open 

or close normally 

Check whether the guide rail for the sun visor 

is blocked by oddities. Check whether the sun 

visor bracket is broken.

Clean the oddities in the guide rail. 

Change the sun visor. Change the sun 

visor bracket.

The sun visor cannot open 

and close completely

Check whether the front part of sun visor 

arches. Check whether the sun visor lever has 

been broken off.

Replace the sun visor. Replace the 

sun visor lever.

Sunroof leakage fault  Sunroof leakage

Check the clearance between the window 

panel and the car roof hatch.

Adjust and enlarge the window panel 

weatherstrip.

Check whether a build up of sand or dust ex-

ists on the surface of window panel weather-

strip.

Clean the weatherstrip surface and 

car roof hatch.

Check the sealing conditions between the 

guide rail & front roof drip channel and rear 

roof drip channel.

Replace the sunroof guide rail assem-

bly.

Check whether the front roof drip channel 

and rear roof drip channel are broken.

Replace the sunroof guide rail assem-

bly or rear roof drip channel.

Abnormal noise

There is abnormal noise 

when closing the sunroof

(1) Check the positioning of the closed win-

dow panel.

(2) Check whether the wind deflector spring is 

in the right position.

(3) Check whether the rear roof drip channel's 

fixed spring has broken off.

(4) Check whether the wind deflector buffer 

rubber block has broken off.

(1) Adjust the window panel's position.

(2) Place the wind deflector spring in 

the right position .

(3) Re-install the fixed spring.

(4) Re-install the rubber block.

There is abnormal 

noise when the sun-

roof is operating

(1) Check whether the motor is working nor-

mally.

(2) Check whether oddities exist in the guide 

rail for mechanism movement .

(3) Check the grease's conditions on the mov-

ing components .

(4) Check whether the moving components 

are broken.

(1) Replace the motor.

(2) Clean out any contamination.

(3) Lubricate the components.

(4) Replace the components or the 

sunroof guide rail assembly.

Troubleshooting

Sunroof assembly removal

1.  Remove the ceiling.

2.  Disconnect and pull the connector of the sunroof ac-

tuator out.

3.  Pull the four sunroof drainage pipes out (positions indi-

cated by the arrows in the diagram).

4.  Remove the sunroof. 

Remove the bolt and plastic gasket, and carry the sunroof 

assembly out of car with the help of an assistant.

Sunroof 

assembly

Mounting bolt

Drive device

Plastic gasket

Drainage pipe port


Content   ..  65  66  67  68   ..