Fiat Doblo Panorama (2019 year). Manual - part 9


  Index      Fiat     Fiat Doblo Panorama (2019 year) - manual in english


Search            


Content      ..     7      8      9      10     ..


Fiat Doblo Panorama (2019 year). Manual - part 9


 IN AN EMERGENCY

138

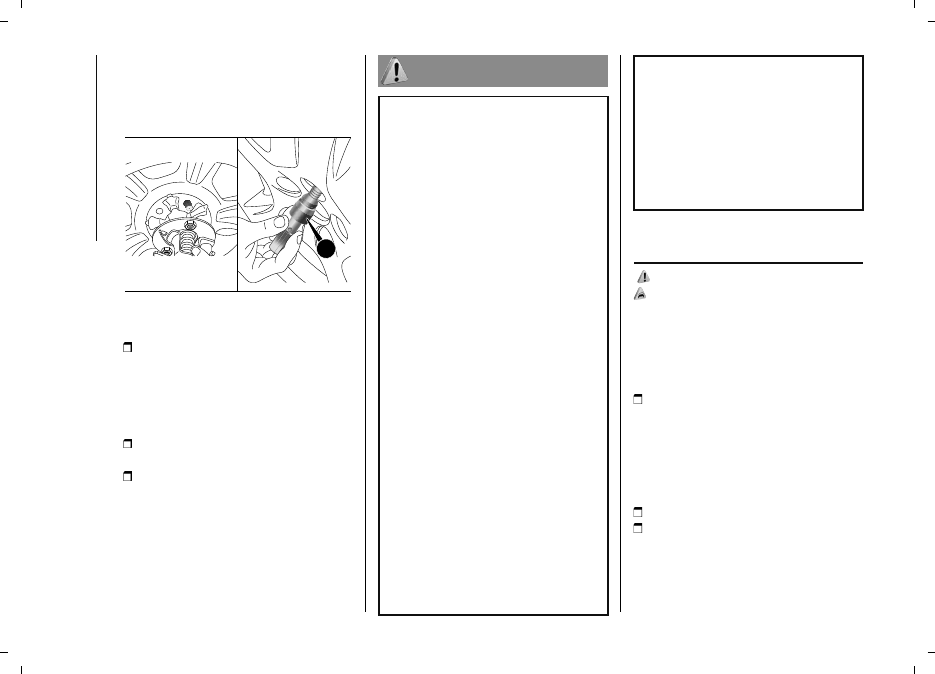
fix the wheel to the adaptor, using the

socket wrench for the wheel nuts (G)

fig. 194.

Tighten the screws with the wheel

removal wrench.

G

194

F0V0216

NOTE Use the spare wheel covering

bag to protect the replaced alloy wheel.

check that the position of the

replaced wheel under the platform is

correct (the lifting system is equipped

with a clutch to limit the end of the

stroke, incorrect positioning may

jeopardise safety);

put the jack and the tools back in the

dedicated tool bag;

reposition the tool bag behind the left

side seat (Cargo versions) or, resting

the bottom of the bag against the side

panel, in the compartment inside the

rear right side (Doblò/Doblò Combi

versions).

WARNING

122)

The space-saver wheel (for

versions/markets, where provided) is

specific to your vehicle, do not use it on

other models, or use the space-saver

wheel of other models on your vehicle. The

space-saver wheel must only be used in

the event of an emergency. Never use it

for more than strictly necessary and never

exceed 80 km/h. Important! For temporary

use only! 80km/h max! Replace with

standard wheel as soon as possible.

Never remove or cover the sticker on

the space-saver wheel. Never apply a

wheel cap on a space-saver wheel. The

driving characteristics of the vehicle will be

modified with the space-saver wheel fitted.

Avoid violent acceleration and braking,

abrupt steering and fast cornering.

123)

Use your hazard lights, warning

triangle, etc to show that your vehicle is

stationary. Passengers should get out

of the vehicle, particularly if it is heavily

loaded, and wait for the wheel to be

changed away from the traffic. If you

are on a slope or uneven surface, place

wedges or other suitable objects under

the wheels to secure the vehicle. Have

the wheel repaired and refitted as soon as

possible. Do not apply grease to the bolt

threads before fitting: they could come

unscrewed.

124)

Use the jack only to replace wheels

on the vehicle with which it is supplied

or on other vehicles of the same model.

Never use the jack for other purposes,

such as lifting other models. Never use the

jack to carry out repairs under the vehicle.

Incorrect positioning of the jack may cause

the lifted vehicle to fall. Do not use the jack

for loads higher than the one shown on its

label.

125)

Incorrect hub cap assembly may

cause it to come off when the vehicle is

moving. Never tamper with the inflation

valve. Never introduce tools of any kind

between rim and tyre. Check tyre and

space-saver wheel pressures regularly,

complying with the values given in the

"Technical specifications" chapter.

FIX&GO AUTOMATIC

KIT

126) 127)

43)

DESCRIPTION

The Fix&Go quick tyre repair kit

fig. 195 is located in the boot, inside a

dedicated container and consists of:

one cartridge (1) containing sealant

and fitted with: transparent tube for

injecting the sealant (4) and sticker (3)

with the wording "Max. 80 km/h" to be

placed in a clearly visible position (e.g.

on the dashboard) after repairing the

tyre;

one compressor (2);

one leaflet containing instructions for

using the kit;

-------------------------------------------------------------------------------------------------------------------------------------------------------------

139

195

F0V0700

TYRE REPAIRING AND

PRESSURE RESTORING

PROCEDURE

Proceed as follows:

196

F0V0701

stop the car in a position that is not

dangerous for oncoming traffic where

you can carry out the procedure safely.

The ground must be flat and sufficiently

compact;

stop the engine, engage the hazard

warning lights and the parking brake;

wear the reflective safety jacket

before getting out of the car (anyway

comply with the laws in force in the

country you are driving in);

insert the sealant cartridge (1)

into the corresponding compressor

compartment (2)and press it down

hard fig. 195. Remove the speed limit

sticker (3)and apply it in a clearly visible

position fig. 199;

wear the gloves;

remove the cap from the tyre valve

and connect and screw the transparent

tube of the sealing fluid (4) fig. 195

onto the valve. If a 250 ml cartridge is

present the housing of the transparent

tube is provided with removable ring to

facilitate extraction. Make sure that the

ON-OFF button (5) fig. 197 is in the off

position (button not pressed);

plug the electric connector (6)

fig. 196 into the 12V socket of the

vehicle and start the vehicle engine;

operate the compressor by pressing

the ON-OFF button (5) fig. 197.

When the pressure shown in Owner

Handbook or on the specific label

appears on the pressure gauge (7),

stop the compressor by pressing the

ON-OFF button (5) again;

disconnect the cartridge (1) from the

compressor, by pressing the release

button (8) and lifting the cartridge (1)

upwards fig. 198.

197

F0V0702

If the pressure gauge (7) fig. 197

indicates a pressure lower than 1.8

bar / 26 psi 15 minutes after starting

the compressor, switch off the

compressor, disconnect the sealing

fluid tube (4) from the tyre valve and

remove the cartridge (1) from the

compressor fig. 198.
Move the vehicle by approximately

10 m to promote the distribution of

sealant; stop the vehicle safely, operate

the handbrake and restore pressure

using the black inflation pipe (9) fig. 200

to reach the required pressure. If

even in this case, the pressure is

less than 1.8 bar / 26 psi 15 minutes

after switching on the compressor,

do not resume driving, but contact a

Dealership.
After driving for about 8 km / 5

miles, position the vehicle in a safe

and suitable area and engage the

handbrake. Take the compressor

-------------------------------------------------------------------------------------------------------------------------------------------------------------

 IN AN EMERGENCY

140

and restore pressure using the black

inflation tube (9) fig. 200.
If the pressure shown is higher than 1.8

bar / 26 psi, restore the pressure and

carefully drive to a Dealership in the

shortest possible time. Otherwise, if the

pressure is less than 1.8 bar / 26 psi,

do not resume driving, but contact a

Dealership.

198

F0V0703

PROCEDURE FOR

RESTORING THE

PRESSURE

Proceed as follows:

stop the vehicle safely, as shown

above, and operate the handbrake;

extract the black inflation tube (9)

fig. 200 and screw it firmly onto the tyre

valve. Follow the instructions shown in

fig. 196 and fig. 200.
Press the air release button (10)

fig. 197 to adjust any tyre overpressure.

199

F0V0704

CARTRIDGE

REPLACEMENT

Proceed as follows:

only use Fix&Go original cartridges,

which can be purchased at the

Dealership.

to remove the cartridge (1) fig. 195

press the release button (8) fig. 198

and lift it.

200

F0V0705

WARNING

126)

The information required by the

applicable regulation is indicated on the

Fix&Go kit package label. Carefully read

the label on the cartridge before use, avoid

improper use. The kit should be used by

adults and cannot be used by children.

127)

IMPORTANT: Do not exceed

80 km/h. Avoid sudden acceleration or

braking. The kit provides a temporary

repair, therefore the tyre must be

examined and repaired by a specialist as

soon as possible. Before using the kit,

ensure that the tyre is not excessively

damaged and that the rim is in good

condition, otherwise do not use it and

call roadside assistance. Do not remove

foreign bodies from the tyre. Do not let the

compressor turned on for more than 20

consecutive minutes - overheating hazard.

IMPORTANT

43)

The sealant is effective with external

temperatures of between -40°C and

+55°C. The sealant has an expiry date. It is

possible to repair tyres which have been

damaged on tread up to a diameter of 6

mm. Show the cartridge and the label to

the personnel charged with handling the

tyre treated with the tyre repair kit.

-------------------------------------------------------------------------------------------------------------------------------------------------------------

141

EMERGENCY

STARTING

Go to a Fiat Dealership immediately if
warning light

comes on steady on

the instrument panel.

JUMP STARTING

If the battery is flat, it is possible to start

the engine using an auxiliary battery

with the same capacity or a little higher

than the flat one.
Proceed as follows to start the car

fig. 201:

connect the positive terminals (+

mark near the terminal) of the two

batteries using a suitable cable;

with a second lead, connect the

negative terminal (–) of the auxiliary
battery to an earthing point

on the

engine or the gearbox of the vehicle to

be started;

start the engine;

when the engine has been started,

remove the cables reversing the order

above.
If after a few attempts the engine does

not start, do not persist but contact the

nearest Fiat Dealership.

201

F0V0147

WARNING Do not directly connect

the negative terminals of the two

batteries: sparks could ignite explosive

gas released from the battery. If the

auxiliary battery is installed on another

vehicle, avoid any metal parts on the

latter and the vehicle with the flat

battery from accidentally coming into

contact.

44)

128)

BUMP STARTING

Never bump start the engine by

pushing, towing or driving downhill.

This could cause fuel to flow into the

catalytic converter and damage it

beyond repair.
WARNING Remember that the brake

servo and electric power steering are

not active until the engine is started.

A much greater effort will therefore be

required to use the brake pedal or turn

the steering wheel.

WARNING

128)

This starting procedure must be

performed by expert personnel because

incorrect actions could cause electrical

discharge of considerable intensity.

Furthermore, battery fluid is poisonous

and corrosive: avoid contact with skin and

eyes. Keep naked flames and lighted

cigarettes away from the battery and do

not cause sparks.

IMPORTANT

44)

Never use a fast battery charger to

start the engine as this could damage the

electronic systems, particularly the engine

ignition and fuel supply control units.

-------------------------------------------------------------------------------------------------------------------------------------------------------------

 IN AN EMERGENCY

142

FUEL CUT-OFF

SYSTEM

This intervenes in the case of an impact

causing:

the interruption of the fuel supply with

the engine consequently cutting out;

the automatic unlocking of the doors;

turning on the lights inside the car;

switching on of the hazard warning

lights (to deactivate the lights press the

dedicated button on the dashboard).

129)

When the system has been triggered,

the message "Fuel cut off, see

handbook" is displayed on some

versions.

Check carefully for fuel leaks, for

instance in the engine compartment,

under the vehicle or near the tank area.

After a collision, turn the ignition key

to STOP to prevent the battery from

running down.

The following procedure should be

carried out to restore the correct

operation of the vehicle:

turn the ignition key to MAR;

activate the right direction indicator;

deactivate the right direction

indicator;

activate the left direction indicator;

deactivate the left direction indicator;

activate the right direction indicator;

deactivate the right direction

indicator;

activate the left direction indicator;

deactivate the left direction indicator;

turn the ignition key to STOP.

Natural Power versions

In the event of an impact to the car,

the petrol and injection supply is cut off

immediately, causing the engine to cut

out and, as a result, the safety solenoid

valves to close.

WARNING

129)

If, after a crash, you smell fuel or

notice leaks from the fuel supply system,

do not reset the switch to avoid fire risk.

LIFTING THE

VEHICLE

If the vehicle needs to be lifted, go to a

Fiat Dealership which is equipped with

the arm hoist or workshop lift.

TOWING THE

VEHICLE

The tow ring provided with the vehicle

is located in the tool box behind the left

seat backrest (Cargo versions) or in the

boot (Doblò / Doblò Combi versions).

ATTACHING THE TOW

HOOK

Proceed as follows:

release the cap (A) fig. 202 - fig. 203;

take the tow hook (B) from the tool

bag;

fully screw the hook onto the

threaded front or rear pin.

202

F0V0050

130) 131) 132)

-------------------------------------------------------------------------------------------------------------------------------------------------------------

143

45)

203

F0V0051

Versions with COMFORT-MATIC

and DUALOGIC™ transmission

Make sure that the gearbox is in neutral

(N) (checking that the vehicle moves

when pushed) and proceed in the

same way as for towing a normal

vehicle with a manual transmission.

If the gear lever cannot be put in

neutral, do not tow the vehicle, but

contact a Fiat Dealership.

WARNING

130)

Before towing, turn the ignition key

to MAR-ON and then to STOP without

removing it. The steering column will

automatically lock when the key is

removed and the wheels cannot be

steered.

131)

Before tightening the ring, clean the

threaded housing thoroughly. Make sure

that the ring is fully fastened in the housing

before towing the vehicle. Do not start the

engine whilst the vehicle is being towed.

132)

When towing, remember that greater

effort is required on the brake pedal in

order to brake, since the brake servo is

not providing assistance. Do not use

flexible cables when towing and avoid jerky

movements. During towing operations,

make sure that the fastened joint does

not damage adjoining components. When

towing the vehicle, it is necessary to obey

specific road regulations which relate both

to the towing device as well as to the

behaviour to adopt on the road. Do not

start the engine whilst the vehicle is being

towed.

IMPORTANT

45)

The front and rear tow hooks should

be used only for emergencies on the

road. You are allowed to tow the vehicle

for short distances using an appropriate

device in accordance with the highway

code (a rigid bar), to move the vehicle

on the road in readiness for towing or

transport via a breakdown vehicle. Tow

hooks MUST NOT be used to tow vehicles

off the road or where there are obstacles

and/or for towing operations using cables

or other non-rigid devices. In compliance

with the above conditions, towing must

take place with the two vehicles (one

towing, the other towed) aligned as much

as possible along the same centre line.

-------------------------------------------------------------------------------------------------------------------------------------------------------------

 SERVICING AND MAINTENANCE

144

SERVICING AND MAINTENANCE

Correct maintenance permits the

performance of the vehicle to be

maintained over time, as well as limited

running costs and safeguarding the

efficiency of the safety systems.
This chapter explains how.

SCHEDULED SERVICING ........... 145
SERVICE SCHEDULE ................. 146
REGULAR CHECKS ................... 154
DEMANDING VEHICLE USE ........ 154
ENGINE COMPARTMENT ........... 155
RECHARGING THE BATTERY ..... 167
WINDSCREEN / REAR

WINDOW WIPERS ..................... 168
WHEELS AND TYRES................. 169

-------------------------------------------------------------------------------------------------------------------------------------------------------------

145

SCHEDULED

SERVICING

Correct servicing is crucial for

guaranteeing a long life for the vehicle

under the best conditions.

This is why Fiat has planned a

series of checks and services every

30,000/35,000 km (depending on the

version).

It is, however, important to remember

that scheduled servicing does not

completely cover all the requirements

of the car: even in the initial period

before 30,000/35,000 km, and

then subsequently between one

service and another, ordinary care

is always required such as routine

checks involving topping up fluid level,

checking tyre pressures etc.

WARNING Scheduled Servicing

interventions are set out by the

Manufacturer. Failure to have them

carried out may invalidate the warranty.

Scheduled Servicing can be carried

out by any Fiat Dealership, at pre-

established times.

If during each operation, in addition to

the ones scheduled, the need arises

for further replacements or repairs,

these may only be carried out with the

express agreement of the Customer.

WARNING It is advisable to inform a

Fiat Dealership of any small operating

irregularities without waiting for the next

service.

If your vehicle is used frequently for

trailer towing, the interval between

scheduled maintenance services must

be reduced.

-------------------------------------------------------------------------------------------------------------------------------------------------------------

 SERVICING AND MAINTENANCE

146

SERVICE SCHEDULE

PETROL / NATURAL POWER VERSIONS

WARNING Once you have carried out the last intervention in the table, continue with the scheduled servicing, maintaining the

frequency indicated in the plan by marking each operation with a dot or dedicated note.

Warning: simply restarting the maintenance from the start of the plan may cause the allowed interval to be exceeded for some

operations!

Thousands of miles

18

36

54

72

90

108

Thousands of kilometres

30

60

90

120

150

180

Years

2

4

6

8

10

12

Check battery charge status and possibly recharge

Check tyre condition/wear and adjust pressure, if necessary; check the condition/expiry

date of the “Fix&Go Automatic” repair kit (for versions/markets, where provided)

Check operation of lighting system (headlamps, direction indicators, hazard warning lights,

luggage compartment, passenger compartment, glove compartment, instrument panel

warning lights, etc.)

Check and, if necessary, top up fluid levels (1)

Check exhaust emissions/smokiness

Use the diagnosis socket to check supply/engine management system operation, emissions

and, for versions/markets, where provided, engine oil degradation

Visually inspect condition of: exterior bodywork, underbody protection, pipes and hoses

(exhaust - fuel system - brakes), rubber elements (boots, sleeves, bushes, etc.)

Check windscreen/rear window wiper blade position/wear (where provided)

Check operation of windscreen washer/wiper, adjust jets

Check cleanliness of bonnet locks, and cleanliness and lubrication of linkages

-------------------------------------------------------------------------------------------------------------------------------------------------------------

147

Thousands of miles

18

36

54

72

90

108

Thousands of kilometres

30

60

90

120

150

180

Years

2

4

6

8

10

12

Check cleanliness of sliding side door lower guides (or every 6 months)

Check handbrake lever travel and adjust, if necessary

Check and adjust clutch pedal, if required

Check condition and wear of front disc brake pads and operation of pad wear indicator

Check rear drum brake lining condition and wear

Visually inspect condition of the accessory drive belt(s)

Check tension of accessory drive belt (versions without automatic tensioner) (or every 2

years)

Visually inspect the toothed timing drive belt

Change engine oil and replace oil filter (2)

Spark plug replacement(3)

Replace toothed timing drive belt (4)

Replace accessory drive belt(s) (4)

Replace air cleaner cartridge (5)

Change brake fluid (or every 24 months)

Replace passenger compartment filter (or every 24 months) (5)

Visually inspect condition of: methane pipes and connectors, methane tank fastening,

restore, if necessary (6) (*)

Check pressure regulator and, if necessary, replace internal filter (6) (*)

-------------------------------------------------------------------------------------------------------------------------------------------------------------

 SERVICING AND MAINTENANCE

148

Thousands of miles

18

36

54

72

90

108

Thousands of kilometres

30

60

90

120

150

180

Years

2

4

6

8

10

12

Check tightening torque of cylinder fastening bands (*)

(1) Only ever use the fluids shown in the handbook for topping up, and only after checking that the system is intact.

(2) If the vehicle annual mileage is less than 10,000 km, the engine oil and filter must be replaced every 12 months. Change engine oil and

filter every 12 months if the vehicle is driven in dusty areas. For Natural Power versions: replace every two years in all cases.

(3) For 1.4 Turbo Petrol versions, in order to guarantee correct operation and prevent serious damage to the engine, it is essential to observe

the following: only use spark plugs specifically certified for these engines; all spark plugs should be of the same type and brand (see the

“Engine” paragraph in the "Technical Specifications" section); strictly comply with the replacement intervals in the Service Schedule; you are

advised to contact a Fiat Dealership to have plugs replaced.

(4) The maximum mileage is 120,000 km. The belt must be replaced every 6 years, regardless of distance travelled. If the vehicle is used in

heavy conditions (dusty areas, especially severe weather conditions, very low or very high temperatures for extended periods, urban driving,

long periods of idling), the maximum mileage is 60,000 km. The belt must be replaced every 4 years regardless of the mileage

(5) If the vehicle is used in dusty areas, this cleaner must be replaced every 15,000 km.

(6) Or every 12 months.

(*) Natural Power versions

-------------------------------------------------------------------------------------------------------------------------------------------------------------

149

DIESEL VERSIONS WITHOUT DPF (1.3 MultiJet - 1.6 MultiJet)

WARNING Once you have carried out the last intervention in the table, continue with the scheduled servicing, maintaining the

frequency indicated in the plan by marking each operation with a dot or dedicated note.

Warning: simply restarting the maintenance from the start of the plan may cause the allowed interval to be exceeded for some

operations!

Thousands of miles

18

36

54

72

90

108

Thousands of kilometres

30

60

90

120

150

180

Years

2

4

6

8

10

12

Check battery charge status and possibly recharge

Check tyre condition/wear and adjust pressure, if necessary; check the condition/expiry

date of the “Fix&Go Automatic” repair kit (for versions/markets, where provided)

Check operation of lighting system (headlamps, direction indicators, hazard warning lights,

luggage compartment, passenger compartment, glove compartment, instrument panel

warning lights, etc.)

Check and, if necessary, top up fluid levels (1)

Check exhaust emissions/smokiness

Use the diagnosis socket to check supply/engine management system operation, emissions

and, for versions/markets, where provided, engine oil degradation

Visually inspect condition of: exterior bodywork, underbody protection, pipes and hoses

(exhaust - fuel system - brakes), rubber elements (boots, sleeves, bushes, etc.)

Check the position/wear of the windscreen/rear window wiper blades (where provided)

Check operation of windscreen washer/wiper, adjust jets

Check cleanliness of bonnet locks, and cleanliness and lubrication of linkages

Check cleanliness of sliding side door lower guides (or every 6 months)

-------------------------------------------------------------------------------------------------------------------------------------------------------------

 SERVICING AND MAINTENANCE

150

Thousands of miles

18

36

54

72

90

108

Thousands of kilometres

30

60

90

120

150

180

Years

2

4

6

8

10

12

Check handbrake lever travel and adjust, if necessary

Check condition and wear of front disc brake pads and operation of pad wear indicator

Check rear drum brake lining condition and wear

Visually inspect condition of the accessory drive belt(s)

Check tension of accessory drive belt (versions without automatic tensioner)

Change engine oil and replace oil filter (or every 24 months)

Replace timing belt (1.6 Multijet version) (2)

Replace accessory drive belt(s) (3)

Replace fuel filter cartridge (4)

Replace air cleaner cartridge

Change brake fluid (or every 24 months)

Replace passenger compartment filter (or every 24 months)

(1) Only ever use the fluids shown in the handbook for topping up, and only after checking that the system is intact.

(2) Irrespective of the mileage, the timing drive belt must be changed every 4 years for heavy-duty use (cold climates, town use, long periods

of idling) or at least every 5 years.

(3) The maximum mileage is 120,000 km. The belt must be replaced every 6 years, regardless of distance travelled. If the vehicle is used in

heavy conditions (dusty areas, especially severe weather conditions, very low or very high temperatures for extended periods, urban driving,

long periods of idling), the maximum mileage is 60,000 km. The belt must be replaced every 4 years regardless of the mileage

(4) When refuelling the vehicle with a quality below the relevant European specification, this filter must be replaced every 35,000 km.

-------------------------------------------------------------------------------------------------------------------------------------------------------------

151

DIESEL VERSIONS WITH DPF (1.3 MultiJet - 1.6 MultiJet - 2.0 MultiJet)

WARNING Once you have carried out the last intervention in the table, continue with the scheduled servicing, maintaining the

frequency indicated in the plan by marking each operation with a dot or dedicated note.

Warning: simply restarting the maintenance from the start of the plan may cause the allowed interval to be exceeded for some

operations!

Thousands of miles

21

42

63

84

105

Thousands of kilometres

35

70

105

140

175

Years

2

4

6

8

10

Check battery charge status and possibly recharge

Check tyre condition/wear and adjust pressure, if necessary; check the condition/expiry

date of the “Fix&Go Automatic” repair kit (for versions/markets, where provided)

Check operation of lighting system (headlamps, direction indicators, hazard warning lights,

luggage compartment, passenger compartment, glove compartment, instrument panel

warning lights, etc.)

Check and, if necessary, top up fluid levels (engine coolant, brake / hydraulic clutch fluid,

windscreen washer, battery, and if present, additive for emissions - UREA) (1) (2)

Check and top up transmission oil level (1.6 Multijet 90 HP with Comfort-matic and

Dualogic™ transmission)

Check exhaust emissions/smokiness

Use the diagnosis socket to check supply/engine management system operation,

emissions and, for versions/markets, where provided, engine oil degradation

Visually inspect condition of: exterior bodywork, underbody protection, pipes and hoses

(exhaust - fuel system - brakes), rubber elements (boots, sleeves, bushes, etc.)

Check the position/wear of the windscreen/rear window wiper blades (where provided)

Check operation of windscreen washer/wiper, adjust jets

-------------------------------------------------------------------------------------------------------------------------------------------------------------

 SERVICING AND MAINTENANCE

152

Thousands of miles

21

42

63

84

105

Thousands of kilometres

35

70

105

140

175

Years

2

4

6

8

10

Check cleanliness of bonnet locks, and cleanliness and lubrication of linkages

Check cleanliness of sliding side door lower guides (or every 6 months)

Check handbrake lever travel and adjust, if necessary

Check condition and wear of front disc brake pads and operation of pad wear indicator

Check rear drum brake lining condition and wear

Visually inspect condition of the accessory drive belt(s)

Check tension of accessory drive belt (versions without automatic tensioner)

Check manual gearbox oil (version 1.3 Multijet)

Check and top up transmission oil level for clutch actuation hydraulic system (1.6 Multijet

90 HP with Comfort-matic and Dualogic™ transmission)

Change engine oil and replace oil filter (versions with DPF)

(3)

Change fluid for hydraulic clutch activation system (or every 24 months) (1.6 Multijet 90 HP

versions with Comfort-matic and Dualogic™ transmission)

Replace toothed timing belt (1.6 Multijet — 2.0 Multijet versions) (4)

Replace accessory drive belt/s

Replace fuel filter cartridge (5)

Replace air cleaner cartridge

Change brake fluid (or every 24 months)

-------------------------------------------------------------------------------------------------------------------------------------------------------------

153

Thousands of miles

21

42

63

84

105

Thousands of kilometres

35

70

105

140

175

Years

2

4

6

8

10

Replace passenger compartment filter (or every 24 months)

(1) Only ever use the fluids shown in the handbook for topping up, and only after checking that the system is intact.

(2) Consumption of additive for emissions (urea) depends on the condition of use of the vehicle and is indicated by a warning light and

message on the instrument panel.

(3) The actual frequency for changing the oil and replacing the engine oil filter depends on the vehicle usage conditions and is signalled by

the warning light or message (where provided) on the instrument panel (see "Warning lights and messages" chapter). In any case, it must

never exceed 24 months. Change engine oil and filter every 12 months if the vehicle is driven mainly in towns.

(4) Irrespective of the mileage, the timing drive belt must be changed every 4 years for heavy-duty use (cold climates, town use, long periods

of idling) or at least every 5 years.

(5) When refuelling the vehicle with a quality below the relevant European specification, this filter must be replaced every 35,000 km.

-------------------------------------------------------------------------------------------------------------------------------------------------------------


Content      ..     7      8      9      10     ..