Dodge Neon / Neon SRT-4. Manual - part 386


  Index      Dodge     Dodge Neon / Neon SRT-4 - service repair manual 2005 year


Search            


Content   ..  384  385  386  387   ..


Dodge Neon / Neon SRT-4. Manual - part 386


DOORS - REAR

TABLE OF CONTENTS

page

page

APPLIQUE

REMOVAL - LOWER REAR DOOR

. . . . . . . . . . 28

INSTALLATION - LOWER REAR DOOR

. . . . . . 28

CHECK STRAP

REMOVAL

. . . . . . . . . . . . . . . . . . . . . . . . . . . . . 29

INSTALLATION

. . . . . . . . . . . . . . . . . . . . . . . . . 29

DOOR

REMOVAL

. . . . . . . . . . . . . . . . . . . . . . . . . . . . . 30

INSTALLATION

. . . . . . . . . . . . . . . . . . . . . . . . . 30

DOOR GLASS

REMOVAL

. . . . . . . . . . . . . . . . . . . . . . . . . . . . . 31

INSTALLATION

. . . . . . . . . . . . . . . . . . . . . . . . . 31

EXTERIOR HANDLE

REMOVAL

. . . . . . . . . . . . . . . . . . . . . . . . . . . . . 32

INSTALLATION

. . . . . . . . . . . . . . . . . . . . . . . . . 32

HINGE

REMOVAL

. . . . . . . . . . . . . . . . . . . . . . . . . . . . . 32

INSTALLATION

. . . . . . . . . . . . . . . . . . . . . . . . . 32

LATCH

REMOVAL

. . . . . . . . . . . . . . . . . . . . . . . . . . . . . 33

INSTALLATION

. . . . . . . . . . . . . . . . . . . . . . . . . 33

ADJUSTMENTS

ADJUSTMENT

. . . . . . . . . . . . . . . . . . . . . . . . 33

LATCH STRIKER

REMOVAL

. . . . . . . . . . . . . . . . . . . . . . . . . . . . . 33

INSTALLATION

. . . . . . . . . . . . . . . . . . . . . . . . . 33

TRIM PANEL

REMOVAL

. . . . . . . . . . . . . . . . . . . . . . . . . . . . . 34

INSTALLATION

. . . . . . . . . . . . . . . . . . . . . . . . . 34

WATERDAM

REMOVAL

. . . . . . . . . . . . . . . . . . . . . . . . . . . . . 35

INSTALLATION

. . . . . . . . . . . . . . . . . . . . . . . . . 35

WINDOW REGULATOR

REMOVAL

. . . . . . . . . . . . . . . . . . . . . . . . . . . . . 36

INSTALLATION

. . . . . . . . . . . . . . . . . . . . . . . . . 36

APPLIQUE

REMOVAL - LOWER REAR DOOR

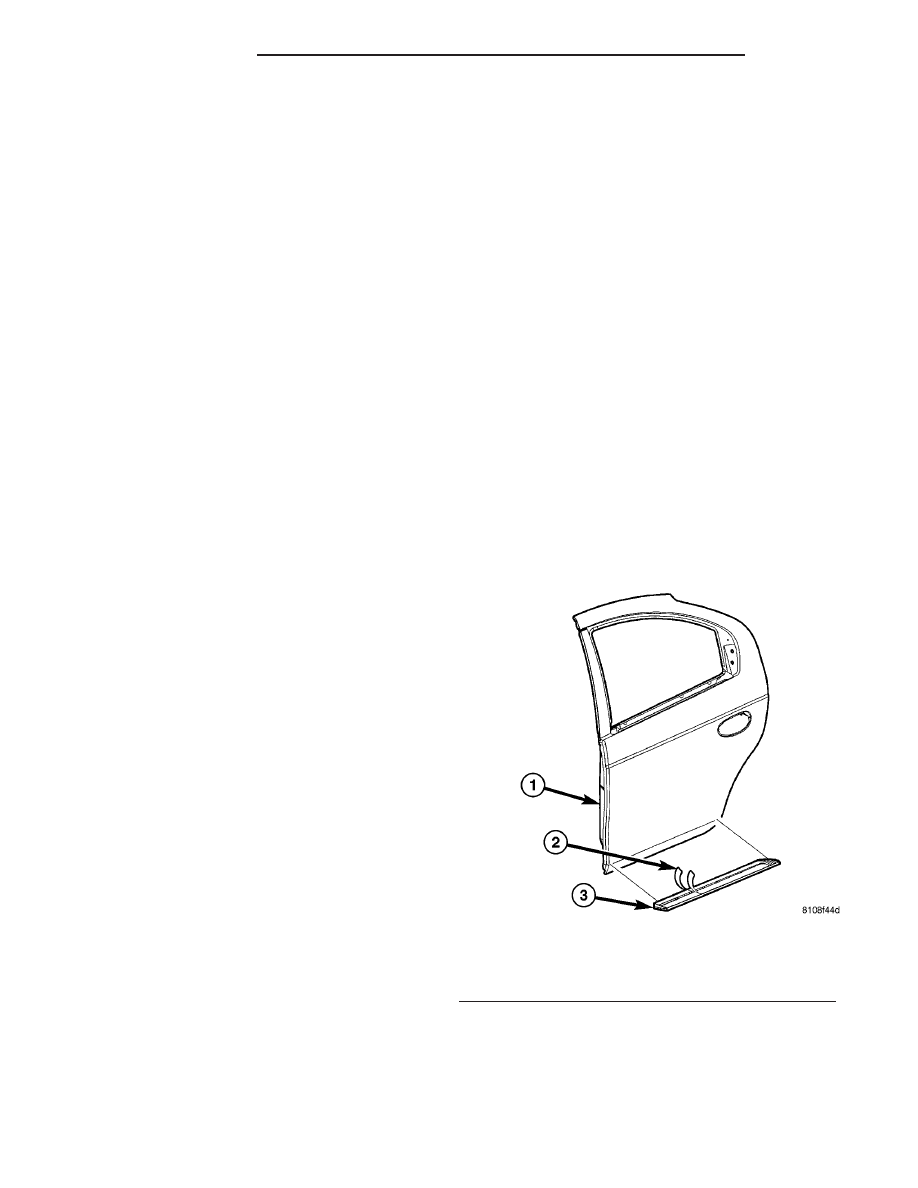
(1) Mark reference points before removing lower

rear door applique (Fig. 1).

(2) If necessary, use a heat gun gently apply heat

in a circular motion to loosen the adhesive bond.

(3) Using a nonmetallic prying device, such as a

plastic or wood trim stick gently pry up at corner of
the applique. Pull applique from lower rear door
painted surface.

(4) Remove adhesive tape residue from painted

surface of vehicle. Use a 3M Scotch-Brite™ Molding
Adhesive and Stripe Removal Disc, or equivalent, to
clean adhesive residue from painted surfaces. These
products are available from automotive paint suppli-
ers. Refer to instructions supplied with the specific
product for proper usage.

INSTALLATION - LOWER REAR DOOR

(1) If applique is to be reused (Fig. 1);

(a) Remove tape residue from applique.
(b) Clean back of applique with Mopar

t Super

Kleen, or equivalent.

(c) Wipe applique dry with lint free cloth.
(d) Apply a single coat of Mopar

t TPO Molding

Prep to tape side of molding and allow to dry thor-
oughly.

(e) Apply new body side molding (double sided)

tape to back of applique.
(2) Clean rear door surface with Mopar

t Super

Kleen, or equivalent. Wipe surface dry with lint free
cloth.

Fig. 1 REAR DOOR APPLIQUE

1 - REAR DOOR
2 - REMOVING ADHESIVE COVER FROM DOUBLE SIDED TAPE
3 - REAR DOOR APPLIQUE

23 - 28

DOORS - REAR

PL/SRT-4

(3) Remove protective cover from tape on back of

applique.

(4) Apply applique to rear door from front to rear.
(5) Using a roller tool, roll applique onto rear door

panel with enough force to assure adhesion. Do not
apply excessive force, or damage to body panels may
result.

CHECK STRAP

REMOVAL

(1) Remove door trim panel.
(2) Remove bolts attaching check strap to hinge

pillar.

(3) Remove check strap seal from door end frame.
(4) Remove bolts attaching check strap to door end

frame (Fig. 2).

(5) Remove check strap from vehicle.

INSTALLATION

CAUTION: Do not close door before adjusting the
door latch. Door may fail to open.

(1) Position door check strap on vehicle.
(2) Install check strap attaching bolts to the door

end frame.

(3) Install check strap seal. If seal is damaged or

worn replace seal.

(4) Install check strap attaching bolts to the hinge

pillar.

(5) Install door trim panel.

Fig. 2 Rear Door Check Strap

1 - REAR DOOR GLASS RUN WEATHERSTRIP
2 - REAR DOOR
3 - DOOR TRIM PANEL

4 - SPACER
5 - WINDOW REGULATOR HANDLE
6 - DOOR CHECK STRAP

PL/SRT-4

DOORS - REAR

23 - 29

APPLIQUE (Continued)

DOOR

REMOVAL

(1) Open door and support on a suitable lifting

device.

(2) Disconnect the wire connector at the hinge pil-

lar.

(3) Remove bolts attaching door check strap to

B-pillar.

(4) Remove bolts attaching lower hinge to door

(Fig. 3).

(5) Remove bolts attaching upper hinge to door.

INSTALLATION

(1) Apply Mopar

t Multimileage Grease to the

inside of the door hinge bushings.

(2) Install bolts to the upper hinge to door.
(3) Install bolts to the lower hinge to door.
(4) Connect the wire connector at the B-pillar.
(5) Remove lifting device.
(6) Adjust door as necessary.

Fig. 3 Rear Door

1 - UPPER HINGE
2 - REAR DOOR
3 - CHECK STRAP

4 - LOWER HINGE
5 - BODY ASSEMBLY

23 - 30

DOORS - REAR

PL/SRT-4

DOOR GLASS

REMOVAL

(1) Remove door trim panel and inner belt weath-

erstrip.

(2) Lower the window to 50 mm (2 ins.) from bot-

tom of travel.

(3) Loosen bolts attaching rear lower run channel

to inner door panel (Fig. 4).

(4) Remove rear run channel from door.
(5) Loosen

screws

attaching

window

regulator

channel to glass.

(6) Slide channel rearward to allow screw heads to

pass through key hole slots in channel.

(7) Remove glass from roller channel.
(8) Lift door glass upward out of the opening at

the top of door.

INSTALLATION

(1) Lower door glass through opening in top of

door and into position in the window regulator.

(2) Position door glass onto roller channel.
(3) Slide roller channel forward to allow screw

heads to engage key hole slots in channel.

(4) Tighten screws attaching window regulator

roller channel to glass.

(5) Install inner door belt door trim panel inner

belt weatherstrip.

(6) Operate window and check for interference.

Adjust glass as necessary.

Fig. 4 Rear Door Glass

1 - REAR DOOR GLASS
2 - REAR DOOR
3 - LATCH STRIKER

4 - SPACER
5 - REAR WINDOW MANUAL REGULATOR
6 - WINDOW TO REGULATOR FASTENERS

PL/SRT-4

DOORS - REAR

23 - 31


Content   ..  384  385  386  387   ..