Dodge Caliber. Manual - part 364


  Index      Dodge     Dodge Caliber - service repair manual 2007 year


Search            


Content   ..  362  363  364  365   ..


Dodge Caliber. Manual - part 364


FRONT POSITION LAMP - EXPORT

1. Disconnect and isolate the battery negative cable.

2. Hoist vehicle.

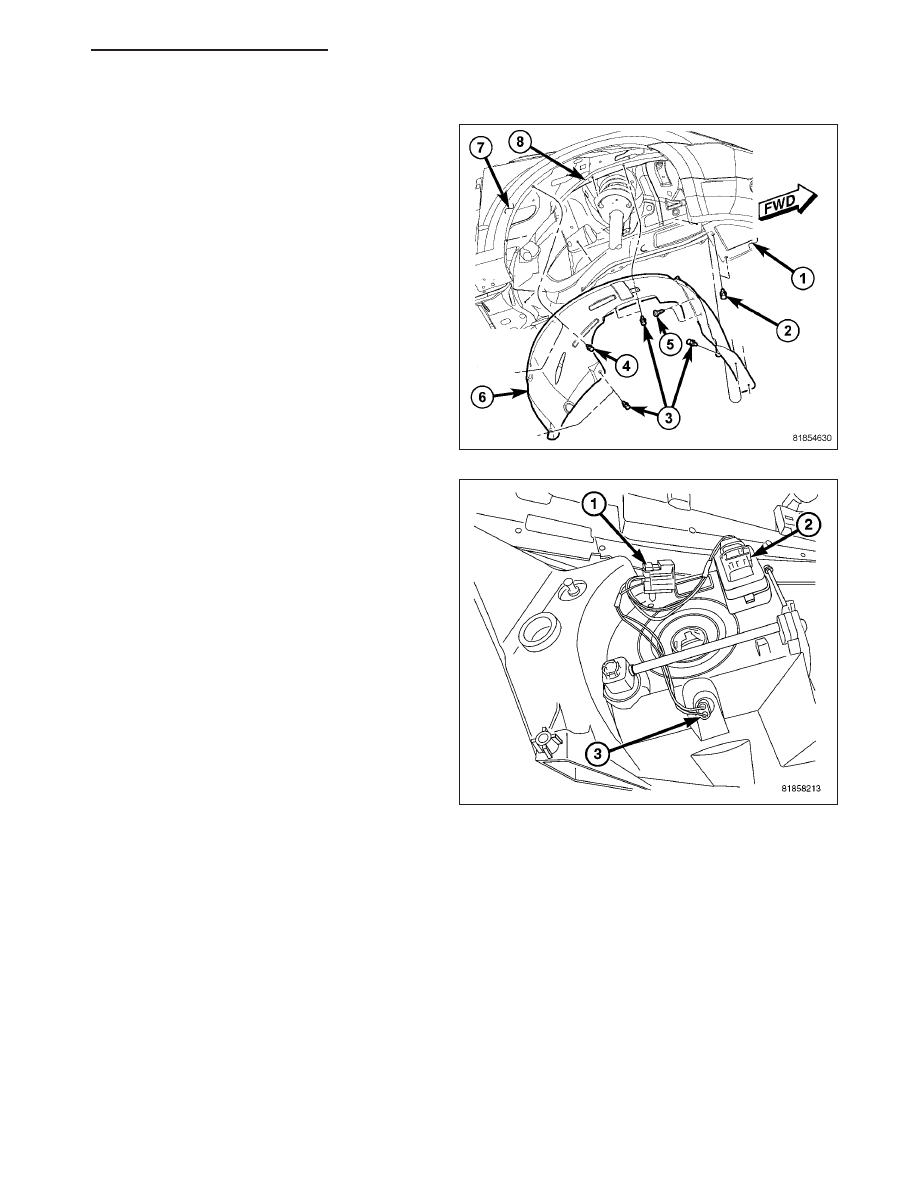
3. Working in the appropriate wheel well, loosen up

the front of the splash shield, but don’t fully remove
it (Refer to 23 - BODY/EXTERIOR/FRONT END
SPLASH SHIELDS - REMOVAL).

4. Looking up through the front wheel well, locate the

front position lamp (3).

5. Grasp the front position lamp (3) twist 1/4 turn

counterclockwise, and pull straight out of front lamp
unit.

6. Pull bulb straight from its socket.

PM

LAMPS/LIGHTING - EXTERIOR - SERVICE INFORMATION

8L - 89

INSTALLATION

BULBS

1. Reaching up through wheel well, install the head-

lamp or park/turn signal bulb (1) in the front lamp
unit, locking it into place by twisting a 1/4 turn
clockwise.

NOTE: EXPORT ONLY - If installing/replacing the
headlamp bulb on export vehicles push the bulb
straight in unit and then install the spring clip.
Install the rubber cover over the rear of the lamp
housing, over the headlamp bulb.

2. Connect the bulb electrical connector (2 or 3).

3. Install the front of the splash shield (6) removed to

gain access to the front lamp unit bulbs (Refer to
23

-

BODY/EXTERIOR/FRONT

END

SPLASH

SHIELDS - INSTALLATION).

4. Lower vehicle from hoist.

5. Connect the battery negative cable.

8L - 90

LAMPS/LIGHTING - EXTERIOR - SERVICE INFORMATION

PM

UNIT

DOMESTIC

1. Position the front lamp unit in its mounting location.

2. Connect the two front lamp unit electrical connec-

tors (2 and 3).

3. Align the ball and socket (1) up and then with a

firm push, snap the front lamp unit into place.

4. Install the three screws (3) to the front lamp unit.

5. Install the fascia that was loosened on the repair

side. One bolt holding the fascia to the fender at
the wheel well opening, the splash shield to fascia
screws, and the fasteners along the radiator clo-
sure panel (Refer to 13 - FRAME & BUMPERS/
BUMPERS/FRONT FASCIA - INSTALLATION).

6. Connect battery negative cable.

EXPORT

1. On BUX models, there are three electrical connec-

tors (2, 3, and 4) to be connected.

2. Install the export front lamp unit the same way as

the domestic unit Step 1.

PM

LAMPS/LIGHTING - EXTERIOR - SERVICE INFORMATION

8L - 91

FRONT POSITION LAMP - EXPORT

1. Install the bulb in its socket (3).

2. Reaching up through wheel well, install front posi-

tion lamp (3) in the front lamp unit, locking it into
place by twisting a 1/4 turn.

3. Install the front of the splash shield removed to

gain access to the front position lamp (Refer to 23
-

BODY/EXTERIOR/FRONT

END

SPLASH

SHIELDS - INSTALLATION).

4. Connect the battery negative cable.

8L - 92

LAMPS/LIGHTING - EXTERIOR - SERVICE INFORMATION

PM


Content   ..  362  363  364  365   ..