Dodge Caliber. Manual - part 166


  Index      Dodge     Dodge Caliber - service repair manual 2007 year


Search            


Content   ..  164  165  166  167   ..


Dodge Caliber. Manual - part 166


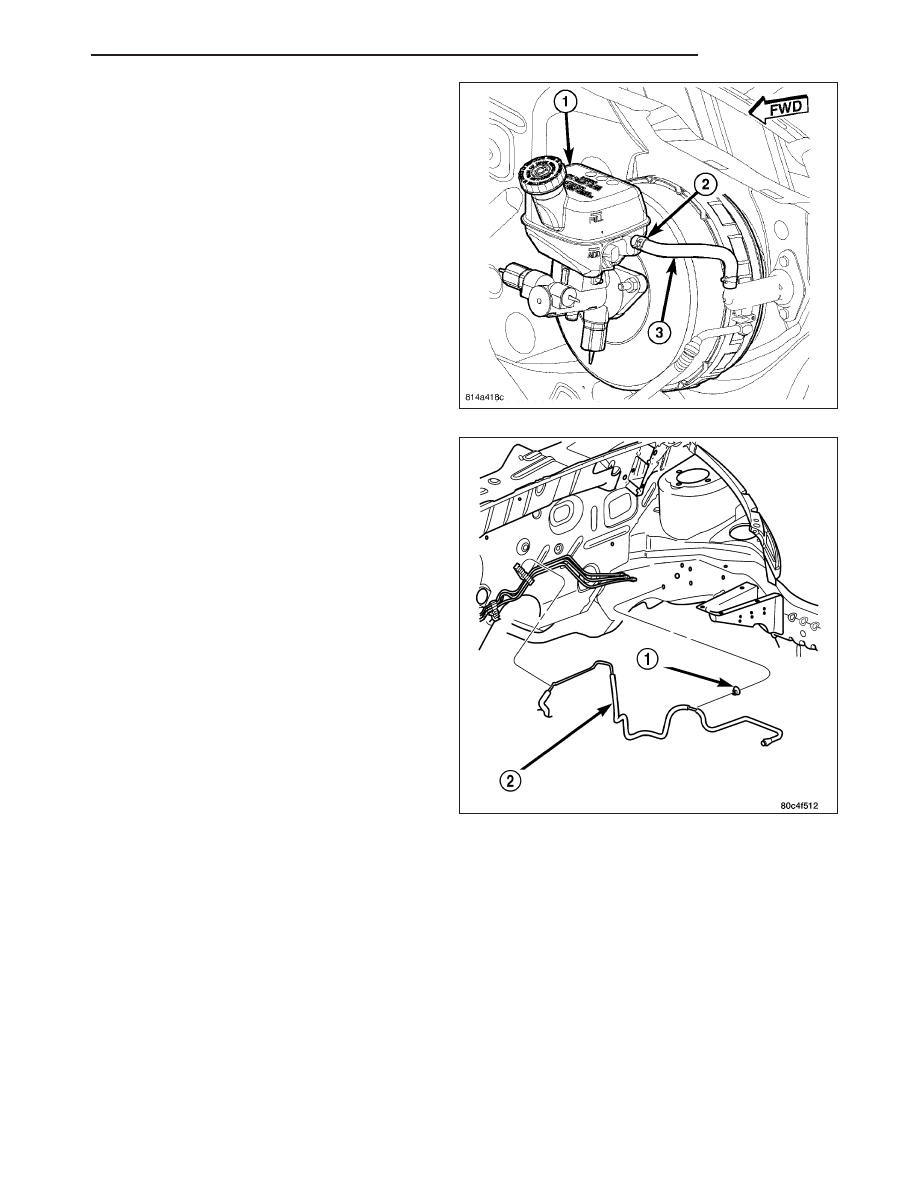
8. Disconnect clutch master cylinder supply line from

brake master cylinder reservoir, Cap off or collect
reservoir fluid spillage.

9. Remove hydraulic tube from left rail retainer.

CAUTION: Use care when removing clutch master
cylinder from engine compartment. Aggressive
handling can result in a damaged hydraulic tube
and

improper

clutch

release

operation

upon

reassembly.

PM

CLUTCH

6 - 23

10. Disengage master cylinder grommet and slide

back.

11. Release master cylinder by rotating to disengage

from pedal bracket assembly.

CAUTION: Use care when removing clutch master
cylinder from engine compartment. Aggressive
handling can result in a damaged hydraulic tube
and improper clutch release operation upon reas-
sembly.

CAUTION: Brake fluid will damage painted sur-
faces. If brake fluid is spilled on any painted sur-
faces, wash it off immediately with water.

12. Remove master cylinder assembly from mounting

position and carefully work hydraulic pipe from out
of engine compartment.

6 - 24

CLUTCH

PM

INSTALLATION

1. Install clutch master cylinder (1) into position but

do not fasten to brake pedal bracket at this
time. 
Carefully route hydraulic pipe into position as
removed.

2. Fasten hydraulic supply tube to retainer (1) at left

rail.

3. Connect hydraulic supply tube to clutch slave cylin-

der:

4. Raise vehicle on hoist. Insert tube into slave cylin-

der port.

5. Lower vehicle.

PM

CLUTCH

6 - 25

6. Connect clutch master cylinder supply hose (3) to

brake master cylinder reservoir (1) and secure with
clamp (2).

7. Fill brake master cylinder to the top with suitable

DOT 3 fluid. Leave cap off. Raise vehicle on hoist.

8. Remove bleed port protective cap, and install suit-

able size and length of clear hose to monitor and
divert fluid into suitable container.

CAUTION: Due to clutch master cylinder design
and placement, the master cylinder body traps a
significant amount of air which does not purge by
means of normal methods. It is necessary to posi-
tion master cylinder body vertical, with pushrod
pointing down, for about ten seconds to purge air
trapped from end of cylinder. Failure to perform
this step upon assembly will result in inadequate
system bleeding and poor release system func-
tionality.

9. Verify that brake master cylinder reservoir is full

and cap is off.

10. Remove clutch master cylinder body from dash

panel. Position master cylinder body vertically,
with pushrod pointing down, for about ten sec-
onds to purge air trapped from end of cylinder.
Install brake master cylinder cap.

11. Install clutch master cylinder body.

12. From inside vehicle, connect clutch master cylin-

der rod to clutch pedal pin. An audible “click”
should be heard. If damaged, replace nylon
retainer.

13. Install and torque clutch master cylinder-to-dash

panel nuts to 34 N·m (300 in.lbs.). Install push rod
retaining clip (1).

14. Install lower instrument panel bezel.

15. Install PDC bracket into position.

16. Raise vehicle on hoist.

17. Connect battery negative cable.

6 - 26

CLUTCH

PM


Content   ..  164  165  166  167   ..