Chrysler Town, Dodge Caravan. Manual - part 110


  Index      Chrysler     Chrysler TOWN & COUNTRY, VOYAGER, Dodge Caravan - service repair manual 2001-2007 year


Search            


Content   ..  108  109  110  111   ..


Chrysler Town, Dodge Caravan. Manual - part 110


PARK/TURN SIGNAL LAMP -
EXPORT

REMOVAL

(1) Disconnect and isolate the battery negative

cable.

(2) Remove the headlamp unit (Refer to 8 - ELEC-

TRICAL/LAMPS/LIGHTING

-

EXTERIOR/HEAD-

LAMP UNIT - EXPORT - REMOVAL).

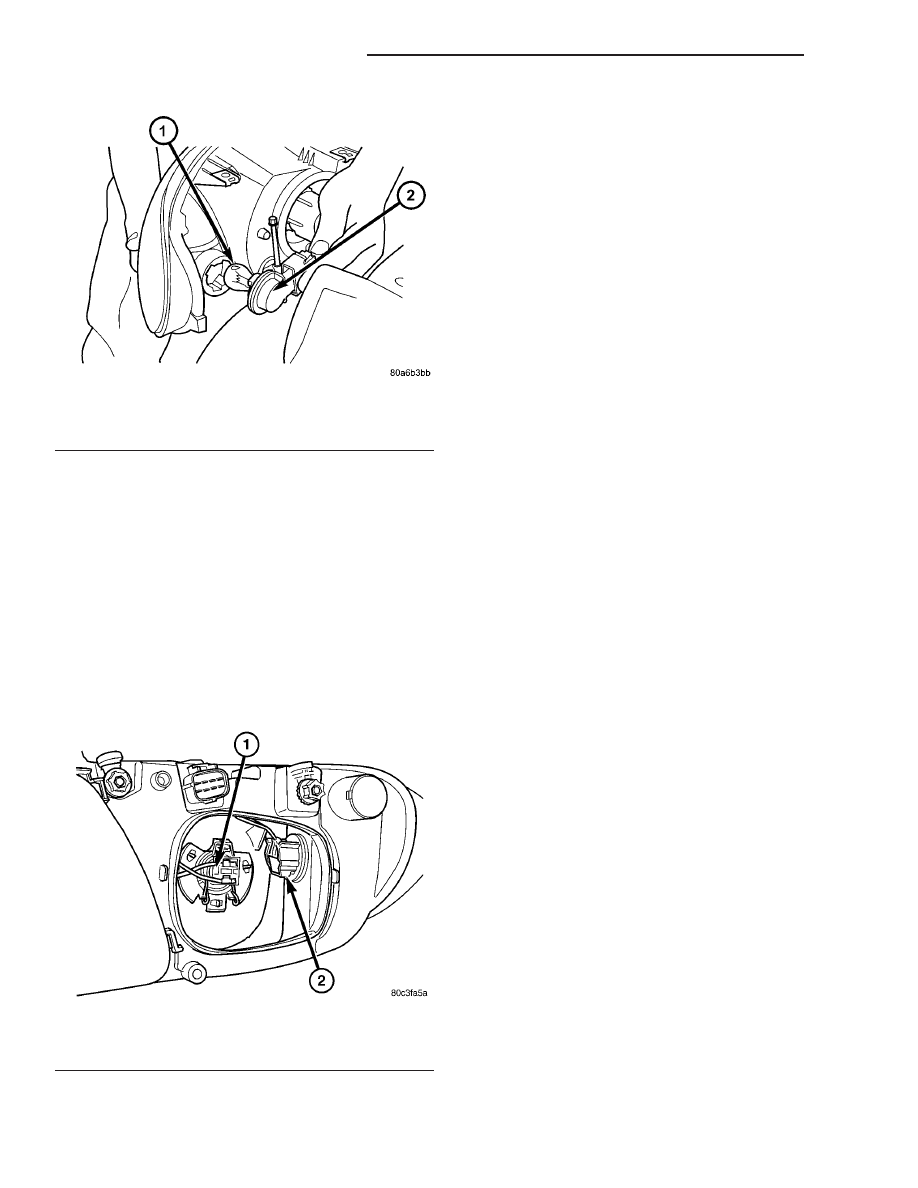
(3) Remove the rubber boot cover.
(4) Twist bulb socket and remove from headlamp

unit (Fig. 28).

(5) Depress, then rotate the bulb and remove from

bulb socket.

INSTALLATION

(1) Install bulb into bulb socket.
(2) Install bulb socket to headlamp unit.
(3) Install rubber boot cover.
(4) Install headlamp unit (Refer to 8 - ELECTRI-

CAL/LAMPS/LIGHTING - EXTERIOR/HEADLAMP
UNIT - EXPORT - INSTALLATION).

(5) Connect battery negative cable.

REAR FOG LAMP - EXPORT

DESCRIPTION

The rear fog lamps are incorporated into the tail

lamp unit. (Refer to 8 - ELECTRICAL/LAMPS/
LIGHTING - EXTERIOR/TAIL LAMP - REMOVAL)
for service procedures.

REPEATER LAMP - EXPORT

REMOVAL

(1) Disconnect and isolate the battery negative

cable.

(2) Push the side repeater lamp to the right and

release retaining tab on the left.

(3) Pull side repeater lamp out and disengage bulb

socket from lamp.

(4) Depress, then rotate and pull bulb from socket.

INSTALLATION

(1) Install bulb to socket.
(2) Push lamp socket into the side repeater lamp.
(3) Position metal spring clip in fender hole notch.
(4) Position side repeater lamp to hole in fender.
(5) Push side repeater lamp to compress metal

spring clip and seat retaining tab into fender.

(6) Connect battery negative cable.

TAIL LAMP

REMOVAL

(1) Disconnect and isolate the battery negative

cable.

(2) Remove the tail lamp unit. (Refer to 8 - ELEC-

TRICAL/LAMPS/LIGHTING

-

EXTERIOR/TAIL

LAMP UNIT - REMOVAL).

(3) Squeeze the tabs on the bulb socket and

remove from tail lamp unit (Fig. 29).

(4) Pull bulb from lamp socket.

INSTALLATION

(1) Push bulb into the lamp socket.

Fig. 27 PARK/TURN SIGNAL LAMP

1 - PARK/TURN SIGNAL LAMP
2 - LAMP SOCKET

Fig. 28 PARK/TURN SIGNAL LAMP

1 - LOW BEAM HEADLAMP
2 - PARK/TURN SIGNAL LAMP

8L - 22

LAMPS/LIGHTING - EXTERIOR

RS

PARK/TURN SIGNAL LAMP (Continued)

(2) Install bulb socket into the tail lamp unit.

Ensure that both retaining tabs engage with an audi-
ble click.

(3) Install the tail lamp unit. (Refer to 8 - ELEC-

TRICAL/LAMPS/LIGHTING

-

EXTERIOR/TAIL

LAMP UNIT - INSTALLATION).

(4) Reconnect the battery negative cable.

TAIL LAMP - EXPORT

REMOVAL

(1) Disconnect and isolate the battery negative

cable.

(2) Remove the tail lamp unit (Refer to 8 - ELEC-

TRICAL/LAMPS/LIGHTING

-

EXTERIOR/TAIL

LAMP UNIT - REMOVAL).

(3) Squeeze the tabs on the back plate retaining

the bulbs and remove from the tail lamp unit (Fig.
30).

(4) Remove bulbs by depressing, then turning

counter-clockwise.

INSTALLATION

(1) Install bulbs by turning clockwise.
(2) Install back plate to tail lamp unit making

sure that both tabs are engaged to the housing.

(3) Install the tail lamp unit (Refer to 8 - ELEC-

TRICAL/LAMPS/LIGHTING

-

EXTERIOR/TAIL

LAMP UNIT - INSTALLATION).

(4) Connect the battery negative cable.

TAIL LAMP UNIT

REMOVAL

(1) Disconnect and isolate the battery negative

cable.

(2) Raise the liftgate.

(3) Remove the two retaining fasteners by prying

under the head of the fastener with a flat bladed tool
(Fig. 31).

(4) Rotate the lamp away from the vehicle body to

disengage hook from the rubber grommet in the
quarter panel opening.

(5) Disconnect wire harness connector from tail

lamp unit by sliding the red lock, then pressing
release tab (Fig. 32).

INSTALLATION

(1) Reconnect wire harness connector to the tail

lamp. Slide red connector lock into position.

(2) Engage hook into rubber grommet in quarter

panel opening.

(3) Place lamp into position on quarter panel.

Fig. 29 TAIL LAMP SOCKET

1 - LAMP SOCKET
2 - TAIL LAMP UNIT

Fig. 30 TAIL LAMP BULBS - EXPORT

1 - TAIL LAMP UNIT
2 - TAIL LAMP
3 - TURN SIGNAL LAMP
4 - BACK UP LAMP
5 - REAR FOG LAMP

Fig. 31 TAIL LAMP UNIT FASTENERS

1 - TAIL LAMP UNIT FASTENER
2 - TAIL LAMP UNIT

RS

LAMPS/LIGHTING - EXTERIOR

8L - 23

TAIL LAMP (Continued)

(4) Insert the two retaining fasteners by pressing

into position (insert into the hole first, followed by
the slot). Ensure that the head of the fastener is
open before inserting.

(5) Close the liftgate.
(6) Reconnect the battery negative cable.

Fig. 32 TAIL LAMP UNIT - REMOVE/INSTALL

1 - WIRE HARNESS CONNECTOR
2 - TAIL LAMP UNIT

8L - 24

LAMPS/LIGHTING - EXTERIOR

RS

TAIL LAMP UNIT (Continued)

LAMPS/LIGHTING - INTERIOR

TABLE OF CONTENTS

page

page

LAMPS/LIGHTING - INTERIOR

SPECIFICATIONS

INTERIOR LAMPS

. . . . . . . . . . . . . . . . . . . . . 25

CENTER CONSOLE LAMP SWITCH

REMOVAL

. . . . . . . . . . . . . . . . . . . . . . . . . . . . . 26

INSTALLATION

. . . . . . . . . . . . . . . . . . . . . . . . . 26

CLUSTER ILLUMINATION LAMPS

REMOVAL

. . . . . . . . . . . . . . . . . . . . . . . . . . . . . 26

INSTALLATION

. . . . . . . . . . . . . . . . . . . . . . . . . 26

COURTESY LAMP

REMOVAL

. . . . . . . . . . . . . . . . . . . . . . . . . . . . . 26

INSTALLATION

. . . . . . . . . . . . . . . . . . . . . . . . . 26

DOME/CARGO LAMP

REMOVAL

. . . . . . . . . . . . . . . . . . . . . . . . . . . . . 26

INSTALLATION

. . . . . . . . . . . . . . . . . . . . . . . . . 26

GLOVE BOX LAMP SWITCH

REMOVAL

. . . . . . . . . . . . . . . . . . . . . . . . . . . . . 26

INSTALLATION

. . . . . . . . . . . . . . . . . . . . . . . . . 26

LIFTGATE LAMP

REMOVAL

. . . . . . . . . . . . . . . . . . . . . . . . . . . . . 27

INSTALLATION

. . . . . . . . . . . . . . . . . . . . . . . . . 27

READING LAMP

REMOVAL

. . . . . . . . . . . . . . . . . . . . . . . . . . . . . 27

INSTALLATION

. . . . . . . . . . . . . . . . . . . . . . . . . 28

VANITY LAMP

REMOVAL

. . . . . . . . . . . . . . . . . . . . . . . . . . . . . 28

INSTALLATION

. . . . . . . . . . . . . . . . . . . . . . . . . 28

LAMPS/LIGHTING - INTERIOR

SPECIFICATIONS

INTERIOR LAMPS

BULB APPLICATION TABLE

LAMP

BULB

ABS

LED

AIRBAG

LED

ALARM SET

PC74

AUTOSTICK

VFD*

BRAKE SYSTEM
WARNING

LED

CONSOLE

194

CRUISE INDICATOR

VFD*

DOME/RAIL LAMPS

578

DOOR AJAR INDICATOR

LED

DOOR COURTESY
LAMP

578

FRONT DOOR
COURTESY

567

GLOVE BOX

194

HIGH BEAM INDICATOR
(BASE CLUSTER)

LED

HIGH BEAM INDICATOR

PC74

LAMP

BULB

CLUSTER
ILLUMINATION

PC74

LIFTGATE

578

LIFTGATE AJAR

LED

LOW FUEL INDICATOR

LED

LOW WASHER FLUID
INDICATOR

LED

MIL (BASE CLUSTER)

LED

MIL

PC74

OIL INDICATOR (BASE
CLUSTER)

LED

OIL INDICATOR

PC74

OVERHEAD CONSOLE
READING

PC579

OVERDRIVE OFF
INDICATOR

VFD*

READING

578

SEAT BELT INDICATOR

LED

TEMPERATURE
INDICATOR

LED

TRAC OFF INDICATOR

VFD*

TURN SIGNAL
INDICATOR (BASE
CLUSTER)

LED

TURN SIGNAL
INDICATOR

PC74

VISOR VANITY

6501966

RS

LAMPS/LIGHTING - INTERIOR

8L - 25


Content   ..  108  109  110  111   ..