Chrysler Crossfire. Manual - part 926


  Index      Chrysler     Chrysler Crossfire - service repair manual 2005 year


Search            


Content   ..  924  925  926  927   ..


Chrysler Crossfire. Manual - part 926


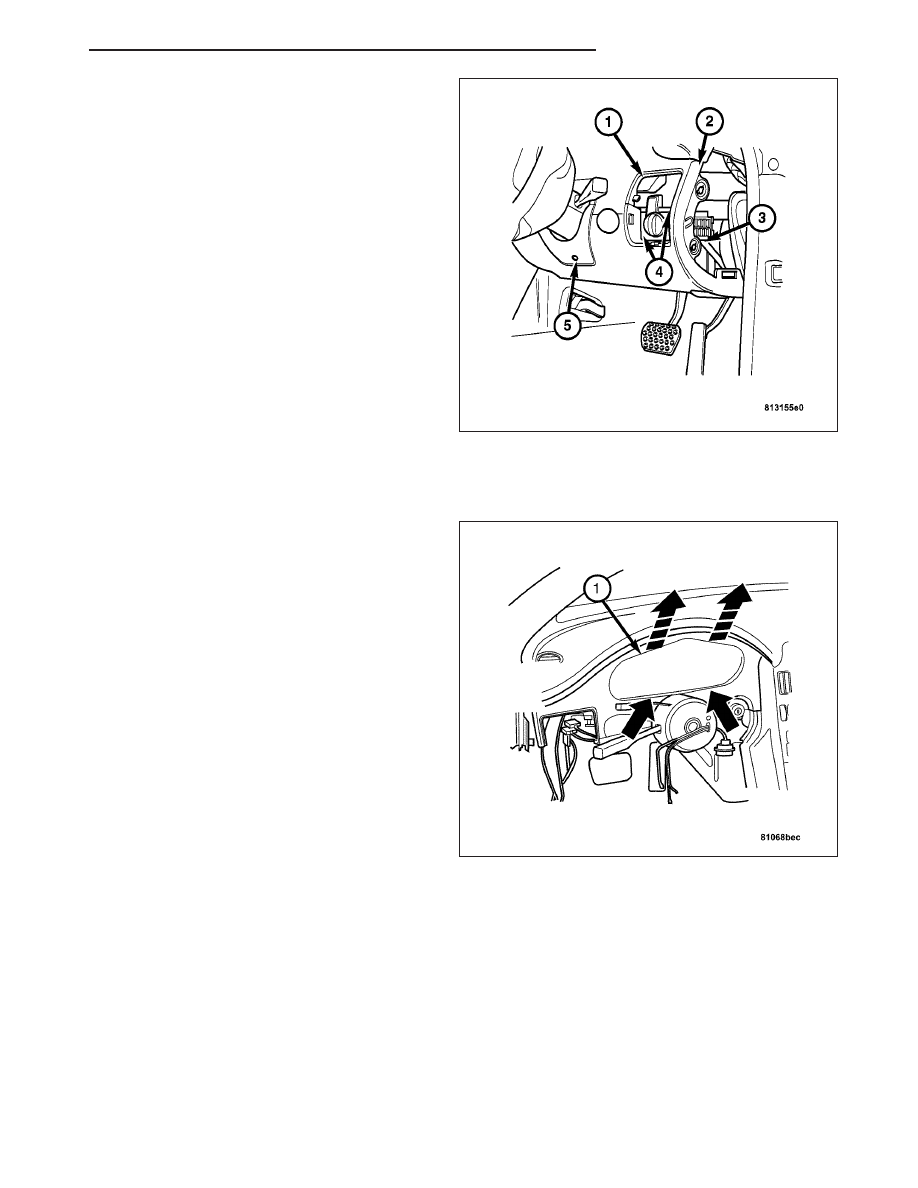
4. Install the screw (2) attaching the lower I/P panel to

the cluster bezel.

5. Install the illumination control module into the I/P,

then connect the illumination control module har-
ness connector.

6. Install the two screws (4) attaching the lower I/P to

the illumination control module and the screw (3)
on the side of the I/P to the illumination control
module support bar.

7. Install the fuse panel side cover.

8. Install the steering column panel then install the

screw (5) attaching the steering column panel
under the steering column.

9. Install the right side I/P air outlet deflector (1).

INSTALLATION - INSTRUMENT CLUSTER COVER

1. Tip the instrument cluster cover toward the rear at

the top, then lift it over the jacket tube covering and
simultaneously guide the adjustment knobs through
the cover.

2. Connect the instrument cluster cover (1) to the

instrument panel top section.

3. Install the screws attaching the instrument cluster

cover to the lower instrument panel.

4. Install the sentry key antenna ring to the key cylin-

der.

5. Install the lower instrument panel. (Refer to 23 -

BODY/INSTRUMENT

PANEL/INSTRUMENT

PANEL ASSEMBLY - INSTALLATION).

6. Install the steering wheel. (Refer to 19 - STEER-

ING/COLUMN/STEERING

WHEEL

-

INSTALLATION).

ZH

INSTRUMENT PANEL

23 - 375

INSTALLATION - INSTRUMENT CLUSTER COVER - RHD

1. Tip the instrument cluster cover toward the front at the top, then lift it over the column and install the cover firmly

into the I/P.

2. Install the screws attaching the instrument cluster cover to the lower instrument panel.

3. Install the SKREEM antenna ring to the key cylinder.

4. Install the right side lower instrument panel. (Refer to 23 - BODY/INSTRUMENT PANEL/INSTRUMENT PANEL

ASSEMBLY - INSTALLATION).

5. Connect the negative battery cable.

23 - 376

INSTRUMENT PANEL

ZH

INTERIOR

TABLE OF CONTENTS

page

page

A-PILLAR TRIM

REMOVAL

. . . . . . . . . . . . . . . . . . . . . . . . . . . . 377

INSTALLATION

. . . . . . . . . . . . . . . . . . . . . . . . 378

CARPET

REMOVAL

REMOVAL - CARPET (LEFT SIDE)

. . . . . . . . 379

REMOVAL - CARPET (RIGHT SIDE)

. . . . . . 383

INSTALLATION

INSTALLATION - CARPET (LEFT SIDE)

. . . . 385

INSTALLATION - CARPET (RIGHT SIDE)

. . . 389

CENTER CONSOLE

REMOVAL

REMOVAL - CENTER CONSOLE (FRONT)

. 392

REMOVAL - CENTER CONSOLE COVER

. . 393

REMOVAL - REAR CENTER CONSOLE

. . . . 395

REMOVAL - ASHTRAY

. . . . . . . . . . . . . . . . . 398

REMOVAL - SHIFT LEVER ASSEMBLY

COVER . . . . . . . . . . . . . . . . . . . . . . . . . . . . 400

INSTALLATION

INSTALLATION - CENTER CONSOLE

(FRONT) . . . . . . . . . . . . . . . . . . . . . . . . . . . 401

INSTALLATION - CENTER CONSOLE

COVER . . . . . . . . . . . . . . . . . . . . . . . . . . . . 405

INSTALLATION - REAR CENTER CONSOLE

. . 407

INSTALLATION - ASH TRAY

. . . . . . . . . . . . . 409

INSTALLATION - SHIFT LEVER ASSEMBLY

COVER . . . . . . . . . . . . . . . . . . . . . . . . . . . . 411

DOOR SILL TRIM PLATE

REMOVAL

. . . . . . . . . . . . . . . . . . . . . . . . . . . . 413

INSTALLATION

. . . . . . . . . . . . . . . . . . . . . . . . 413

HEADLINER

REMOVAL

. . . . . . . . . . . . . . . . . . . . . . . . . . . . 414

INSTALLATION

. . . . . . . . . . . . . . . . . . . . . . . . 417

SPORT BAR

REMOVAL

. . . . . . . . . . . . . . . . . . . . . . . . . . . . 419

INSTALLATION

. . . . . . . . . . . . . . . . . . . . . . . . 421

A-PILLAR TRIM

REMOVAL

1. Press the A-pillar (1) out of the retaining clips (3

each) with a plastic wedge starting at the top.

2. Remove the A-pillar (1) toward the middle of the

vehicle.

ZH

INTERIOR

23 - 377

3. Remove the retaining clips (1) if doing any service

to the instrument panel.

INSTALLATION

1. Install the retaining clips on the A-pillar and attach

the electric wire.

23 - 378

INTERIOR

ZH


Content   ..  924  925  926  927   ..