Chrysler Crossfire. Manual - part 667


  Index      Chrysler     Chrysler Crossfire - service repair manual 2005 year


Search            


Content   ..  665  666  667  668   ..


Chrysler Crossfire. Manual - part 667


REMOVAL- RIGHT SIDE

1. Disconnect the negative battery cable.

2. Remove the air cleaner housing. (Refer to 9 - ENGINE/AIR INTAKE SYSTEM/AIR CLEANER HOUSING -

REMOVAL).

3. Raise and support the vehicle.

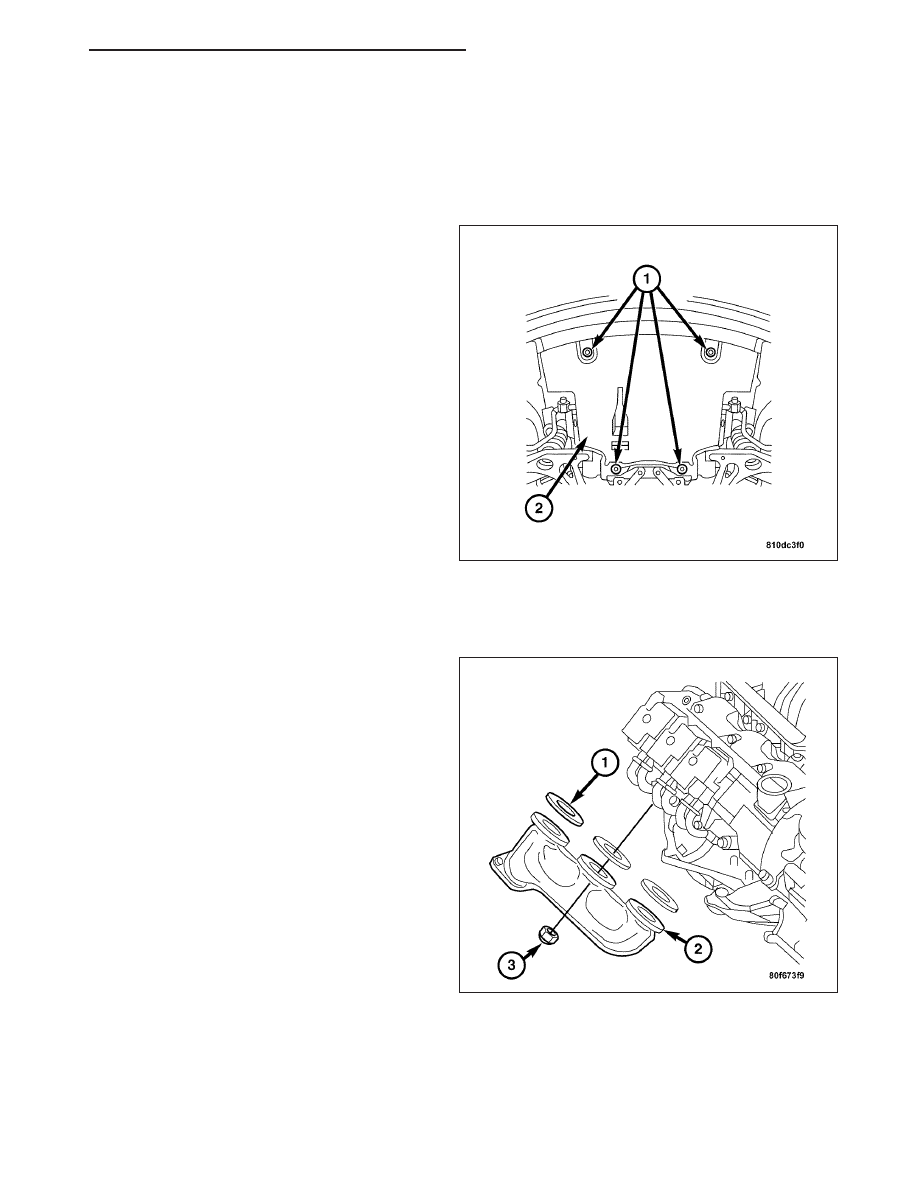
4. Remove the lower splash shield screws (1) and the

splash shield.

5. Remove the right side catalytic converter. (Refer to 11 - EXHAUST SYSTEM/CATALYTIC CONVERTER -

REMOVAL).

6. Remove exhaust manifold nuts (3), the exhaust

manifold (2), and the gaskets (1) from below the
vehicle.

ZH

ENGINE - 3.2L SERVICE INFORMATION

9 - 813

INSTALLATION

LEFT SIDE

1. Position the manifold (1) and gaskets (2) on the

cylinder head. Install the manifold nuts (3) and
tighten to 35 N·m (26 ft. lbs.).

2. Install the left side catalytic converter (Refer to 11 -

EXHAUST SYSTEM/CATALYTIC CONVERTER -
INSTALLATION).

3. Install the lower splash shield and screws (1).

Tighten to 5 N·m (44 in. lbs).

4. Lower the vehicle.

5. Install the air cleaner (Refer to 9 - ENGINE/AIR

INTAKE

SYSTEM/AIR

CLEANER

HOUSING

-

REMOVAL).

6. Connect the negative battery cable.

7. Start the engine and check for exhaust leaks.

9 - 814

ENGINE - 3.2L SERVICE INFORMATION

ZH

INSTALLATION - RIGHT SIDE

1. Position the manifold (2) and gaskets (1) on the

cylinder head.

2. Install the manifold nuts (3). Tighten to 35 N·m (26

ft. lbs.).

3. Install the right side catalytic converter (Refer to 11

- EXHAUST SYSTEM/CATALYTIC CONVERTER -
INSTALLATION).

4. Install the lower splash shield and screws (1).

Tighten to 5 N·m (44 in. lbs.).

5. Lower the vehicle.

6. Install the air cleaner (Refer to 9 - ENGINE/AIR

INTAKE

SYSTEM/AIR

CLEANER

HOUSING

-

REMOVAL).

7. Connect the negative battery cable.

8. Start the engine and check for exhaust leaks.

ZH

ENGINE - 3.2L SERVICE INFORMATION

9 - 815

TIMING CHAIN TENSIONER

REMOVAL

1. Remove the generator (Refer to 8 - ELECTRICAL/CHARGING/GENERATOR - REMOVAL).

2. Remove the timing chain tensioner (1).

INSTALLATION

1. Install the timing chain tensioner. Tighten tensioner to 80 N·m (59 ft. lbs.).

2. Install the generator (Refer to 8 - ELECTRICAL/CHARGING/GENERATOR - INSTALLATION).

TIMING CHAIN COVER

REMOVAL

1. Disconnect the negative battery cable.

2. Drain the cooling system (Refer to 7 - COOLING/ENGINE/COOLANT - STANDARD PROCEDURE).

3. Remove the engine cover (Refer to 9 - ENGINE/AIR INTAKE SYSTEM/AIR CLEANER HOUSING - REMOVAL).

4. Remove the radiator fan (Refer to 7 - COOLING/ENGINE/RADIATOR FAN - REMOVAL).

5. Remove the accessory drive belt (Refer to 7 - COOLING/ACCESSORY DRIVE/DRIVE BELTS - REMOVAL).

6. Remove the idler pulley.

7. Remove accessory drive belt tensioner (Refer to 7 - COOLING/ACCESSORY DRIVE/BELT TENSIONERS -

REMOVAL).

9 - 816

ENGINE - 3.2L SERVICE INFORMATION

ZH


Content   ..  665  666  667  668   ..