Chrysler Crossfire. Manual - part 1006


  Index      Chrysler     Chrysler Crossfire - service repair manual 2005 year


Search            


Content   ..  1004  1005  1006  1007   ..


Chrysler Crossfire. Manual - part 1006


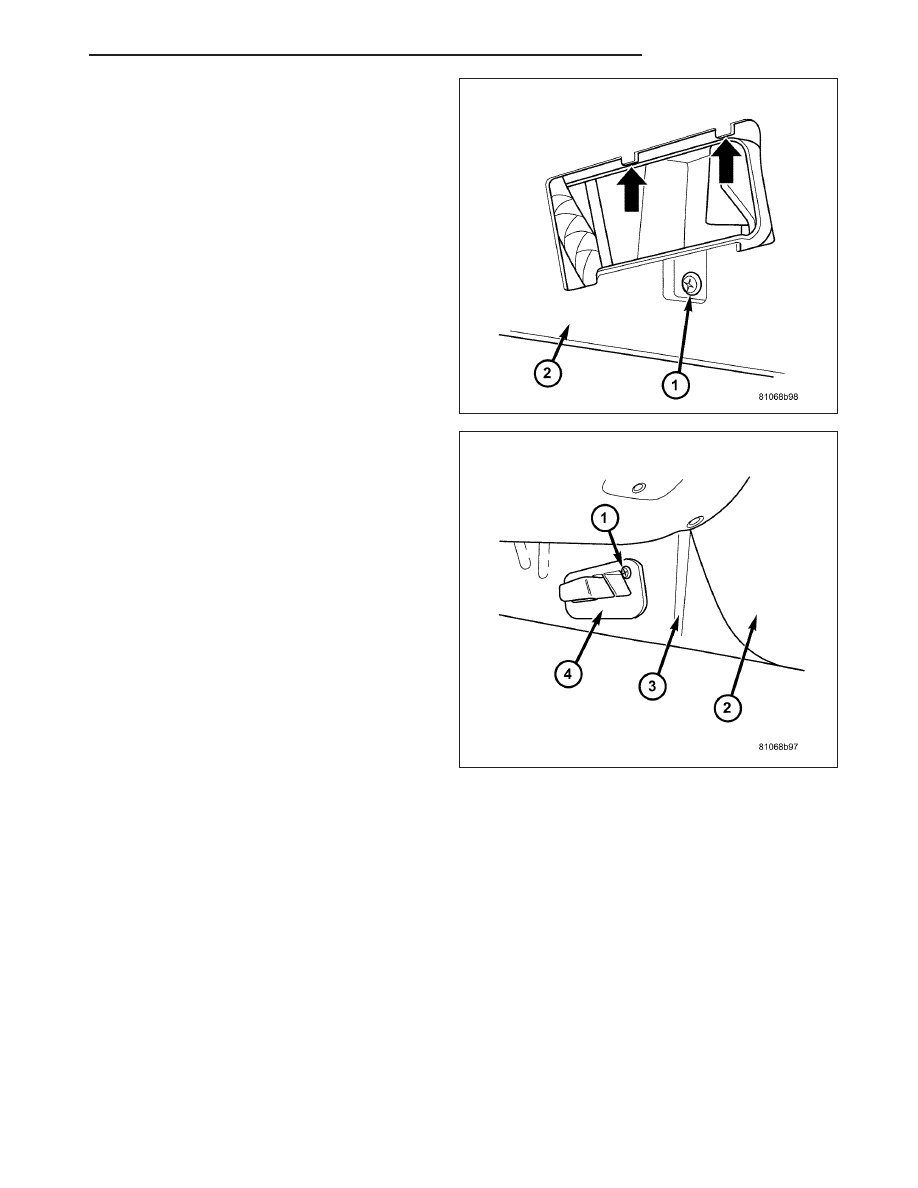
2. Install the screw attaching the footwell air outlet

cover to the center console.

3. Install the cover then turn the screw 90° to the

right.

ZH

DISTRIBUTION

24 - 127

PLUMBING

TABLE OF CONTENTS

page

page

PLUMBING

DESCRIPTION - REFRIGERANT LINES/

HOSES/TUBES

. . . . . . . . . . . . . . . . . . . . . . 129

WARNING

. . . . . . . . . . . . . . . . . . . . . . . . . . . . 130

CAUTION

. . . . . . . . . . . . . . . . . . . . . . . . . . . . 130

DIAGNOSIS AND TESTING - REFRIGERANT

SYSTEM LEAKS

. . . . . . . . . . . . . . . . . . . . . 131

STANDARD PROCEDURE

REFRIGERANT SYSTEM SERVICE

EQUIPMENT . . . . . . . . . . . . . . . . . . . . . . . . 131

STANDARD PROCEDURE - REFRIGERANT

RECOVERY . . . . . . . . . . . . . . . . . . . . . . . . . 132

STANDARD PROCEDURE - REFRIGERANT

SYSTEM EVACUATE . . . . . . . . . . . . . . . . . . 132

STANDARD PROCEDURE - REFRIGERANT

SYSTEM CHARGE . . . . . . . . . . . . . . . . . . . . 133

A/C COMPRESSOR

DESCRIPTION - A/C COMPRESSOR

. . . . . . . 134

OPERATION - A/C COMPRESSOR

. . . . . . . . . 134

DIAGNOSIS AND TESTING - COMPRESSOR

NOISE

. . . . . . . . . . . . . . . . . . . . . . . . . . . . . 135

REMOVAL

. . . . . . . . . . . . . . . . . . . . . . . . . . . . 136

INSTALLATION

. . . . . . . . . . . . . . . . . . . . . . . . 136

PLUMBING

DESCRIPTION

. . . . . . . . . . . . . . . . . . . . . . . . 136

OPERATION

. . . . . . . . . . . . . . . . . . . . . . . . . . 137

REMOVAL

. . . . . . . . . . . . . . . . . . . . . . . . . . . . 137

INSTALLATION

. . . . . . . . . . . . . . . . . . . . . . . . 138

A/C CONDENSER

DESCRIPTION

. . . . . . . . . . . . . . . . . . . . . . . . 139

OPERATION

. . . . . . . . . . . . . . . . . . . . . . . . . . 139

REMOVAL

. . . . . . . . . . . . . . . . . . . . . . . . . . . . 139

INSTALLATION

. . . . . . . . . . . . . . . . . . . . . . . . 141

A/C EVAPORATOR

DESCRIPTION

. . . . . . . . . . . . . . . . . . . . . . . . 143

OPERATION

. . . . . . . . . . . . . . . . . . . . . . . . . . 143

REMOVAL

. . . . . . . . . . . . . . . . . . . . . . . . . . . . 143

INSTALLATION

. . . . . . . . . . . . . . . . . . . . . . . . 145

LIQUID LINE

REMOVAL

. . . . . . . . . . . . . . . . . . . . . . . . . . . . 147

INSTALLATION

. . . . . . . . . . . . . . . . . . . . . . . . 147

SUCTION LINE

REMOVAL

. . . . . . . . . . . . . . . . . . . . . . . . . . . . 148

INSTALLATION

. . . . . . . . . . . . . . . . . . . . . . . . 149

A/C EXPANSION VALVE

DESCRIPTION

. . . . . . . . . . . . . . . . . . . . . . . . 151

OPERATION

. . . . . . . . . . . . . . . . . . . . . . . . . . 151

DIAGNOSIS AND TESTING - A/C EXPANSION

VALVE

. . . . . . . . . . . . . . . . . . . . . . . . . . . . . 151

REMOVAL

. . . . . . . . . . . . . . . . . . . . . . . . . . . . 152

INSTALLATION

. . . . . . . . . . . . . . . . . . . . . . . . 152

HEATER CORE

DESCRIPTION

. . . . . . . . . . . . . . . . . . . . . . . . 153

OPERATION

. . . . . . . . . . . . . . . . . . . . . . . . . . 153

REMOVAL

. . . . . . . . . . . . . . . . . . . . . . . . . . . . 153

INSTALLATION

. . . . . . . . . . . . . . . . . . . . . . . . 155

RECEIVER / DRIER

DESCRIPTION

. . . . . . . . . . . . . . . . . . . . . . . . 157

OPERATION

. . . . . . . . . . . . . . . . . . . . . . . . . . 157

REMOVAL

. . . . . . . . . . . . . . . . . . . . . . . . . . . . 157

INSTALLATION

. . . . . . . . . . . . . . . . . . . . . . . . 159

REFRIGERANT

DESCRIPTION

. . . . . . . . . . . . . . . . . . . . . . . . 159

OPERATION

. . . . . . . . . . . . . . . . . . . . . . . . . . 159

REFRIGERANT OIL

DESCRIPTION

. . . . . . . . . . . . . . . . . . . . . . . . 160

OPERATION

. . . . . . . . . . . . . . . . . . . . . . . . . . 160

STANDARD PROCEDURE - REFRIGERANT

OIL LEVEL

. . . . . . . . . . . . . . . . . . . . . . . . . . 160

COOLANT CIRCULATION VALVE

DESCRIPTION

. . . . . . . . . . . . . . . . . . . . . . . . 161

OPERATION

. . . . . . . . . . . . . . . . . . . . . . . . . . 161

REMOVAL

. . . . . . . . . . . . . . . . . . . . . . . . . . . . 162

INSTALLATION

. . . . . . . . . . . . . . . . . . . . . . . . 163

24 - 128

PLUMBING

ZH

PLUMBING

DESCRIPTION - REFRIGERANT LINES/HOSES/TUBES

The refrigerant lines and hoses are used to carry the
refrigerant between the various Air Conditioning Sys-
tem components:

Evaporator (1)

Expansion Valve (3)

Receiver/Drier (5)

Condenser (6)

A/C Compressor (8)

A barrier hose design with a nylon tube, which is
sandwiched between rubber layers, is used for the
R-134a air conditioning systems. This nylon tube helps
to further contain the R-134a refrigerant, which has a
smaller molecular structure than R-12 refrigerant. The
ends of the refrigerant hoses are made from light-
weight aluminum or steel, and commonly use braze-
less fittings.

Any kinks or sharp bends in the refrigerant plumbing
will reduce the capacity of the entire air conditioning
system. Kinks and sharp bends reduce the flow of refrigerant in the system. A good rule for the flexible hose refrig-
erant lines is to keep the radius of all bends at least ten times the diameter of the hose. In addition, the flexible
hose refrigerant lines should be routed so they are at least 80 millimeters (3 inches) from the exhaust manifold.

There are two types of refrigerant fittings:

All fittings with O-rings need to be coated with refrigerant oil before installation. Use only O-rings that are the
correct size and approved for use with R-134a refrigerant. Failure to do so may result in a leak.

Unified plumbing connections with gaskets cannot be serviced with O-rings. The gaskets are not reusable and
new gaskets do not require lubrication before installing.

Using the proper tools when making a refrigerant plumbing connection is very important. Improper tools or improper
use of the tools can damage the refrigerant fittings. Always use two wrenches when loosening or tightening tube
fittings. Use one wrench to hold one side of the connection stationary, while loosening or tightening the other side
of the connection with a second wrench.

The refrigerant must be recovered completely from the system before opening any fitting or connection. Open the
fittings with caution, even after the refrigerant has been recovered. If any pressure is noticed as a fitting is loosened,
tighten the fitting and recover the refrigerant from the system again.

Do not discharge refrigerant into the atmosphere. Use an R-134a refrigerant recovery/recycling device that meets
SAE Standard J2210.

The refrigerant system will remain chemically stable as long as pure, moisture-free R-134a refrigerant and refriger-
ant oil is used. Dirt, moisture, or air can upset this chemical stability. Operational troubles or serious damage can
occur if foreign material is present in the refrigerant system.

When it is necessary to open the refrigerant system, have everything needed to service the system ready. The
refrigerant system should not be left open to the atmosphere any longer than necessary. Cap or plug all lines and
fittings as soon as they are opened to prevent the entrance of dirt and moisture. All lines and components in parts
stock should be capped or sealed until they are to be installed.

All tools, including the refrigerant recycling equipment, the manifold gauge set, and test hoses should be kept clean
and dry. All tools and equipment must be designed for R-134a refrigerant.

ZH

PLUMBING

24 - 129

WARNING

WARNING: THE AIR CONDITIONING SYSTEM CONTAINS REFRIGERANT UNDER HIGH PRESSURE. SEVERE
PERSONAL INJURY MAY RESULT FROM IMPROPER SERVICE PROCEDURES. REPAIRS SHOULD ONLY BE
PERFORMED BY QUALIFIED SERVICE PERSONNEL.
AVOID BREATHING THE REFRIGERANT AND REFRIGERANT OIL VAPOR OR MIST. EXPOSURE MAY IRRI-
TATE THE EYES, NOSE, AND/OR THROAT. WEAR EYE PROTECTION WHEN SERVICING THE AIR CONDI-
TIONING REFRIGERANT SYSTEM. SERIOUS EYE INJURY CAN RESULT FROM DIRECT CONTACT WITH THE
REFRIGERANT. IF EYE CONTACT OCCURS, SEEK MEDICAL ATTENTION IMMEDIATELY.
DO NOT EXPOSE THE REFRIGERANT TO OPEN FLAME. POISONOUS GAS IS CREATED WHEN REFRIGER-
ANT IS BURNED. AN ELECTRONIC LEAK DETECTOR IS RECOMMENDED.
IF ACCIDENTAL SYSTEM DISCHARGE OCCURS, VENTILATE THE WORK AREA BEFORE RESUMING SER-
VICE. LARGE AMOUNTS OF REFRIGERANT RELEASED IN A CLOSED WORK AREA WILL DISPLACE THE
OXYGEN AND CAUSE SUFFOCATION.
THE EVAPORATION RATE OF R-134a REFRIGERANT AT AVERAGE TEMPERATURE AND ALTITUDE IS
EXTREMELY HIGH. AS A RESULT, ANYTHING THAT COMES IN CONTACT WITH THE REFRIGERANT WILL
FREEZE. ALWAYS PROTECT THE SKIN OR DELICATE OBJECTS FROM DIRECT CONTACT WITH THE
REFRIGERANT.
THE R-134a SERVICE EQUIPMENT OR THE VEHICLE REFRIGERANT SYSTEM SHOULD NOT BE PRESSURE
TESTED OR LEAK TESTED WITH COMPRESSED AIR. SOME MIXTURES OF AIR AND R-134a HAVE BEEN
SHOWN TO BE COMBUSTIBLE AT ELEVATED PRESSURES. THESE MIXTURES ARE POTENTIALLY DAN-
GEROUS, AND MAY RESULT IN FIRE OR EXPLOSION CAUSING INJURY OR PROPERTY DAMAGE.

CAUTION

CAUTION: Liquid refrigerant is corrosive to metal surfaces. Follow the operating instructions supplied with
the service equipment being used.
Never add R-12 to a refrigerant system designed to use R-134a. Damage to the system will result.
R-12 refrigerant oil must not be mixed with R-134a refrigerant oil. They are not compatible.
Do not use R-12 equipment or parts on the R-134a system. Damage to the system will result.
Do not overcharge the refrigerant system. This will cause excessive compressor head pressure and can
cause noise and system failure.
Recover the refrigerant before opening any fitting or connection. Open the fittings with caution, even after
the system has been discharged. Never open or loosen a connection before recovering the refrigerant.
The refrigerant system must always be evacuated before charging.
Do not open the refrigerant system or uncap a replacement component until you are ready to service the
system. This will prevent contamination in the system.
Before disconnecting a component, clean the outside of the fittings thoroughly to prevent contamination
from entering the refrigerant system.
Immediately after disconnecting a component from the refrigerant system, seal the open fittings with a cap
or plug.
Before connecting an open refrigerant fitting, always install a new seal or gasket. Coat the fitting and seal
with clean refrigerant oil before connecting.
Do not remove the sealing caps from a replacement component until it is to be installed.
When installing a refrigerant line, avoid sharp bends that may restrict refrigerant flow. Position the refrig-
erant lines away from exhaust system components or any sharp edges, which may damage the line.
Tighten refrigerant fittings only to the specified torque. The aluminum fittings used in the refrigerant system
will not tolerate overtightening.
When disconnecting a refrigerant fitting, use a wrench on both halves of the fitting. This will prevent twist-
ing of the refrigerant lines or tubes.
Refrigerant oil will absorb moisture from the atmosphere if left uncapped. Do not open a container of refrig-
erant oil until you are ready to use it. Replace the cap on the oil container immediately after using. Store
refrigerant oil only in a clean, airtight, and moisture-free container.
Keep service tools and the work area clean. Contamination of the refrigerant system through careless work
habits must be avoided.

24 - 130

PLUMBING

ZH


Content   ..  1004  1005  1006  1007   ..