Chrysler 300/300 Touring/300C, Dodge Magnum. Manual - part 527


  Index      Chrysler     Chrysler 300/300 Touring/300C, Dodge Magnum - service repair manual


Search            


Content   ..  525  526  527  528   ..


Chrysler 300/300 Touring/300C, Dodge Magnum. Manual - part 527


INSTALLATION

CAUTION: Make sure that the master spot lamp
feed or either the left or right spot lamp feed are
removed from the Power Distribution Center (PDC)
before performing service on the spot lamps.

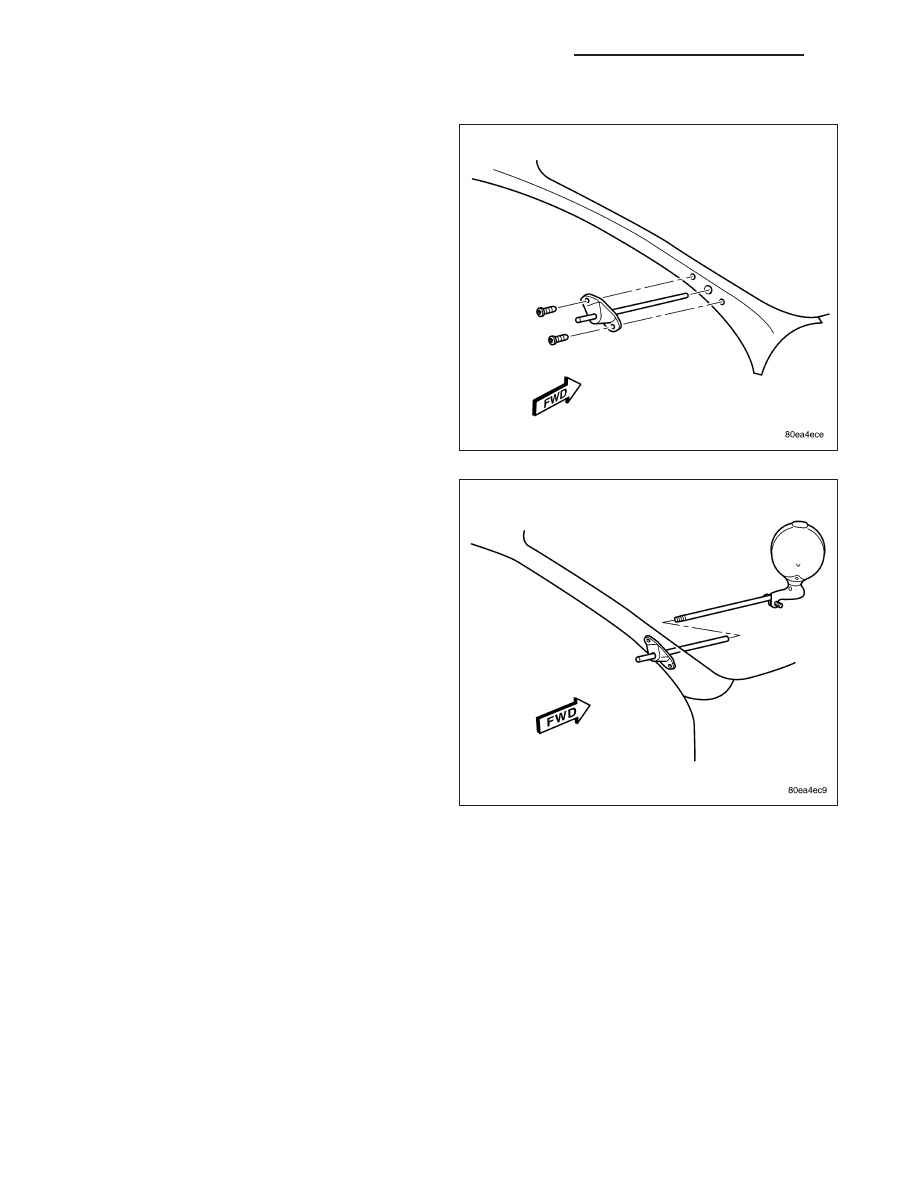
1. Install the spot lamp outer tube and mounting

bracket to the A-pillar.

2. Install the screws retaining the spot lamp mounting

bracket to the A-pilla and tighten to 33 N·m (29 in.
lbs.).

3. Carefully lift the edge of the secondary door seal

along the windshield pillar to expose the spot lamp
outer tube and apply a small amount of clear sili-
cone sealer to the base of the outer tube.

4. Carefully install the spot lamp head with the inter-

mediate and inner shafts to the outer tube and
mounting bracket until the head assembly bottoms
out on the outer tube.

8L - 138

LAMPS/LIGHTING - EXTERIOR - SERVICE INFORMATION

LX

5. Tighten the clamp screw (1) at the base of the spot

lamp head assembly in small increments while test-
ing the effort required to rotate the spot lamp
between the stowed and operating positions. Stop
tightening the clamp screw when the spot lamp can
maintain any desired position.

6. Position the A-pillar trim to the spot lamp outer

tube.

CAUTION: Support the head of the spot lamp
while tightening the head assembly clamp screw.
Maintain an operating or vertical position.

7. Install the handle to the outer tube.

a. Position the spot lamp handle in the operating

(downward close to vertical) position to the
outer tube.

b. There are two detent positions to which the

handle must line up and engage. Rotate the
knob of the handle and the handle base to aid
in engaging each of the detents. Using the
wedge nut opening on the handle for visual
aid, rotate the handle as necessary while
installing, in order to bring the flat detent on
the intermediate shaft into view along the bot-
tom of the opening.

8. Tighten the bolt (1) retaining the handle to the outer tub and tighten to 6.5 N·m (58 in. lbs.).

LX

LAMPS/LIGHTING - EXTERIOR - SERVICE INFORMATION

8L - 139

9. Connect the spot lamp electrical connector.

10. Install the instrument panel end-cap.

11. Install the A-pillar trim.

12. Install the fuse, depending on which spot lamp is

being serviced.

13. Inspect the operation of the spot lamp to ensure that the range of movement is correct.

Using the handle, rotate the spot lamp from the operating position to the stowed position and back. Ensure
that the lamp will maintain the desired position. The stowed position should be just above the windshield and
the operating position should be vertical to slightly outboard.

Using the knob of the handle, rotate the head of the spot lamp around on its axis. The spot lamp must rotate
360 degrees on its axis.

14. If the spot lamp head does not rotate 360 degrees on its axis, or if excessive effort is required to rotate the

lamp head on its axis, perform the following:

a. Remove the handle and inspect for damage to the inner shaft and the gears in the handle. Repair or replace

as necessary.

b. If no damage is present to the inner shaft or the gears in the handle, reinstall the handle and reinspect the

operation of the lamp.

c. If the spot lamp head still does not properly rotate 360 degrees on its axis, remove the cover from the end

of the spot lamp head assembly and inspect for damage to the gears in the head assembly. Repair or
replace as necessary.

15. Lower the spot lamp to the stowed position.

8L - 140

LAMPS/LIGHTING - EXTERIOR - SERVICE INFORMATION

LX

UNDERHOOD LAMP - POLICE

REMOVAL

1. Open hood, disconnect and isolate the battery neg-

ative remote terminal or pull fuse in the PDC.

2. Insert a small flat blade in access slot between the

lamp base (1) and lamp lens (2).

3. Lift the lamp lens (2) upward and remove the lamp

lens (2).

4. Depress bulb terminal (2) inward to release bulb

(1).

INSTALLATION

1. Engage the replacement bulb wire loop (3) to ter-

minal closest to lamp base (4) wire connector.

2. Depress the opposite terminal inward and engage

the remaining bulb wire loop (3).

LX

LAMPS/LIGHTING - EXTERIOR - SERVICE INFORMATION

8L - 141


Content   ..  525  526  527  528   ..