Chrysler 300/300 Touring/300C, Dodge Magnum. Manual - part 2341


  Index      Chrysler     Chrysler 300/300 Touring/300C, Dodge Magnum - service repair manual


Search            


Content   ..  2339  2340  2341  2342   ..


Chrysler 300/300 Touring/300C, Dodge Magnum. Manual - part 2341


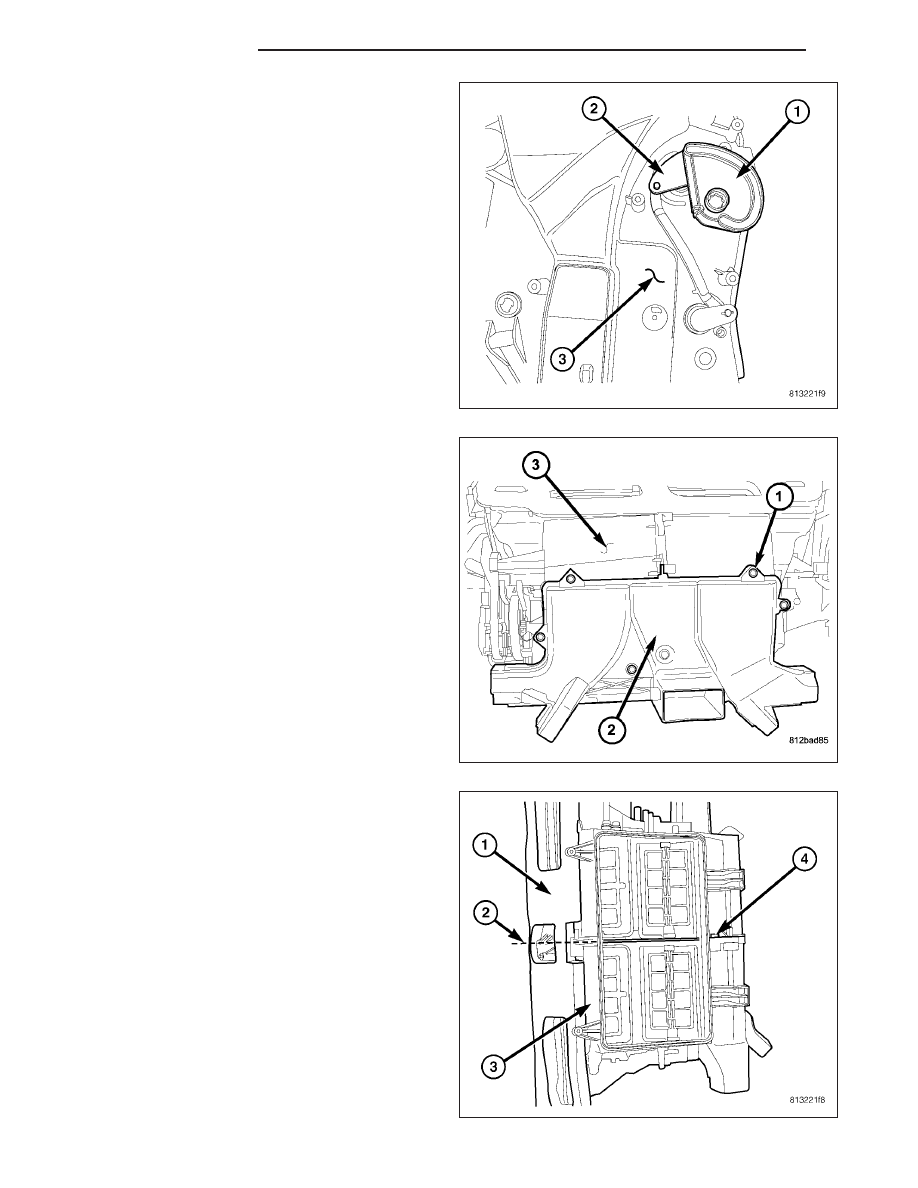
13. If equipped with dual zone heating-A/C, remove

the blend door cam (1) from blend door lever (2)
and the pivot shaft located on the passenger side
of the air distribution housing (3).

14. Remove the six screws (1) that secure the front

floor distribution duct (2) to the bottom of the air
distribution housing (3) and remove the duct.

15. Carefully cut the foam seal (1) along the parting

line (2) of the two halves of the air distribution
housing (3). If the seal is deformed or damaged, it
must be replaced.

16. Remove the screws (4) that secure the two halves

of the air distribution housing together.

24 - 398

DISTRIBUTION

LX

17. Carefully separate the left half of the air distribu-

tion housing (1) from the right half of the housing
(2).

18. Remove the center partition (3).

19. To remove the air doors (1) from the air distribu-

tion housing (2), first carefully push down on the
tab (3) of the air door lever (4) located in the pivot
shaft of the air door being removed.

NOTE: If the seal on the air door is deformed or
damaged, the air door must be replaced.

20. Gently pull the air door lever out of the pivot shaft

and remove the air door(s) from the air distribu-
tion housing as required.

HOUSING-AIR INLET

NOTE: The air inlet housing must be removed from HVAC housing and disassembled for service of the
recirculation-air door.

LX

DISTRIBUTION

24 - 399

NOTE: LHD model shown. RHD model similar.

1. Remove the air inlet housing (1) from the HVAC

housing and place it on a workbench (Refer to 24 -
HEATING & AIR CONDITIONING/DISTRIBUTION/
HOUSING-HVAC

-

HOUSING-AIR

INLET

-

REMOVAL)

2. Remove the three screws (2) that secure the recir-

culation door actuator (3) to the air inlet housing
and remove the actuator.

3. Remove the recirculation-air door (4) from the air

inlet housing.

HOUSING-HVAC

NOTE: The HVAC housing must be removed from the vehicle and disassembled for service of the A/C evap-
orator.

NOTE: LHD model shown in illustrations. RHD model similar.

1. Remove the HVAC housing assembly and place it

on a workbench (Refer to 24 - HEATING & AIR
CONDITIONING/DISTRIBUTION /HOUSING-HVAC
- HOUSING-HVAC ASSEMBLY - REMOVAL).

2. Remove the air distribution housing (3) from the

HVAC housing (1) (Refer to 24 - HEATING & AIR
CONDITIONING/DISTRIBUTION/HOUSING-HVAC
- HOUSING-AIR DISTRIBUTION - REMOVAL).

3. Remove the air inlet housing (2) from the HVAC

housing (Refer to 24 - HEATING & AIR CONDI-
TIONING/DISTRIBUTION/HOUSING-HVAC

-

HOUSING-AIR INLET - REMOVAL).

24 - 400

DISTRIBUTION

LX

4. Remove the two screws (1) that secure the flange

(2) to the front of the HVAC housing (3).

5. Remove the flange and the heater core tubes (4)

from the HVAC housing.

6. Disconnect the HVAC wiring harness (1) from the

evaporator temperature sensor (2), blower motor
resistor or power module (3) (depending on appli-
cation) and the blower motor (4).

7. Disengage the two HVAC wire harness retainers

(5) from the blower motor and remove the blower
motor from the HVAC housing (Refer to 24 - HEAT-
ING & AIR CONDITIONING/DISTRIBUTION/MO-
TOR-BLOWER - REMOVAL).

8. Remove the blower motor resistor or power mod-

ule, depending on application (Refer to 24 - HEAT-
ING

&

AIR

CONDITIONING/CONTROLS/

RESISTOR-BLOWER MOTOR - REMOVAL) or
(Refer to 24 - HEATING & AIR CONDITIONING/
CONTROLS/MODULE-POWER-BLOWER MOTOR
- REMOVAL).

9. Remove the evaporator temperature sensor (Refer

to 24 - HEATING & AIR CONDITIONING/CON-
TROLS/SENSOR-EVAPORATOR TEMPERATURE
- REMOVAL).

10. Remove the two bolts (1) that secure the A/C

expansion valve (2) to the evaporator tube tap-
ping block located within the foam seal (3).

11. Remove the A/C expansion valve from the evapo-

rator tube tapping block and foam seal.

12. Remove the O-ring seals from the evaporator

tube fittings and discard.

13. Install plugs in, or tape over the opened evapora-

tor tube fittings and all expansion valve ports.

LX

DISTRIBUTION

24 - 401


Content   ..  2339  2340  2341  2342   ..