Chrysler 300/300 Touring/300C, Dodge Magnum. Manual - part 2340


  Index      Chrysler     Chrysler 300/300 Touring/300C, Dodge Magnum - service repair manual


Search            


Content   ..  2338  2339  2340  2341   ..


Chrysler 300/300 Touring/300C, Dodge Magnum. Manual - part 2340


1. Recover the refrigerant from the refrigerant system

(Refer to 24 - HEATING & AIR CONDITIONING/
PLUMBING

-

STANDARD

PROCEDURE

-

REFRIGERANT SYSTEM RECOVERY).

2. Drain the engine cooling system (Refer to 7 -

COOLING - STANDARD PROCEDURE - COOL-
ING SYSTEM DRAIN).

3. Disconnect and isolate the negative battery cable.

4. Remove the fresh air inlet housing from the dash

panel (Refer to 24 - HEATING & AIR CONDITION-
ING/DISTRIBUTION/HOUSING-HVAC - HOUSING-
FRESH AIR INLET - REMOVAL).

5. Disconnect the A/C liquid line and the A/C suction

line from the A/C evaporator (Refer to 24 - HEAT-
ING & AIR CONDITIONING/PLUMBING/LINE-A/C
LIQUID - REMOVAL).

6. Disconnect the heater hoses from the heater core

tubes.

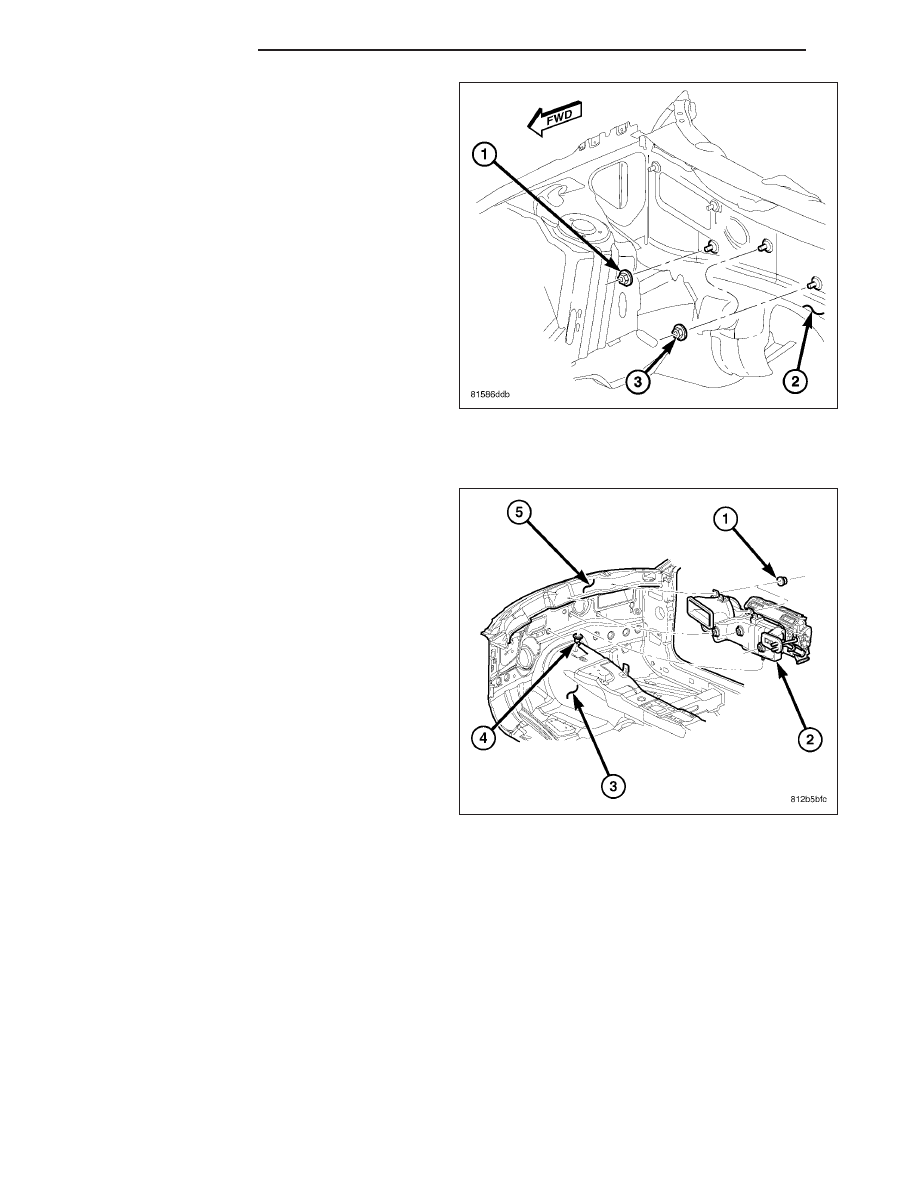
7. Remove the three nuts (1 and 3) that secure the HVAC housing to the engine compartment side of the dash

panel (2).

8. Remove the instrument panel from the passenger

compartment (Refer to 23 - BODY/INSTRUMENT
PANEL/INSTRUMENT

PANEL

ASSEMBLY

-

REMOVAL).

9. Disconnect the floor console duct (Refer to 24 -

HEATING & AIR CONDITIONING/DISTRIBUTION/
DUCT-FLOOR CONSOLE - REMOVAL).

10. Disconnect the rear floor distribution ducts (Refer

to 24 - HEATING & AIR CONDITIONING/DISTRI-
BUTION/DUCT-FLOOR

DISTRIBUTION

-

REMOVAL).

11. Remove the defroster ducts (Refer to 24 - HEAT-

ING

&

AIR

CONDITIONING/DISTRIBUTION/

DUCT-DEFROSTER - REMOVAL).

12. Remove the two nuts (1) that secure the HVAC

housing (2) to the passenger compartment side of
the dash panel (5).

13. Pull the HVAC housing assembly rearward so that

the mounting studs clear the dash panel.

14. Lift the HVAC housing assembly upwards so that the condensate drain tube clears the grommet (4) in the floor

panel (3) and remove the HVAC housing assembly from the passenger compartment.

15. If required, disassemble the HVAC housing assembly (Refer to 24 - HEATING & AIR CONDITIONING/DISTRI-

BUTION/HOUSING-HVAC - HOUSING-HVAC ASSEMBLY - DISASSEMBLY).

HOUSING-FRESH AIR INLET

WARNING: Refer to the applicable warnings and cautions for this system before performing the following
operation (Refer to 24 - HEATING & AIR CONDITIONING/PLUMBING - WARNINGS) and (Refer to 24 - HEAT-
ING & AIR CONDITIONING/PLUMBING - CAUTIONS). Failure to follow the warnings and cautions could result
in possible personal injury or death.

NOTE: The fresh air inlet housing must be removed from the vehicle for removal of the HVAC housing.

NOTE: LHD model shown in illustrations. RHD model similar.

24 - 394

DISTRIBUTION

LX

1. Disconnect and isolate the negative battery cable.

2. Remove the cowl top panel from the dash panel

(Refer to 23 - BODY/EXTERIOR/PANEL-COWL
TOP - REMOVAL).

3. Remove the two bolts (1) that secure the strut sup-

port (2) to the driver side strut tower (3).

4. Disengage the wiper motor (5) from the bracket (4)

located on the strut support.

5. Disengage the retainer that secures the wire har-

ness (4) to the bottom of the strut support (3).

6. On LHD models, remove the purge solenoid (5)

from its mounting bracket and position the solenoid
out of the way.

7. Remove the two bolts (1) that secure the strut sup-

port to the passenger side strut tower (6) and
remove the support from the engine compartment.

8. Position the powertrain control module (PCM) or

the engine control module (ECM) (2) (depending
on engine application) out of the way.

9. Remove the push-pin retainer (1) that secures the

fresh air inlet housing (2) to the passenger side
inner fender (6).

10. Disengage the wire harness retainer (3) from

inside the bottom of the fresh air inlet housing, if
equipped.

11. Remove the push-pin retainer (5) that secures the

insulator (4) to the front of the fresh air inlet hous-
ing and position the insulator out of the way.

LX

DISTRIBUTION

24 - 395

12. Remove the two nuts (1) that secure the fresh air

inlet housing (4) and water separator (2) or partic-
ulate air filter (6) and filter housing (5) (depending
on application) to the dash panel (3).

13. Remove the fresh air inlet housing and water sep-

arator or particulate air filter and filter housing
(depending on application) as an assembly from
the dash panel.

DISASSEMBLY

HOUSING-AIR DISTRIBUTION

NOTE: The air distribution housing must be removed from the HVAC housing and disassembled for service
of the mode-air and blend-air doors.

NOTE: LHD model shown in illustrations. RHD model similar.

1. Remove the air distribution housing (1) from the

HVAC housing and place it on a workbench (Refer
to 24 - HEATING & AIR CONDITIONING/DISTRI-
BUTION/HOUSING-HVAC - HOUSING-AIR DIS-
TRIBUTION - REMOVAL).

2. Remove the screws (2) that secure the mode door

actuator (4) and the blend door actuator (7) to the
driver side of the air distribution housing and
remove the actuators.

3. Remove the screws (5) that secure the blend door

actuator mounting bracket (6) and the mode door
actuator mounting bracket (3) to the driver side of
the air distribution housing and remove the mount-
ing brackets.

24 - 396

DISTRIBUTION

LX

4. Remove the instrument panel door linkage (3) from

the pivot shaft located on the driver side of the air
distribution housing (8) and carefully disconnect the
linkage rod (2) from the instrument panel door lever
(1).

5. Remove the defrost/demister door linkage (7) from

the pivot shaft on the air distribution housing and
carefully disconnect the linkage rod (12) from the
defrost/demister door lever (11).

6. Remove the mode door cam (6) from the air distri-

bution housing.

7. Remove the floor door linkage (5) from the floor

door lever (4) and the air distribution housing.

8. Remove the blend door cam (9) from the blend

door lever (10) and the air distribution housing.

9. Remove the screw (1) that secures the heater core

retaining bracket (2) to the driver side of the air dis-
tribution housing (3) and remove the bracket.

10. Carefully pull the heater core (4) out of the air dis-

tribution housing.

11. If equipped with dual zone heating-A/C, remove

the screws (1) that secure the blend door actuator
(2) to the passenger side of the air distribution
housing (3) and remove the actuator.

12. Remove the screws (4) that secure the blend door

actuator mounting bracket (5) to the passenger
side of the air distribution housing and remove the
mounting bracket.

LX

DISTRIBUTION

24 - 397


Content   ..  2338  2339  2340  2341   ..