Chrysler 300/300 Touring/300C, Dodge Magnum. Manual - part 2123


  Index      Chrysler     Chrysler 300/300 Touring/300C, Dodge Magnum - service repair manual


Search            


Content   ..  2121  2122  2123  2124   ..


Chrysler 300/300 Touring/300C, Dodge Magnum. Manual - part 2123


GLASS

REMOVAL

1. Remove the trim panel from the inside of the front

door. (Refer to 23 - BODY/DOOR - FRONT/TRIM
PANEL - REMOVAL).

2. Remove the speaker from the inside of the front

door. (Refer to 8 - ELECTRICAL/AUDIO/SPEAKER
- REMOVAL).

3. Remove the inner belt weatherstrip from the front

door.

(Refer

to

23

-

BODY/WEATHERSTRIP/

SEALS/DOOR INNER BELT WEATHERSTRIP -
REMOVAL - FRONT).

4. Remove the watershield from the inside of the front

door. (Refer to 23 - BODY/DOOR - FRONT/WA-
TERSHIELD - REMOVAL).

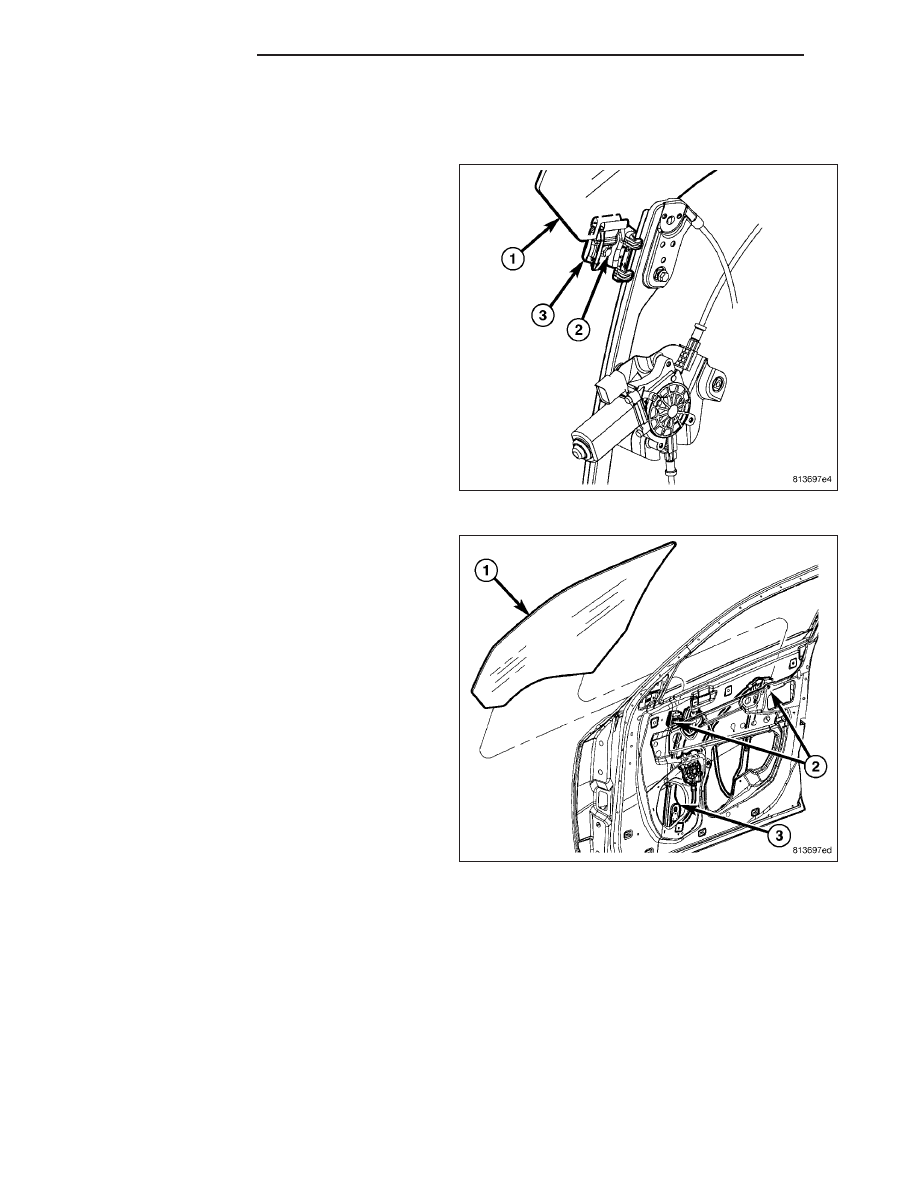
5. Using the regulator, adjust the front door glass (1)

position up or down as required for access to the
two window regulator glass clamps (3).

6. Loosen the screw (3) in each of the glass clamps

far enough to release the glass.

7. From the outside of the front door, lift the glass (1)

upward far enough to disengage it from the two
glass clamps (2).

8. Lift the rear side of the glass upward and out from

the top of the door shell first to unload the glass
from the door.

23 - 40

DOOR - FRONT

LX

INSTALLATION

1. From the outside of the front door, insert the front

side of the glass (1) into the top of the door shell
first to load the glass into the door.

2. Engage the glass into the two window regulator

glass clamps (2).

3. Using the regulator, lower the window as required

for access to the two window regulator glass clamp
screws (2).

4. Tighten the screw in each of the glass clamps.

Tighten the screws to 10 N·m (90 in. lbs.).

5. Reinstall the watershield onto the inside of the front

door. (Refer to 23 - BODY/DOOR - FRONT/WA-
TERSHIELD - INSTALLATION).

6. Reinstall the inner belt weatherstrip onto the front

door.

(Refer

to

23

-

BODY/WEATHERSTRIP/

SEALS/DOOR INNER BELT WEATHERSTRIP -
INSTALLATION - FRONT).

7. Reinstall the speaker onto the inside of the front

door. (Refer to 8 - ELECTRICAL/AUDIO/SPEAKER
- INSTALLATION).

8. Reinstall the trim panel onto the inside of the front

door. (Refer to 23 - BODY/DOOR - FRONT/TRIM
PANEL - INSTALLATION).

LX

DOOR - FRONT

23 - 41

HINGE

REMOVAL

1. Remove the front door from the vehicle. (Refer to

23 - BODY/DOOR - FRONT/DOOR - REMOVAL).

2. Mark the upper or lower hinge bracket (2) location

on the outside of the lower A-pillar to aid reinstal-
lation.

3. Remove the screws (1) that secure the hinge

bracket to the outside of the lower A-pillar.

4. Remove the hinge bracket from the A-pillar.

5. Mark the upper (1) or lower (4) door hinge location

on the hinge face of the front door (2) to aid rein-
stallation.

6. Remove the screw (5) that secures the hinge to the

door.

7. Remove the nut (3) that secures the hinge to the

stud on the door.

8. Remove the upper or lower hinge from the hinge

face of the door.

23 - 42

DOOR - FRONT

LX

INSTALLATION

1. Position the upper (1) or lower (4) hinge to the

hinge face of the front door.

2. Install and tighten the nut (3) that secures the

hinge to the stud on the door. Tighten the nut to 28
N·m (21 ft. lbs.).

3. Install and tighten the screw (5) that secures the

hinge to the door. Tighten the screw to 28 N·m (21
ft. lbs.).

4. Position the upper or lower hinge bracket (2) onto

the outside of the lower A-pillar.

5. Install and tighten the three screws (1) that secure

the hinge bracket to the outside of the lower A-pil-
lar. Tighten the screws to 30 N·m (22 ft. lbs.).

6. Reinstall the front door onto the vehicle. (Refer to

23

-

BODY/DOOR

-

FRONT/DOOR

-

INSTALLATION).

LX

DOOR - FRONT

23 - 43


Content   ..  2121  2122  2123  2124   ..