Chrysler 300/300 Touring/300C, Dodge Magnum. Manual - part 1713


  Index      Chrysler     Chrysler 300/300 Touring/300C, Dodge Magnum - service repair manual


Search            


Content   ..  1711  1712  1713  1714   ..


Chrysler 300/300 Touring/300C, Dodge Magnum. Manual - part 1713


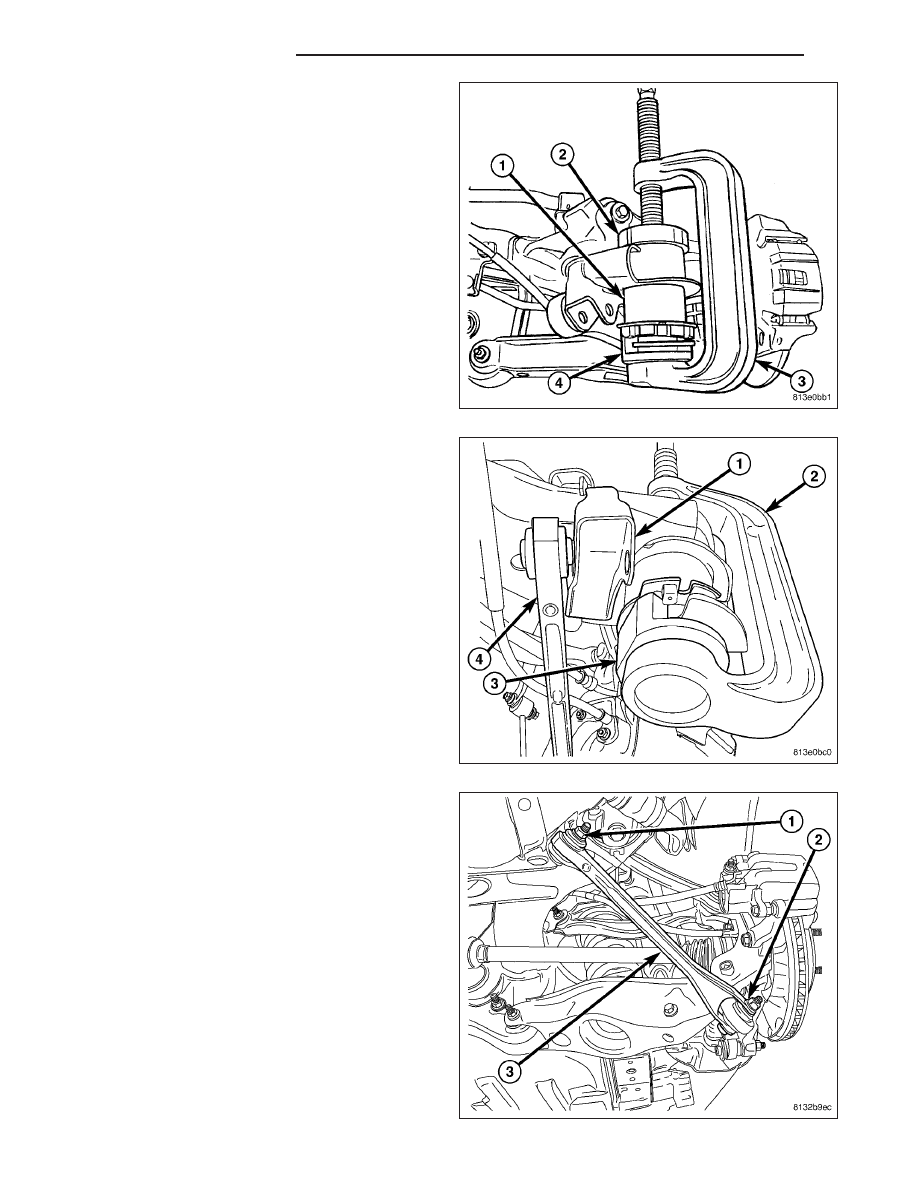
2. Assemble tools (See following list) over bushing

and crossmember as shown.

(2) Receiver 9031-6

(3) Press C-4212F

(4) Installer 9031-7A

NOTE: Ensure Installer (3), Special Tool 9031-7, is
positioned that it will clear compression link
bracket (1) while bushing is being installed.

3. Tighten Press (2) screw-drive, pressing bushing

into crossmember. Install bushing until bushing can
flange contacts surface of crossmember.

4. Remove tools.

5. Verify bushing closely lines up with reference

marks applied during removal.

6. Install bolt and nut as shown (1) fastening com-

pression link (3) to crossmember. Do not tighten
bolt at this time.

13 - 52

FRAME & BUMPERS

LX

NOTE: Do not reinstall coil springs on spring links at this time. Install as directed in later steps.

7. Raise crossmember to body mounting points. As

crossmember is raised, slide propeller shaft (1)
onto rear axle differential flange (2) and align shock
absorbers with pockets in spring links.

NOTE: There are four crossmember mounting
bolts. Rear mounting bolts (2) are longer than
front mounting bolts (3). Do not interchange
mounting bolts.

8. Continue to raise crossmember (1) with jack until

crossmember mounting bolts (2 and 3) can be
installed. Install left side crossmember mounting
bolts, but not the right side bolts. It is not neces-
sary to tighten bolts at this point.

LX

FRAME & BUMPERS

13 - 53

CAUTION: To avoid damaging other components
of vehicle, do not lower crossmember any further
than necessary to install coil spring (2).

9. Slowly lower jack allowing right side of crossmem-

ber to drop. Do not lower jack at a fast rate.
Lower jack just enough to allow spring (2) Installa-
tion. Do not lower jack any further than neces-
sary.

NOTE: Before installing coil spring, make sure iso-
lators (1 and 5) are completely installed on ends of
spring.

10. Install coil spring (2) with isolators into spring

pocket of spring link fitting the lower isolator to the
shape of the pocket, then align top of spring with
body mount.

11. Carefully raise jack, guiding coil spring and lower

end of shock absorber (1) into mounted positions.
Once shock absorber (1) lower mounting hole
lines up with hole in spring link (3), stop jacking.

12. Install lower shock mounting bolt (2) and nut (4).

Do not tighten at this time.

13. If vehicle is equipped with AWD, insert spacers (1)

on top of right crossmember mount bushings (2)
before crossmember is raised into place.

13 - 54

FRAME & BUMPERS

LX

NOTE: There are four crossmember mounting
bolts. Rear mounting bolts (2) are longer than
front mounting bolts (3). Do not interchange
mounting bolts.

14. Raise right side of crossmember (1) into mounted

position. Install right side crossmember mounting
bolts (2 and 3). Snug, but do not fully tighten
bolts at this time.

15. Remove both front and rear crossmember mount-

ing bolts (2 and 3) on left side of vehicle.

CAUTION: To avoid damaging other components
of vehicle, do not lower crossmember any further
than necessary to install coil spring (2).

16. Slowly lower jack allowing left side of crossmem-

ber to drop. Do not lower jack at a fast rate.
Lower jack just enough to allow spring (2) Instal-
lation. Do not lower jack any further than nec-
essary.

NOTE: Before installing coil spring, make sure iso-
lators (1 and 5) are completely installed on ends of
spring.

17. Install coil spring (2) with isolators into spring

pocket of spring link fitting the lower isolator to the
shape of the pocket, then align top of spring with
body mount.

18. Carefully raise jack, guiding coil spring and lower

end of shock absorber (1) into mounted positions.
Once shock absorber (1) lower mounting hole
lines up with hole in spring link (3), stop jacking.

19. Install lower shock mounting bolt (2) and nut (4).

Do not tighten at this time.

LX

FRAME & BUMPERS

13 - 55


Content   ..  1711  1712  1713  1714   ..