Chrysler 300/300 Touring/300C, Dodge Magnum. Manual - part 153


  Index      Chrysler     Chrysler 300/300 Touring/300C, Dodge Magnum - service repair manual


Search            


Content   ..  151  152  153  154   ..


Chrysler 300/300 Touring/300C, Dodge Magnum. Manual - part 153


RWD

CAUTION: Always inspect brake pads before installing disc brake caliper and replace as necessary. (Refer
to 5 - BRAKES/HYDRAULIC/MECHANICAL/BRAKE PADS/SHOES - INSPECTION)

1. Completely retract caliper pistons back into bores of caliper. Use hand pressure or a C-clamp may also be used

to retract pistons, first placing a wood block over piston before installing C-clamp to avoid damaging piston.

CAUTION: Use care when installing caliper onto disc brake adapter to avoid damaging boots on caliper
guide pins.

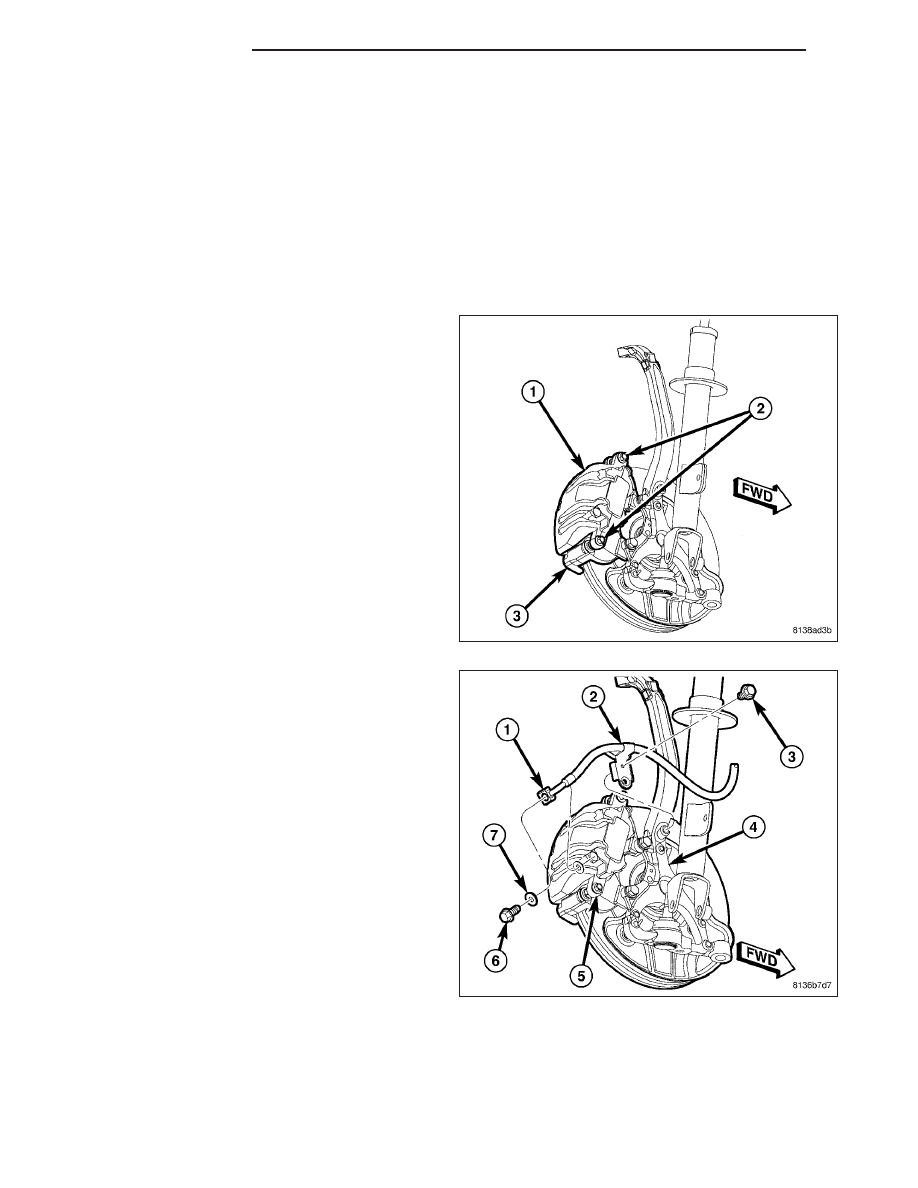
2. Push caliper guide pins into caliper adapter to clear caliper mounting bosses when installing.

3. Slide caliper over brake pads and onto caliper

adapter (3).

CAUTION: Extreme caution should be taken not to
crossthread caliper guide pin bolts (2) when they
are installed.

4. Align caliper mounting holes with guide pins, then

install guide pin bolts (2). While holding guide pins
from turning, tighten bolts to 60 N·m (44 ft. lbs.)
torque.

5. Install banjo bolt (6) attaching brake hose (1) to

caliper (5). Install NEW washers (7) on each side
of hose fitting as banjo bolt is placed through fit-
ting. Thread banjo bolt into caliper and tighten to
50 N·m (37 ft. lbs.) torque.

5 - 54

BRAKES - BASE

LX

6. Install tire and wheel assembly (1). Tighten wheel

mounting nuts (3) to 150 N·m (110 ft. lbs.) torque.
(Refer to 22 - TIRES/WHEELS - INSTALLATION)

7. Lower vehicle.

8. Remove brake pedal holding tool.

9. Connect battery negative cable (2) to battery post.

It is important that this is performed properly. (Refer
to 8 - ELECTRICAL/BATTERY SYSTEM - STAN-
DARD PROCEDURE)

10. Bleed (1) base brake hydraulic system as neces-

sary. (Refer to 5 - BRAKES - STANDARD PRO-
CEDURE)

11. Road test vehicle making several stops to wear off

any foreign material on brakes and to seat brake
shoes.

LX

BRAKES - BASE

5 - 55

CALIPER - FRONT DISC BRAKE - SRT8

REMOVAL

NOTE: Before proceeding, (Refer to 5 - BRAKES - WARNING) (Refer to 5 - BRAKES - CAUTION).

1. Disconnect and isolate battery negative cable (2)

from battery post.

2. Using a brake pedal holding tool, depress brake

pedal past its first inch of travel and hold it in this
position. Holding pedal in this position will isolate
master cylinder from hydraulic brake system and
will not allow brake fluid to drain out of brake fluid
reservoir while brake lines are open.

3. Raise and support vehicle. (Refer to LUBRICATION

&

MAINTENANCE/HOISTING

-

STANDARD

PROCEDURE)

4. Remove wheel mounting nuts (3), then tire and

wheel assembly (1).

5 - 56

BRAKES - BASE

LX

5. Remove banjo bolt (4) connecting flexible brake

hose (5) to caliper (1). There are two sealing wash-
ers (2, 3) (one one each side of hose fitting) that
will come off when bolt is removed. Discard these
washers; use NEW washers upon installation.

CAUTION: When pushing pistons back into caliper bores, use only a trim stick as shown or other suitable
soft tool. Never use a screwdriver or other metal pry bar due to potential damage to braking surface of
rotor, caliper, pistons or dust boots.

6. Place trim stick (4) between brake pad (2) and

outer edge of rotor (3).

7. Using trim stick, slowly apply pressure against

brake pad (2) until both pistons (on that side of cal-
iper) are completely bottomed in bores of caliper
half.

NOTE: Repeat above procedure to opposite brake
pad (1) and pistons as necessary.

LX

BRAKES - BASE

5 - 57


Content   ..  151  152  153  154   ..