Chery Tiggo T11 LHD. Manual - part 128


  Index      Chery     Chery Tiggo T11 LHD - service repair manual


Search            


Content   ..  126  127  128  129   ..


Chery Tiggo T11 LHD. Manual - part 128


Chery International                          Emergency Assistance

4.

Please   make   passengers   leave
the vehicle.

5.

Use   the   appropriate   wheel
stopper to secure the vehicle to
avoid   tumbling   or   slipping,   if
necessary. 

6.

Insert a flat screwdriver into the
space between the steel ring and
hub cap, and then turn it carefully
to remove the hub cap. 
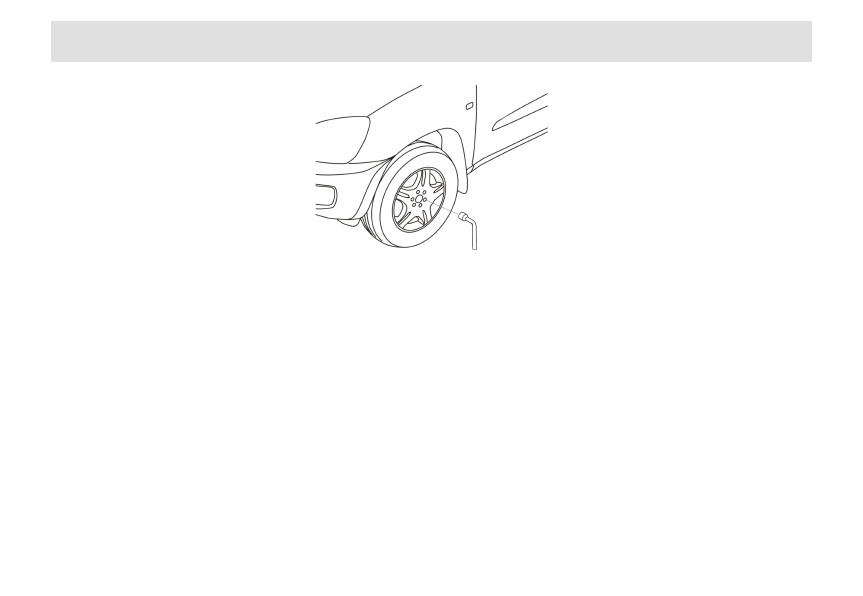
7.

Use the special tool to unscrew
the   wheel   nuts,   shown   in   the
figure below.

8.

Place  the  jack, and  ensure  that
the   whole   foot   seat   surface   is
situated on the firm ground.

9.

The   jack   must   rise   vertically   to
the lifting point.

10. Lift up the vehicle until the wheel

leaves the ground.

11. Remove the wheel nuts and then

dismount the wheel.

Install the tire

1.

Push   the   wheel   to   the   wheel
cotter,   and   screw   on   the   wheel
nuts   clockwise   and   confirm   that
the tip of any wheel nut faces to
the wheel.

2.

Jack   down   the   vehicle   and
remove the jack.

3.

Fully   screw   up   the   wheel   nuts
with the diagonal screw mode.

4.

Press   the   hub   cap   steadily   into
its   proper   position   by   your   both
hands.

5.

Collect   the   jack   and   disable
wheel   according   to   the   reserve
sequence and fix them.

6.

Please   get   to   the   Chery

Chery International                          Emergency Assistance

Authorized   Service   Station
A.S.A.P. to make the wheel nut
screwing torque and tire pressure
examined.

Chery International                          Emergency Assistance

Battery

Safety recommendations

Take   care   to   apply   the
following


preventive

measures   when   carrying   the
battery.

The   battery   acid   features   with

corrosivity.   Be   sure   to   wear
gloves   and   safety   goggles.   Do
not make acid or lead touch your
skin or clothes. Do not lean the
battery   because   the   acid  liquor
may flow out from the vent. If the
acid  liquor  splashes   into   your
eyes,   please   clean   them
immediately   with  fresh   water   for
several minutes and  then see a
doctor   immediately.   If   the   acid
liquor  splashes   to   your   skin   or
clothes, you can use the alkaline
water   (soap)   to  neutralize   the
acid and then clean it with fresh
water.   If   swallowing   the   acid
liquor,   you   shall   see   a   doctor
immediately. 

Keep   children   away   from   the
battery acid.

The   battery   will   release   the
explosive gas when charging.

Chery International                          Emergency Assistance

Open   flames,   sparks   and
smoking   prohibited.   Please
prevent from the sparks when the
wiring and electric operation are
conducted.   Please   do   not
connect   the   electrodes.   The
resulted   short-circuit   may   create
the   sparks   and   make  people
injured.

There is the high voltage  in the
electronic ignition system. Please
DO   NOT   touch   these
components   in   the   case   of   the
engine   operating   or   the   ignition

switch turning on. 

Disassemble and install

Take   care   to   apply   the
following  

preventive

measures   when   the   battery   is
disassembled and installed.

Your   vehicle   is   equipped   with   a
12   V,   65   A•h,   maintenance-free
lead and acid battery.

The old battery must be replaced
with a new lead and acid battery
when   replacing   the   battery.   Do
not   use   the   other   kinds   of
batteries.   The   current   and
capacity of the new battery must
be   the   same   as   that   of   the   old
battery   or   conform   to   the

specification   of   the   Chery
Company. For the  right,  detailed
specification   of   battery,   please
enquire   the   Chery   Authorized
Service Station.

Please   remove   the   negative   (-)
cable firstly after the ignition and
all electrical equipment are turned
off. 

Please   operate   carefully   and
avoid that the metal tools contact
the  two   electrodes   of  battery
simultaneously  or   contact   the
positive electrode and the vehicle
body by accident. 

When   connecting   the   battery
again,   you   shall   connect  the
positive (+) cable firstly, and then


Content   ..  126  127  128  129   ..