Chery Tiggo T11 LHD. Manual - part 75


  Index      Chery     Chery Tiggo T11 LHD - service repair manual


Search            


Content   ..  73  74  75  76   ..


Chery Tiggo T11 LHD. Manual - part 75


(2)If water or grease is found in these parts,

please check whether there is any leakage
in the oil seal of front cover, the oil seal of
camshaft and water pump.

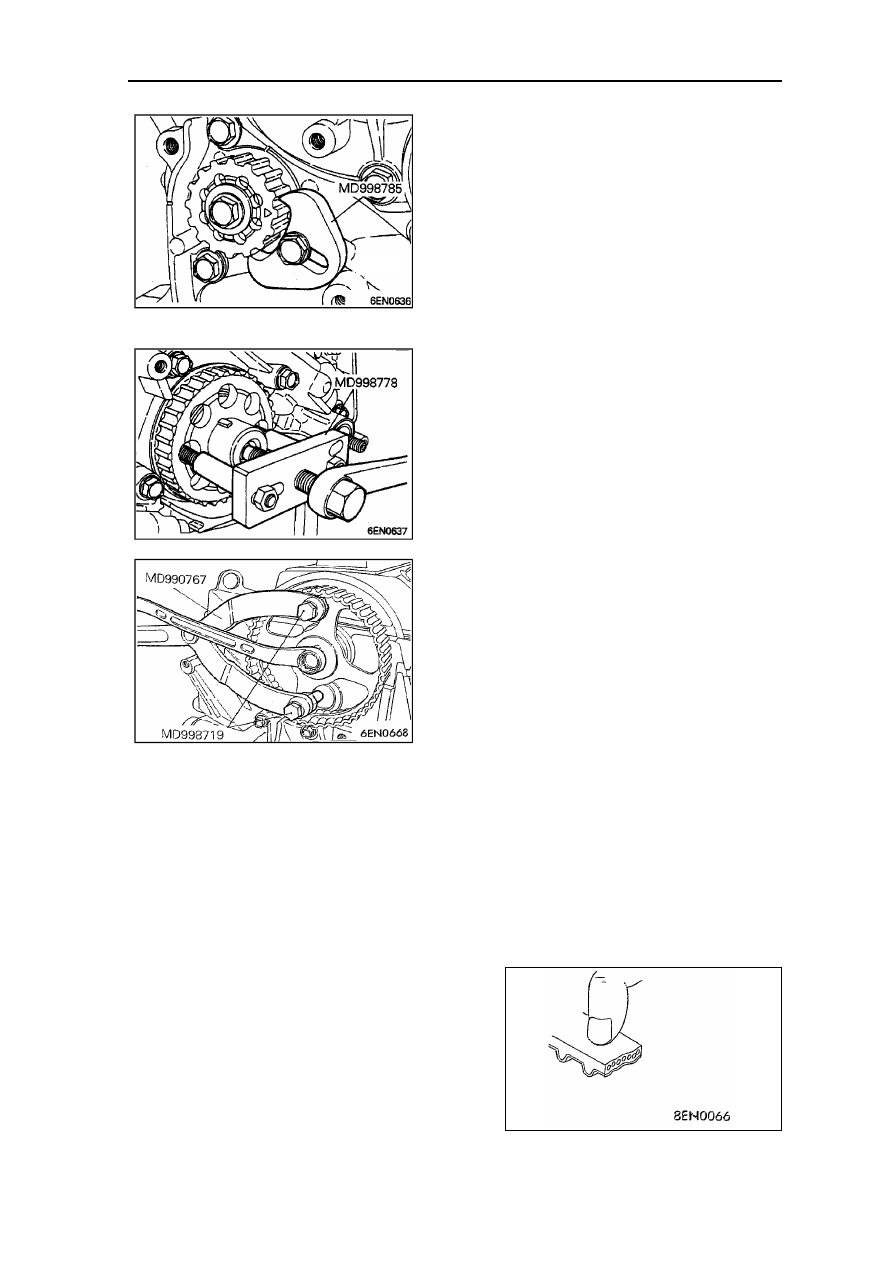
Disassembling   of   pulley   of   upper
balance shaft

(1) Apply tool as shown in the illustration to

fix the pulley of balance gear.

(2) Disassemble the pulley of upper balance

shaft.

Disassembling  of  crankshaft  pulley
B

(1)If it is difficult to disassemble due to the

reason of adhering, please apply special tool.

Disassembling   of  camshaft  pulley
screw bolts

(1) Fix   the   camshaft   timing   pulley   with

special tool.

(2) Disassemble   the   screw   bolts   of

camshaft pulley.

2 Check

Timing belt

Check every part of the belt carefully, if there is any
damage as the following, please replace with new
one.
(1) The back rubber is aging and glistening. There

is   no   crack   when   fingernail   scratches   it   and
there is no flexibility.

(2) There is crack in the back rubber.
(3) There is crack and stripping in the canvas.
(4) There is crack at the bottom of pulley.
(5) There is crack in the side of pulley.
(6) Abnormal abrasion in the side of pulley. When

the side of belt is as smooth as surface of one
cut by sharp knife, it is normal.

(7) Abnormal abrasion in the part of pulley.
(8) Teeth off.

Automatic tensioner

(1) Check   the   leakage   of   automatic   tensioner.

Replace with a new one when necessary.

(2) Check if there is any abrasion or damage at

the end of the rod. Replace with a new one
when necessary.

crack

canvas stripping

side crack

pulley bottom crack

belt corner turning round

abnormal abrasion(belt core reveal)

Canvas 

abrasion,

rubber reveal

pulley fall 
off

plug cock

(3) Measure the stretch of the rod. If it is not

conformed   to   the   standard,   replace   the
automatic tensioner with a new one.

Standard value: 12mm

(4) Press down the rod with a power of 98

196N and measure the rod displacement.

(5) If the rod displacement is 1mm larger than

the   value   measured   in   the   (3)item,   the
automatic tensioner should be replaced.
Standard value: ≤1mm

(6) Fasten   the   automatic   tensioner   with   vises

which has soft opening.

Caution:
·As there is screw bolt stretching out at

the   bottom   of   automatic   tensioner,   a
plain pad should be inserted between
the vises and screw bolt to avoid their
direct contact.

(7) Rotate the handle of vises to push the rod of

automatic tensioner in. If it is easy to push in,
please replace the automatic tensioner with
a   new  one.   It   should   be   felt   as  if   there   is
some resistance when you push in the rod.

Installation Notice

Fasten bolt of camshaft pulley

(1) Fix the camshaft pulley with special tool.
(2) Fasten   the   bolt   of   camshaft   pulley   to   the

assigned torque.

Installation of engine bracket base

(1) Before starting fastening, apply sealant to the

bolt part as shown in the illustration.

12mm

98

~196N

rod

displaceme

nt

plug cock

brass


or

aluminum

 vise

opening

plain pad

brass   or  aluminum  vise

opening

Installation   of   bushing   in   upper
balance shaft

(1)When   installing   the   bushing,   place   the

side with deburring to the direction of oil seal.

Installation   of   pulley   in   upper
balance shaft

(1) Fix pulley in the balance shaft with a tool

as shown in the illustration.

(2) Fasten the bolt to assigned torque.

Installation of timing belt B

(1) Align the marks  on the crankshaft  pulley

and balance shaft pulley with the marks on
the front cover respectively.

(2) Install timing belt B in the crankshaft pulley

and balance shaft pulley. There should not
be loose in the tensioner side.

(3)

Make   sure   that   the   position   of   tensioner

center   and   bolt   center   as   shown   in   the
illustration.

(4)

While putting power on the side of timing
belt tensioner with finger, move tensioner
B according to the arrow. Now fasten the
screw bolt to fix tensioner B.

Caution:  When   fastening   the   bolt,   do   not
keep the axle revolve with the pulley in case
that the belt gets too tight.

timing 

mark

(front 

cap)

timing 

mark

tensiner 

"B"

bolt 
center

tensioner 
pulley 
center

bushing

oil 

seal

balance 

shaft

deburring


Content   ..  73  74  75  76   ..