Chery Tiggo T11 LHD. Manual - part 8


  Index      Chery     Chery Tiggo T11 LHD - service repair manual


Search            


Content   ..  6  7  8  9   ..


Chery Tiggo T11 LHD. Manual - part 8


Chery T11 Service Manual


Body and Accessories   


-30- 


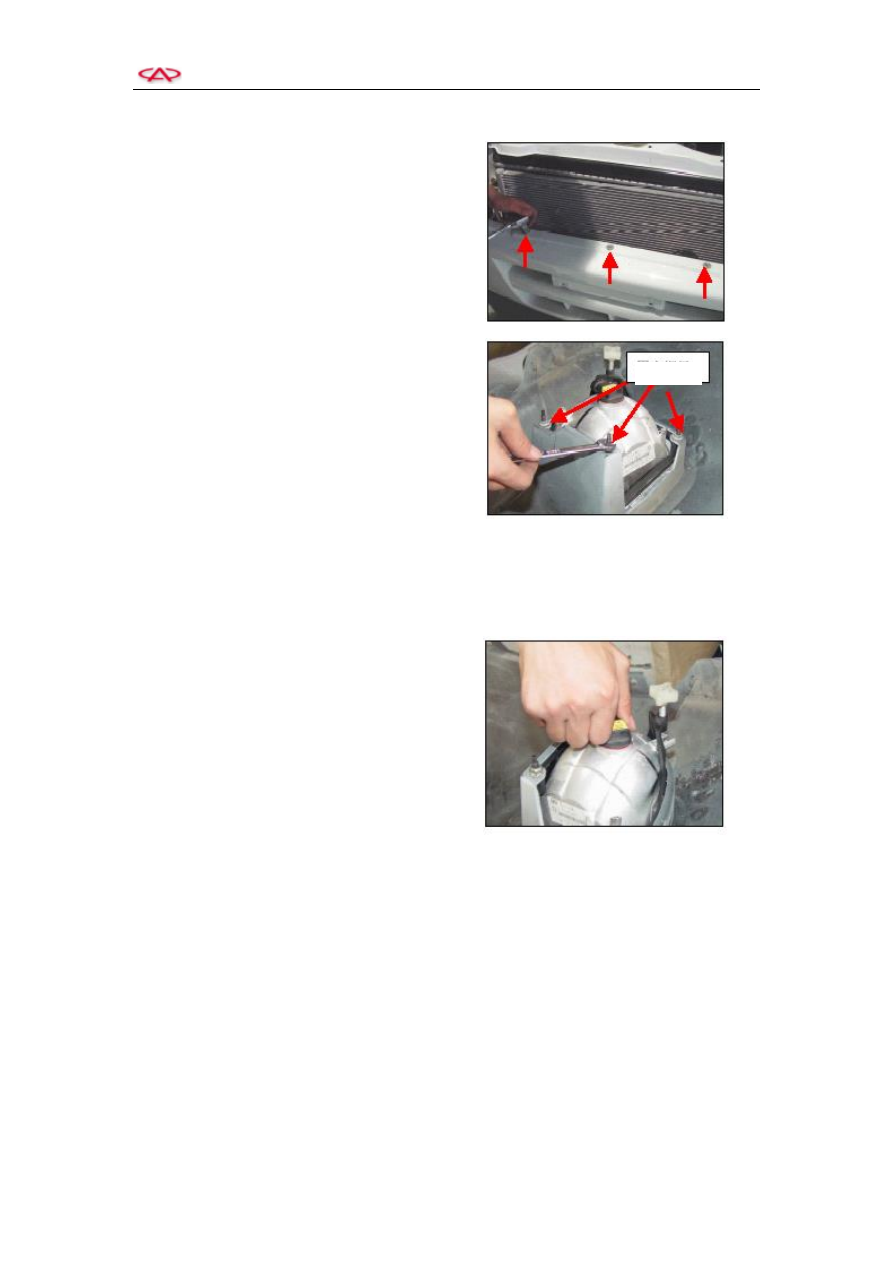
d.  Dismantle the three fixing bolts at the 

top of front bumper.   

e.  Remove  the  bumper  with  attention  to 

the top clips at both sides. Unplug the 
wiring harness for the two foglamps in 
front.   

Note:  Please  don’t  overexert  while  taking  out 

the  wiring  harness  as  well  as  plug  for  the 
foglamp.   


2)  Dismantle front foglamp from the bumper. 

    Dismantle  the  three  nuts  as  shown  by  the 

arrow  by  open  wrench,  and  remove  the 
foglamp  assembly  from  the  front  of  the 
bumper.   

3)  Install in the reversed sequence. 

Torque:   

Fixing of front foglamp 2.0±0.2 Nm     

Q32006 (3 pcs) 


7. Replacement of Fog Lamp Bulb   

1)  Hold  the  backseat  of  the  bulb  and  spin  it 

out in counterclockwise.   

2)  Install the new bulb in clockwise.   

3)  Install the new bulb of foglamp. 


Fixing Nut 

Chery T11 Service Manual


Body and Accessories   


-31- 


8. Taillamp 

1)  Position of each bulb in the taillamp assembly.   


2)  Removal and Installation   

(1)  Open the back door.   

(2)  Dismantle  the  lower  garnish  of  Pillar 

C.   


a.  Dismantle  the  tapping  screw 

under the shield. 


b.  Dismantle  the  tapping  screw 

inside the plug of storing box. 


c.  Remove  the  cage  plate  of  back 

door,  and  dismantle  the  screw 
underneath. 

d.  Remove  the  lower  garnish  of 

Pillar C. 


Position light 

Backup light 

Turning light 

Braking light 

Plug of Storing Box 

Fixing point 

Chery T11 Service Manual


Body and Accessories   


-32- 


(3)  Dismantle  the  three  fixing  nut  from 

the reserved hole on the body. 

(4)  Unplug the taillamp. 

(5)  Pull out the taillamp gentlely.   

(6)  Install in the reversed sequence. 

Torque:   

Fixing nut of taillamp 5±1Nm     

Q3 2005(3 pcs) 


3)  Bulb Replacement 


(1)  Open the plug cover of storing box at 

rear luggage cabin.   


(2)  Prize  up  the  internal  protection  cover 

by  screwdriver.  Screw  out  the  bulbs 
for  sidelamps,  backup  lamp,  turning 
lamp 

and 

stop 

lamp 

counterclockwisely  by  hand  through 
the hole.   

(3)  Replace them with new bulbs. 


Fixing point 

Chery T11 Service Manual


Body and Accessories   


-33- 


9.    License Plate Lamp 

  Removal and installation of license plate lamp 
1)  The lamp for license plate is attached to the 

back bumper by its elastic clip seat at both 
ends.   

2)  For  dismantle,  press  the  clip  seat  by  flat 

screwdriver,  remove  the  lamp  for  license 
plate slowly, and unplug the pluged in.   

3)  For  installation,  insert  the  pluged  in,  then 

push the lamp for license plate in.   


  Replacement of license plate lamp bulb 
   

1)  Screw  off  the  bulb  counterclockwisely 

when  the  lamp  for  license  plate  is  taken 
out.   

2)  Replace it with new bulb.   


10. Removal and Intallation of Side Turning Lamp 

1)  Hold  the  side  turning  lamp  by  hand  and 

pull back to remove the lamp slowly.   

2)  For  installation,  force  it  in  reversed 

direction to the place.   


Content   ..  6  7  8  9   ..