Chery Tiggo T11 LHD. Manual - part 5


  Index      Chery     Chery Tiggo T11 LHD - service repair manual


Search            


Content   ..  3  4  5  6   ..


Chery Tiggo T11 LHD. Manual - part 5


Chery T11 Service Manual


Body and Accessories   


-18- 


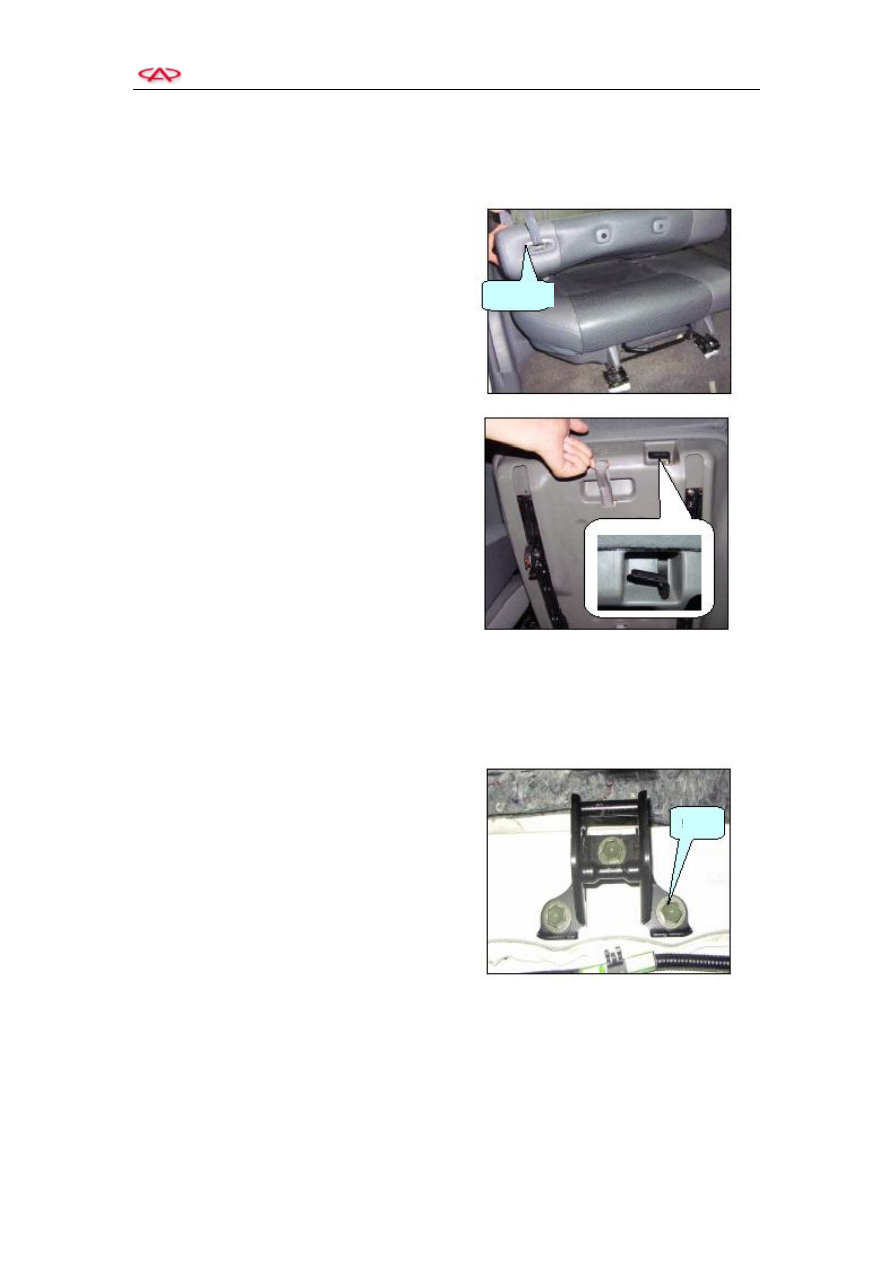
2. Dismantle Right Rear Seat   


1)  Open the back door.   


2)  Pull the switch upward to fold up the right 

rear seat.   

3)  Press  the  switch  of  back  clip  rod  to 

separate  the  back  end  of  the  seat  from  the 
back clip rod.   

4)  Pull up the string behind the seat when it is 

folded  up  to  open  the  lock  in  front  of  the 
seat.   

5)  Now it is possible to lift up the seat.   

6)  Install in the reversed sequence. 


3. Dismantle Erection Base of Rear Seat


Just loosen the 3 fixing bolts.   

Torque:   

25±3Nm     

Q146C1028F30 (3 pcs) 

Note: Please  refer  to  the  removal  procedure  of 
right back seat for the disassembly of left back 
seat.   


Switch Belt 

Bolt 

Chery T11 Service Manual


Body and Accessories   


-19- 

4. Dismantle Safety Belt 

1)  Remove  the  protection  cover  of  upper 

fixing bolts of safety belt.   


2)  Loosen the fixing bolts.   


3)  Remove  the  protection  cover  of  lower 

fixing bolts of safety belt.   


4)  Loosen the fixing bolts.   


Chery T11 Service Manual


Body and Accessories   


-20- 

5)  Remove the lower garnish of pillar C.   

6)  Loosen  the  fixing  bolts  of  safety  belt 

retractor.   

7)  Install in the reversed sequence. 


    Torque:   

    Fix  the  head  plate  of  safety  belt  to  the   

lower part of retractor   

    50±5Nm (1pcs) 

    Fix the adjusting mechanism to sliding rail 

    50+5Nm(1pcs) 


4. Dismantle Roof Headlining


1)  Dismantle the armrest of passenger.   


2)  Remove  the  front  lamp  indoor.  (Please 

refer to section Disassembly of Lamps). 

3)  Remove  the  middle  lamp  indoor.  (Please 

refer to section Disassembly of Lamps). 

4)  Remove  the  front  lamp  indoor.  (Please 

refer to section Disassembly of Lamps). 

5)  Remove the air admission cover.   

6)  Remove the shields of Pillar A, B and C.   

7)  Prize up the fixing clip by flat screwdriver.   

8)  Remove the roof headlining.   

9)  Install in the reversed sequence. 


Fixing Seat B 

Clip   

Headlining 
vent 

Clip   

Chery T11 Service Manual


Body and Accessories   


-21- 

  Exterior 

1. Removal and Installaiton of front door outside handle   

1)  Remove  the  left  front  door  panel  (please 

refer  to  Removal  and  Installaiton  of  Door 
Panel) and then the protection film.   

2)  Prize up the cover in the outside handle. 


3)  Dismantle  the  fixing  bolts  with  hexagon 

spline wrench.   


4)  Detach the lock element from the link rod, 

remove  the  lock  element  and  the  cover  of 
left front door.   


5)  Remove the outside handle.   

6)  Install in the reversed sequence. 

    Torque:   

    Lock element fixing 11Nm   

    T 11-6 105243 (1 piece) 

    Note:  Please  refer  to  section  Disassembly 

and  Assembly  of  Left  Front  Door  for  the 
outer handle of right front door.   


Cover 


Content   ..  3  4  5  6   ..