Chery Tiggo. Manual - part 13


  Index      Chery     Chery Tiggo - service repair manual 2009 year


Search            


Content   ..  11  12  13  14   ..


Chery Tiggo. Manual - part 13


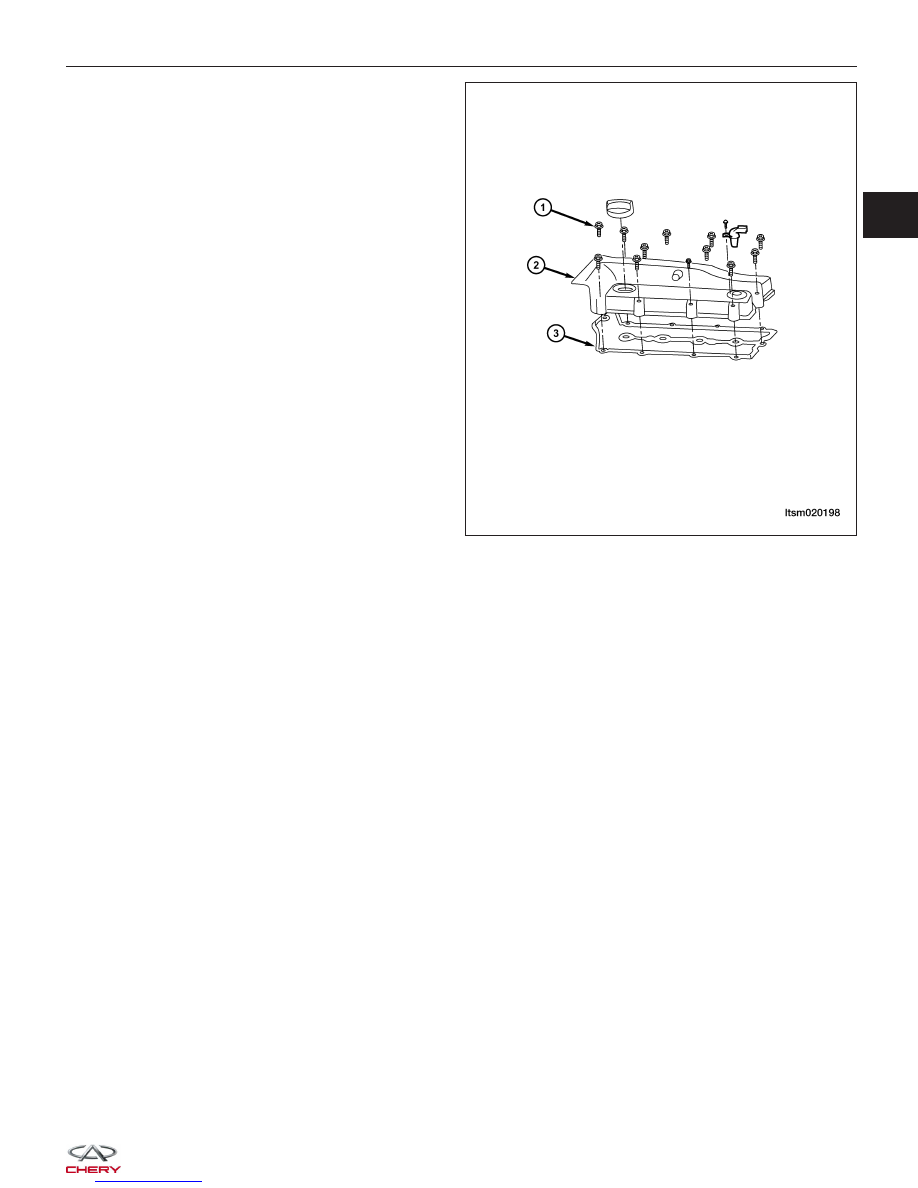
8. Remove the cylinder head cover bolts (1).

(Tighten: Cylinder head cover bolts to 11 N·m)

9. Remove the cylinder head cover (2) from the cyl-

inder head.

10. Remove the cylinder head cover gasket (3).

11. Installation is in the reverse order of removal.

NOTE :
Install a new cylinder head cover gasket during
installation.

Camshaft

Removal & Installation

NOTE :
The following special tools are required to perform the repair procedure:
• CH-20002 - Camshaft Seal Installer

• CH-20010 - Camshaft Holder

1. Remove the accessory drive belt (See Accessory Drive Belt Removal & Installation in Section 02 Engine).

2. Remove the engine timing belt (See Engine Timing Belt Removal & Installation in Section 02 Engine).

3. Remove the cylinder head cover (See Cylinder Head Cover Removal & Installation in Section 02 Engine).

4. Remove the intake or exhaust camshaft timing belt pulley.

(Tighten: Camshaft timing belt pulley bolt to 120 N·m)

ON-VEHICLE SERVICE

LTSM020198

02


5. Remove the rear timing cover of the timing pulley.

(Tighten: Rear timing cover bolts to 7 N·m)

6. Remove the camshaft bearing cap bolts.

(Tighten: Camshaft bearing cap bolts to 11 N·m)

NOTE: Equally loosen camshaft bearing cap bolts
in several steps.

7. Remove the camshaft bearing caps and place

them in proper order.

NOTE: The camshaft bearing caps are marked for
identification.

8. Remove the camshafts and then remove the cam-

shaft seals.

9. Installation is in the reverse order of removal.

ON-VEHICLE SERVICE

BESM020034

BESM020035


Installation Notes:
• Use special tool CH-20010 (1), to install the camshaft holder to hold the camshafts in place.

NOTE :
The camshaft holder will prevent the camshafts from
rotating in either direction.

• Use special tool CH-20002 (1), to install the camshaft seal.

• Install the intake and exhaust camshaft bearing

caps in the proper order.

• Slowly tighten bolts to the specified torque.

• Follow the torque sequence as shown.

ON-VEHICLE SERVICE

BESM020016

LTSM020215

BESM020036

02


Cylinder Head

Removal & Installation

NOTE :
Replacement cylinder head comes complete with valves, seals, springs, retainers, keepers, and camshafts.

1. Remove engine timing belt (See Engine Timing Belt Removal & Installation in Section 02 Engine).

2. Remove the cylinder head cover (See Cylinder Head Cover Removal & Installation in Section 02 Engine).

3. Remove the camshafts (See Camshaft Removal & Installation in Section 02 Engine).

4. Remove intake manifold (See Intake Manifold Removal & Installation in Section 02 Engine).

5. Remove exhaust manifold (See Exhaust Manifold Removal & Installation in Section 02 Engine).

6. Remove water pipe and thermostat assembly.

1 - Rocker Arms

2 - Hydraulic Tappets

3 - Valve Keepers

4 - Valve Spring Upper Retainers

5 - Valve Springs

6 - Valve Oil Seals

7 - Valve Spring Lower Retainers

8 - Valves

ON-VEHICLE SERVICE

LTSM020167


Content   ..  11  12  13  14   ..