Iran Khodro Bardo. Service Manual - part 5


  Index      Manuals     Iran Khodro Bardo. Service Manual


Search            copyright infringement  


Content      ..     3      4      5      6     ..


Iran Khodro Bardo. Service Manual - part 5


-------------------------------------------------------------------------------------------------------------------------------------------------------------

70

4

Warning

Water penetrates through doors 

and windows sealing in some water 

washing systems and damages the 

locks. Do not take high pressure 

water directly on the sensitive parts.

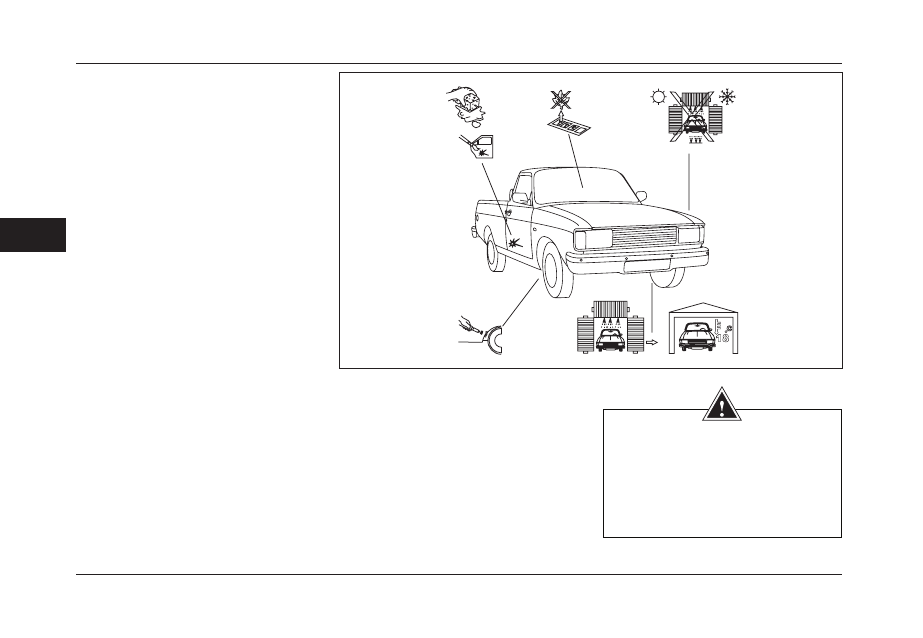
Maintaining  the body

Never: 

park wet vehicle in a very warm (more than 

18 Celsius degree) and confined area.

- Do not forget washing the vehicle after 

driving on the snow and salty mud (especially 

under the body and mud apron.

- Never let the rust of the damaged parts 

(scratches,) comes up to vehicle body.

- Do not wash vehicle under sun or freezing 

weather. 

- First rinse the body, and then clean it. 

- Do not let the foreign material (oil or birds 

dropping) remain on your vehicle. 

- Do not clean bitumen stain by gasoline 

or unsuitable solvents which damage your 

vehicle finish or plastic parts.

Always:

- Drive slowly and maintain your distance 

from front vehicle (small stones damage 

vehicle  finish  or  bottom  parts  of  the 

vehicle.

Wash vehicle frequently, especially when 

you have been driving on the salty roads.

WASHING AND MAINTAINING THE VEHICLE

- Do not park under trees and/or polluted 

areas. 

- Clean salt sediments and mud under 

the vehicle body and mud apron by high 

pressure water. These sediments cause 

corrosion of the vehicle.

- Stain  the wanness  of the vehicle.

Do not hesitate to consult with Iran Khodro 

authorized dealers.

-------------------------------------------------------------------------------------------------------------------------------------------------------------

-------------------------------------------------------------------------------------------------------------------------------------------------------------

71

4

Spotting out

Any damages to the vehicle paint shall be 

cleaned out to  prevent corrosion of the 

vehicle.

Body color number has been indicated 

on  the  identification  plate  (refer  to  the 

dimension section).

Necessary tools for spotting out: 

Paint scraper ,  Anti-rust , Small brush

If the damage is sever and the body 

metal is noticeable 

1- Scrap damaged part by paint scraper to 

level the paint borders

2- Apply anti-rust and allow it to dry, then 

abrade by a very fine abrasive

3- “touch up” the damaged spots lightly 

using the small brush (repeat several 

times). Allow  the paint to dry each time

4- If vehicle paint has polisher, use polisher 

after spotting out to have monotonous paint.

Rusting always threaten Vehicle body. You 

can slow it process by employing certain 

procedures. Iran Khodro has employ 

some approaches such as proper lining 

and paint and also injection of the foam 

within vehicle body.

BODY STAIN REMOVING

Following factors accelerate rusting:

- Driving on the salting icy roads in winter

- Pollution

- Humid weather or near the seas

Lubricate followings:

- Engine cover hinges

- Engine cover lock

- Doors hinges

- Door loops

1

-------------------------------------------------------------------------------------------------------------------------------------------------------------

-------------------------------------------------------------------------------------------------------------------------------------------------------------

72

4

Notice

-The oil must be checked every 400 

kilometer. To make sure, please 

inspect with the specific indicator.

- Using of non-recommended brake 

fluid, will damage the rubber seals of 

break system. Brake fluid damages the 

body painting. Correct and authorized 

usage of oil is recommended.

Oil types 

The frequency and routine change of oils 

in different parts of car is essential factor 

for improving durability and long-lived. 

Therefore oil service should be taken into 

account carefully before traveling. Otherwise 

it creates heavy damages on your vehicle. 

With consideration of different weather and 

temperature conditions, recommended 

lubricant is shown in next page.

CHANGING OIL

-------------------------------------------------------------------------------------------------------------------------------------------------------------

-------------------------------------------------------------------------------------------------------------------------------------------------------------

73

4

OIL TYPES*

*It's recommended to use the approved brands and packages, offered by the Isaco.

Capacity

Oil type*

Component

4.5 litter with filter

3.97 litter without filter

10 W 40  -  20 W 50 

Engine

2 litter

85 W 90

Gearbox (4 speed)

1.2 litter

85 W 90

Differential

0.32 litter

85 W 90

Steering Box

0.568 litter

DOT 3  -  DOT 4

Brakes & Clutch

-------------------------------------------------------------------------------------------------------------------------------------------------------------

-------------------------------------------------------------------------------------------------------------------------------------------------------------

74

4

Warning

- If you drive vehicle with high speed for a long time, check its engine oil level 

frequently.

- In case of any sudden or significant decrease of the vehicle’s fluids and/or uneven 

worn of tire, refer as soon as possible to authorized dealer.

OIL TYPES

Oil Types

Component

Multi Purpose Grease (Grade2) 

Battery Clamps 

Engine Oil 

Hinges, Handles & Locks 

Multi Purpose Grease (Grade2)

Front Wheel Hubs 

Multi Purpose Grease (Grade2)

Handbrake Spring

-------------------------------------------------------------------------------------------------------------------------------------------------------------

-------------------------------------------------------------------------------------------------------------------------------------------------------------

75

4

Warning

- When working on the engine, be 

careful. Engine of the radiator fan may 

start working anytime and cause injury.

- Adding- when adding oil, be careful 

not to pour it on the other parts. There 

is the risk of firing. Do not forget closing 

the cap, otherwise there may be risk of 

the firing due to the oil spattering on 

the hot parts of the engine. 

- Changing engine oil: if you change 

engine oil while engine is still hot, be 

careful, you may be burned due to the 

spattering of the oil.

-  Do  not  start  engine  in  a  confined 

area. Exhaust gasses are poisonous. 

Caution

Never mix the oil with additives. This 

may cause serious damage to the 

engine.

*

 Hard condition: Short and repeatedly stoppage during driving, driving in heavy traffic 

conditions, towing a trailer, high speed prolonged driving, under high loads, frequent 

acceleration and deceleration, short trips with cold engine in low temperature, hot 

weather generally over 30 centigrade, cold weather generally below 15 centigrade, in 

dusty weather, usage of low quality oil / fuel.

Changing engine oil 

The amount of engine oil consumed 

depends on the viscosity the oil, the quality 

of the oil and the conditions* the vehicle is 

driven under. In normal condition the oil 

should be changed within 6000 km and in 

the conditioned as mentioned below (*) it 

should be changed within 4000 km. 

Gearbox oil 

The existing oil in gearbox should be 

checked according to the regular checks 

and services table. 

Iran khodro 4 speed gear box oil must 

be changed after each 2-stage of oil 

change (per 8000 kilometer)

INSPECTION AND REPLACING OIL

-------------------------------------------------------------------------------------------------------------------------------------------------------------

-------------------------------------------------------------------------------------------------------------------------------------------------------------

76

4

Differential oil

When delivering car, the differential box 

has  been  filled  with  oil.  The  oil  should 

be checked in every step of periodical 

services. Check the oil level with the vehicle 

on a level surface. Clean thoroughly all 

around of the filling plug, then remove the 

oil filler plug and finally check the oil level. 

Top up the oil level to the plug thread (1). 

Checking the hydraulic steering 

wheel fluid 

Checking  the  hydraulic  steering  fluid 

every 4000 km. The best way to balance 

the fluid in the system is when the level is 

a little under the oil passage outlet. 

This track is blocked by the rubber lead 

above the steering Reservoir. Always 

use the certified oils and pay attention to 

cleanse the lead and outlet edges while 

pouring oil and after that the said lead 

must be completely closed (2). 

Inspection for front wheels lubrication 

After passing from 8000 kilometers driving, 

front wheels hub must be greased again. 

For this purpose remove the wheel hubcap 

and clean it thoroughly. Then check the 

roller bearing and fill up with grease.

INSPECTION AND REPLACING OIL

-------------------------------------------------------------------------------------------------------------------------------------------------------------

-------------------------------------------------------------------------------------------------------------------------------------------------------------

77

4

Warning

-Brake  fluid  is  very  poisonous  and 

should be kept in a closed container out 

of reach of children. If it is swallowed 

please refer immediately to a doctor.

-Avoid  contacting  of  the  brake  fluid 

with skin and eye. Should it pours on 

the skin; wash it by plenty of water. It 

is get contact with eye refer to a doctor 

after washing the eye with water.

-Be  careful  the  brake  fluid  shall  not 

be poured on the warm engine, 

otherwise there may be firing.

Caution

Brake  fluid  damages  the  painted 

surfaces. First clean the surface by 

a clean cloth and then wash it with 

special shampoo and water.

Brake fluid check 

Pour  brake  fluid  in  a  reservoir  witch  is 

placed in the front of car and in the engine 

compartment near the steering rod. Check 

the brake fluid in the reservoir after within 

1600 kilometers driving and fill up it. Top 

up the brake fluid reservoir till 12 mm to 

the brim if required.

Brake oil should be changed only after 

prolonged distance. If there is a significant 

drop in the brake fluid level – the level of 

the brake fluid must never fall below the 

minimum mark of the reservoir- check 

for the leakage in the brake system and 

have your brake fluid fixed if necessary. 

Make sure the air intake on the brake fluid 

is clean and not clogged; otherwise your 

brake systems may not work well, or they

INSPECTION AND REPLACING OIL

Caution:  Each 4000 km, have the 

brake oil changed. 

-------------------------------------------------------------------------------------------------------------------------------------------------------------

-------------------------------------------------------------------------------------------------------------------------------------------------------------

78

4

Change of air filter (Picture 1 and 2) 

To change air filter easily, the filter housing 

has been fixed on the car body. To remove 

filter, just open the two clamps on the filter.

The oil vapor conditioner and 

penetrating gases of carter reservoir 

To remit the penetrated gases inside the 

carter sump, a three-way and two plastic 

passages  are  plugged  to  the  air  inflow 

pipe and to the gas rectum and by a 

dimmer to air manifold. (Figure 3)

INSPECTION AND REPLACING FILTERS 

-------------------------------------------------------------------------------------------------------------------------------------------------------------

-------------------------------------------------------------------------------------------------------------------------------------------------------------

79

TECHNICAL EMERGENCIES

5

REPLACING TIRES..............................................................80-81

REPLACING LAMPS............................................................82-83

FUES BOX..................................................................................84

TACKLING METHOD IN CASE OF GAS LEAKAGE................85

REPLACING FILTER..................................................................86

* If equipped

-------------------------------------------------------------------------------------------------------------------------------------------------------------

-------------------------------------------------------------------------------------------------------------------------------------------------------------

80

5

Caution

- The wheels must be balanced. 

- Never use jack to repair while going   

under the vehicle 

- To regulate the safety issues, check the 

air pressure of the wheels, including spare 

wheel, while the tires are cold.

Warning

Do not get under your vehicle if it is 

supported only with jack. Jack is only for 

changing wheels. 

- Check the tire pressure after changing 

wheels and make sure the wheel nuts are 

tightened 

- Replace the wheel as soon as it is 

deflated. 

-  Deflated  tire  should  be  inspected  (and 

repaired if necessary) by an expert.

- Park the vehicle on level, stable and non-

slippery ground (for example avoid parking 

on the ceramic surface), (use a bulkhead 

under jack shoe if necessary), turn on the 

flasher blinker light. Apply hand brake and 

engage  first  or  reverse  gear  or  position 

P for automatic gearbox. All occupants 

should be go out of the vehicle to a place 

far from vehicle traffic.

Wheels replacement 

-  Put  the  vehicle  at  the  flat  level,  after 

pulling the handbrake put the automobile 

at gear one or reverse gear 

- The hazard warning triangle is placed 

under the seat (according to announced 

space on the caution box) to procure the 

safety issues while replacing the wheel (2 

on previous page) 

- Remove jack and the wheel brace 

- Open the spare wheel strap and remove 

the spare wheel 

- Loose the wheel nuts and remove the 

wheel trim(wheel cover)by using wheel 

brace 

- Put the Jack at a special place (1) and 

raise the vehicle by turning the jack in 

clockwise direction 

- Unscrew the wheel nuts and remove the 

wheel 

- Replace the spare wheel 

- Tighten the nuts a little 

- Lower and remove the jack 

- Tighten all nuts completely 

- Replace the wheel trims(wheel cover) 

- Put the punctured tires in the place of 

spare wheel and tighten the strap          

- Replace the tires, according to the ( 2 )for 

each 8000 kilometers.

REPLACING TIRES

-------------------------------------------------------------------------------------------------------------------------------------------------------------

-------------------------------------------------------------------------------------------------------------------------------------------------------------

81

5

Warning

- Low pressure of tires causes fatigue, abnormal heating of tires and the following consequences:  

- Malfunctioning in roads.

- Explosion of tire and fatigue of jags.

- The tire pressure must be set according to the weight and speed of the vehicle.

- Fasten valve of the tire properly, so that there won’t be any decrease of pressure from it.

Spare wheel 

It is located under the passenger’s side 

seats. Open it by a finger press (1). Replace 

the wheels, according to the pictures. 

Then put the hook on the holder section of 

the wheel and press it to the wheel side. 

Turning the screw counter- clockwise (to 

the left) tighten it. Always make sure of not 

over-tightening it.

Tools located under the seat 

(Passanger side) 

1- Jack and Spare Tire 

2- Jack Wrench and wheel Brace 

3- Toolbox and Hazard Warning Triangle 

Tool bag contains

1- Ignition wrench

2- Open end wrench 7.16 and 3.8

3- Open end wrench 9.16 and 1.2

4- Double end screwdriver

5- Crosshead screwdriver

6- Pliers

REPLACING TIRES

-------------------------------------------------------------------------------------------------------------------------------------------------------------

-------------------------------------------------------------------------------------------------------------------------------------------------------------

82

5

Warning

Lamps are under vacuum condition. 

They may break during replacing and 

cause injury.

Caution

To lift a new bulb, never touch it with 

your hands. It is recommended to 

take it with a piece of cloth.

Replacing headlamp (2) 

- Open the grill 

- Remove the bayonets around the lamps 

- Loose the main beam headlamp assembly 

- Detach the socket 

- Separate the spring at the back of the lamp

- Replace the lamp

Changing lamps 

Unscrew 1, 2, 3 and 4 screws (1) and 

remove the cover. Push the used lamp 

inside, turn it and then remove it. To put 

the new lamp, push it towards inside and 

then turn it in an anticlockwise direction. 

Replace the bulb.

Replacing instrument panel warning 

lamps

All the warning lamps could be accessible 

simply from the back of the panel. Just 

remove the related lamp and replace it.

REPLACING LAMPS

-------------------------------------------------------------------------------------------------------------------------------------------------------------

-------------------------------------------------------------------------------------------------------------------------------------------------------------

83

5

REPLACING LAMPS

Warning

Check function of the all external lamps before driving To avoid short circuit, switch 

off the lamp key when replacing a lamp.

Lamp specifications table

contacts

Volt

Watt

Lamp location

12 Volt

21 watt

Front / Rear Direction Indicator

Main/Dipped Headlamp

12 Volt

40 and 45  Watt

Head lamp

Main/Dipped Headlamp

12 Volt

21watt (front) and 5 watt (Rear)

Brake lamp

12 Volt

5 watt

License Plate Lamp

12 Volt

2.2 watt

Cluster back light

12 Volt

21 watt

Reverse lamp

12 Volt

5 watt

Side lamp

-------------------------------------------------------------------------------------------------------------------------------------------------------------

-------------------------------------------------------------------------------------------------------------------------------------------------------------

84

5

FUSE BOX

Warning

When one the fuses is blown and blows again 

after replacing with new one, do not replace 

with a more resistant fuse. Refer as soon as 

possible to the Iran Khodro authorized (van) 

dealer. There may be the risk of firing.

Caution

Any alteration (modification) on the electric 

circuit should only be done by the any of 

the authorized dealer which has necessary 

parts available, otherwise only one wrong 

coupling may result to total damage of the 

electric system (wiring, parts and specially 

the alternator).

Fuse box

Ten fuses are set up in the fuse box of the vehicle. 

These fuses are placed at the plastic box engine 

parts. In case one of the fuses break-down, after 

the replacement do not take a step in repairing 

or placing fuse with more resistances and refer to 

Iran Khodro dealer.

Electrical parts for each fuses (1). 

Fuses No.

Fuse type

Electrical parts related to every fuse

F1

F1 Capacity 30

Main Beam Headlamps, Flasher, Digital Clock 

F2

F2 Capacity 20

Start switch Supply, Electronic Control Unit(ECU) 

F3

F3 Capacity 15

Cigarette Lighter, Radio Broadcast Memory 

F4

F4 Capacity 15

Front Lamps, High Beams (right and left) 

F5

F5 Capacity 15

Front Lamps, Low Beams (right and left) 

F6

F6 Capacity 30

Side Lamps, Digital Clock Dimmer and Cigarette Lighter 

F7

F7 Capacity 15

Digital Clock Dimmer, Direction Indicators, Horn 

F8

F8 Capacity 15

Windscreen Wiper, Windscreen Wiper Pump. Injection System 

F9

F9 Capacity 15

Injection System 

F10

F10 Capacity 15

Injection System 

-------------------------------------------------------------------------------------------------------------------------------------------------------------

-------------------------------------------------------------------------------------------------------------------------------------------------------------

85

5

* If equipped

Notice

- any manipulation and doing repairs 

and maintenance of the gas system 

by unauthorized people.

- It spoils the guaranty conditions 

and possible damages and losses. 

Repairing shop personnel only does 

so all the repairs.

-any repair at sumps such as 

replacement or repairing the sump 

head valve or repair and servicing 

regulators is merely done by the trained 

people and authorized by the producer 

companies and at the certified agencies. 

Also while the sump and regulator is 

part of the detectible tools, any repair 

and replacement must be posted at the 

repairing identity ca

Tackling method In case of happening 

any type of gas leakage 

Despite considering many safety points 

at the gas system its necessary to keep 

informed of the following issues: 

- every day inspect the automobile to 

make sure of leaking the gas 

- Any type of gas leakage at the high 

pressure pipe installations at the drivers’ 

cabin or at the load section is transmitted 

out of the cabin by means of conditioning 

muzzle pipe. 

If park the car at the closed places which 

lack conditioning system, you recommend 

you to turn off the head sump valve. 

- In case of happening any leakage and 

smelling gas from trunk compartment or 

inside the room. Put the fuel selection key 

in gasoline mode, turn off the head sump 

valve and refer to the certified agency for 

tackling the error.

TACKLING METHOD IN CASE OF GAS LEAKAGE

-------------------------------------------------------------------------------------------------------------------------------------------------------------


Content      ..     3      4      5      6     ..