Suzuki GSX-R1000. Service Manual - part 32


  Index      Manuals     Suzuki GSX-R1000. Service Manual


Search            copyright infringement  


Content      ..     30      31      32      33     ..


Suzuki GSX-R1000. Service Manual - part 32


4A-8 Brake Control System and Diagnosis: 

8) Loosen the air bleeder valve and pump the brake 

pedal until the old brake fluid flows out of the brake 
system.

9) Close the air bleeder valve and disconnect the clear 

hose.

Tightening torque
Air bleeder valve (Rear caliper):  6 N·m (0.6 kgf-
m, 4.5 lbf-ft)

10) Fill the reservoir with brake fluid to the upper line of 

the reservoir.

11) Bleed air from the brake fluid circuit. Refer to “Air 

Bleeding from Brake Fluid Circuit” (Page 4A-4).

12) Install the diaphragm and reservoir cap.

13) Install the removed parts.

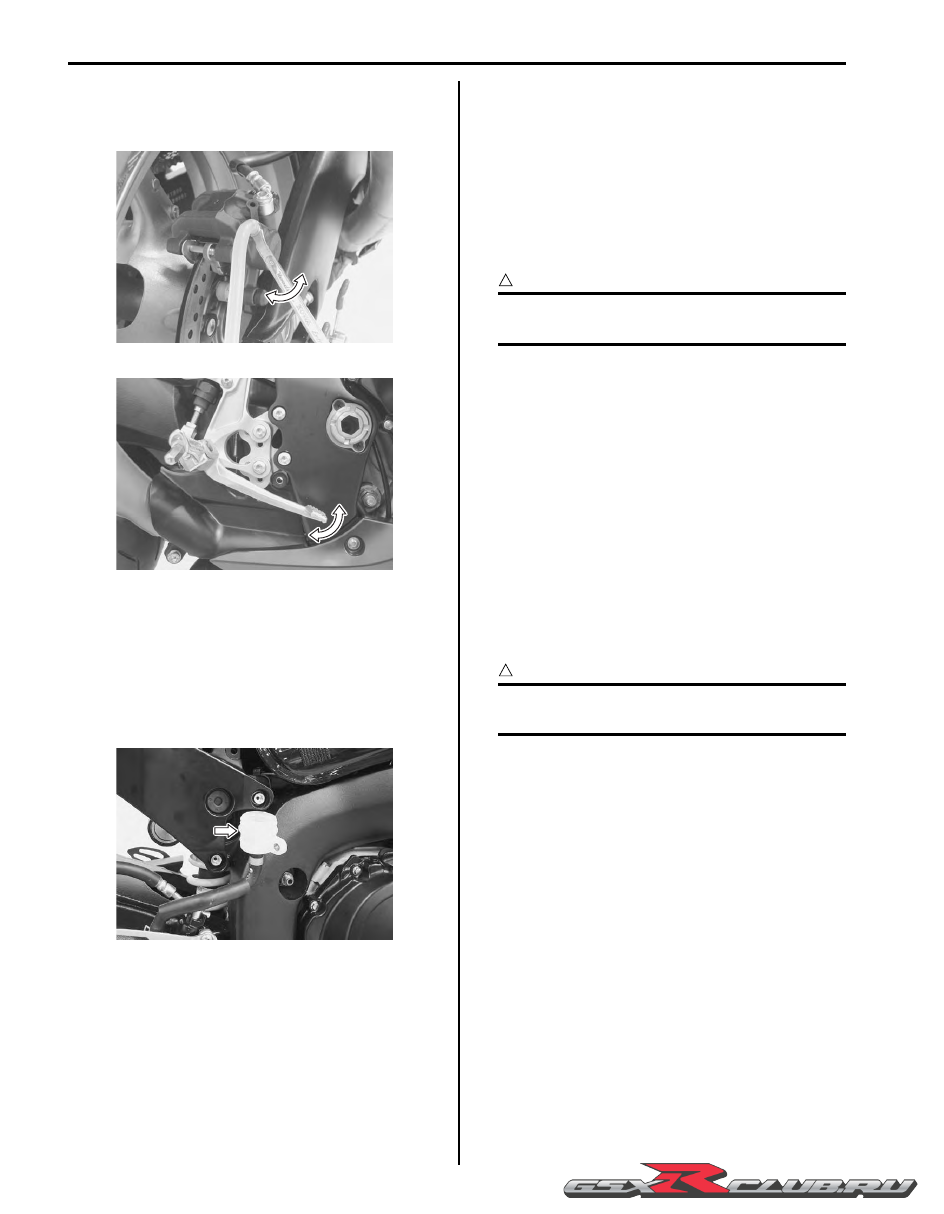
Front Brake Hose Removal and Installation

B947H14106009

Removal

1) Drain brake fluid. Refer to “Brake Fluid 

Replacement” (Page 4A-6).

2) Remove the front brake hoses as shown in the front 

brake hose routing diagram. Refer to “Front Brake 
Hose Routing Diagram” (Page 4A-1)
.

Installation

CAUTION

!


The seal washers should be replaced with the 
new ones to prevent fluid leakage.


1) Install the front brake hose as shown in the front 

brake hose routing diagram. Refer to “Front Brake 
Hose Routing Diagram” (Page 4A-1)
.

2) Bleed air from the front brake system. Refer to “Air 

Bleeding from Brake Fluid Circuit” (Page 4A-4).

Rear Brake Hose Removal and Installation

B947H14106010

Removal

1) Drain brake fluid. Refer to “Brake Fluid 

Replacement” (Page 4A-6).

2) Remove the rear brake hoses as shown in the rear 

brake hose routing diagram. Refer to “Rear Brake 
Hose Routing Diagram” (Page 4A-2)
.

Installation

CAUTION

!


The seal washers should be replaced with 
new ones to prevent fluid leakage.


1) Install the rear brake hose as shown in the rear 

brake hose routing diagram. Refer to “Rear Brake 
Hose Routing Diagram” (Page 4A-2)
.

2) Bleed air from the rear brake system. Refer to “Air 

Bleeding from Brake Fluid Circuit” (Page 4A-4).

I947H1410015-01

I947H1410016-01

I947H1410017-03

-------------------------------------------------------------------------------------------------------------------------------------------------------------

Brake Control System and Diagnosis:  4A-9

Front Brake Master Cylinder Components

B947H14106011

1

2

3

5

6

7

8

11

13

4

FWD

FWD

(b)

9

(a)

12

(c)

10

(a)

12

(a)

12

(e)

(d)

I947H1410051-02

1. Reservoir cap

8. Brake lever

: 1 N

m (0.1 kgf-m, 0.5 lbf-ft)

2. PLATE

9. Brake lever pivot bolt

: 6 N

m (0.6 kgf-m, 4.5 lbf-ft)

3. Diaphragm

10. Brake lever pivot bolt lock-nut

: 10 N

m (1.0 kgf-m, 0.7 lbf-ft)

4. Reservoir tank

11. Brake light switch

: 6 N

m (0.6 kgf-m, 4.5 lbf-ft)

5. Master cylinder

12. Brake hose union bolt

: Apply brake fluid.

6. Dust boot

13. Brake hose

: Apply silicone grease.

7. Piston set

: 23 N

m (2.3 kgf-m, 16.5 lbf-ft)

: Do not reuse.

-------------------------------------------------------------------------------------------------------------------------------------------------------------

4A-10 Brake Control System and Diagnosis: 

Front Brake Master Cylinder Assembly Removal 
and Installation

B947H14106012

Removal

1) Drain brake fluid. Refer to “Brake Fluid 

Replacement” (Page 4A-6).

2) Disconnect the front brake light switch coupler (1).

3) Place a rag underneath the brake hose union bolt (2) 

on the master cylinder to catch any spilt brake fluid.

4) Remove the brake hose union bolt (2).

5) Remove the master cylinder assembly.

Installation

Install the front brake master cylinder in the reverse 
order of removal. Pay attention to the following points:

• When installing the master cylinder (1) onto the 

handlebar, align the master cylinder holder’s mating 
surface “A” with the punch mark “B” on the handlebar 
and tighten the upper holder bolt first.

Tightening torque
Front brake master cylinder holder bolt (Upper 
and Lower) (a):  10 N·m (1.0 kgf-m, 7.0 lbf-ft)

1

2

I947H1410018-02

I947H1410019-02

“C”: Up mark

“a”: Clearance

(a)

1

“A”

“B”

I947H1410020-01

(a)

(a)

“C”

“ a ”

“B”

“A”

1

I947H1410041-01

-------------------------------------------------------------------------------------------------------------------------------------------------------------

Brake Control System and Diagnosis:  4A-11

• After setting the brake hose union to the stopper, 

tighten the union bolt (2) to the specified torque.

CAUTION

!


The seal washers should be replaced with the 
new ones to prevent fluid leakage.


Tightening torque
Brake hose union bolt (b):  23 N·m (2.3 kgf-m, 16.5 
lbf-ft)

• Bleed air from the master cylinder in the same manner 

as caliper side.

NOTE

If air is trapped in the master cylinder, bleed 
air from the master cylinder first.


Tightening torque
Air bleeder valve (Front master cylinder):  6 N·m (
0.6 kgf-m, 4.5 lbf-ft)

• Bleed air from brake system. Refer to “Air Bleeding 

from Brake Fluid Circuit” (Page 4A-4).

Front Brake Master Cylinder / Brake Lever 
Disassembly and Assembly

B947H14106013

Refer to “Front Brake Master Cylinder Assembly 
Removal and Installation” (Page 4A-10).

Disassembly

1) Remove the reservoir cap (1), PLATE (2), diaphragm 

(3) and reservoir tank (4).

2) Remove the brake light switch (5) and brake lever 

(6).

3) Remove the dust boot (7) and push rod (8).

4) Remove the snap ring (9).

(b)

2

I947H1410021-03

I947H1410022-01

1

2

3

4

I947H1410023-01

5

6

I947H1410024-01

7

8

9

I947H1410025-02

-------------------------------------------------------------------------------------------------------------------------------------------------------------

4A-12 Brake Control System and Diagnosis: 

5) Remove the following parts from the master cylinder.

• Piston (10)

• Return spring (11)

• Return spring guide (12)

6) Remove the dust rubber (13) and snap ring (14).

7) Remove the connector (15), O-ring (16) and air 

bleeder valve (17).

Assembly

Assemble the master cylinder in the reverse order of 
disassembly. Pay attention to the following points:

CAUTION

!


• Wash the master cylinder components with 

new brake fluid before reassembly.

• Do not wipe the brake fluid off after 

washing the components.

• When washing the components, use the 

specified brake fluid. Never use different 
types of fluid or cleaning solvents such as 
gasoline, kerosine, etc.

• Apply brake fluid to the master cylinder 

bore and all of the master cylinder 
component to be inserted into the bore.


BF:  Brake fluid  (DOT 4)

• When install the spring guide, insert the spring guide 

end “A” into the hole “B” of the master cylinder.

10

11

12

I947H1410026-01

14

13

I947H1410027-02

15

16

17

I947H1410028-01

I837H1410034-01

“A”

“B”

I947H1410029-01

-------------------------------------------------------------------------------------------------------------------------------------------------------------

Brake Control System and Diagnosis:  4A-13

• Apply grease to the push rod.

:  Grease 99000–25100 (SUZUKI SILICONE 

GREASE or equivalent)

• Apply grease to the brake lever pivot bolt.

:  Grease 99000–25100 (SUZUKI SILICONE 

GREASE or equivalent)

• Tighten the pivot bolt (1) and lock-nut (2) to the 

specified torque.

Tightening torque
Brake lever pivot bolt  (a):  1 N·m (0.1 kgf-m, 0.5 
lbf-ft)
Brake lever pivot bolt lock-nut  (b):  6 N·m (0.6 
kgf-m, 4.5 lbf-ft)

• When installing the brake light switch, align the 

projection “C” on the switch with the hole “D” in the 
master cylinder.

Front Brake Master Cylinder Parts Inspection

B947H14106014

Refer to “Front Brake Master Cylinder / Brake Lever 
Disassembly and Assembly” (Page 4A-11).

Master Cylinder

Inspect the master cylinder bore for any scratches or 
other damage.

Piston / Rubber Parts

Inspect the piston surface for any scratches or other 
damage.
Inspect the primary cup, secondary cup and dust boot 
for wear or damage.

I947H1410030-01

I947H1410031-01

(b)

2

(a)

1

I947H1410032-02

“C”

“D”

I947H1410044-03

I947H1410033-01

I837H1410041-01

-------------------------------------------------------------------------------------------------------------------------------------------------------------

4A-14 Brake Control System and Diagnosis: 

Rear Brake Master Cylinder Components

B947H14106015

FWD

FWD

1

2

3

5

6

9

8

11

10

12

13

4

(a)

7

(a)

7

(c)

(b)

I947H1410052-02

1. Reservoir cap

6. Brake hose

11. Piston/Cup set

: 17 N

m (1.7 kgf-m, 12.5 lbf-ft)

2. PLATE

7. Brake hose union bolt

12. Push rod

: Apply silicone grease.

3. Diaphragm

8. Brake hose connector

13. Dust boot

: Apply thread lock to the thread part.

4. Reservoir tank

9. Master cylinder

: 23 N

m (2.3 kgf-m, 16.5 lbf-ft)

: Apply brake fluid.

5. Reservoir hose

10. Spring

: 10 N

m (1.0 kgf-m, 0.7 lbf-ft)

: Do not reuse.

-------------------------------------------------------------------------------------------------------------------------------------------------------------

Brake Control System and Diagnosis:  4A-15

Rear Brake Master Cylinder Assembly Removal 
and Installation

B947H14106016

Refer to “Rear Brake Hose Routing Diagram” (Page 4A-
2).

Removal

1) Remove the right side frame cover. Refer to “Exterior 

Parts Removal and Installation” in Section 9D 
(Page 9D-6).

2) Remove the rear brake fluid reservoir mounting bolt 

(1).

3) Drain brake fluid. Refer to “Brake Fluid 

Replacement” (Page 4A-6).

4) Place a rag underneath the brake hose union bolt (2) 

on the master cylinder to catch any spilt brake fluid.

5) Remove the brake hose union bolt (2).

6) Loosen the lock-nut (3).

7) Remove the master cylinder mounting bolts (4).

8) Remove the master cylinder along with the reservoir 

by turning the push rod (5).

Installation

Install the rear brake master cylinder in the reverse order 
of removal. Pay attention to the following points:

CAUTION

!


The seal washers should be replaced with the 
new ones to prevent fluid leakage.


• Apply thread lock to the master cylinder mounting 

bolts (1) and tighten them to the specified torque.

:  Thread lock cement 99000–32110 

(THREAD LOCK CEMENT SUPER “1322” or 
equivalent)

• Tighten the lock-nut (2) temporarily.

• After setting the brake hose union to the stopper, 

tighten the union bolt (3) to the specified torque.

Tightening torque
Rear brake master cylinder mounting bolt (a):  10 
N·m (1.0 kgf-m, 7.0 lbf-ft)
Brake hose union bolt (b):  23 N·m (2.3 kgf-m, 16.5 
lbf-ft)

• Bleed air from the brake system after reassembling 

the master cylinder. Refer to “Air Bleeding from Brake 
Fluid Circuit” (Page 4A-4).

• Adjust the brake pedal height. Refer to “Brake Pedal 

Height Inspection and Adjustment” (Page 4A-3).

• Install the removed parts.

1

I947H1410053-01

2

3

5

4

I947H1410034-02

2

(b)

3

(a)

1

I947H1410045-02

-------------------------------------------------------------------------------------------------------------------------------------------------------------

4A-16 Brake Control System and Diagnosis: 

Rear Brake Master Cylinder Disassembly and 
Assembly

B947H14106017

Refer to “Rear Brake Master Cylinder Assembly 
Removal and Installation” (Page 4A-15)
.

Disassembly

1) Disconnect the reservoir hose (1).

2) Remove the lock-nut (2).

3) Remove the brake hose connector (3) and O-ring 

(4).

Special tool

:  09900–06108 (Snap ring remover (Close 

type))

4) Pull out the dust boot (5) and remove the snap ring 

(6).

Special tool

:  09900–06108 (Snap ring remover (Close 

type))

5) Remove the push rod (7), piston/cup set (8) and 

spring (9).

1

2

I947H1410035-02

3

4

I947H1410036-02

5

6

I947H1410037-02

7

8

9

I947H1410054-01

-------------------------------------------------------------------------------------------------------------------------------------------------------------

Brake Control System and Diagnosis:  4A-17

Assembly

Assemble the master cylinder in the reverse order of 
disassembly. Pay attention to the following points:

CAUTION

!


• Wash the master cylinder components with 

new brake fluid before reassembly.

• Do not wipe the brake fluid off after 

washing the components.

• When washing the components, use the 

specified brake fluid. Never use different 
types of fluid or cleaning solvents such as 
gasoline, kerosine, etc.

• Apply brake fluid to the master cylinder 

bore and all of the master cylinder 
component to be inserted into the bore.


BF:  Brake fluid  (DOT 4)

• Apply grease to the push rod end.

:  Grease 99000–25100 (SUZUKI SILICONE 

GREASE or equivalent)

CAUTION

!


Replace the O-ring with a new one.


Rear Brake Master Cylinder Parts Inspection

B947H14106018

Refer to “Rear Brake Master Cylinder Disassembly and 
Assembly” (Page 4A-16).

Master Cylinder

Inspect the master cylinder bore for any scratches or 
other damage.

Piston / Rubber Parts

Inspect the piston surface for any scratches or other 
damage.
Inspect the primary cup, secondary cup and dust boot 
for wear or damage.

I947H1410038-01

I947H1410039-02

1

I947H1410055-01

I947H1410040-02

I837H1410050-01

-------------------------------------------------------------------------------------------------------------------------------------------------------------

4A-18 Brake Control System and Diagnosis: 

Rear Brake Pedal Construction

B947H14106019

Rear Brake Pedal Removal and Installation

B947H14106020

Removal

1) Remove the master cylinder assembly. Refer to 

“Rear Brake Master Cylinder Assembly Removal 
and Installation” (Page 4A-15).

2) Disconnect the rear brake light switch lead wire 

coupler. Refer to “Rear Brake Light Switch 
Inspection” (Page 4A-4).

3) Remove the rear brake pedal as shown in the rear 

brake pedal construction. Refer to “Rear Brake 
Pedal Construction” (Page 4A-18).

Installation

CAUTION

!


Replace the snap ring with a new one.


Install the rear brake pedal as shown in the rear brake 
pedal construction. Refer to “Rear Brake Pedal 
Construction” (Page 4A-18)
.

FWD

FWD

1

2

3

5

4

(a)

(b)

(c)

I947H1410056-02

1. Footrest bracket No. 2

5. Footrest

: Apply grease.

2. Footrest bracket No. 1

: 35 N

m (3.5 kgf-m, 25.5 lbf-ft)

: Apply thread lock to the thread part.

3. Rear brake pedal

: 23 N

m (2.3 kgf-m, 16.5 lbf-ft)

: Do not reuse.

4. Footrest holder

: 18 N

m (1.8 kgf-m, 13.0 lbf-ft)

-------------------------------------------------------------------------------------------------------------------------------------------------------------

Brake Control System and Diagnosis:  4A-19

Specifications

Service Data

B947H14107001

Brake

Unit: mm (in)

Tightening Torque Specifications

B947H14107002

NOTE

The specified tightening torque is described in the following.
“Front Brake Hose Routing Diagram” (Page 4A-1)
“Rear Brake Hose Routing Diagram” (Page 4A-2)
“Front Brake Master Cylinder Components” (Page 4A-9)
“Rear Brake Master Cylinder Components” (Page 4A-14)
“Rear Brake Pedal Construction” (Page 4A-18)


Reference:

For the tightening torque of fastener not specified in this section, refer to “Tightening Torque List” in Section 0C 
(Page 0C-9)
.

Item

Standard

Limit

Rear brake pedal height

65 – 75 (2.6 – 3.0)

Master cylinder bore

Front

17.460 – 17.503 (0.6874 – 0.6891)

Rear

14.000 – 14.043 (0.5512 – 0.5529)

Master cylinder piston diam.

Front

17.417 – 17.444 (0.6857 – 0.6868)

Rear

13.957 – 13.984 (0.5495 – 0.5506)

Brake fluid type

DOT 4

Fastening part

Tightening torque

Note

N

m

kgf-m

lbf-ft

Air bleeder valve (Front caliper)

7.5

0.75 5.

)

(Page 4A-5) / 

)

(Page 4A-7)

Air bleeder valve (Rear caliper)

6

0.6 4.

)

(Page 4A-6) / 

)

(Page 4A-8)

Front brake master cylinder holder bolt (Upper 
and Lower)

10

1.0 7.0 

)

(Page 4A-10)

Brake hose union bolt

23

2.3 16.5 

)

(Page 4A-11) / 

)

(Page 4A-15)

Air bleeder valve (Front master cylinder)

6

0.6 

4.5 

)

(Page 4A-11)

Brake lever pivot bolt 

1

0.1 

0.5 

)

(Page 4A-13)

Brake lever pivot bolt lock-nut 

6

0.6 

4.5 

)

(Page 4A-13)

Rear brake master cylinder mounting bolt

10

1.0 

7.0 

)

(Page 4A-15)

-------------------------------------------------------------------------------------------------------------------------------------------------------------

4A-20 Brake Control System and Diagnosis: 

Special Tools and Equipment

Recommended Service Material

B947H14108001

NOTE

Required service material is also described in the following.
“Front Brake Master Cylinder Components” (Page 4A-9)
“Rear Brake Master Cylinder Components” (Page 4A-14)
“Rear Brake Pedal Construction” (Page 4A-18)


Special Tool

B947H14108002

Material

SUZUKI recommended product or Specification

Note

Brake fluid

DOT 4

)

(Page 4A-6) / 

)

(Page 4A-

7) / 

)

(Page 4A-12) / 

)

(Page 4A-17)

Grease

SUZUKI SILICONE GREASE or 
equivalent

P/No.: 99000–25100

)

(Page 4A-13) / 

)

(Page 4A-13) / 

)

(Page 4A-17)

Thread lock cement

THREAD LOCK CEMENT SUPER 
“1322” or equivalent

P/No.: 99000–32110

)

(Page 4A-15)

09900–06108

09900–25008

Snap ring remover (Close 
type)

Multi circuit tester set

)

(Page 4A-16) / 

)

(Page 4A-16)

)

(Page 4A-3) / 

)

(Page 4A-

4)

-------------------------------------------------------------------------------------------------------------------------------------------------------------

Front Brakes:  4B-1

Brake

Front Brakes

Repair Instructions

Front Brake Components

B947H14206001

1

2

3

5

4

FWD

FWD

(a)

(b)

(c)

(d)

I947H1420020-01

1. Seal set

5. Front brake disc

: 18 N

m (1.8 kgf-m, 13.0 lbf-ft)

2. Piston and seal set

: 7.5 N

m (0.75 kgf-m, 5.5 lbf-ft)

: Apply thread lock to the thread part.

3. Brake pad spring

: 15 N

m (1.5 kgf-m, 11.0 lbf-ft)

: Apply brake fluid.

4. Brake pad set

: 39 N

m (3.9 kgf-m, 28.0 lbf-ft)

: Do not reuse.

-------------------------------------------------------------------------------------------------------------------------------------------------------------

4B-2 Front Brakes: 

Front Brake Pad Inspection

B947H14206002

The extent of brake pads wear can be checked by 
observing the grooved limit line “A” on the pads. When 
the wear exceeds the grooved limit line, replace the 
pads with new ones. Refer to “Front Brake Pad 
Replacement” (Page 4B-2).

CAUTION

!


Replace the brake pad as a set, otherwise 
braking performance will be adversely 
affected.


Front Brake Pad Replacement

B947H14206003

1) Loosen the pad mounting pins (1).

2) Remove the brake caliper by removing the caliper 

mounting bolts (2).

3) Remove the pad mounting pins (1), brake pads and 

spring.

CAUTION

!


Do not operate the brake lever while the pads 
are removed.


NOTE

When removing the pads and pad spring, 
push the pistons all the way into the brake 
caliper.


4) Clean up the caliper especially around the caliper 

pistons.

5) When installing the spring to caliper, bring its wider 

pawl “A” to top side.

6) Install new brake pads and temporarily tighten the 

pad mounting pins.

CAUTION

!


Replace the brake pads as a set, otherwise 
braking performance will be adversely 
affected.


7) Install the brake caliper.

8) Tighten the front brake caliper mounting bolts (2) and 

front brake pad mounting pins (1) to the specified 
torque.

Tightening torque
Front brake caliper mounting bolt (a):  39 N·m (
3.9 kgf-m, 28.0 lbf-ft)
Front brake pad mounting pin (b):  15 N·m (1.5 
kgf-m, 11.0 lbf-ft)

NOTE

After replacing the brake pads, pump the 
brake lever several times to check for proper 
brake operation and then check the brake 
fluid level.


“A”

I947H1420001-02

1

2

I947H1420002-01

“A”

I947H1420018-01

(a)

2

(b)

1

I947H1420003-02

-------------------------------------------------------------------------------------------------------------------------------------------------------------

Front Brakes:  4B-3

Front Brake Caliper Removal and Installation

B947H14206004

NOTE

The right and left calipers are installed 
symmetrically and therefore the removal 
procedure for one side is the same as that for 
the other side.


Removal

1) Drain brake fluid. Refer to “Brake Fluid 

Replacement” in Section 4A (Page 4A-6).

2) Remove the brake hose from the caliper by 

removing the union bolt (1) and catch the brake fluid 
in a suitable receptacle.

NOTE

Place a rag underneath the union bolt on the 
brake caliper to catch any spilt brake fluid.


3) Remove the brake caliper by removing its mounting 

bolts (2).

Installation

Install the brake caliper in the reverse order of removal. 
Pay attention to the following points:

• Tighten each bolt to the specified torque.

Tightening torque
Front brake caliper mounting bolt (a):  39 N·m (3.9 
kgf-m, 28.0 lbf-ft)

• After setting the brake hose union to the stopper, 

tighten the union bolt to the specified torque.

CAUTION

!


The seal washers should be replaced with the 
new ones to prevent fluid leakage.


Tightening torque
Brake hose union bolt (b):  23 N·m (2.3 kgf-m, 16.5 
lbf-ft)

• Bleed air from the brake system after installing the 

caliper. Refer to “Air Bleeding from Brake Fluid 
Circuit” in Section 4A (Page 4A-4).

• Check the brake fluid leakage and brake operation.

WARNING

!


Brake fluid, if it leaks, will interfere with safe 
running and discolor painted surfaces. 
Check the brake hose and hose joints for 
cracks and fluid leakage.


Front Brake Caliper Disassembly and Assembly

B947H14206005

Refer to “Front Brake Caliper Removal and Installation” 
(Page 4B-3)
.

NOTE

The right and left calipers are installed 
symmetrically and therefore the disassembly 
procedure for one side is the same as that for 
the other side.


1

I947H1420019-01

2

I947H1420017-02

(a)

(b)

(a)

I947H1420004-01

-------------------------------------------------------------------------------------------------------------------------------------------------------------


Content      ..     30      31      32      33     ..