SINUMERIK 840D sl. Training. Operate - Turning (2016-2020) - page 17
M600
Basics of programming with ShopMill
Creating ShopMill programs
Creating a new ShopMill program
A new ShopMill program can be created from the operating modes “JOG”, “MDA” and “AUTO” as follows:
Press the “Program Manager“ key on the keyboard.
The window for creating and manage programs opens directly.
See module M575 - “Operating area Program Manager“.
- OR -
Press the “MENU SELECT“ key on the operator panel (OP).
Press the yellow HSK 4 “Program Manager“.
The window for creating and managing programs opens.
- THEN -
Select a storage drive by pressing the horizontal softkey “NC”, “Local drive” or “USB” where
you want to create the program.
Move the orange cursor with the blue cursor-keys to the directory of your choice.
Press the VSK 2 “New”.
The vertical softkey bar with functions for creating new programs opens.
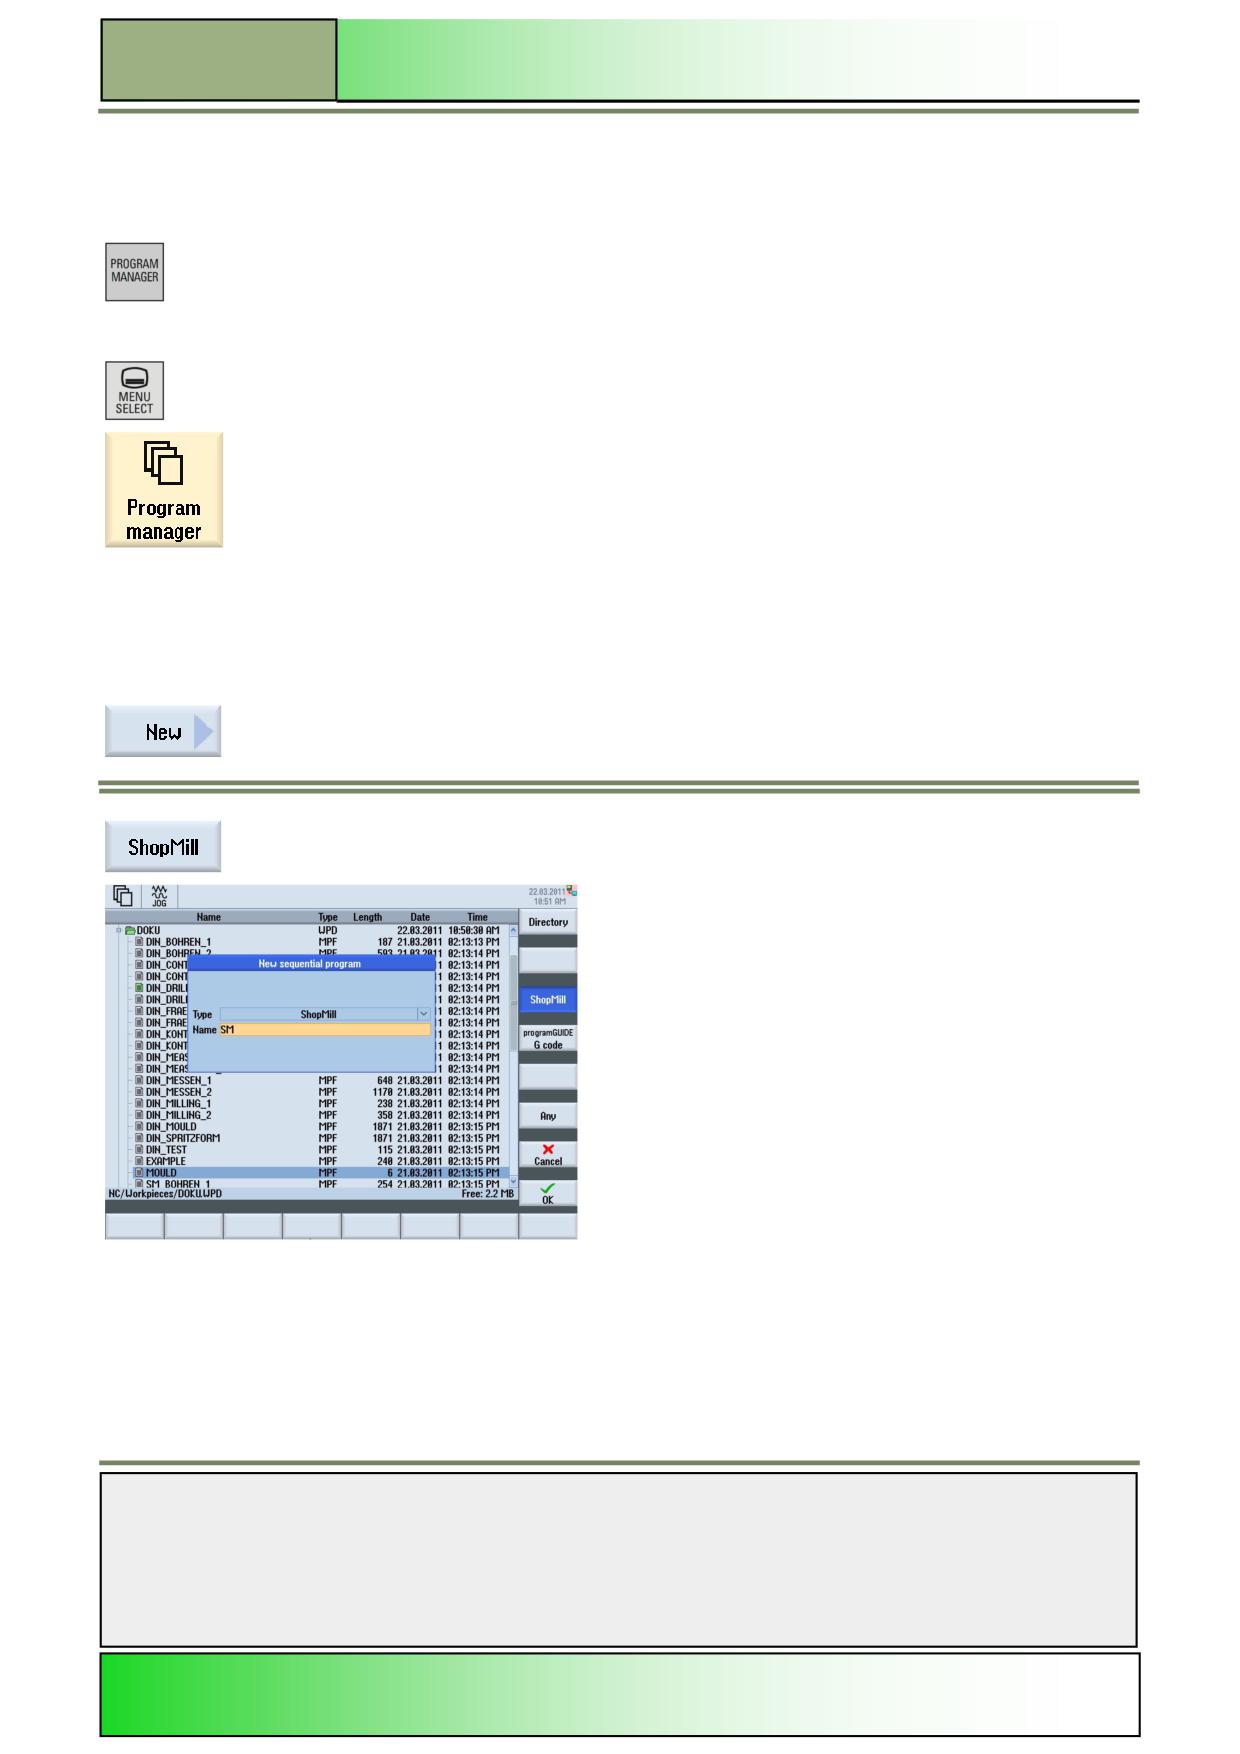
Press the VSK 3 “ShopMill”, to open the input mask for creating a new sequential ShopMill
program, like displayed below.
Notes
M600
Page 8
828D/840Dsl SINUMERIK Operate
Basics of programming with ShopMill
M600
Defining the program header
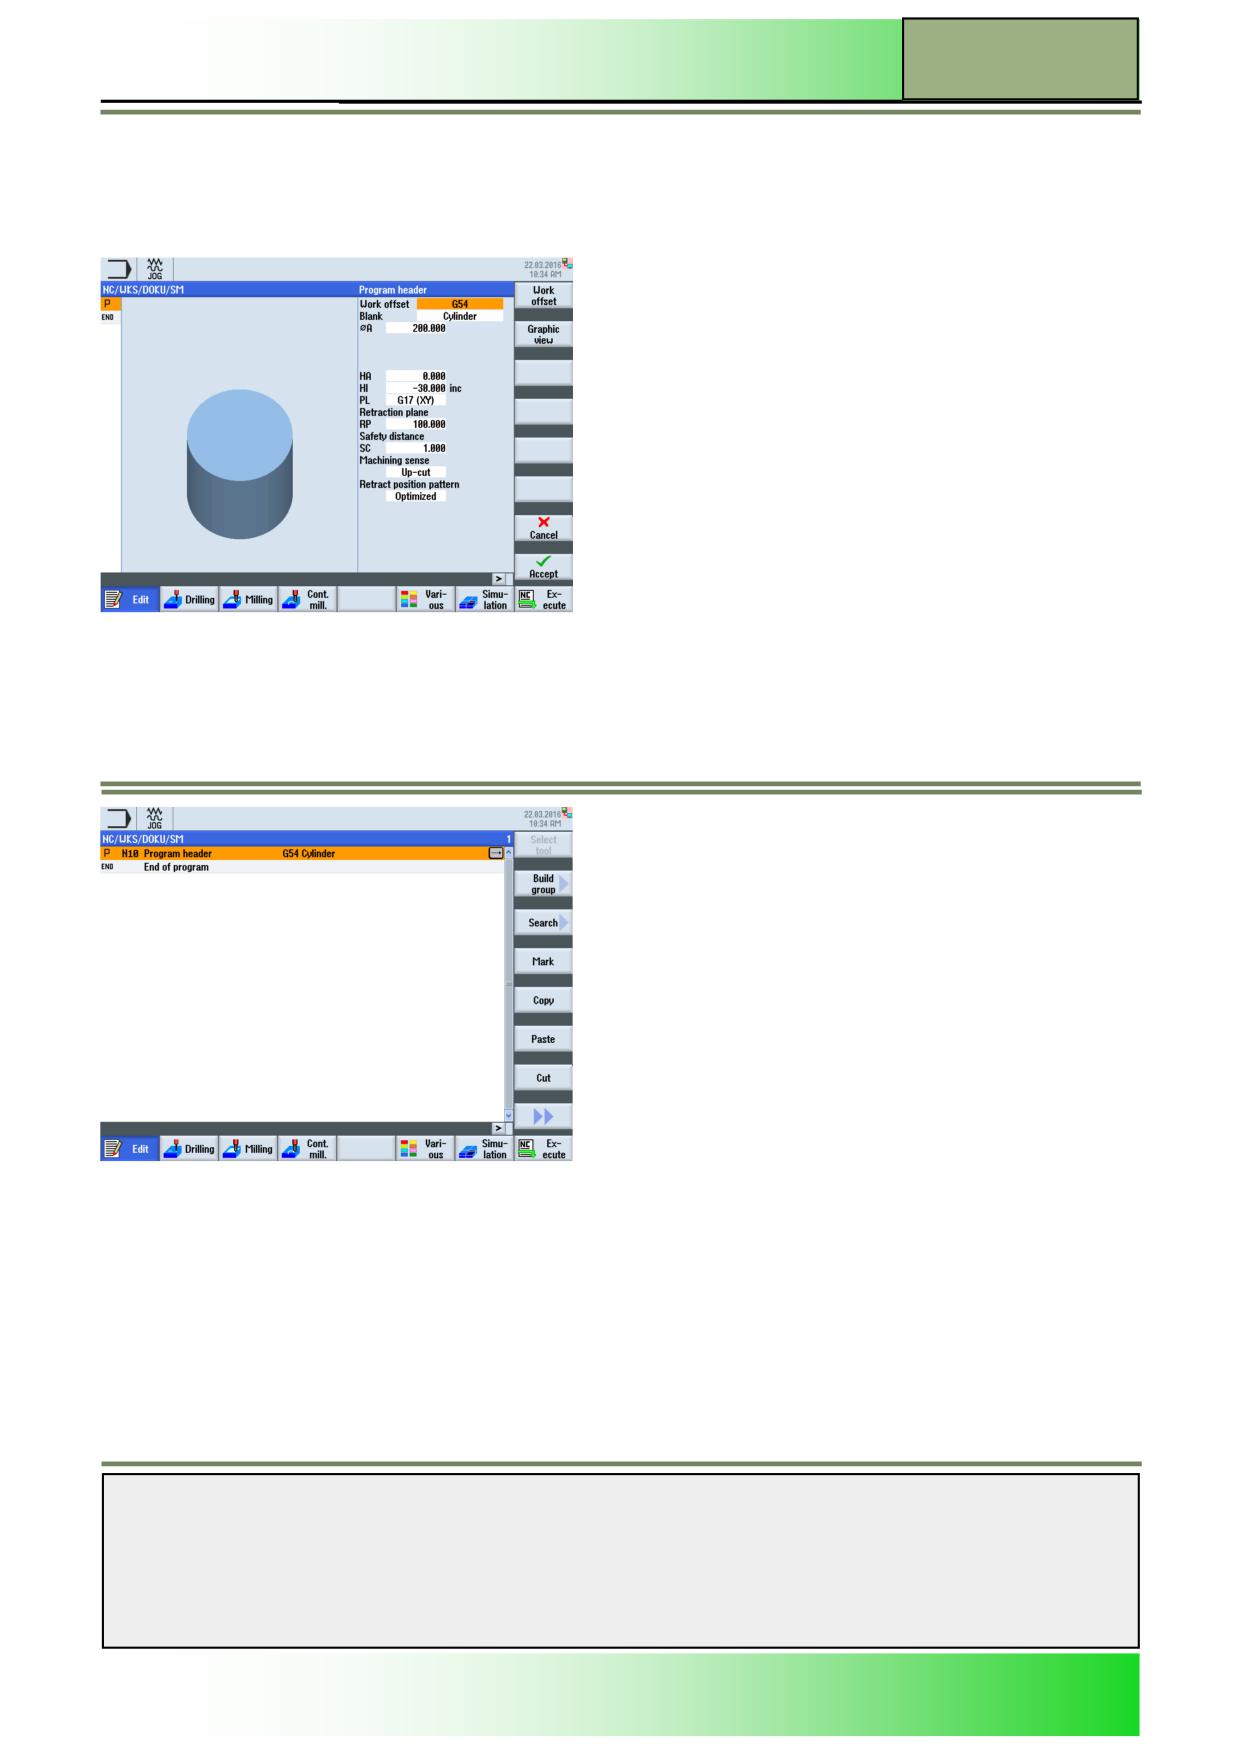
After entering a name for the program and pressing the VSK 8 “OK” the mask for entering the parameters for the program
header opens automatically. Here you can enter parameters for the measuring units, the work offset, blank shape, blank
dimensions, retraction plane, safety distance, machining sense and the retract position patterns (see picture below).
Enter the appropriate parameter values and confirm with pressing the VSK 8 “Accept” or abort with pressing the VSK 7
“Cancel”, to switch back to the editor window.
The view changes to the work plan view in the editor window. Program header and program end are automatically pro-
grammed.
Notes
828D/840Dsl SINUMERIK Operate
Page 9
M600
M600
Basics of programming with ShopMill
Creating program blocks
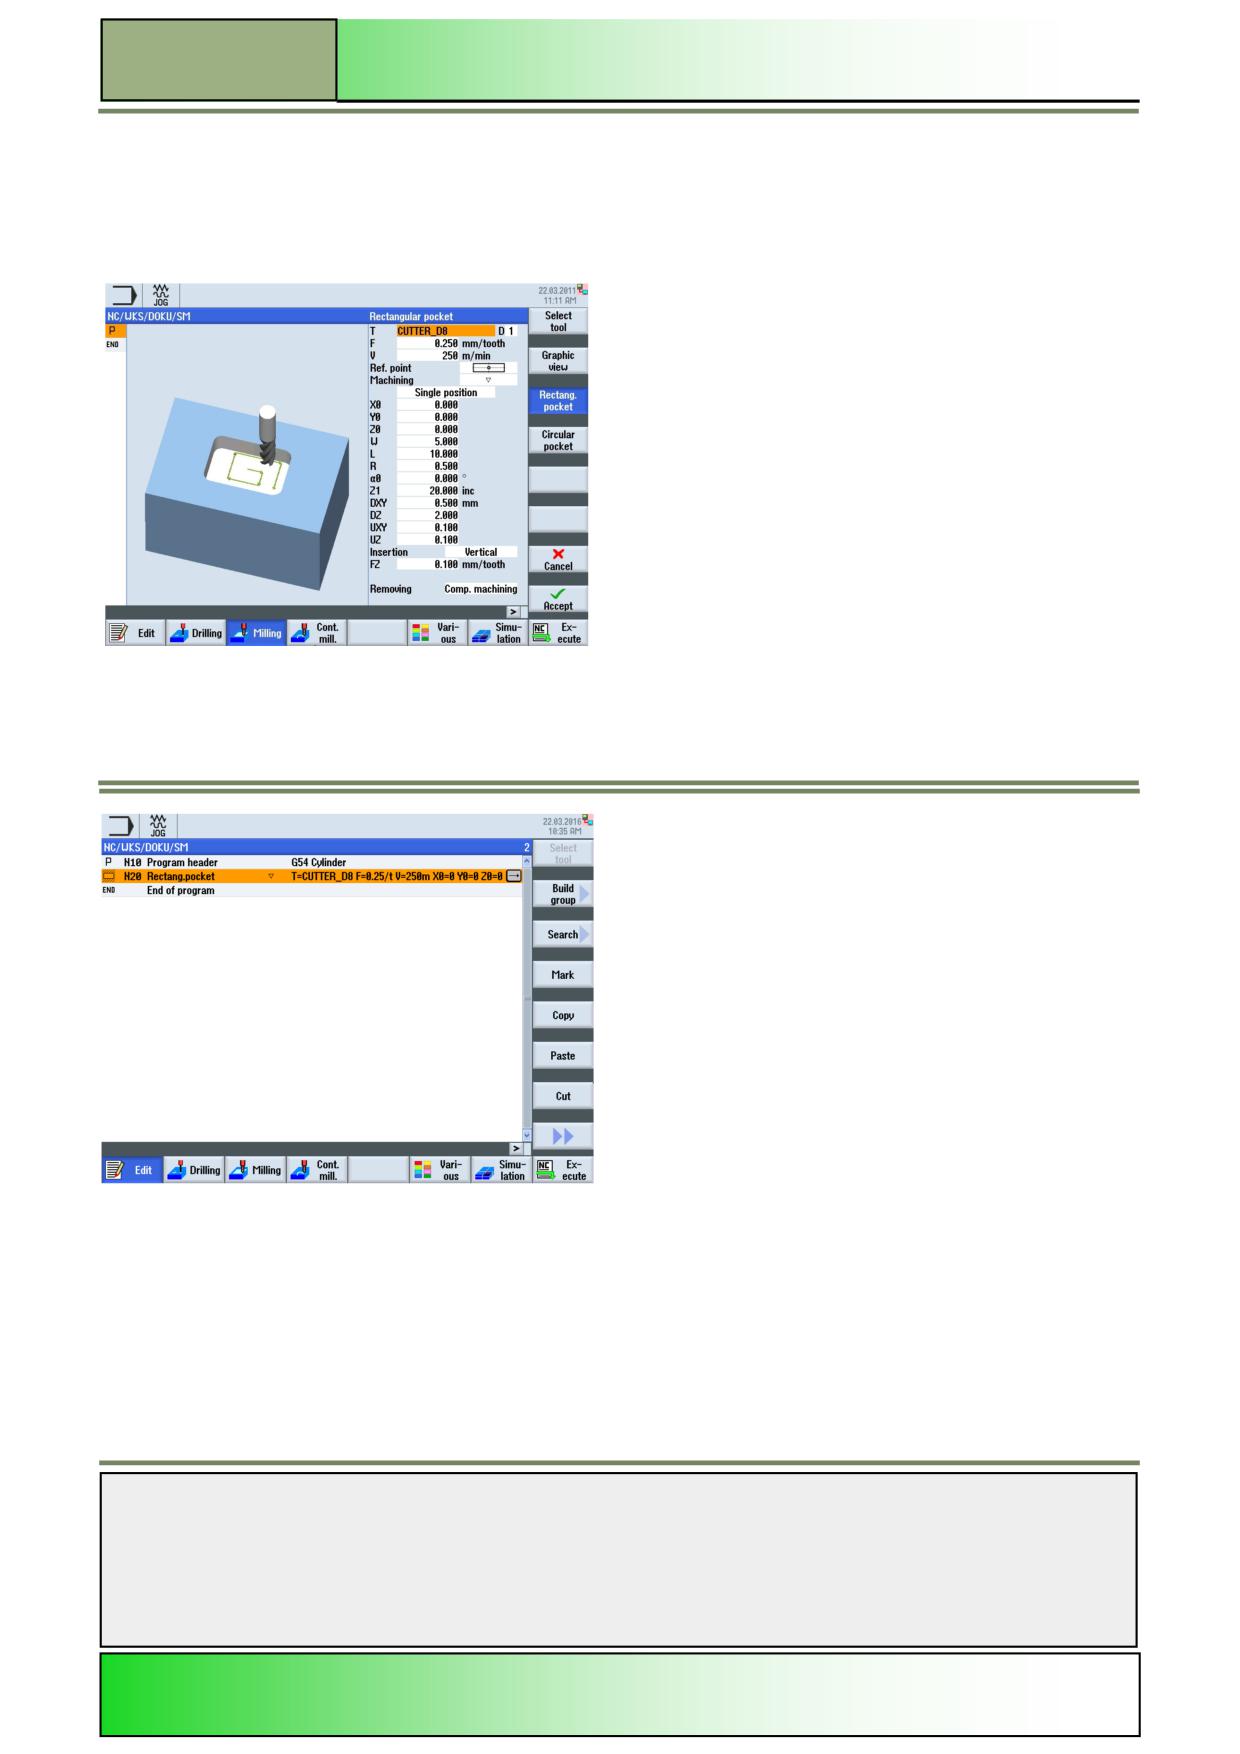
Place the orange cursor on the program header block, or any other program block after which you want to insert a new pro-
gram block. Select a technology you want to apply like “Drilling”, “Milling”, “Contour milling”, “Straight Circle”. For example
select “Milling” -> “Pocket” -> “Rectangular pocket” to open the corresponding parameter window and help screen by means
animation for this technology.
Enter the appropriate parameter values and confirm with pressing the VSK 8 “Accept” or abort with pressing the VSK 7
“Cancel”, to switch back to the editor window. The new program block is inserted automatically into the editor window. The
“cursor-to-the-right” key opens the parameter window anytime, to change the input parameters you have done before.
If necessary enter more program steps like described above.
Notes
M600
Page 10
828D/840Dsl SINUMERIK Operate
Basics of programming with ShopMill
M600
End of program
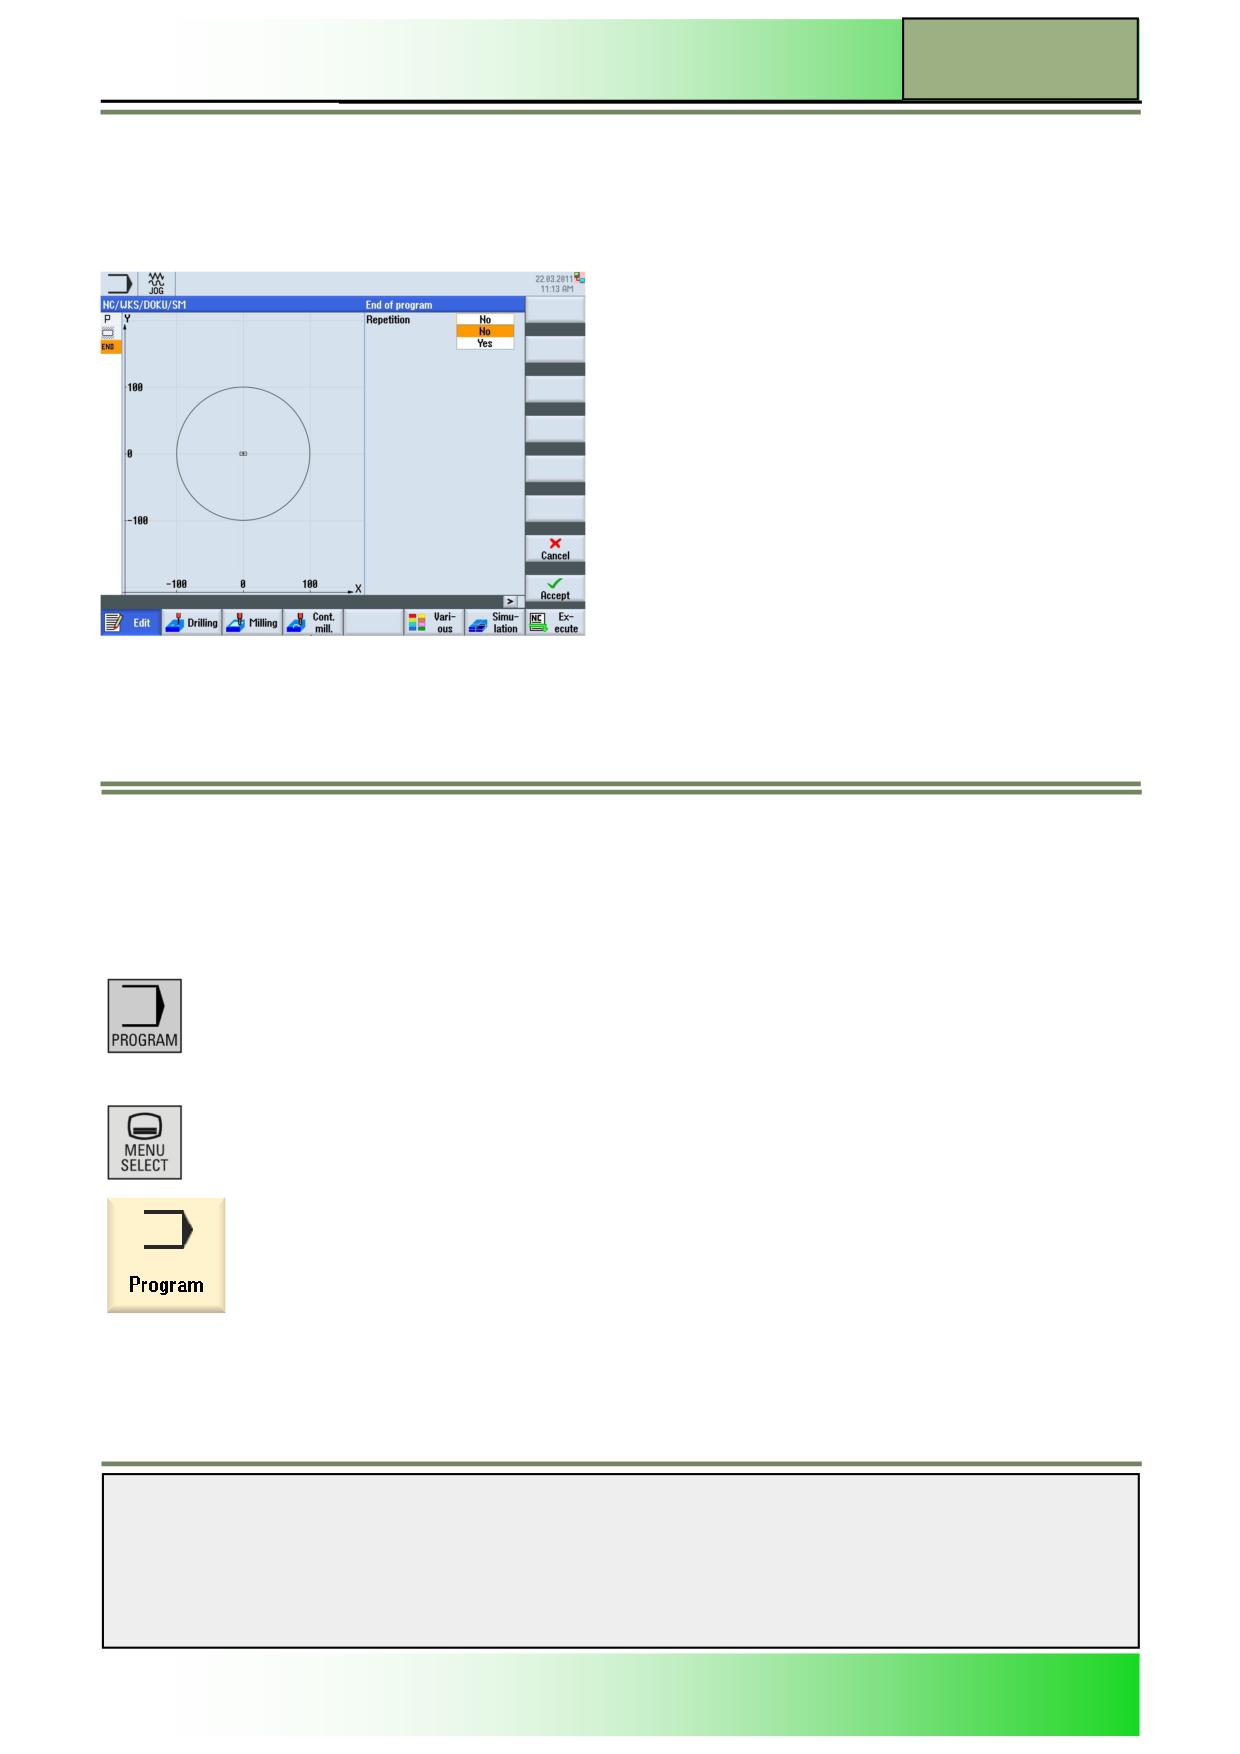
The program block “End of program” is already created automatically upon creation of a new program. if you want to make
changes to the program end, you have to place the orange selection cursor with the blue arrow keys on the “End of pro-
gram” block and extend the display by pressing the “cursor-to-the-right” key. The parameter input mask for “END of pro-
gram” opens as displayed below. You can set here , if the program is to be repeated for multiple workpieces.
Select “Yes” if you want to repeat the workpiece and confirm with pressing the VSK 8 “Accept” or abort with pressing the
VSK 7 “Cancel” to switch back to the editor window.
The new values entered are updated automatically .
With the editor you can create, supplement and change part programs.
Editor
Selecting the function “Edit“
The function “Editor” can be opened from the operating mode “JOG”, “MDA“ and “AUTO“.
By pressing the “PROGRAM“-key on the keyboard
the operating area “Program” opens, showing the last program you have worked on.
- OR -
Press the “MENU SELECT“-key on the operator panel (OP).
Press the yellow HSK 3 “Program“ to switch to the operating area “Program“.
The operating area “Program” opens, showing the last program you have worked on (see pic-
ture below).
If not selected, press the HSK 1 “Edit”.
If no program was loaded after starting the control,
the “program manager” window opens first, after pressing the HSK 3 “Program”.
Here you can select either a existing ShopMill-program or create a new one.
Notes
828D/840Dsl SINUMERIK Operate
Page 11
M600
M600
Basics of programming with ShopMill
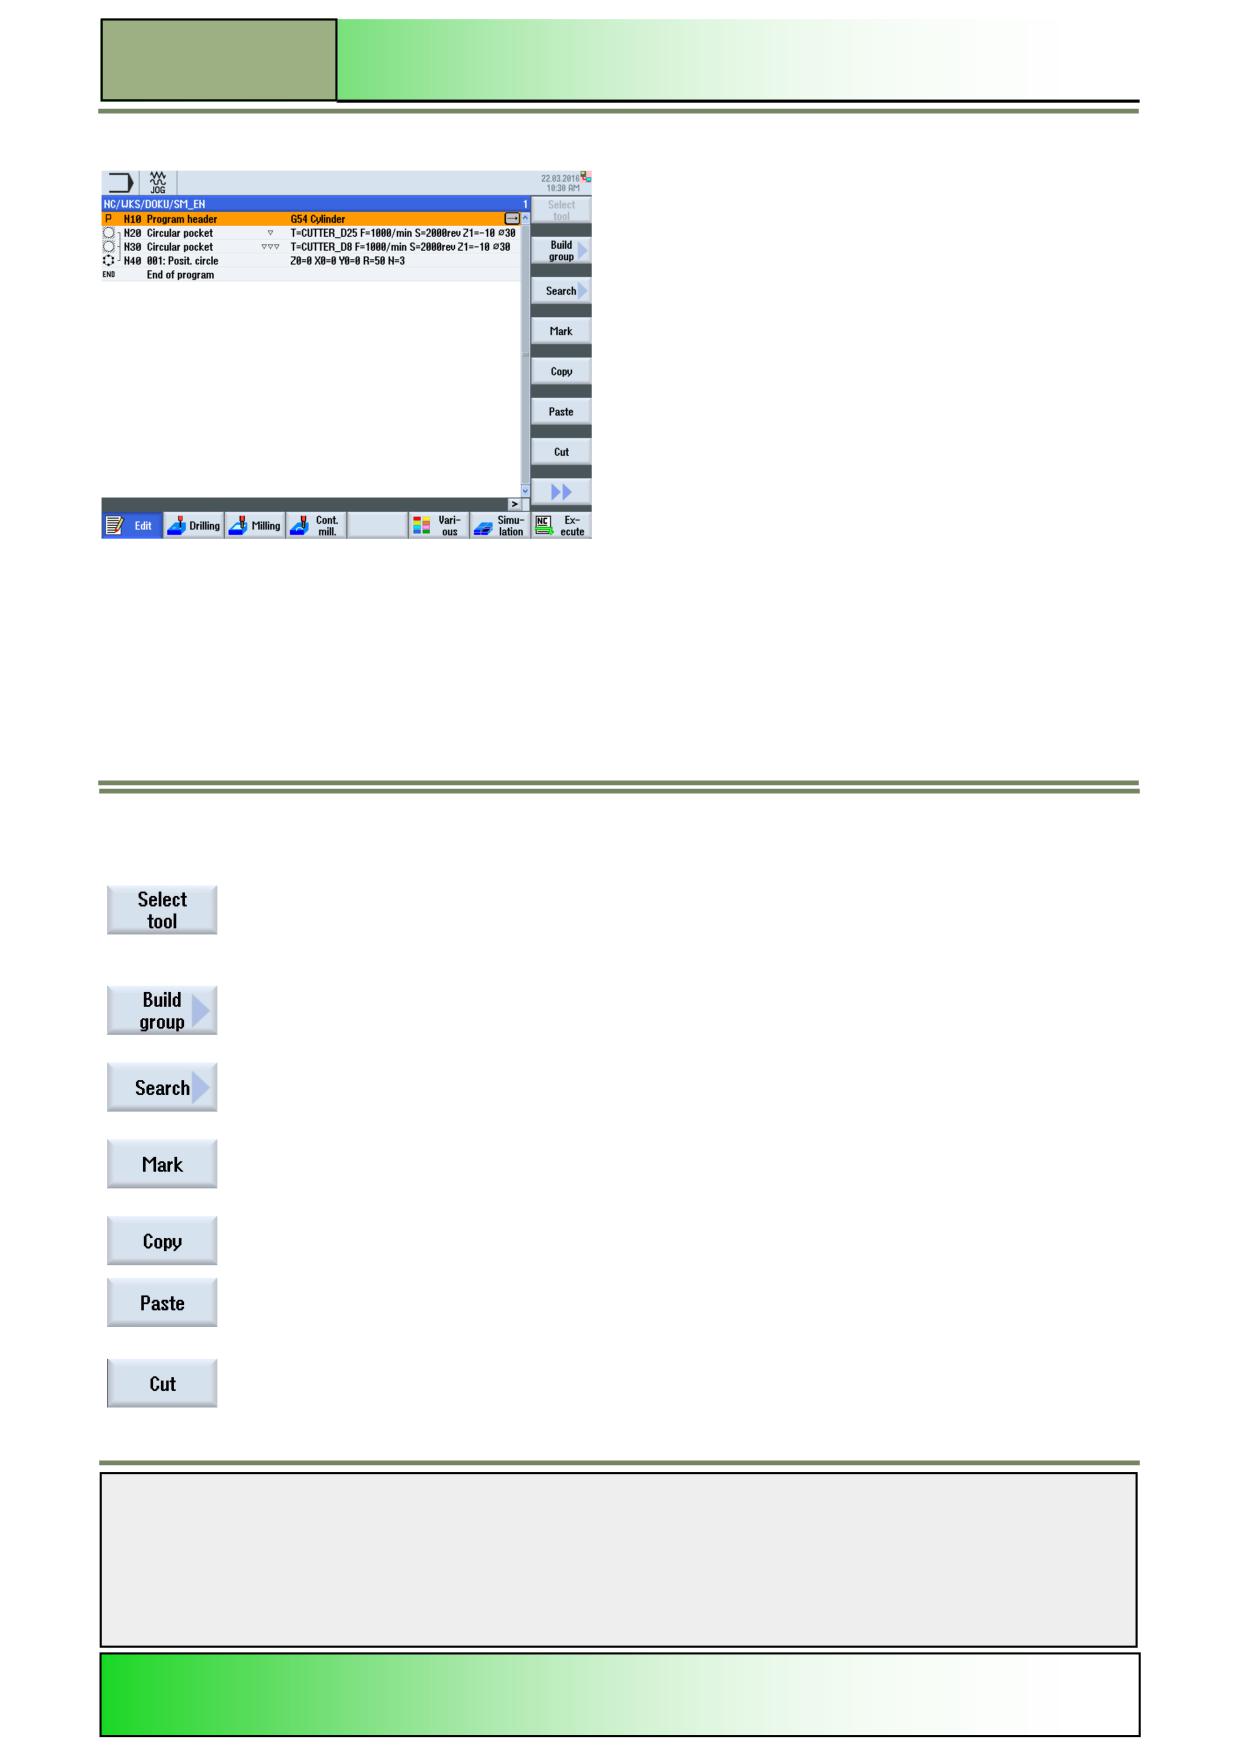
The following softkeys with their corresponding functions are now available in the vertical softkey bar:
Vertical softkey bar 1 and 2
Display area
Description
In a ShopMill program the tool call is inside the cycle mask. The function “Select tool” is available for
ShopMill programs under the technologies “Drilling”, Milling, “Contour milling”, “Straight Circle” or in a
corresponding program block with tool utilization. This is the reason for VSK 1.1 “Select tool” being
grayed out (inactive) as long their is no G code line inserted.
By pressing the VSK 1.2 “Build group” you can create programme blocks into groups, this can be
useful when creating large programs.
By pressing the VSK 1.3 “Search“ you can search for any text in the program blocks. A search win-
dow opens where you can enter a search string. You can continue searching afterwards.
By pressing the VSK 1.4 “Mark” you can mark one or several program blocks in order to copy or cut
(delete) them.
By pressing the VSK 1.5 “Copy” you can copy one or several program blocks to the internal memory
of the control, to paste them to a different location in the active program or to another program.
By pressing the VSK 1.6 “Paste“ copied or cut program blocks can be inserted behind the selected
program block (actual cursor position). You can paste the block to the active program as well as to
another ShopMill program.
By pressing the VSK 1.7 “Cut” you can cut out one or several program blocks, to paste them later
somewhere in a program or to delete them. Cut out program blocks remain in the clip board and can
be inserted again with the VSK 1.6 “Paste”.
Notes
M600
Page 12
828D/840Dsl SINUMERIK Operate
Basics of programming with ShopMill
M600
Vertical softkey bar 1 and 2 continued
Display area
Description
By pressing the VSK 1.8 “Extend“ the extended vertical softkey bar 2 will be displayed.
By pressing the VSK 2.1 “View” you can choose between “Close all blocks” and “Open all
blocks”.
By pressing the VSK 2.2 “Graphic view” you can see the simulated workpiece from a top view as an
outline drawing.
Note SK only visible in ShopMill
By pressing the VSK 2.3 “Renumbering” you can assign new numbers for every program step in the
Work plan window.
By pressing the VSK 2.4 “Open further program” you can view two programs side by side.
By pressing the VSK 2.6 “Settings“ you can change the settings for the editor.
By pressing the VSK 2.7 “Close” you close the editor with the active program.
By pressing the VSK 2.8 “Back“ you switch back to the vertical softkey bar 1.
Select tool
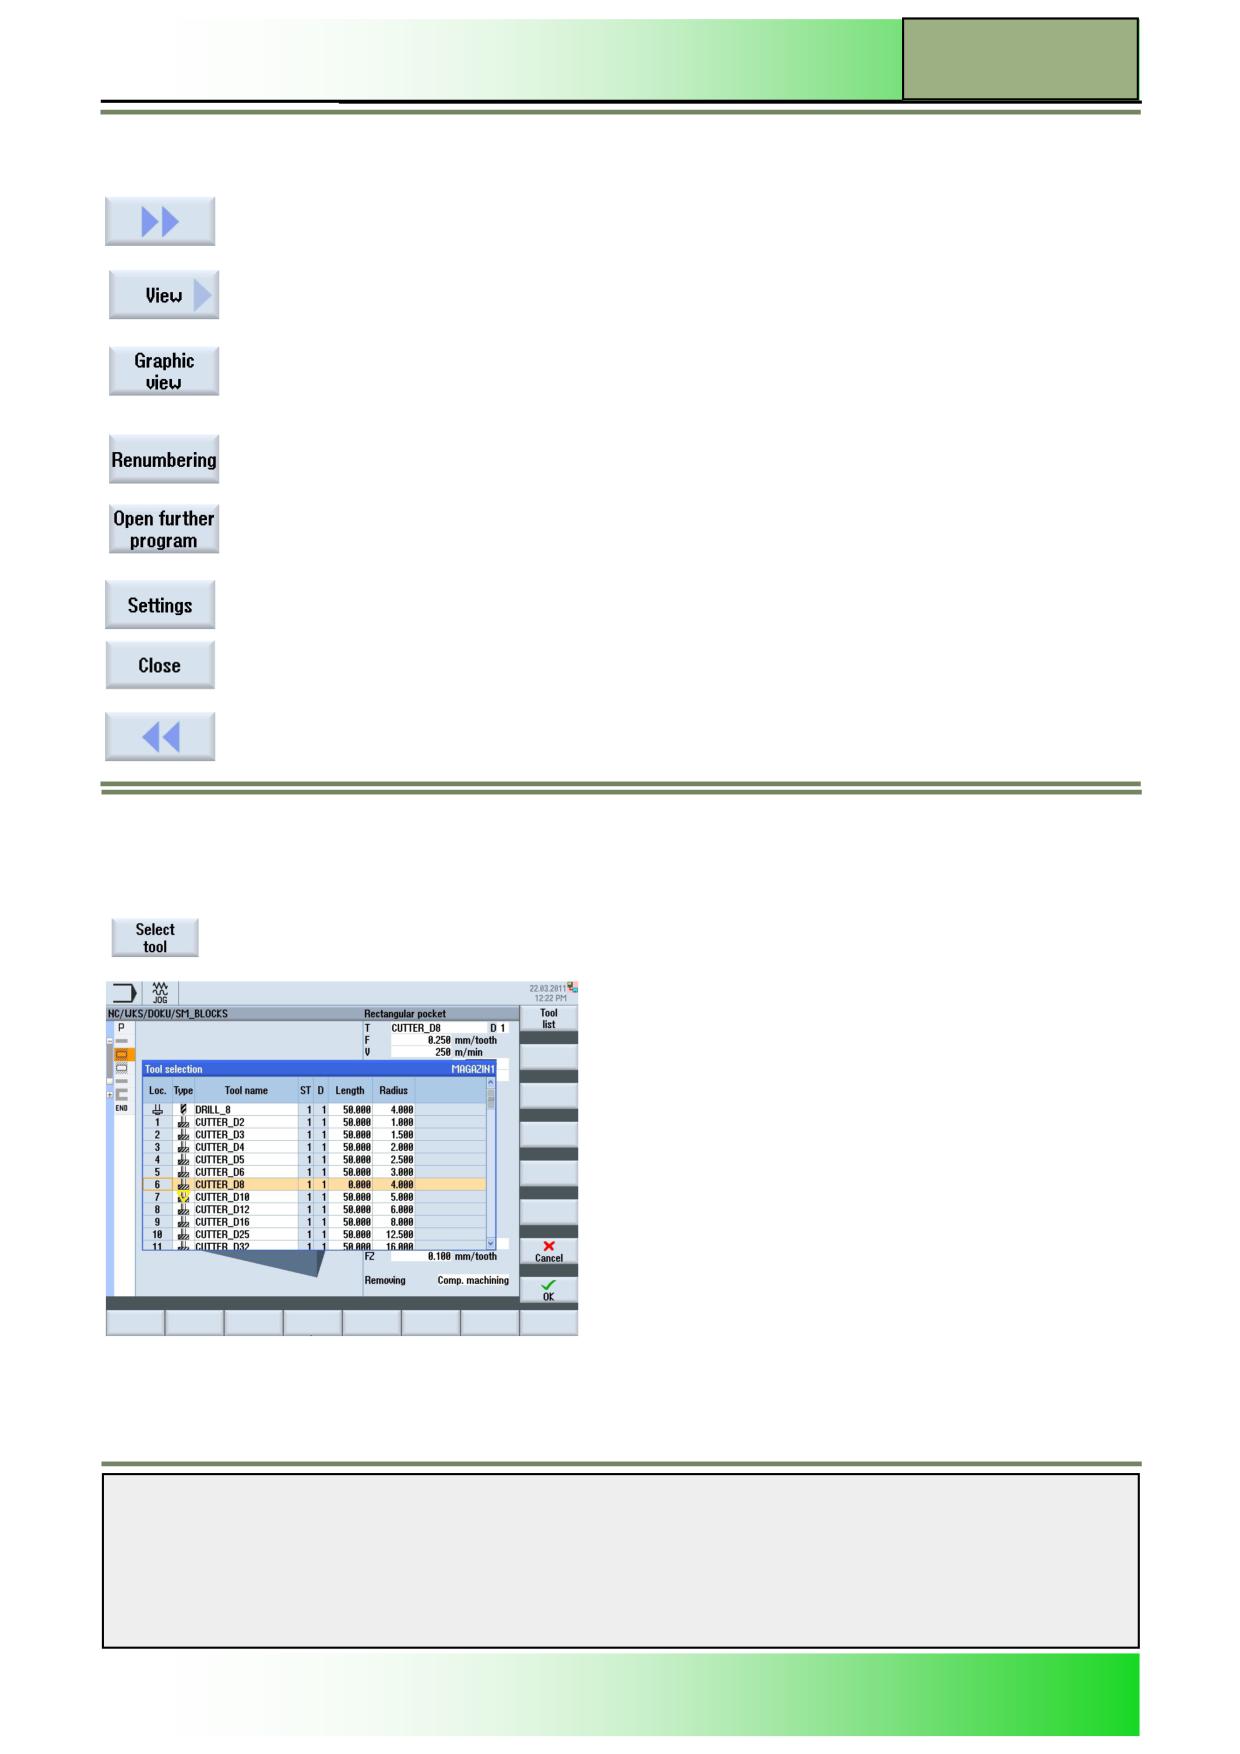
With the function “Select tool” you can search and select a tool .
Selecting the function “Select tool”
By pressing the VSK1.3 “Select tool” the search window opens like displayed below, with the
following functions available in the vertical softkey bar.
Use the “cursor up & cursor down” keys on the key board the select the required tool for the machining block.
If the required tool is not available press the VSK1 “Tool list” so that a new tool can be created .
Notes
828D/840Dsl SINUMERIK Operate
Page 13
M600
M600
Basics of programming with ShopMill
Vertical softkey bar
Display area
Description
By pressing the VSK 1 “Tool list” you are taken to the tool list.
See module - M573 “Operating area Parameter”.
With pressing the VSK 7 “Cancel” you can abort the search process.
By pressing the VSK 8 “OK“ you will load the selected tool into the machining block.
Build group
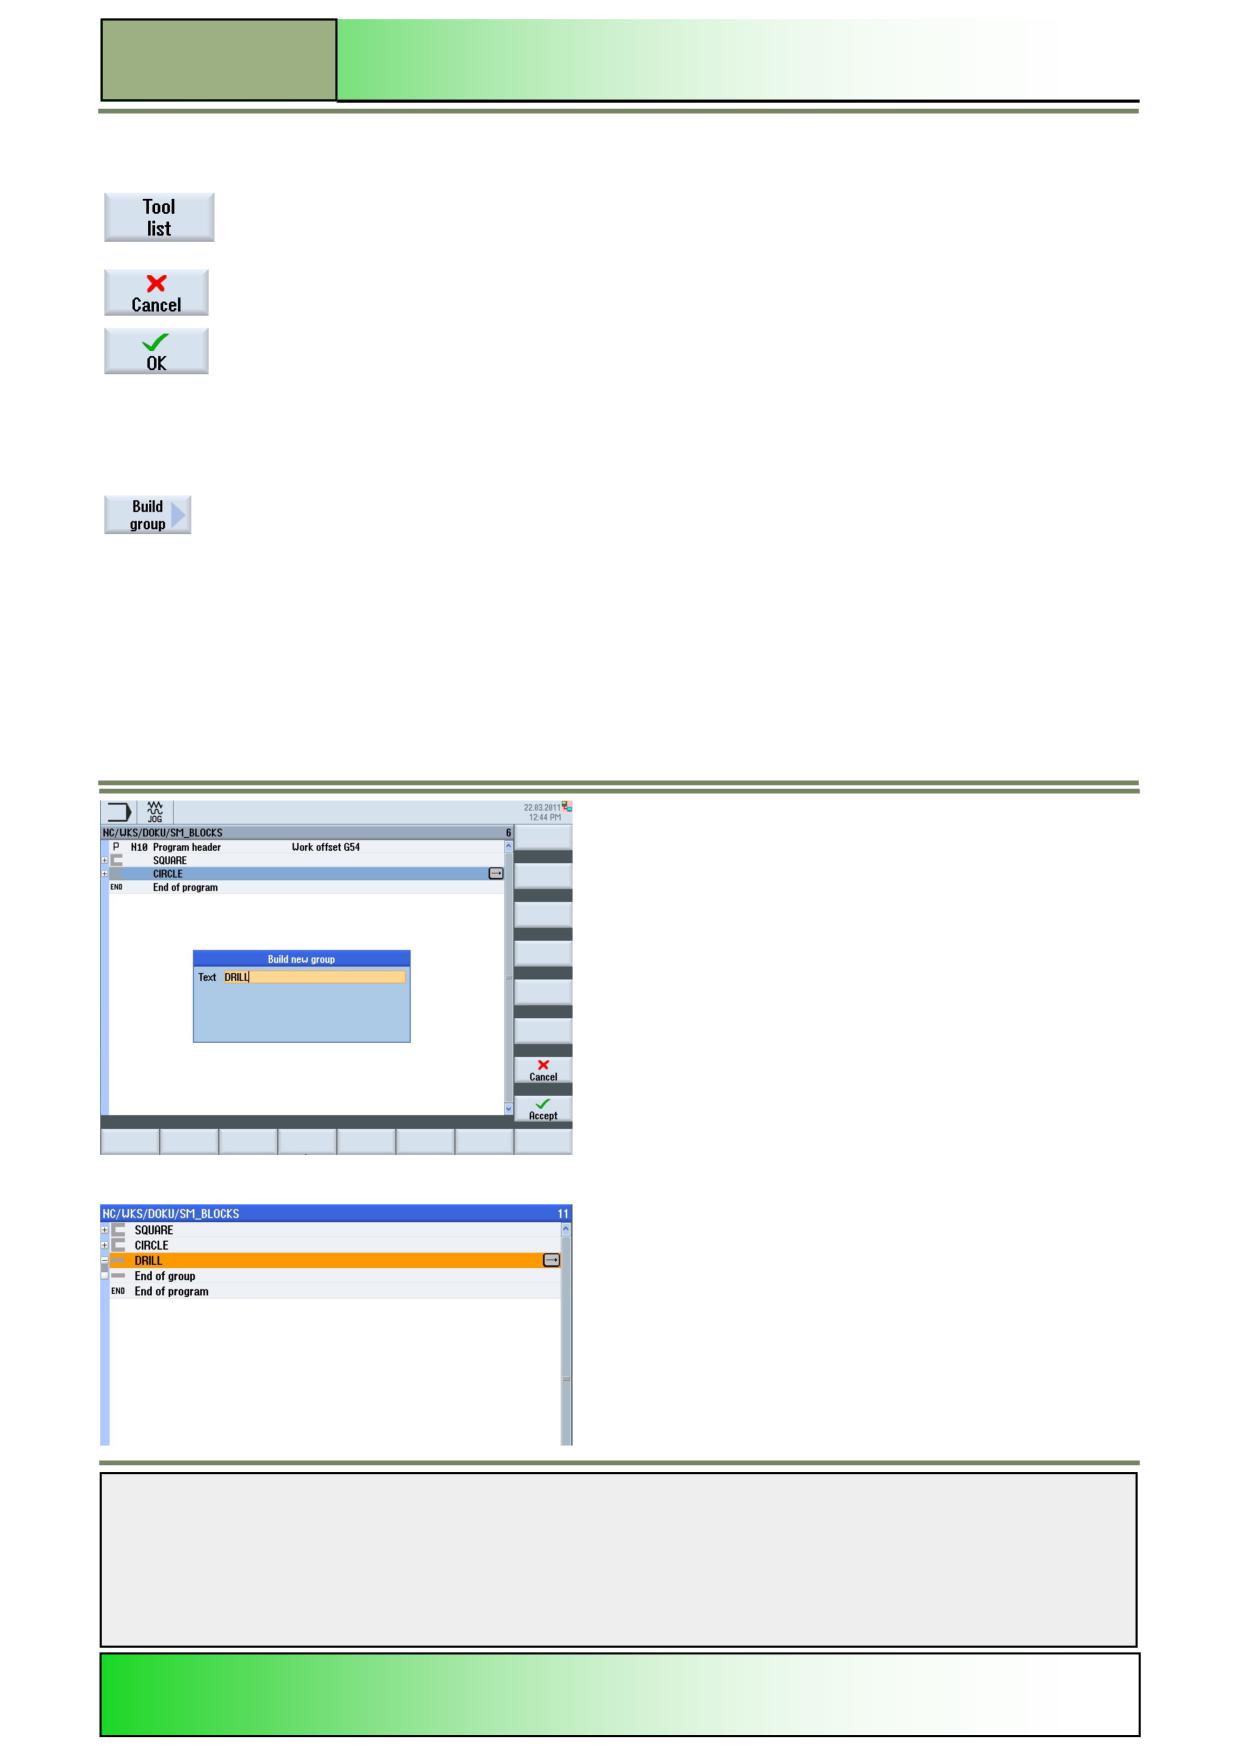
With the function “Build group” you can group similar machining blocks together .
Selecting the function “Build group”
By pressing the VSK1.2 “Build group” the build new block window opens like displayed below,
allowing you to give a name to a group
Once you have typed in a name press the “OK” softkey
Notes
M600
Page 14
828D/840Dsl SINUMERIK Operate
Basics of programming with ShopMill
M600
You can now create machining blocks inside the group.
Vertical softkey bar
Display area
Description
With pressing the VSK 7 “Cancel” you can abort the search process.
By pressing the VSK 8 “OK“ you will load a new group block into the program with the name
you have chosen.
Search
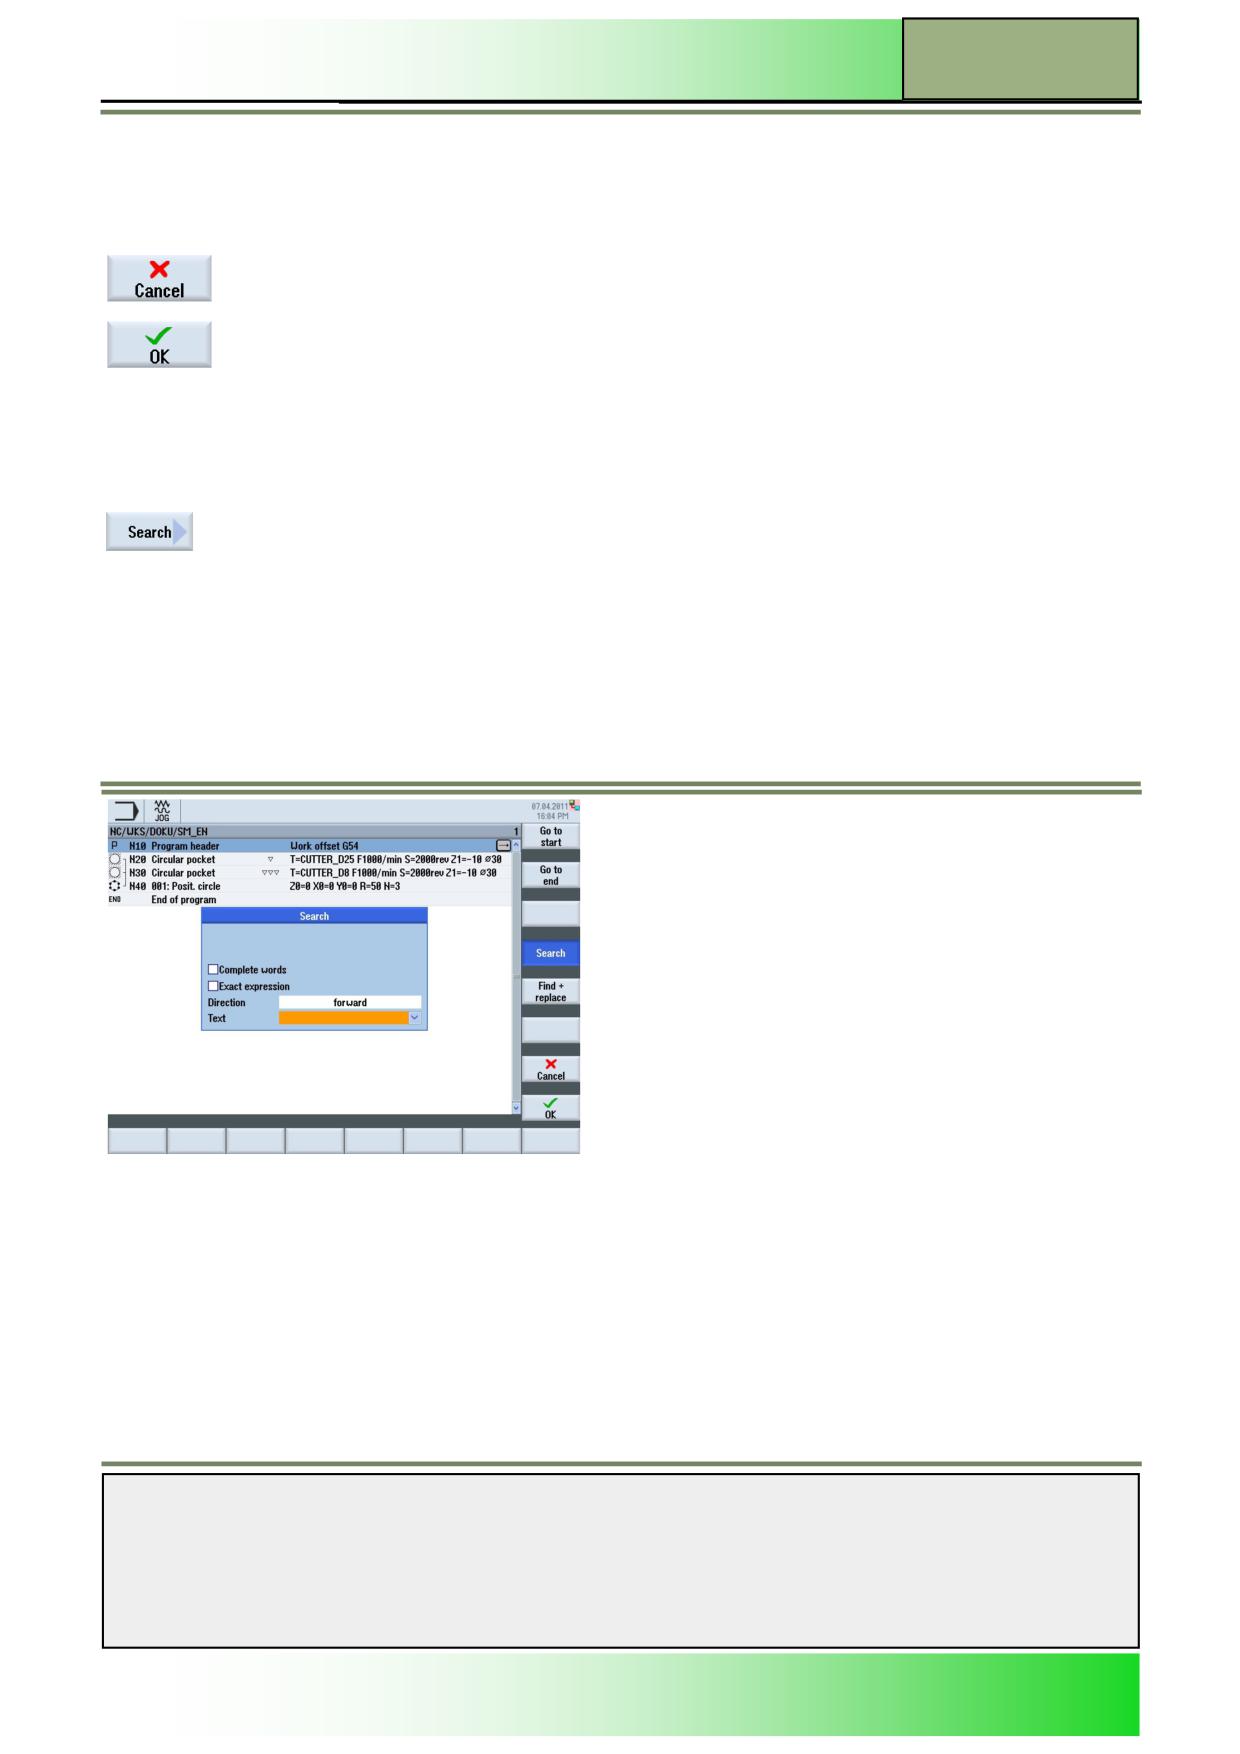
With the function “Search” you can search for any text in a sequential program and even replace the text with other text.
Selecting the function “Search”
By pressing the VSK1.3 “Search” the search window opens like displayed below, with the follow-
ing functions available in the vertical softkey bar.
Notes
828D/840Dsl SINUMERIK Operate
Page 15
M600
M600
Basics of programming with ShopMill
Vertical softkey bar
Display area
Description
By pressing the VSK 1 “Go to start” the cursor will be positioned on the first line of the program.
By pressing the VSK 2 “Go to end” the cursor will be positioned on the last line of the program.
By pressing the VSK4 “Search” the search mask opens, where you can decide to search for
complete words or Exact expression, select the search direction (forward/backwards) and enter
the search text.
By pressing the VSK5 “Find + replace” the “Search and replace” mask opens where you can
decide to search for complete words, select the search direction (forward/backwards), enter the
search text and enter the text you want to use for the replacement.
With pressing the VSK 7 “Cancel” you can abort the search process.
By pressing the VSK 8 “OK“ you start a search run with the above mentioned search criteria.
View
With the function “View” you can expand or close all “groups” that have been created in the program.
Selecting the function “View”
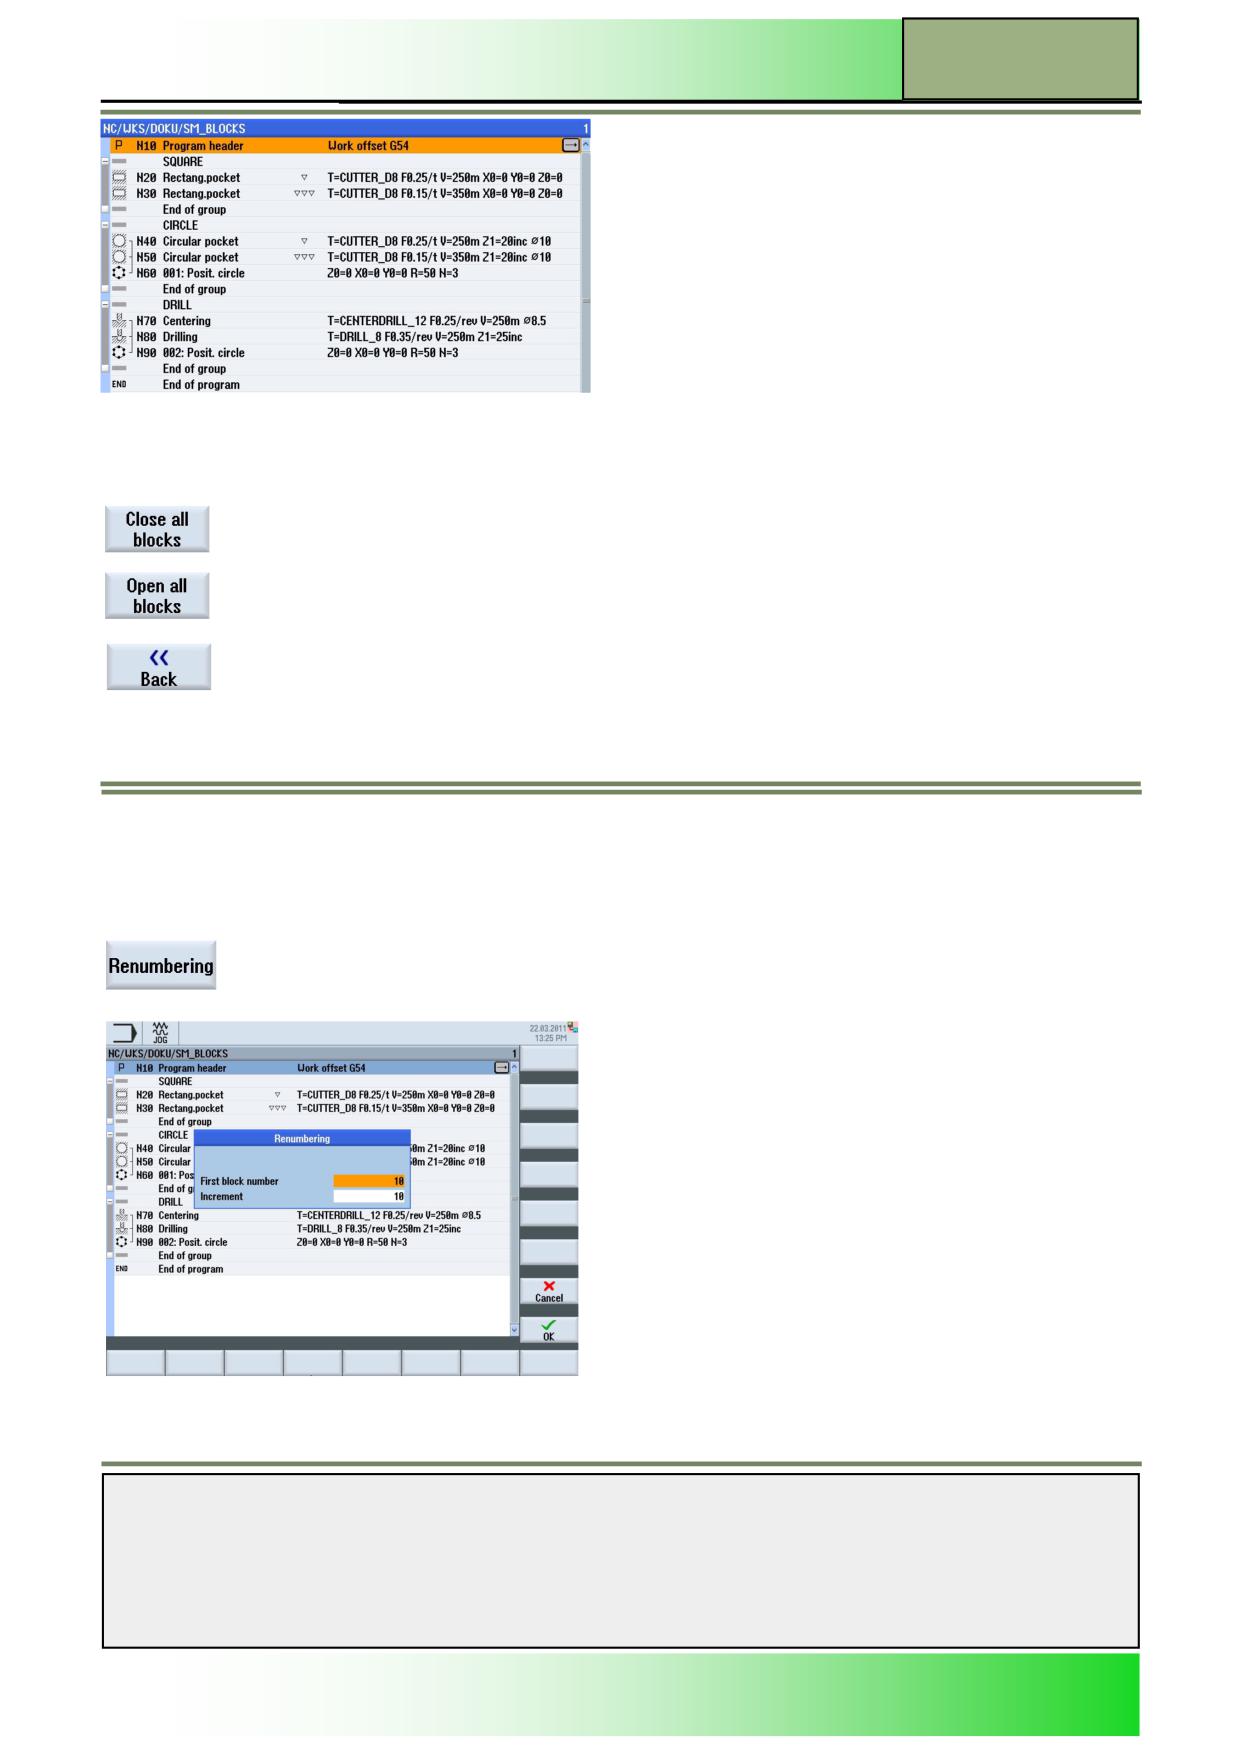
By pressing the VSK1.2 “View” the softkeys “Close all blocks” and “Open all blocks” are shown
like displayed below.
Press VSK 5 “Open all blocks”
Notes
M600
Page 16
828D/840Dsl SINUMERIK Operate
Basics of programming with ShopMill
M600
Vertical softkey bar
Display area
Description
Pressing the VSK 4 “Close all blocks” you can close all block in the program.
Pressing the VSK 5 “Open all blocks“ you can open all block in the program
With the VSK 8 “Back” you can go back to the previous vertical softkey bar.
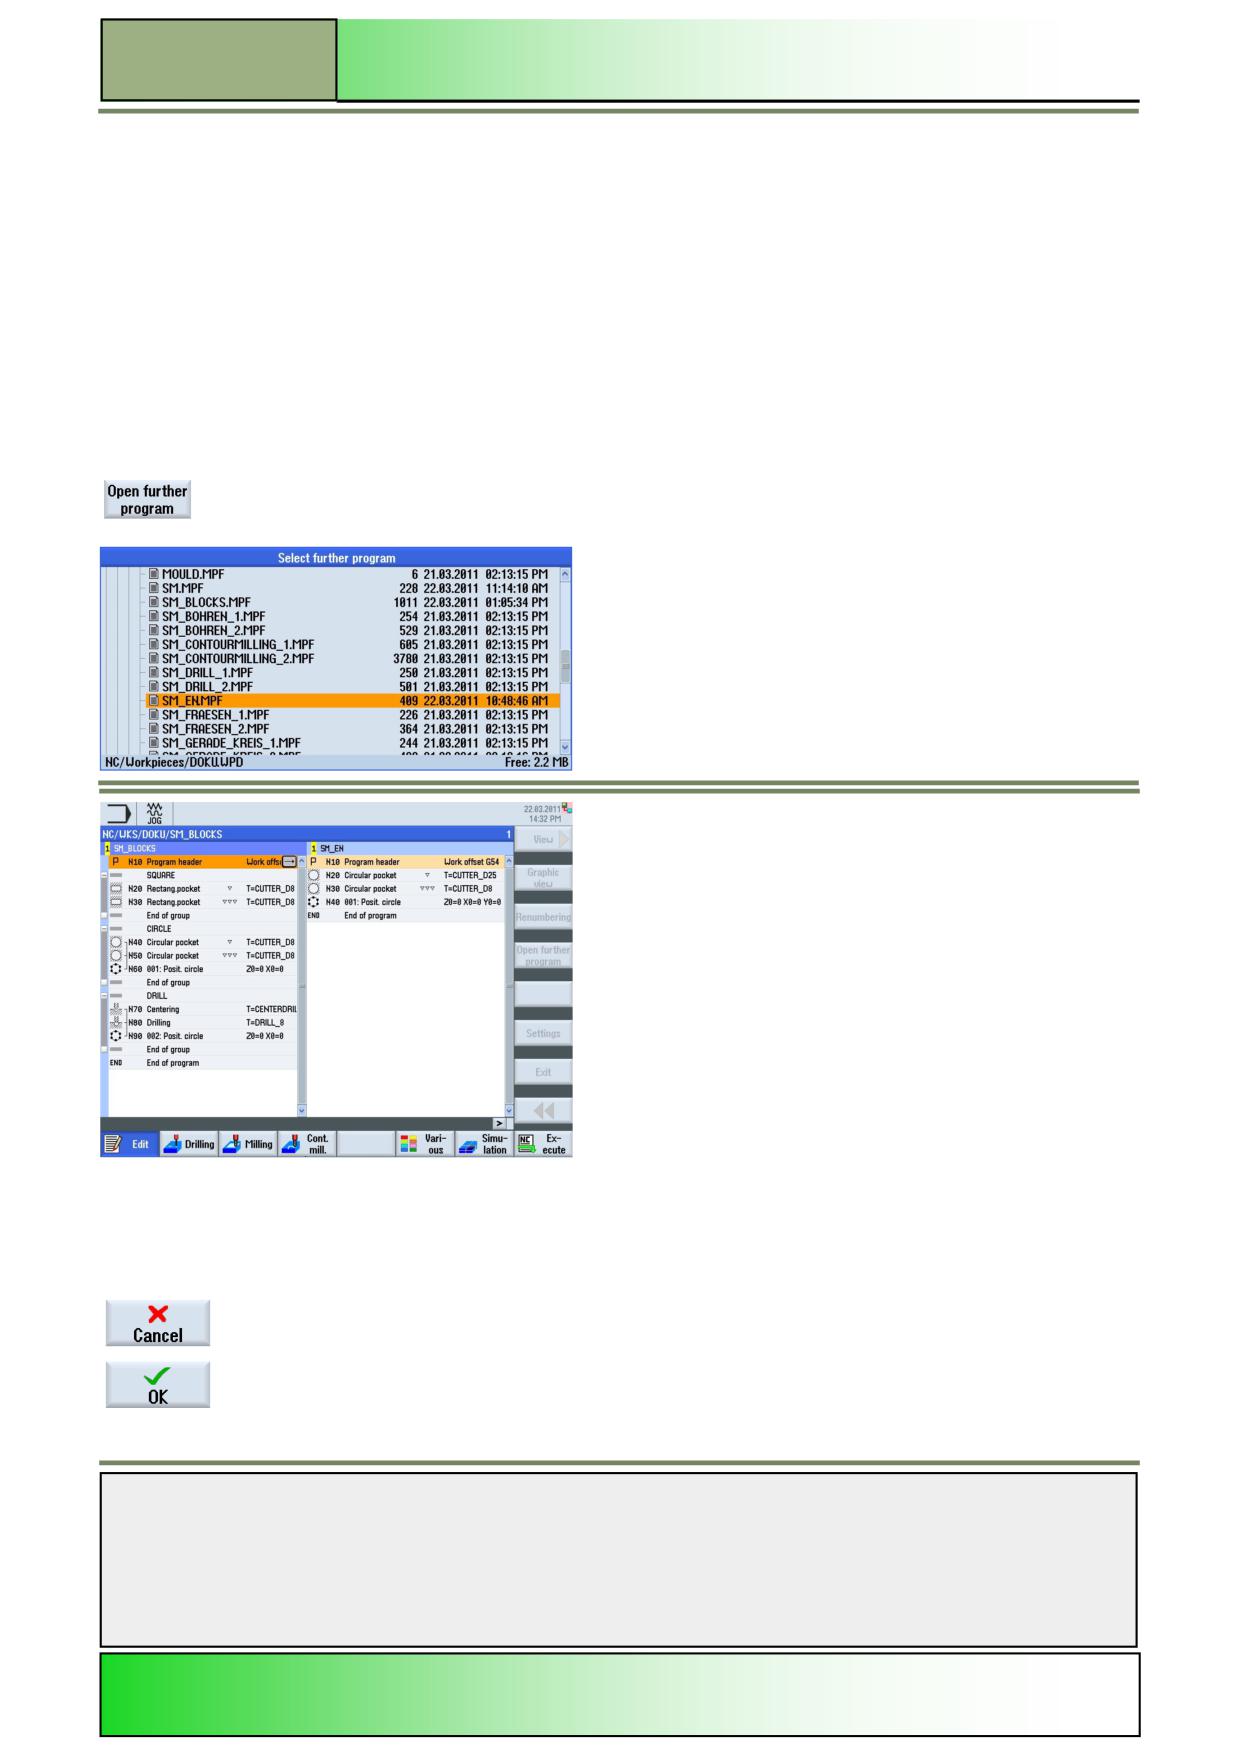
Renumbering
With the function “Renumbering” you can renumber the program steps in the editor window with an increment you can se-
lect here.
Selecting the function “Renumbering”
By pressing the VSK 2.3 “Renumbering” the input mask for the renumbering settings of blocks
opens.
Notes
828D/840Dsl SINUMERIK Operate
Page 17
M600
M600
Basics of programming with ShopMill
Parameters for “Renumbering”
Parameters
Meaning
First block number
The first block number you want to start with.
The values shown here by default can be adjusted under the function “Settings” in the input field
“First block number”.
Increment
The Increment between the program blocks.
The values shown here by default can be adjusted under the function “Settings” in the input field
“Increment”.
Open further programs
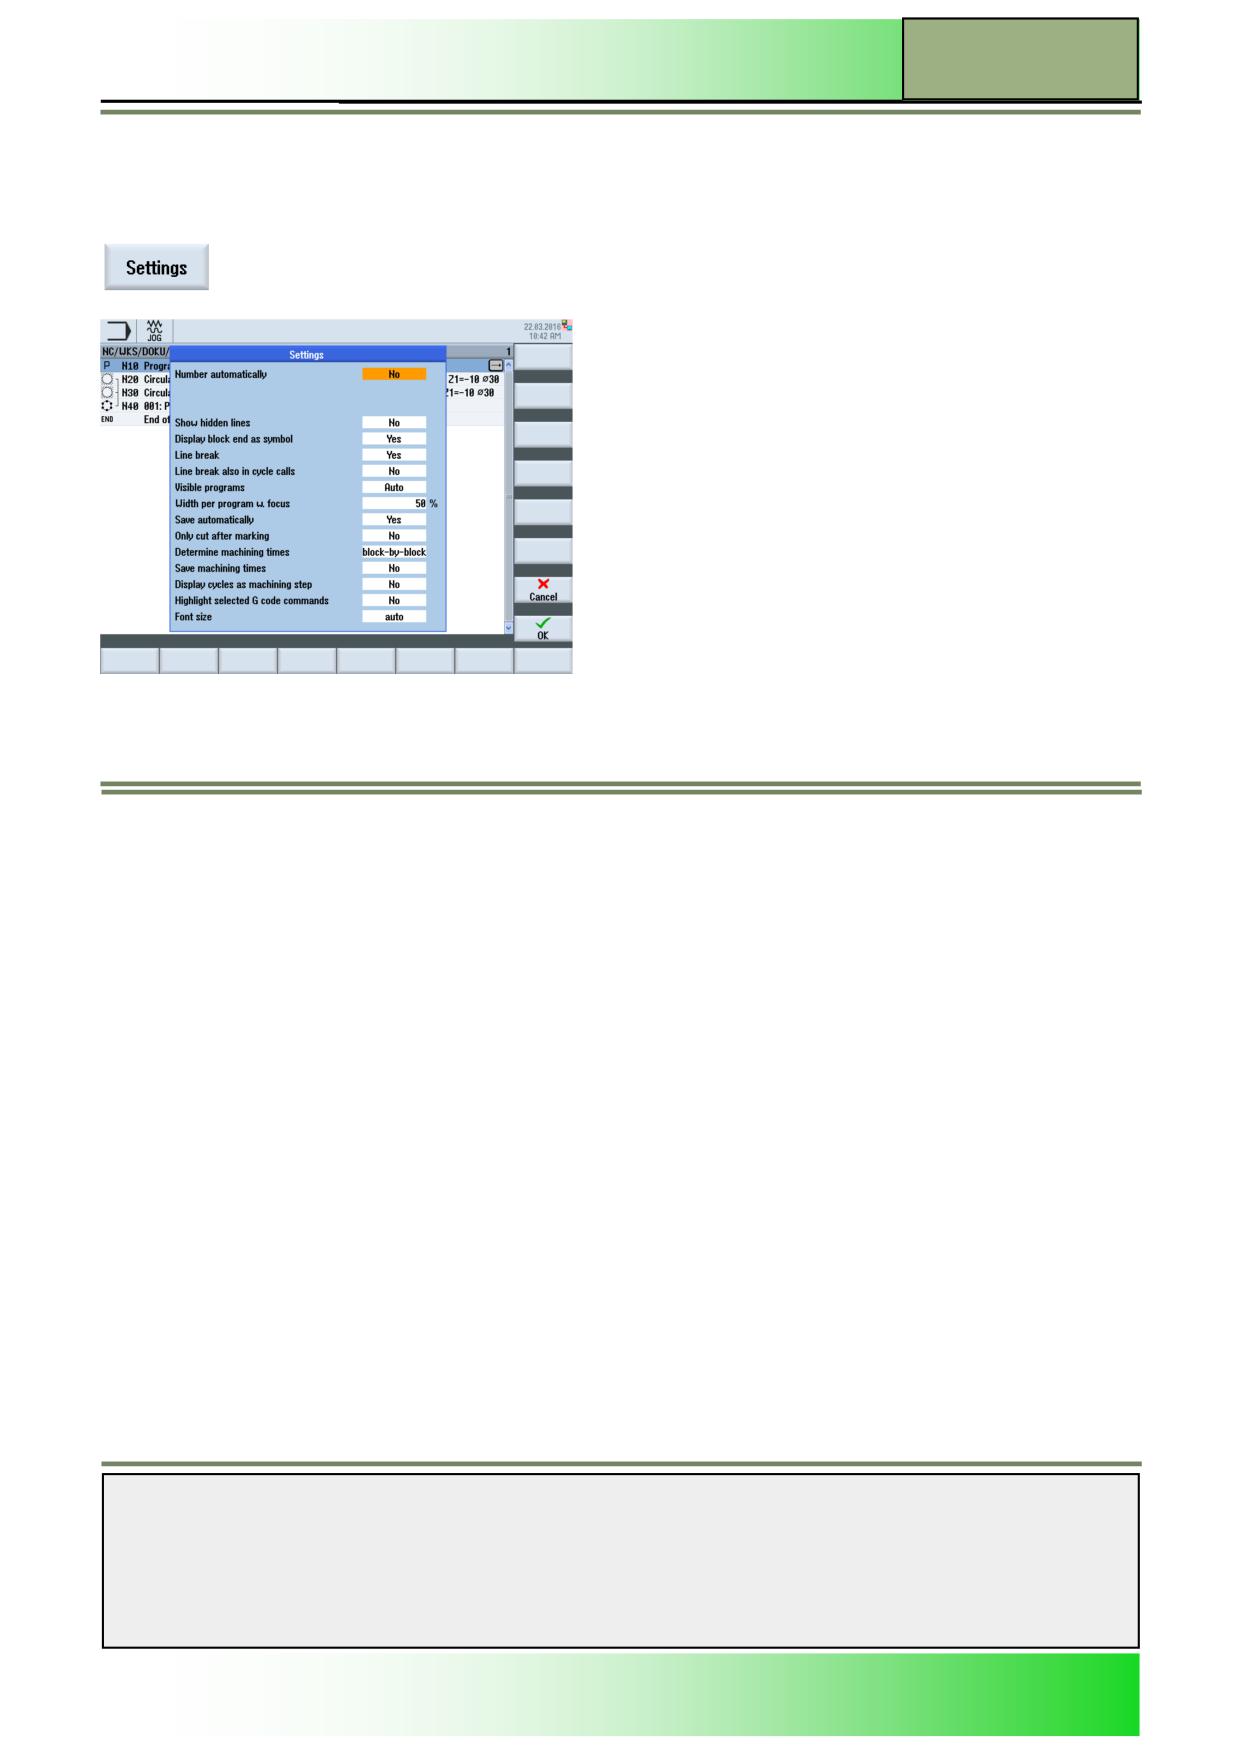
With the function “Open further programs” the control will show two programs side by side.
Selecting the function “Open further programs”
By pressing the VSK2.4 “Open further programs” the window opens that allows you to choose
a further program to be shown.
Use the “cursor up” or “cursor down” keys on the key board the select the required program and press VSK8 “OK”
Vertical softkey bar
Display area
Description
With pressing the VSK 7 “Cancel” you can abort the select process.
By pressing the VSK 8 “OK“ the control will show two programs side by side, as shown above.
Notes
M600
Page 18
828D/840Dsl SINUMERIK Operate
Basics of programming with ShopMill
M600
Settings
With the function “Settings” you can change the settings for the editor.
Selecting the function “Settings”
By pressing the VSK2.6 “Settings” the input mask for the editor settings opens.
Parameters for “Settings”
Parameters
Meaning
Number automatically
Program blocks will be numbered automatically.
(Yes/No)
Deactivating this parameter, hides the following two parameters too.
Show hidden lines
Show hidden line (with the ID ;*HD).
(Yes/No)
Display block end as
A symbol is displayed at the end of each block.
symbol (Yes/No)
Line break (Yes/No)
Lines are broken and wrapped around, or a horizontal scrollbar is displayed
Line break also in cycle If the line of a cycle call becomes too long, then it is displayed over several lines, or the line is
call (Yes/No)
truncated.
Visible programs
Selects how many programs can be displayed next to one another in the editor
Width of program w. fo-
Here, you enter the width of the selected program in the editor as a percentage of the window
cus
width.
Save automatically
Changes are saved automatically without a query.
(Yes/No)
Only cut after making
The cutting of program sections is possible only when program lines have been selected or
(yes/no)
where the cursor is positioned.
determine machining
Block-by-block / off / Non-modal
times
Display cycles as ma-
The cycle calls in the G code are displayed as plain text or NC syntax.
chining step (Yes/No)
Highlight selected G
Selected G code commands or key words can be highlighted in colour
code commands
Font size
Defines the font size for the editor and the display of the program sequence
Notes
828D/840Dsl SINUMERIK Operate
Page 19
M600
M600
Basics of programming with ShopMill
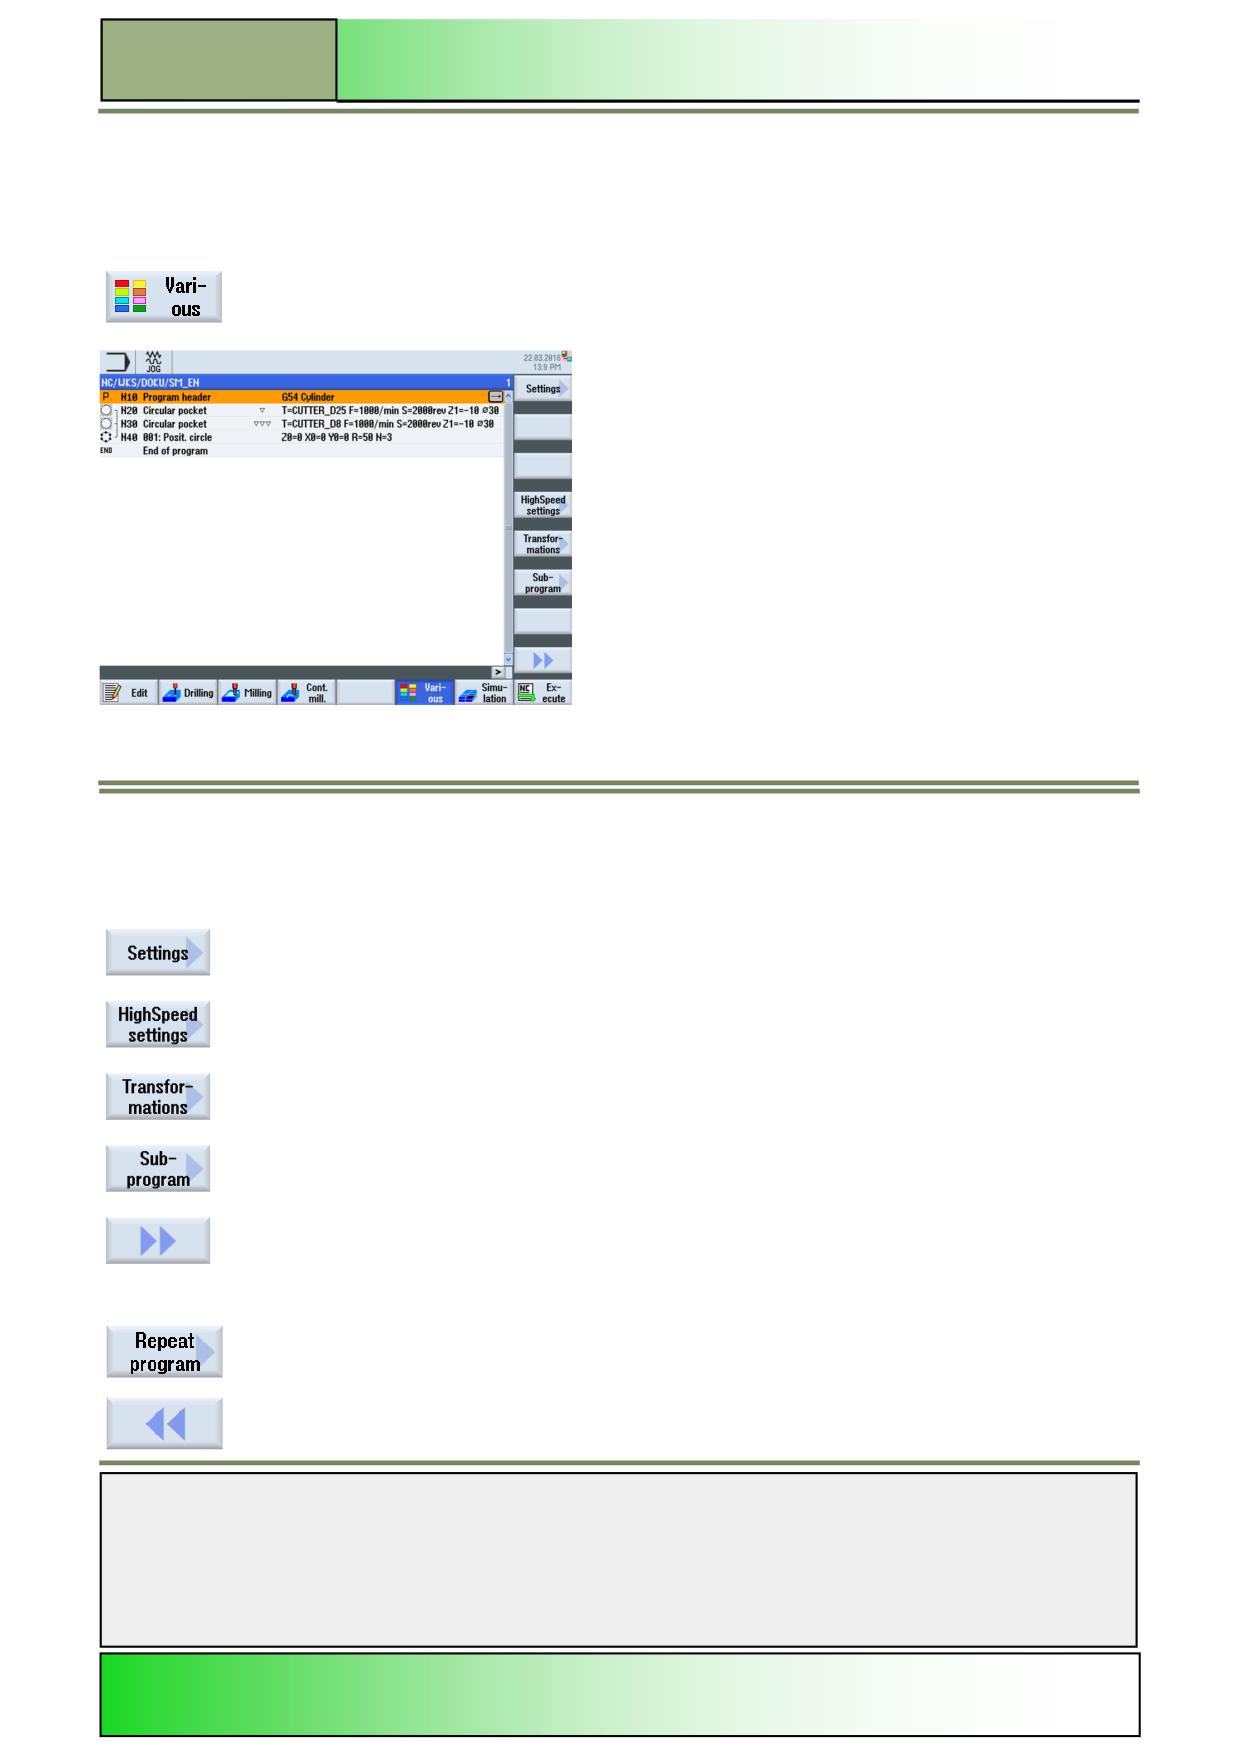
Various
Selecting the function “Various“
The function “Various” can be selected from the operating mode “JOG”, “MDA” or “AUTO” in the operating area “Program”
as follows:
Press the HSK 1.6 “Various“ to switch over to the function “Various”.
A screen similar to the screen shown below opens.
The following functions with their corresponding softkeys are displayed in a vertical softkey bar:
Vertical softkey bar 1 and 2
Display area
Description
By pressing the VSK 1.1 “Settings“ an input mask opens where you can change the settings
for the blank.
By pressing the VSK 1.4 “HighSpeed settings“ the input mask for adjusting the settings for the
optimal speed in relation to the machining method opens.
By pressing the VSK 1.5 “Transformations” the vertical softkey bar with the functions for the
coordinate transformations is displayed.
By pressing the VSK 1.6 “Subprogram” the input mask for loading a subprogram to the main
program opens.
By pressing the VSK 1.8 “Extend“ the vertical softkey bar 2 opens.
Display area
Description (Continuation)
By pressing the VSK 2.3 “Repeat program” the vertical softkey bar with the function for repeat-
ing parts of programs opens (see section 5.7).
By pressing the VSK 2.8 “Back“ you switch back to the vertical softkey bar 1.
Notes
M600
Page 20
828D/840Dsl SINUMERIK Operate
Basics of programming with ShopMill
M600
Settings
Each parameter defined in the program header, except the measuring units, can be changed everywhere in the program.
The settings in the program header are constant, as long as they are not altered later in the program.
For example you can define a new blank in a sequential program later on, if during a simulation run there is the need to
change the visible view on the workpiece. This can be reasonable within the functions “Work offset” “Coordinate transfor-
mation” “Rotational transformation” and “Swivelling”. With that you can program the above mentioned functions first, and
then define the blank afterwards.
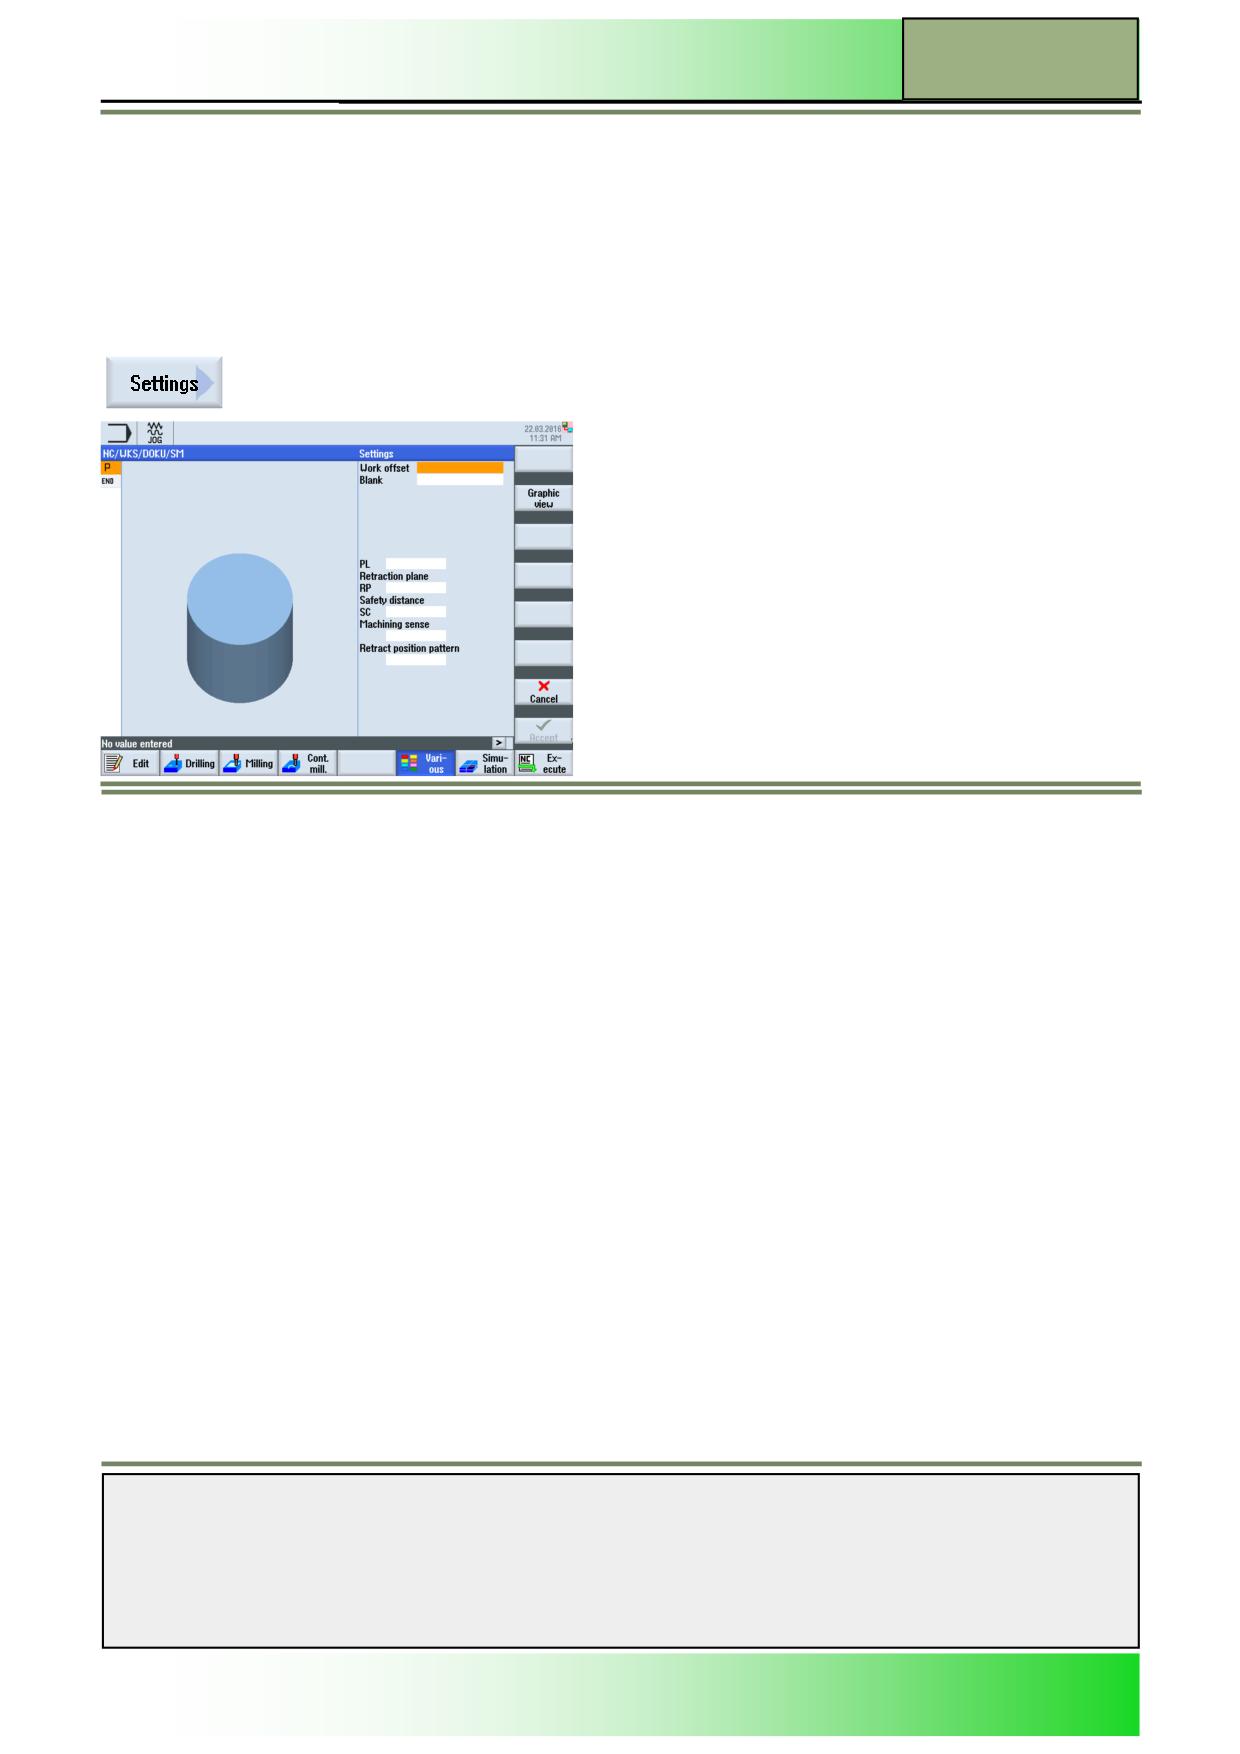
The function “Settings” can be opened as follows:
Selecting the function “Settings”
By pressing the VSK 1.1 “Settings” the following window for entering the parameters for the
blank opens.
Transformations
To make programming easier, you can transform the coordinate
system.
Use this function, for example, to rotate the coordinate system. Coordinate transformations only apply in the current
program. You can define displacement, rotation, scaling or mirroring. You can select between a new or an additive coordi-
nate transformation. In the case of a new coordinate transformation, all previously defined coordinate transformations are
deselected. An additive coordinate transformation acts in addition to the currently selected coordinate transformations.
Supported are:
Offset:
For each axis, you can program an offset of the zero point.
Rotation:
You can rotate every axis through a specific angle. A positive angle corresponds to a counter-clockwise rotation.
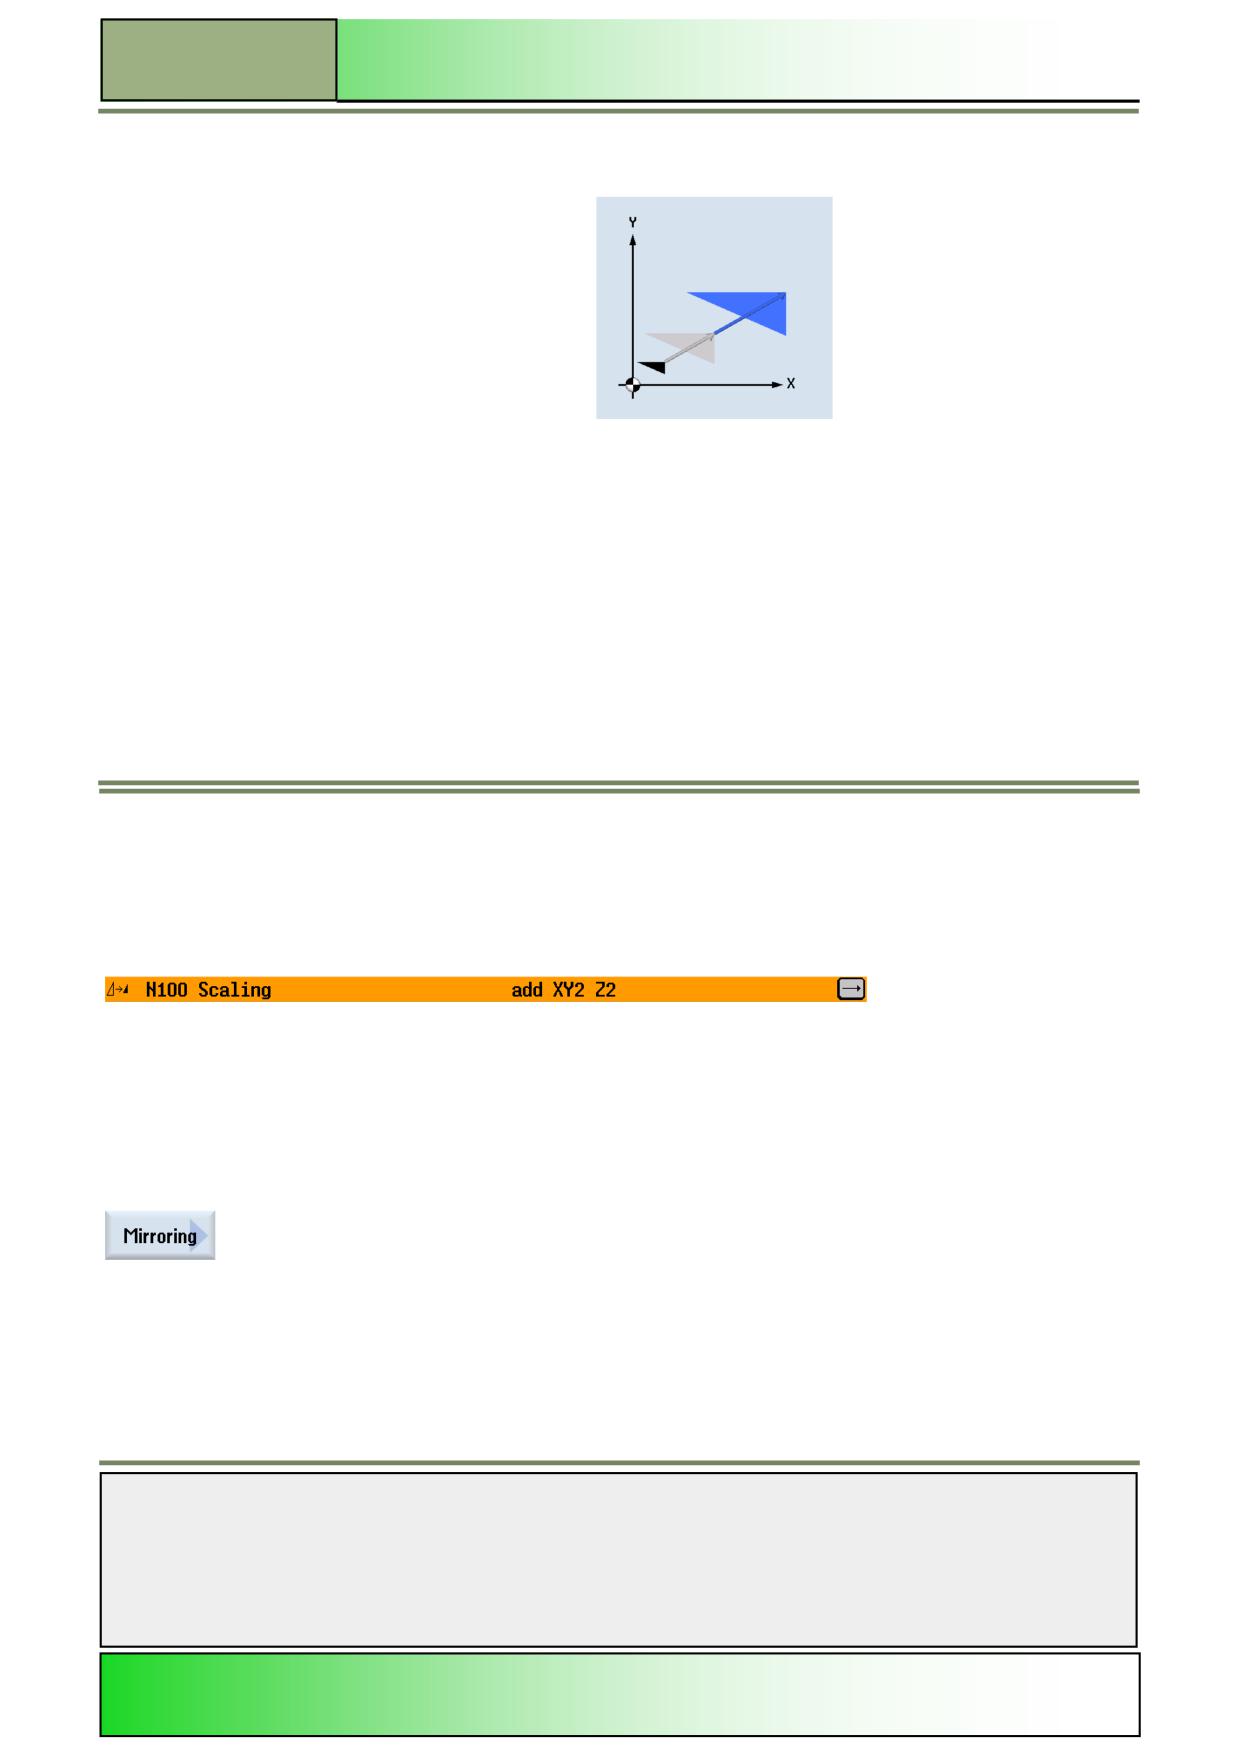
Scaling:
You can specify a scale factor for the active machining plane as well as for the tool axis. The programmed coordinates
are then multiplied by this factor. Note that the scaling always refers to the zero point of the workpiece. For example, if
you increase the size of a pocket whose centre point does not coincide with the zero point, scaling will shift the centre
of the pocket.
Mirroring:
Furthermore, you can mirror all axes. Enter the axis to be mirrored in each case. Note that with mirroring, the travel
direction of the cutting tool (conventional/climb) is also mirrored.
Notes
828D/840Dsl SINUMERIK Operate
Page 21
M600
M600
Basics of programming with ShopMill
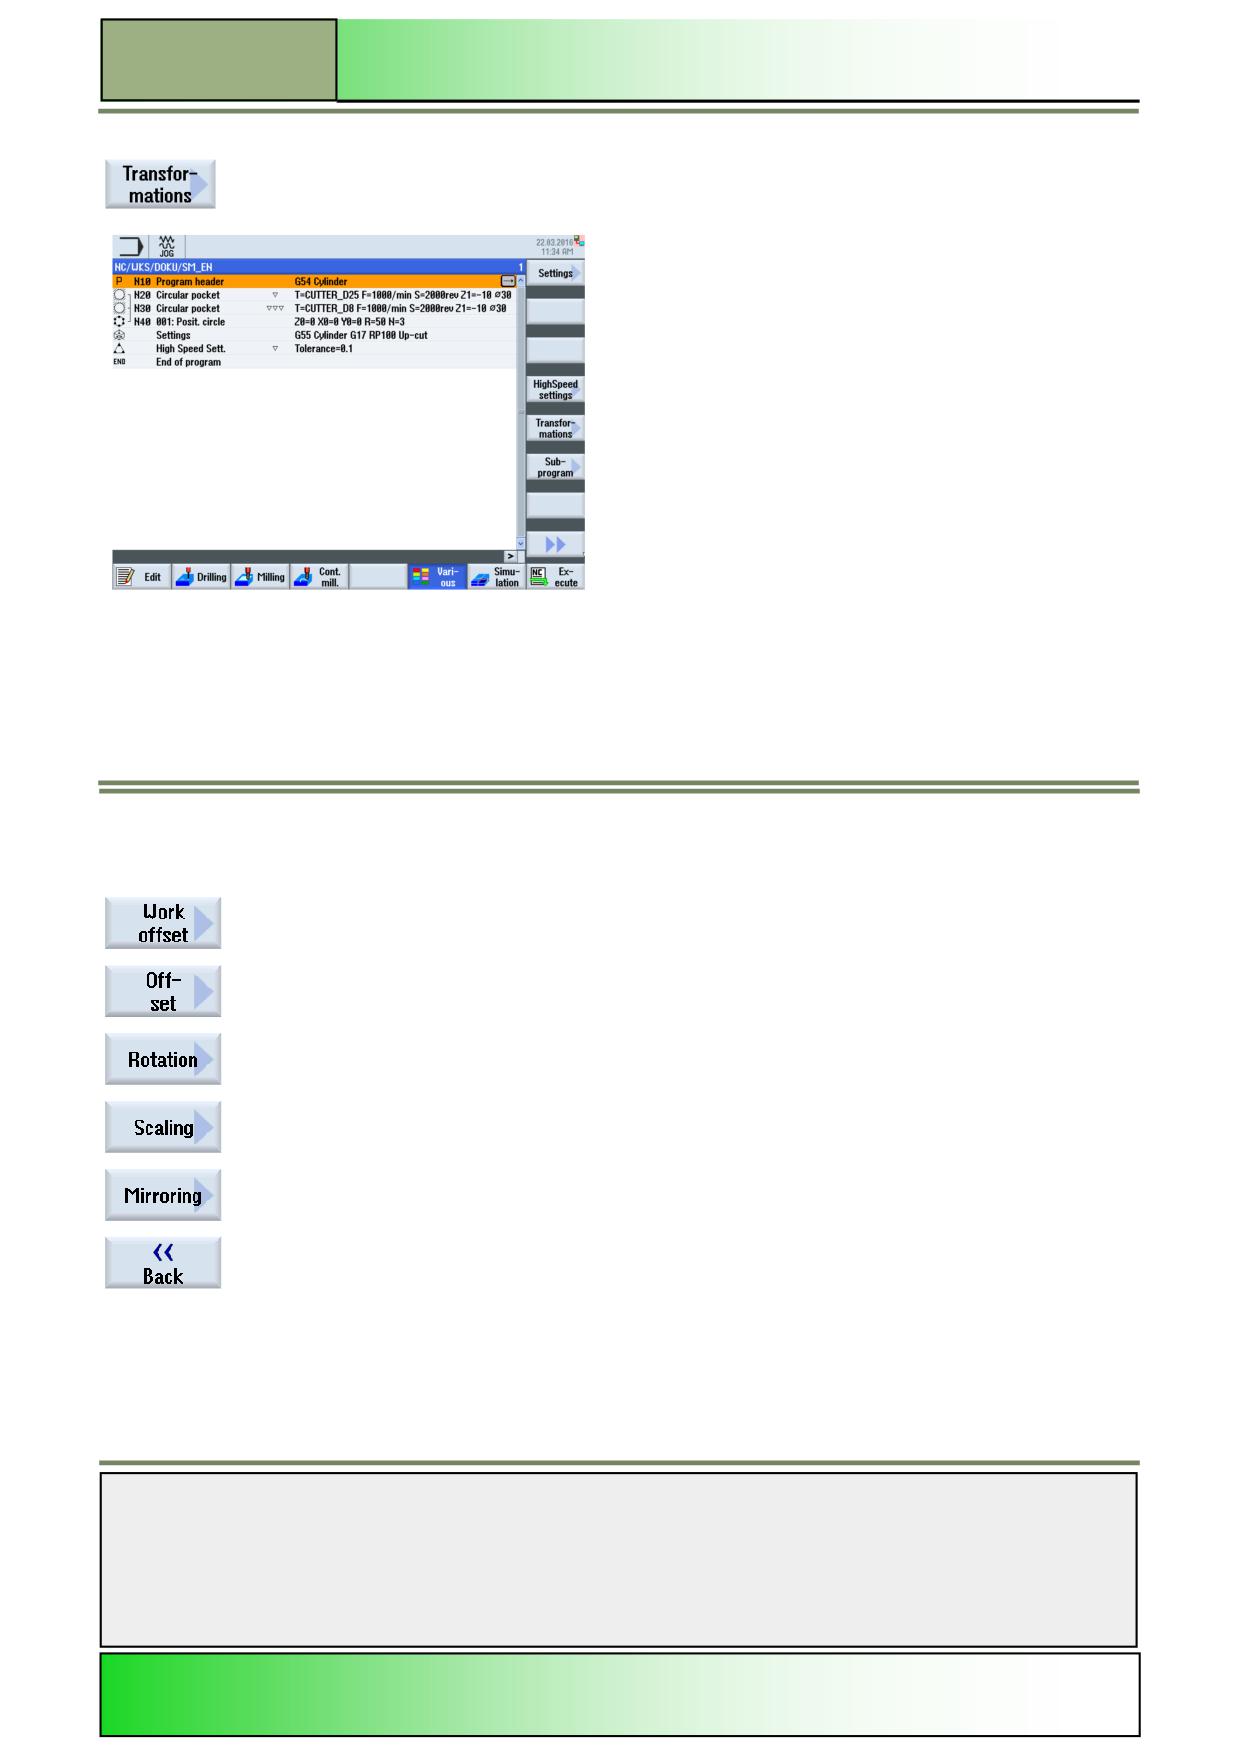
Selecting the function „Transformations“
By pressing the VSK 5 “Transformations“ the following vertical softkey bar in the editor window
opens.
Vertical softkey bar
Display area
Description
By pressing the VSK 1 “Work offset” the parameter window for the work offset opens.
By pressing the VSK 2 “Offset” the parameter window for the offset opens.
By pressing the VSK 3 “Rotation” the parameter window for the rotations opens.
By pressing the VSK 4 “Scaling” the parameter window for the scaling opens.
By pressing the VSK 5 “Mirroring” the parameter window for the mirroring opens.
The VSK 8 “Back” brings you back to the start screen of the function “Various”.
Notes
M600
Page 22
828D/840Dsl SINUMERIK Operate
Basics of programming with ShopMill
M600
Work offset
You can call work offsets (G54, etc.) from any program. You can use these offsets, for example, when you want to machine
workpieces with various blank dimensions using the same program. The offset will, in this case, adapt the workpiece zero to
the new blank.
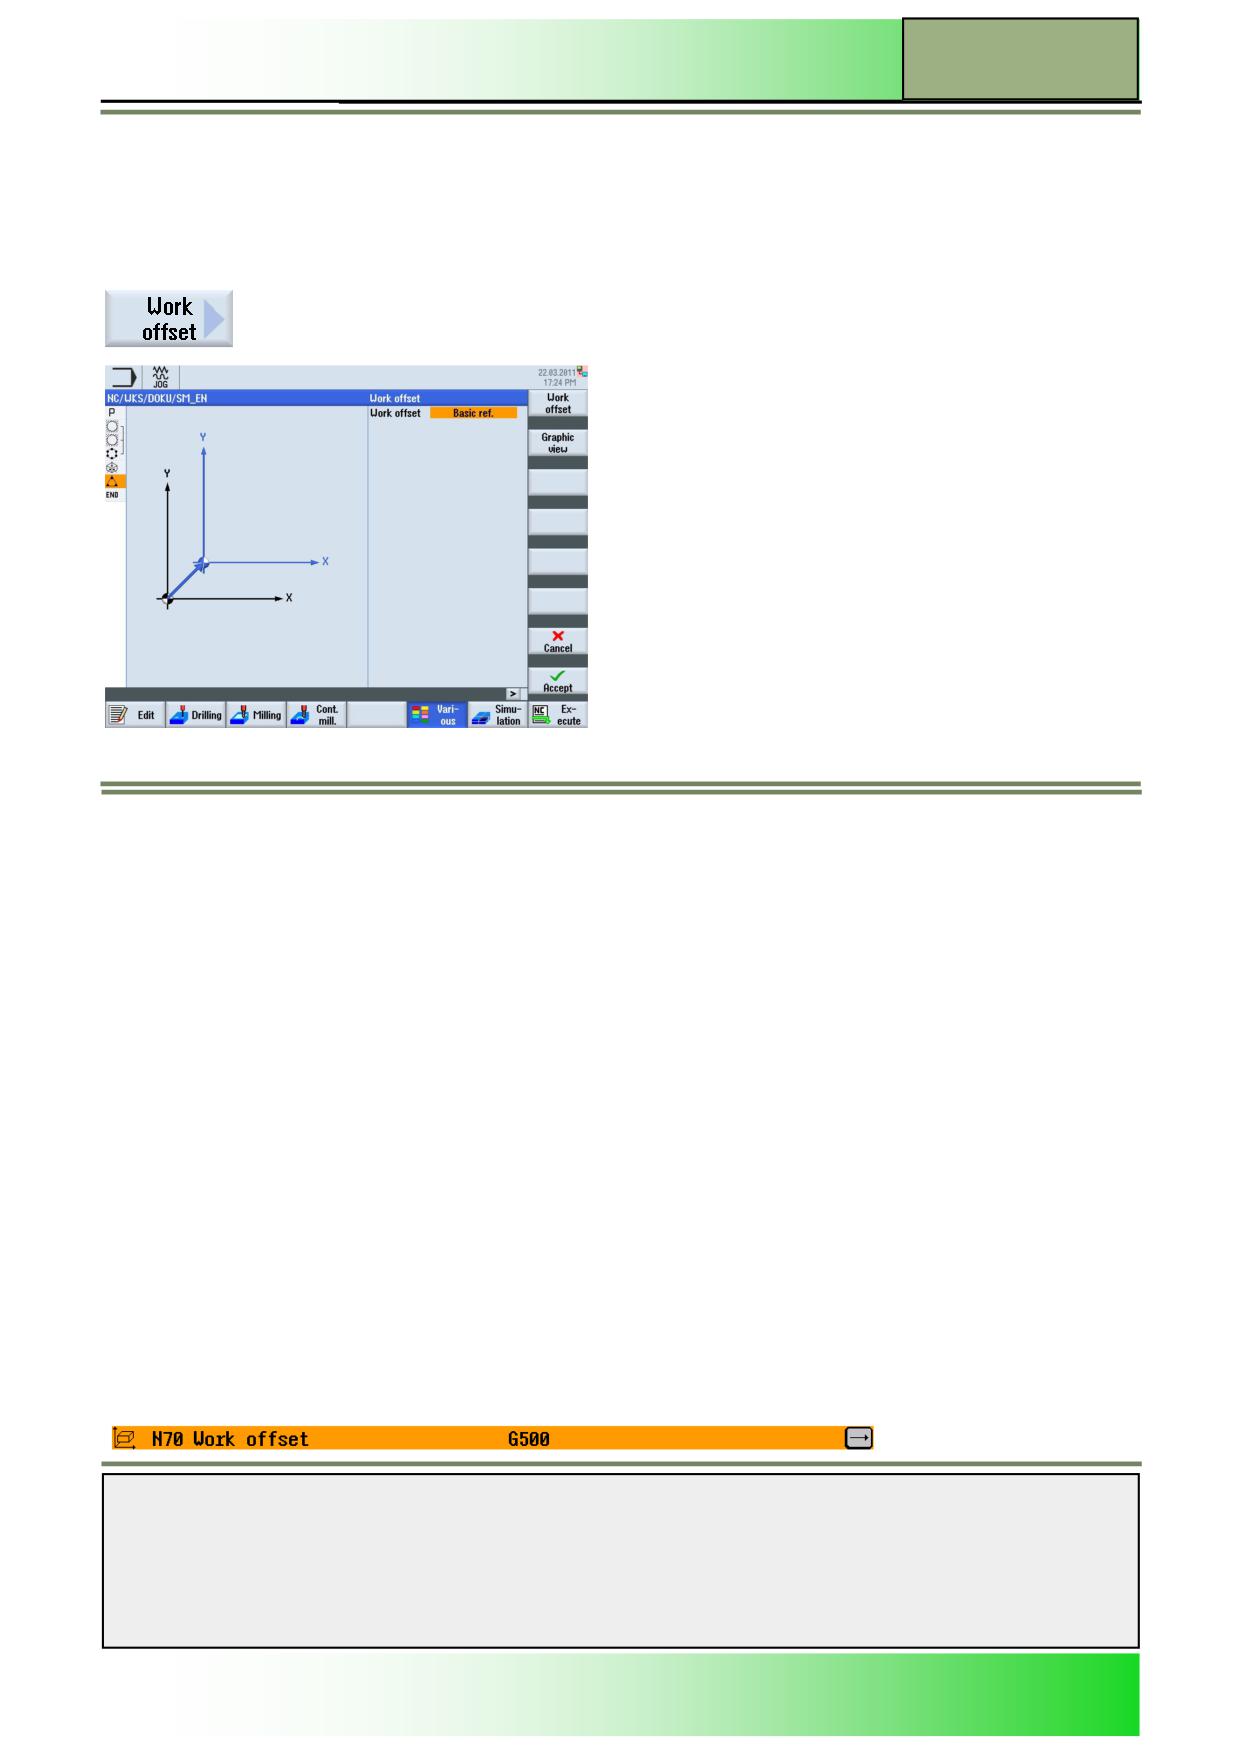
Selecting the function “Work offset”
By pressing the VSK 1 “Work offset” the input mask “work offset” opens.
Parameters for the work offset
Parameter
Meaning
Work offset.
Alternative work offsets
Basic
Reference G500
Basic ref.
G54
Storable
Zero offset
Storable
Zero offset
G55
Storable
Zero offset
G56
Storable
Zero offset
G57
Setting the work offset
1.
In the operating area “Program“ and operation mode “JOG”, “MDA”, or “AUTO” press the HSK 6
“Various“ and the VSK5 “Transformations”.
2.
Press the VSK 1 “Work offset”.
3.
Optionally change the graphic view for the blank between sectional drawing/3-D model or
wireframe model by pressing the VSK 2 “Graphic view”.
4.
Select the work offset (Basic reference, G54, G55, G56 or G57).
Press the VSK 8 “Accept” to confirm your selection or press the VSK 7 “Cancel” to abort.
A new program block “Work offset” is inserted into the program in the editor window (see picture
below).
Notes
828D/840Dsl SINUMERIK Operate
Page 23
M600
M600
Basics of programming with ShopMill
Offset
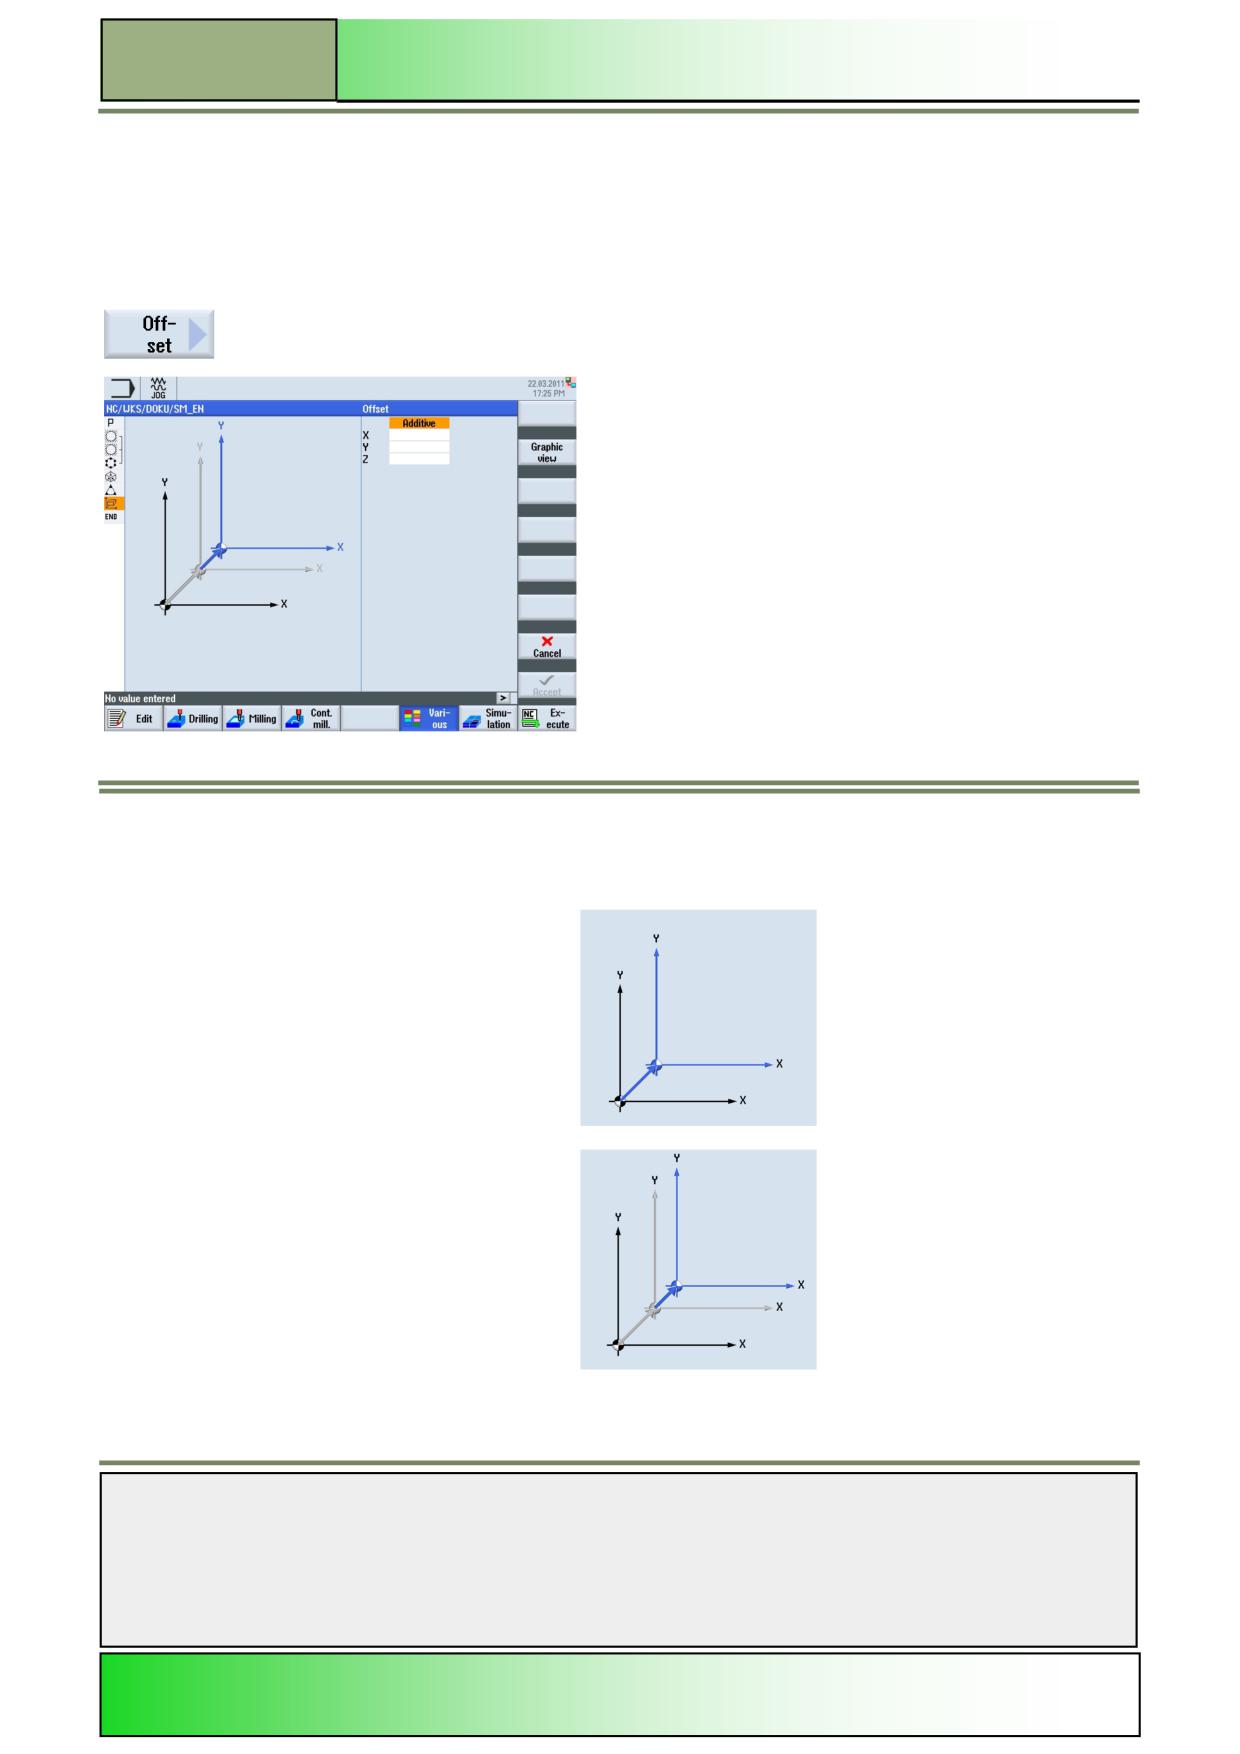
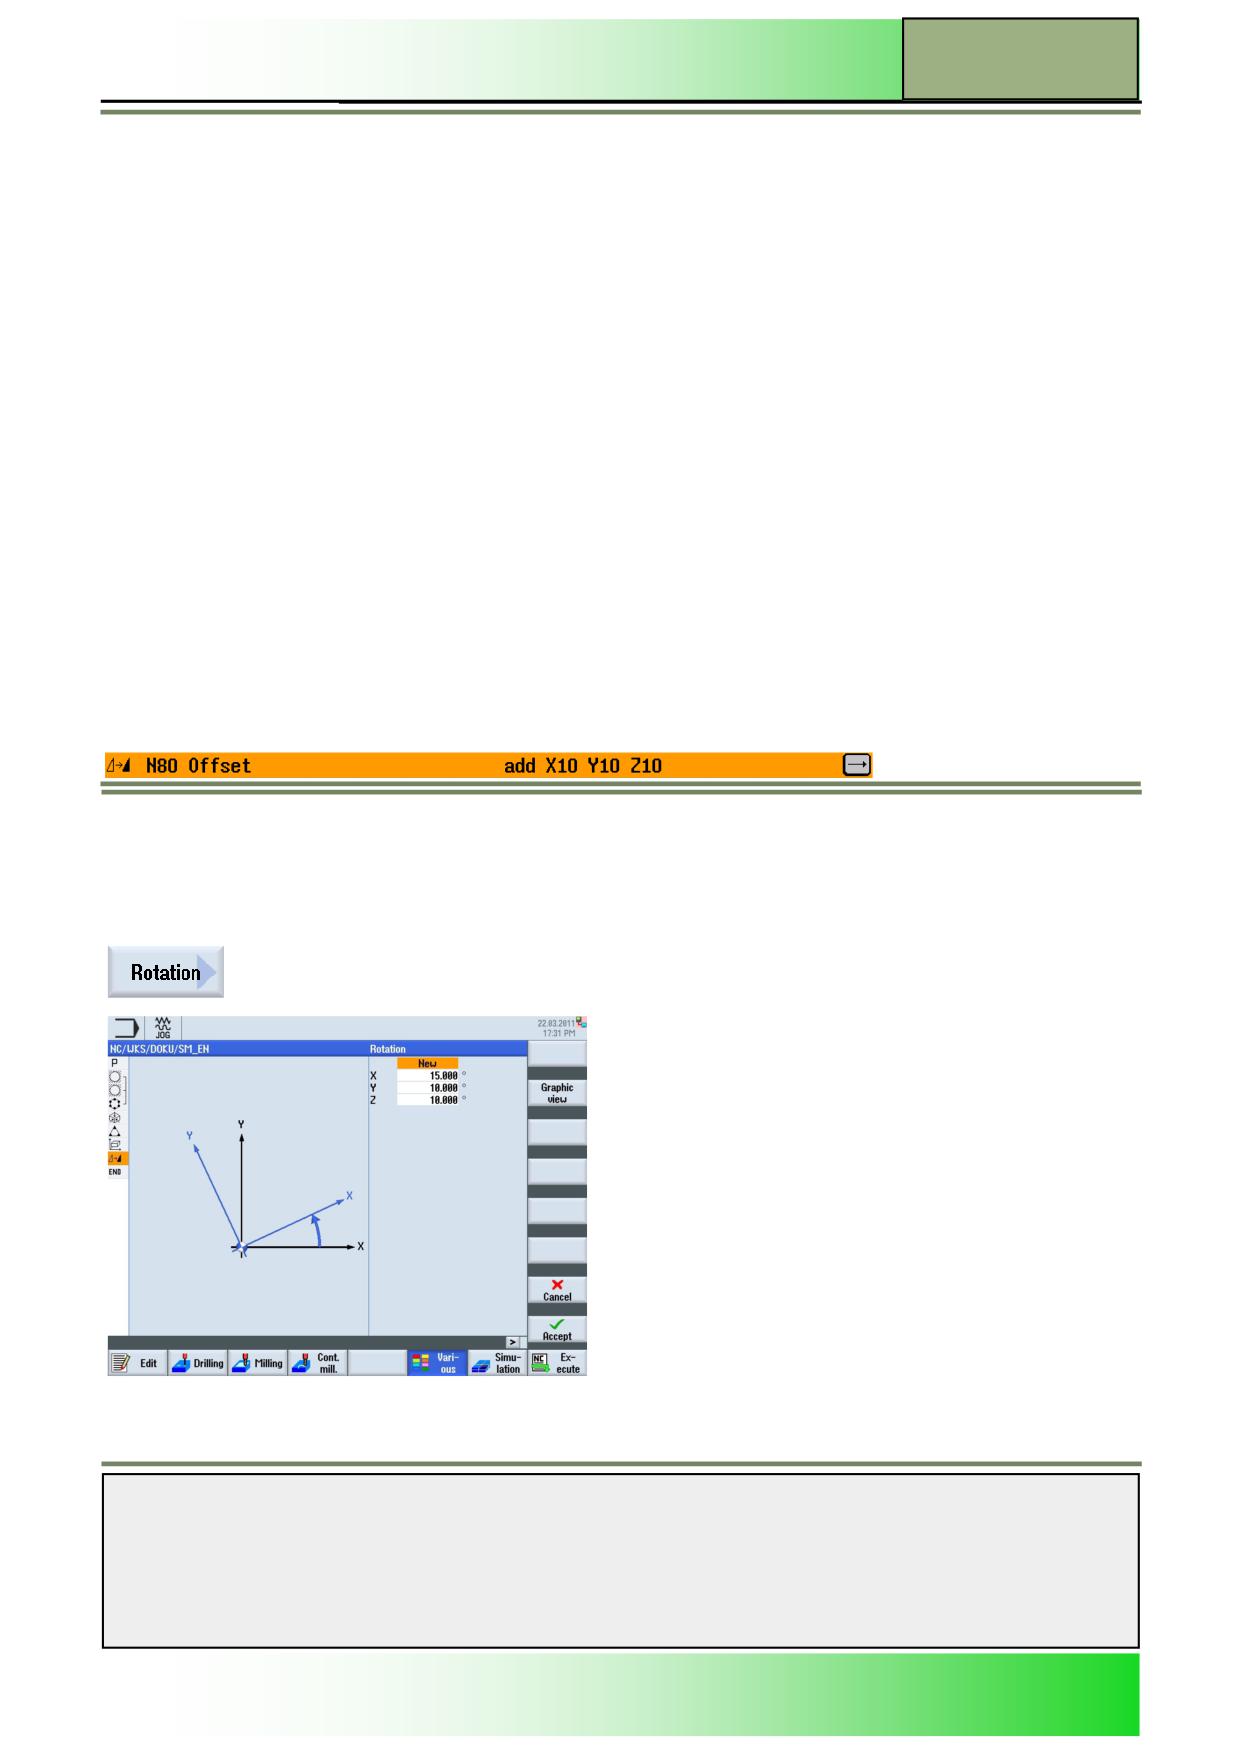
Offsets apply only to the current program.
Besides, you can select between a new and an additive offset.
With a new offset, all offsets defined before are deselected.
An additive offset works additional to the current selected offset.
For every axis an offset can be programmed.
Selecting the function “Offset”
By pressing the VSK 2 “Offset” the input screen mask ”Offset” opens.
Parameters for the “Offset”
Parameters
Description
Help picture/Animation
Offset:
New
Adds a new offset
Adds an additive offset
Additive
Notes
M600
Page 24
828D/840Dsl SINUMERIK Operate
Basics of programming with ShopMill
M600
Parameters for the “Offset”
Parameters
Description
Help picture/Animation
Offset:
Axes:
Unit
X
Offset X-axis
mm
Offset Y-axis
mm
Y
Offset Z-axis
mm
Z
Setting the “Offset”
1.
In the operating area “Program“ and operation mode “JOG”, “MDA”, or “AUTO” press the HSK
6 “Various“ and the VSK5 “Transformations”.
2.
Press the VSK 2 “Offset”.
3.
Optionally change the graphic view for the blank between sectional drawing/3-D model or
wireframe model by pressing the VSK 2 “Graphic view”.
4.
Select the kind of offset “new” or “additive”.
Enter the offset values for the different axes (X,Y,Z) in millimetre.
Press the VSK 8 “Accept” to confirm your inputs or press the VSK 7 “Cancel” to abort.
A new program block “Offset” is inserted into the program in the editor window (see picture
below).
Rotation
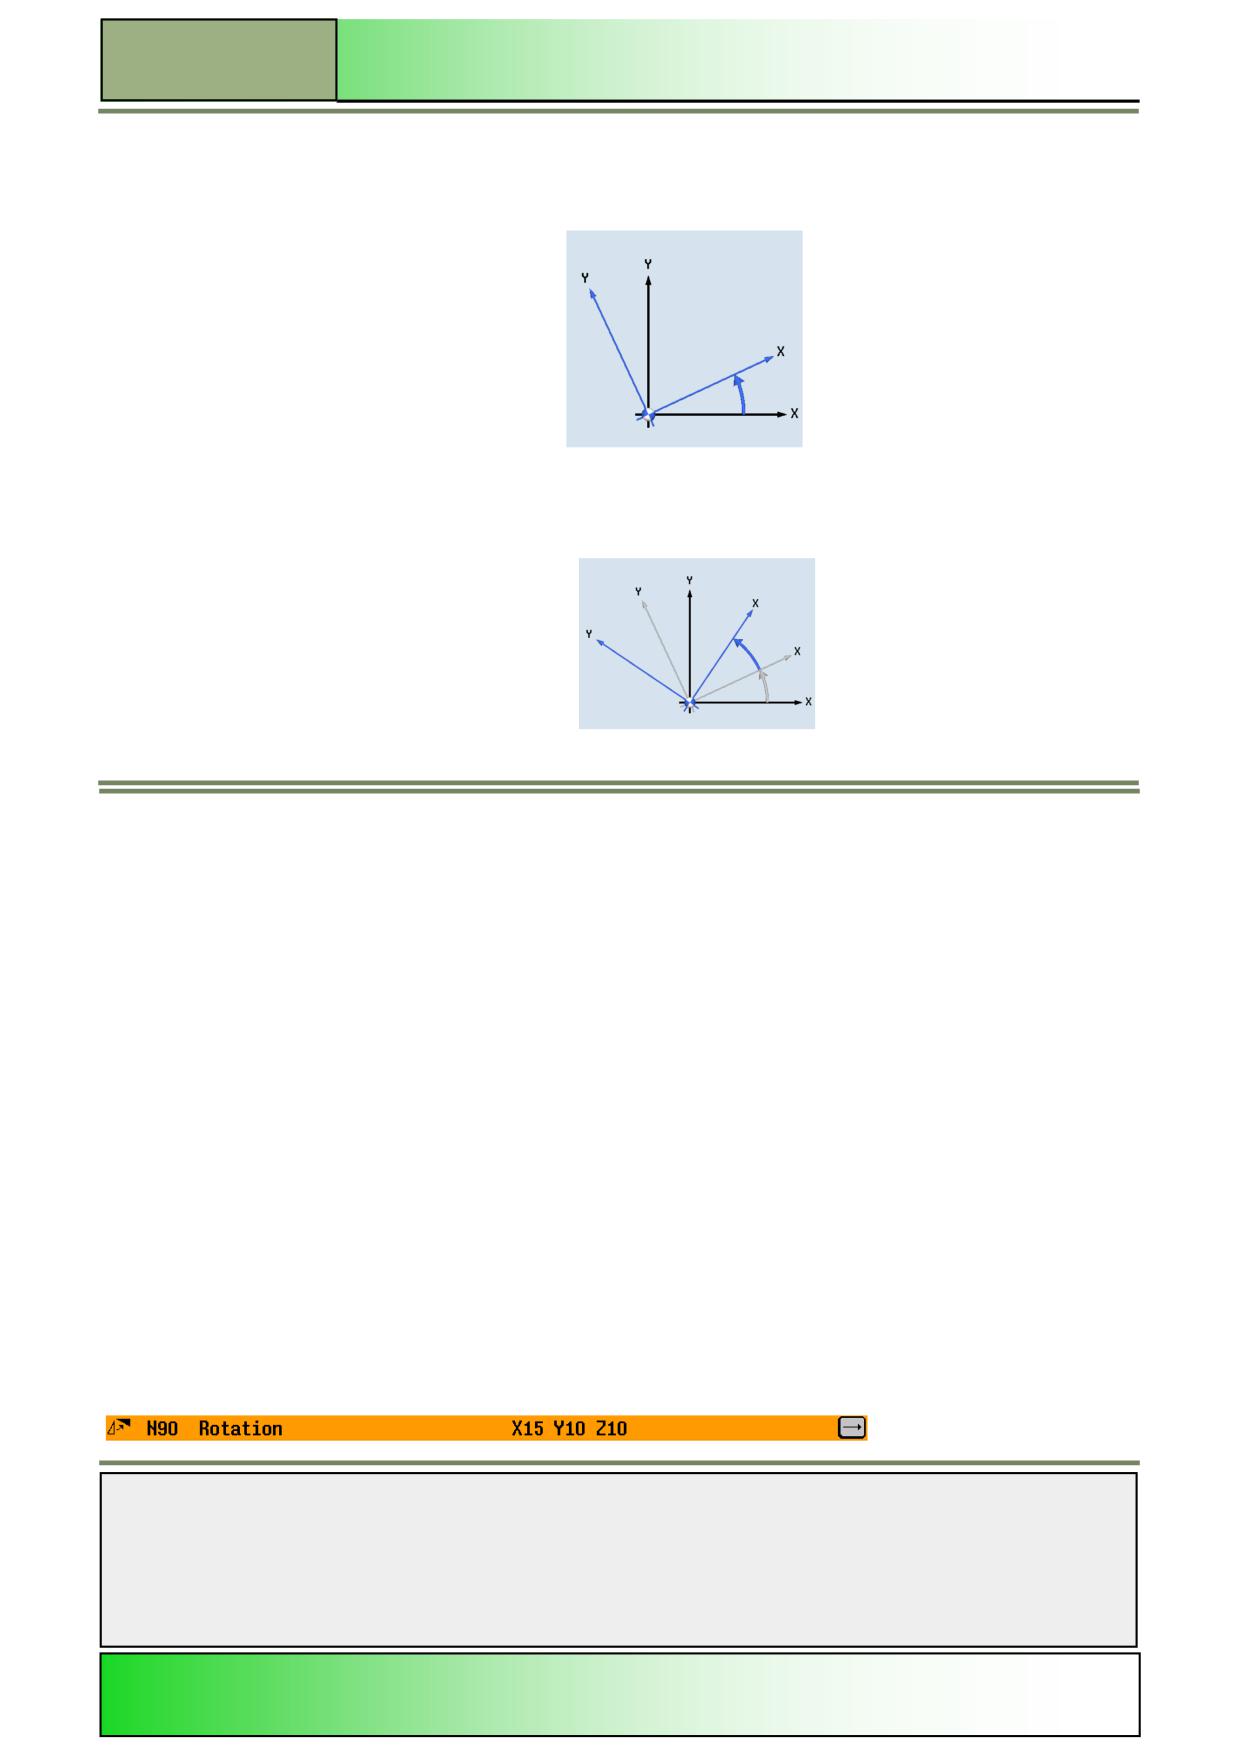
Rotations apply only to the current program. Besides, you can select between a new and an additive rotation. With a new
rotation, all rotations defined before are deselected. An additive rotation works additional to the current selected rotation.
For every axis an rotational angle in degrees can be programmed. A positive angle means a rotation counter clockwise.
Selecting the function “Rotation“
By pressing the VSK 3 “Rotation“ the input screen mask “Rotation” opens.
Notes
828D/840Dsl SINUMERIK Operate
Page 25
M600
M600
Basics of programming with ShopMill
Parameters for “Rotation”
Parameters
Description
Help picture/Animation
Rotation:
New
Adds a new rotation
Parameter
Description
Help picture/Animation (continuation)
Rotation:
Incremental rotation
Additive
Axes:
Units
Rotation around the
mm
X
X-axis
Rotation around the
mm
Y
Y- axis
Rotation around the
mm
Z
Z-axis
Setting the rotations
1.
In the operating area “Program“ and operation mode “JOG”, “MDA”, or “AUTO” press the HSK
6 “Various“ and the VSK5 “Transformations”.
2.
Press the VSK 3 “Rotation“.
3.
Optionally change the graphic view for the blank between sectional drawing/3-D model or
wireframe model by pressing the VSK 2 “Graphic view”.
4.
Select if you want to add a “new” or a “additive” rotation. Enter the values for the rotation
about the axes X, Y, und Z in degrees.
Press the VSK 8 “Accept” to confirm your inputs or press the VSK 7 “Cancel” to abort.
A new program block “Rotation” is inserted into the program in the editor window (see picture
below).
Notes
M600
Page 26
828D/840Dsl SINUMERIK Operate
Basics of programming with ShopMill
M600
Scaling
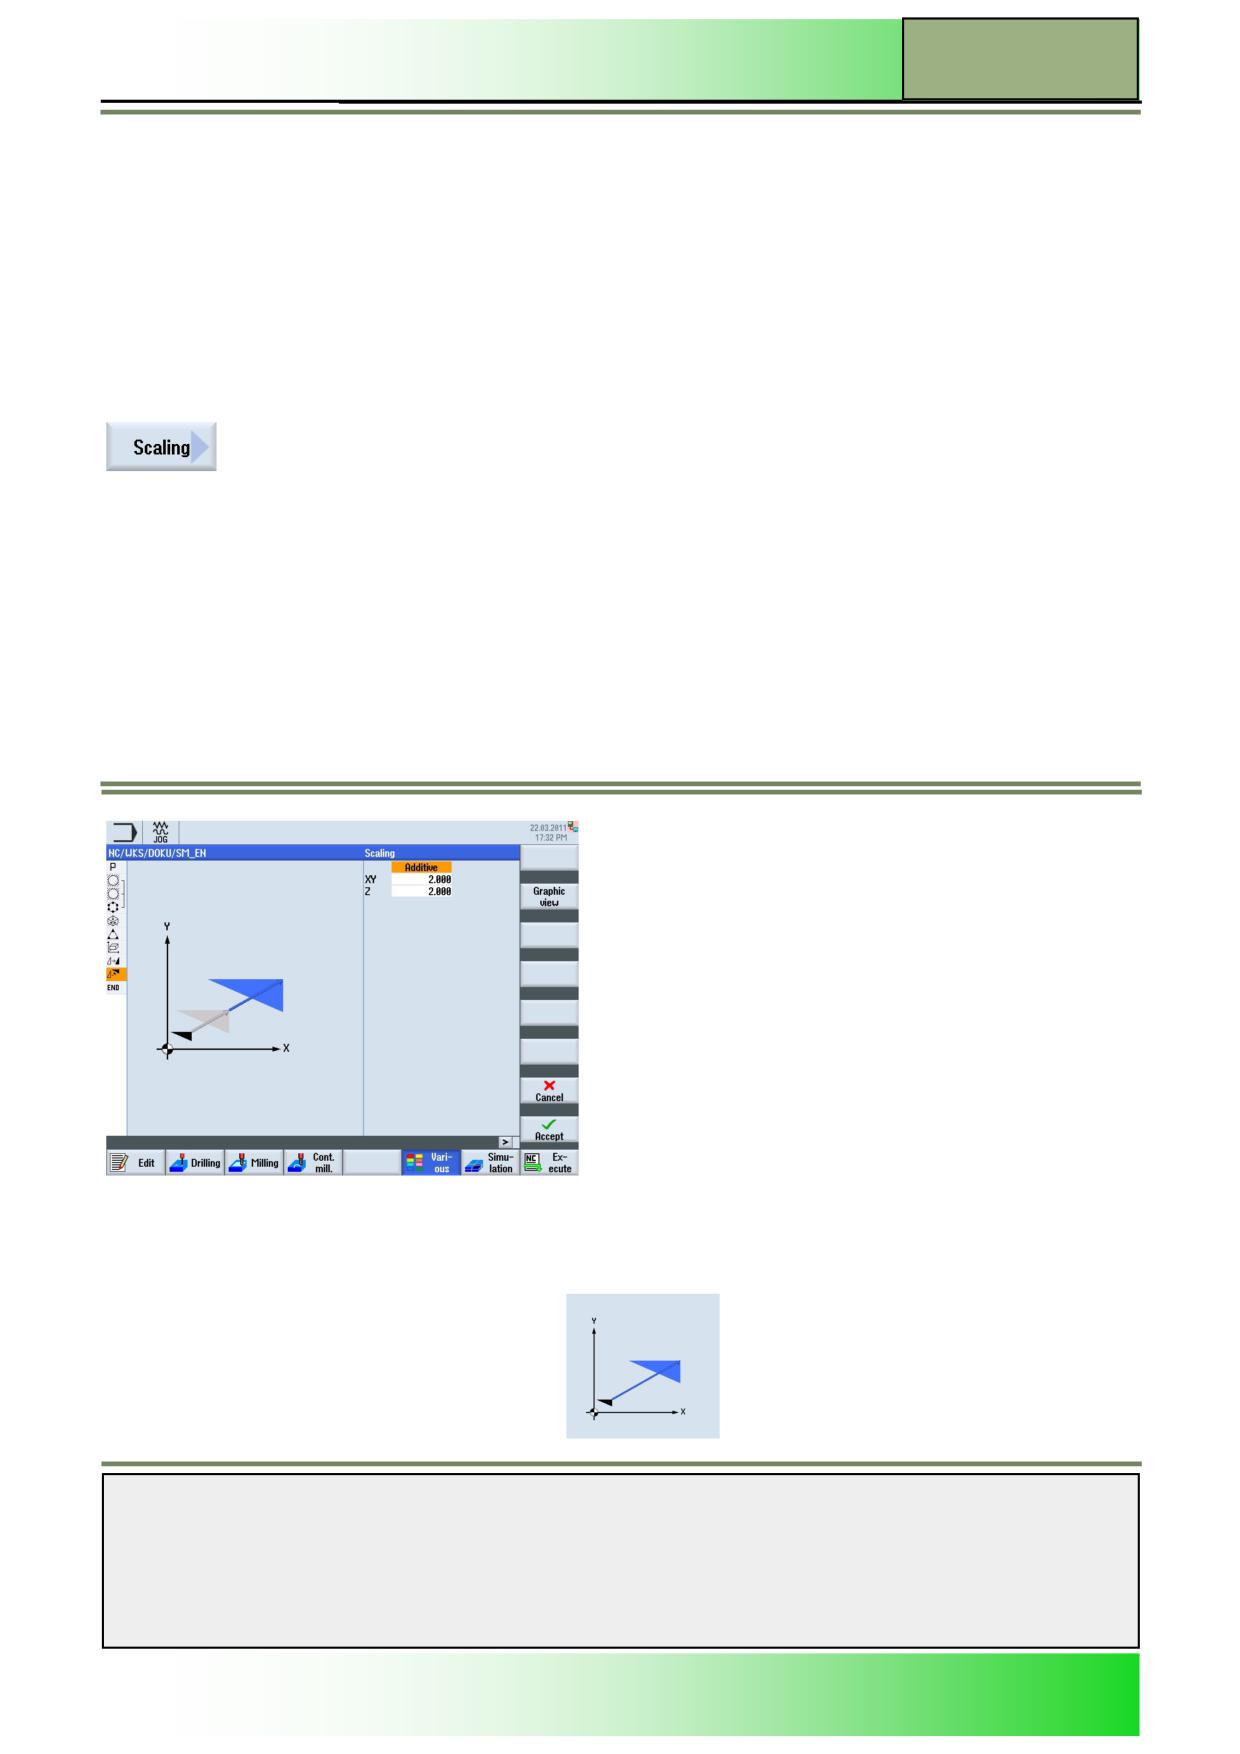
Scaling applies only to the current program. Besides, you can select between a new and an additive scaling.
With a new scaling, every scaling defined so far is deselected.
An additive scaling works incremental to the current selected scaling.
You can specify a scale factor for the active machining plane as well as for the tool axis. The programme coordinates are
then multiplied by this factor.
Note:
Note that the scaling always refer to the zero point of the workpiece.
For example, if you increase the size of a pocket whose centre point does not coincide with the zero point, scaling will shift
the centre of the pocket.
5.4.6.1 Selecting the function “Scaling”
By pressing the VSK 4 “Scaling” the input screen mask “Scaling” opens.
5.4.2 Parameters for “Scaling”
Parameter
Description
Help picture/Animation
Scaling:
Adds a new scaling
New
Notes
828D/840Dsl SINUMERIK Operate
Page 27
M600
M600
Basics of programming with ShopMill
Parameter
Description
Help picture/Animation (continuation)
Scaling:
Adds an additive scaling
Additive
Axes:
Scaling factor XY
XY
Scaling factor Z
Z
Setting the scaling
1.
In the operating area “Program“ and operation mode “JOG”, “MDA”, or “AUTO” press the HSK
6 “Various“ and the VSK5 “Transformations”.
2.
Press the VSK 4 „Scaling“.
3.
Optionally change the graphic view for the blank between sectional drawing/3-D model or
wireframe model by pressing the VSK 2 “Graphic view”.
4.
Select whether the scaling “new” or “additive”.
Insert the values for the scaling factor XY and Z.
Press the VSK 8 “Accept” to confirm your inputs or press the VSK 7 “Cancel” to abort.
A new program block “Rotation” is inserted into the program in the editor window (see picture
below).
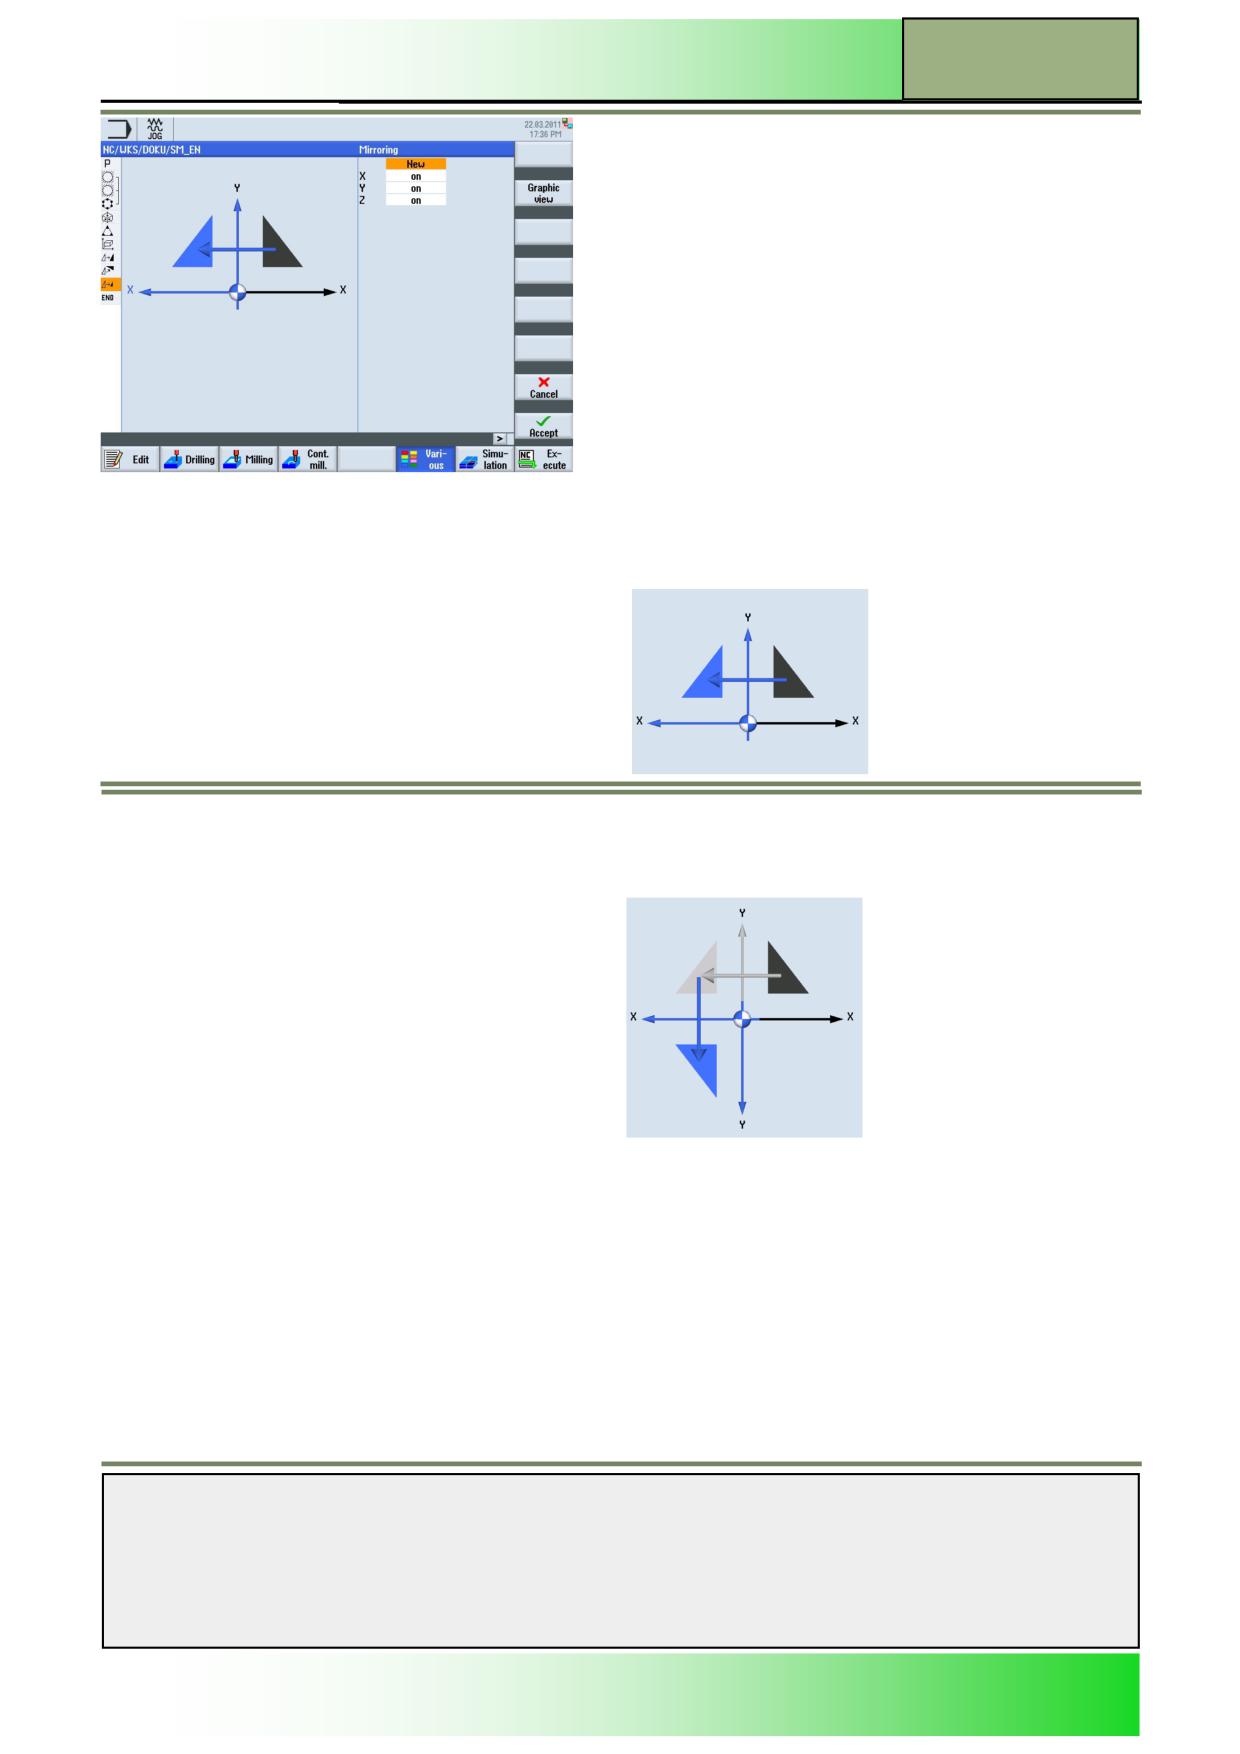
Mirroring: applies only to the current program. Besides, you can select between a new and an additive mirroring. With a
new mirroring, all mirror images defined so far are deselected. An additive mirroring works additional to the current selected
mirroring. Furthermore it is possible to mirror all axes.
Activate the axis to be mirrored in each case.
Note:
Note that with mirroring, the travel direction of the cutting tool (down-cut/up-cut) is also mirrored.
Selecting the function “Mirroring”
By pressing the VSK 5 “Mirroring” the input screen mask “Mirroring” opens.
Notes
M600
Page 28
828D/840Dsl SINUMERIK Operate
Basics of programming with ShopMill
M600
Parameters for “Mirroring”
Parameter
Description
Help picture/Animation
Mirroring:
New
Adds a new mirroring
Parameters
Description
Help picture/animation
(continuation)
Mirroring:
Adds an additive mirroring
Additive
Axes:
X
Mirroring for the X-axis (on/off)
Mirroring for the Y-axis (on/off)
Y
Z
Mirroring for the Z-axis (on/off)
Notes
828D/840Dsl SINUMERIK Operate
Page 29
M600
M600
Basics of programming with ShopMill
Mirroring the axes
1.
In the operating area “Program“ and operation mode “JOG”, “MDA”, or “AUTO” press the HSK
6 “Various“ and the VSK5 “Transformations”.
2.
Press the VSK 5 “Mirroring”.
3.
Optionally change the graphic view for the blank between sectional drawing/3-D model or
wireframe model by pressing the VSK 2 “Graphic view”.
4.
Select whether the Mirroring is “new” or “additive”.
Switch on or off the axis that you want to have mirrored.
Press the VSK 8 “Accept” to confirm your inputs or press the VSK 7 “Cancel” to abort.
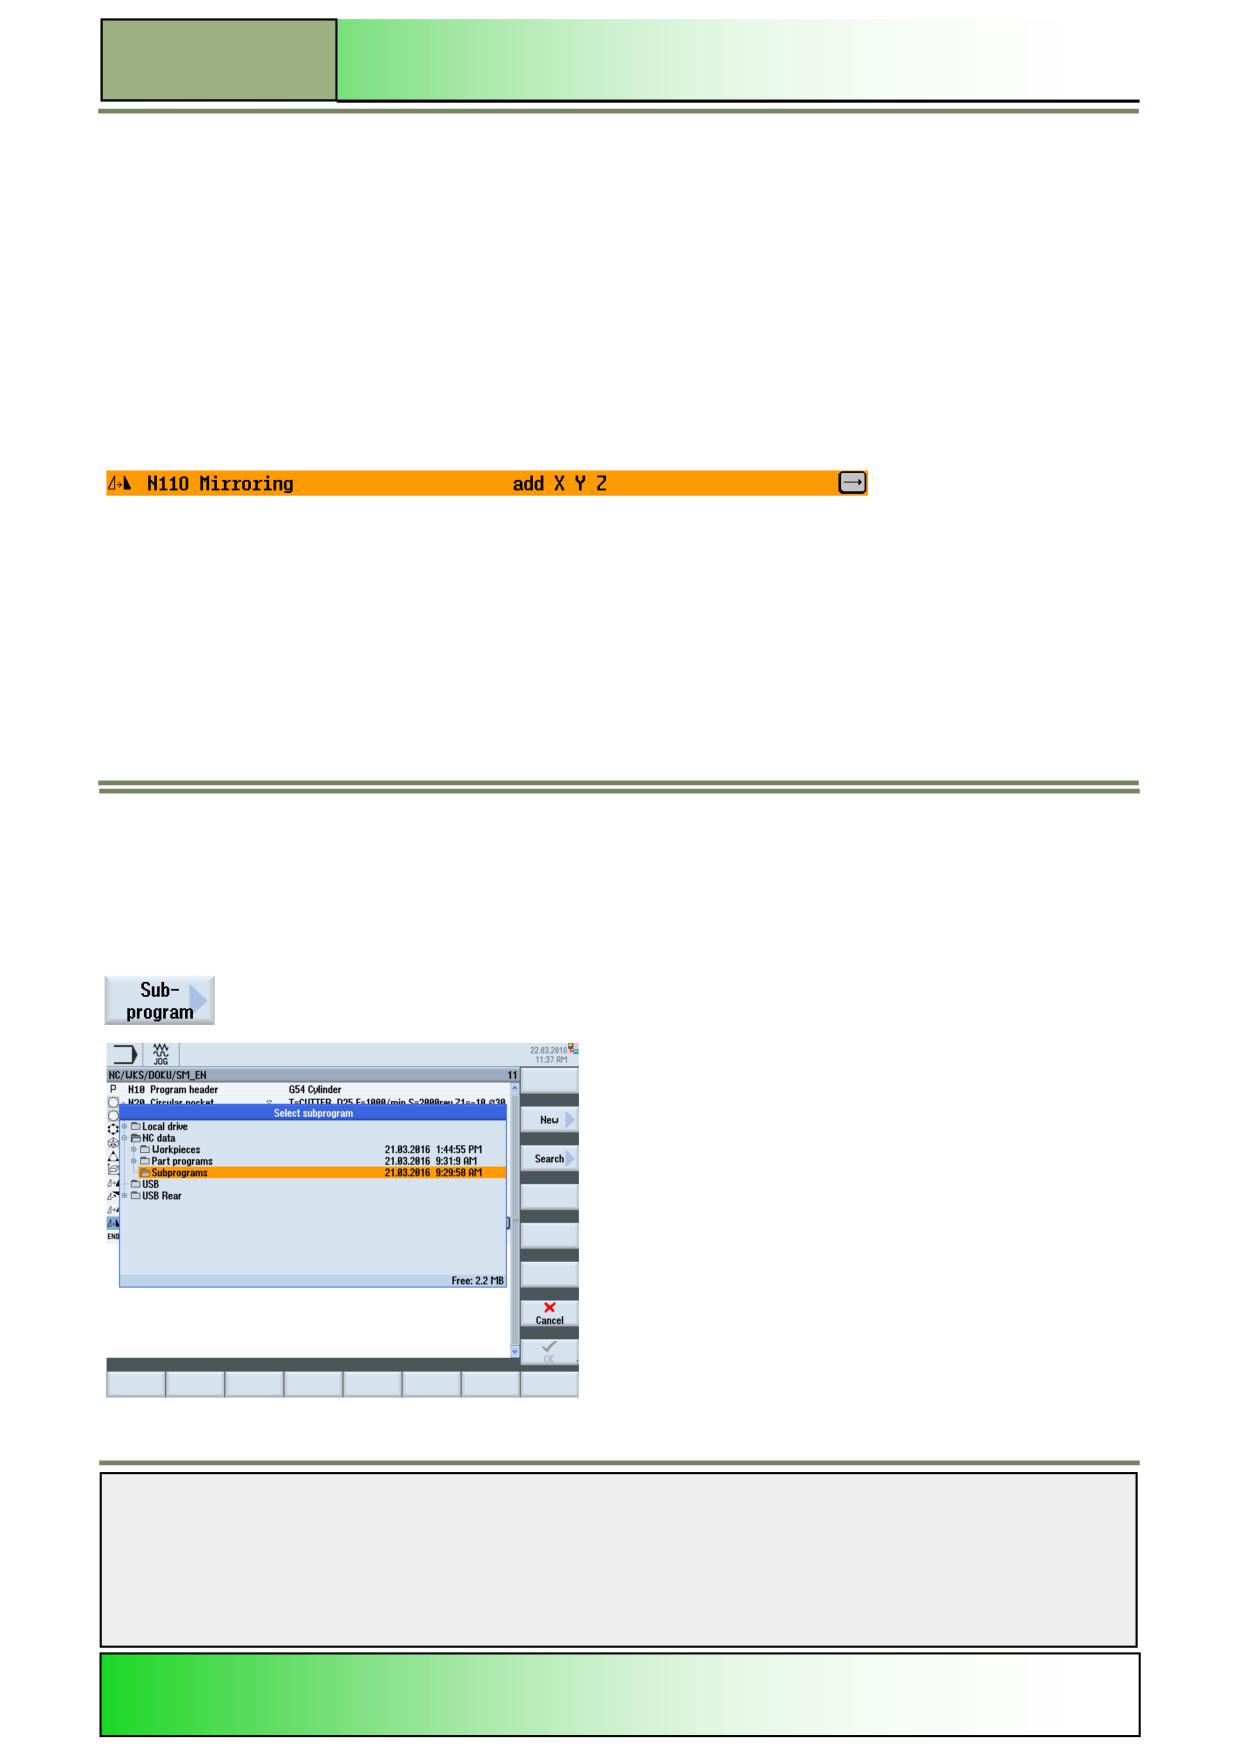
A new program block “Mirroring” is inserted into the program in the editor window (see picture
below).
Subprogram
If you require the same machining steps in the programming of different workpieces, you can define these machining steps
in a separate subroutine. You can then call this subroutine in any program.
Identical machining steps therefore only have to be programmed once. ShopMill does not differentiate between main pro-
gram and subprogram. This means that you can call a "standard" sequential program or G code program as subprograms in
another sequential program. In this subprogram, you can also call another subprogram. The maximum nesting depth is 8
subroutines. You cannot insert subroutines among blocks chained by the control. If you want to call a sequential control
program as a subroutine, the program must already have been calculated once (load or simulate program in “AUTO” operat-
ing mode). This is not necessary for G code subroutines. The subroutine must always be stored in the NCK main memory
(in a separate directory "XYZ" or in the "ShopMill", "Part programs", "Subprograms" directories). If you want to call a subpro-
gram located on another drive, you can use G code command "EXTCALL".
Note:
Please note that, when a subprogram is called, ShopMill evaluates the settings in the program header of the subroutine.
These settings also remain active even after the subprogram has ended.
If you wish to activate the settings from the program header for the main program again, you can make the settings again in
the main program after calling the subprogram.
Selecting the function “Subprogram“
By pressing the VSK 3 “Subprogram” the input screen mask “Subprogram” opens.
Notes
M600
Page 30
828D/840Dsl SINUMERIK Operate
Basics of programming with ShopMill
M600
Inserting a subprogram
1.
In the operating area “Program“ and operation mode “JOG”, “MDA”, or “AUTO” press the HSK
6 “Various“
2.
Press the VSK 1.6 ”Subprogram”.
3.
Optionally change the graphic view on the blank by pressing the VSK 2 “Graphic view”.
4.
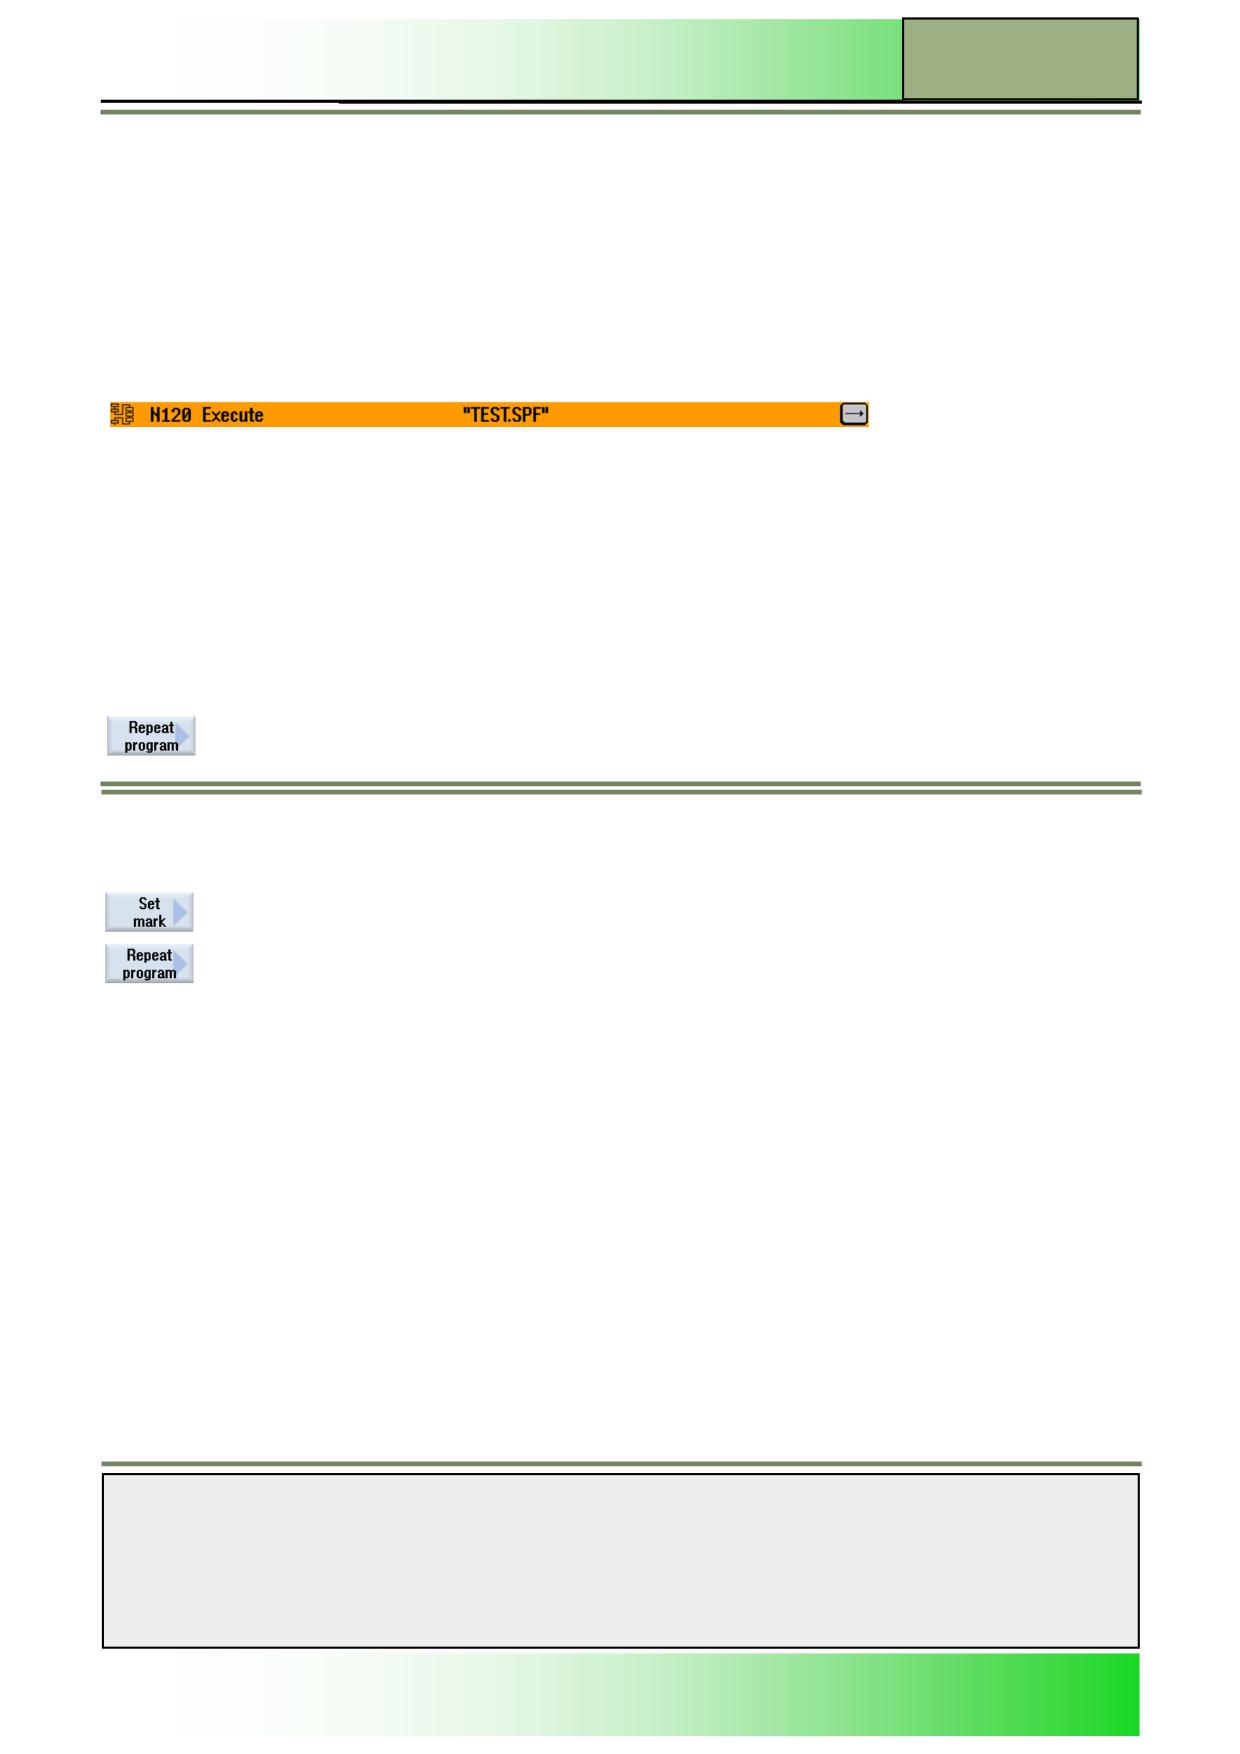
Enter the path to the subprogram folder and the name of the subprogram in the input mask.
Press the VSK 8 “Accept” to confirm your inputs or press the VSK 7 “Cancel” to abort.
A new program block “Execute” is inserted into the program in the editor window (see picture
below).
Repeating program blocks
If certain steps in the machining of a workpiece have to be executed more than once, it is only necessary to program these
steps once. ShopMill offers a function for repeating program blocks. You must mark the program blocks that you want to
repeat with a start and end marker. You can then call these program blocks up to 9999 times again within a program. The
markers must be unique, i.e. they must have different names. No names used in the NCK can be used for this. You can also
set markers and repeats after creating the program, but not within chained program blocks.
Note:
It is also possible to use the same marker as the end marker of the preceding program blocks and as the start marker for
the following program blocks.
Selecting the function “Repeat program”
By pressing the VSK 3 “Repeat Program” the following vertical softkey bar with the functions
for repeating program parts opens.
Vertical softkey bar
Display area
Description
By pressing the VSK 1 “Set Mark” the window for setting a start or end mark opens.
By pressing the VSK 2 “Repeat program” an input mask opens where you can specify the
start and end marker which enclose the program parts you want to repeat.
Repeating a program block
1.
In the operating area “Program“ and operation mode “JOG”, “MDA”, or “AUTO” press the HSK 6
“Various“
2.
Press the VSK 1.8 “Extend” to open the extended vertical softkey bar 2.
3.
Press the VSK 2.3 “Repeat program”.
4.
Place the orange selection cursor on the program block before the program block that you want
to repeat.
Notes
828D/840Dsl SINUMERIK Operate
Page 31
M600
M600
Basics of programming with ShopMill
Repeating a program block
5.
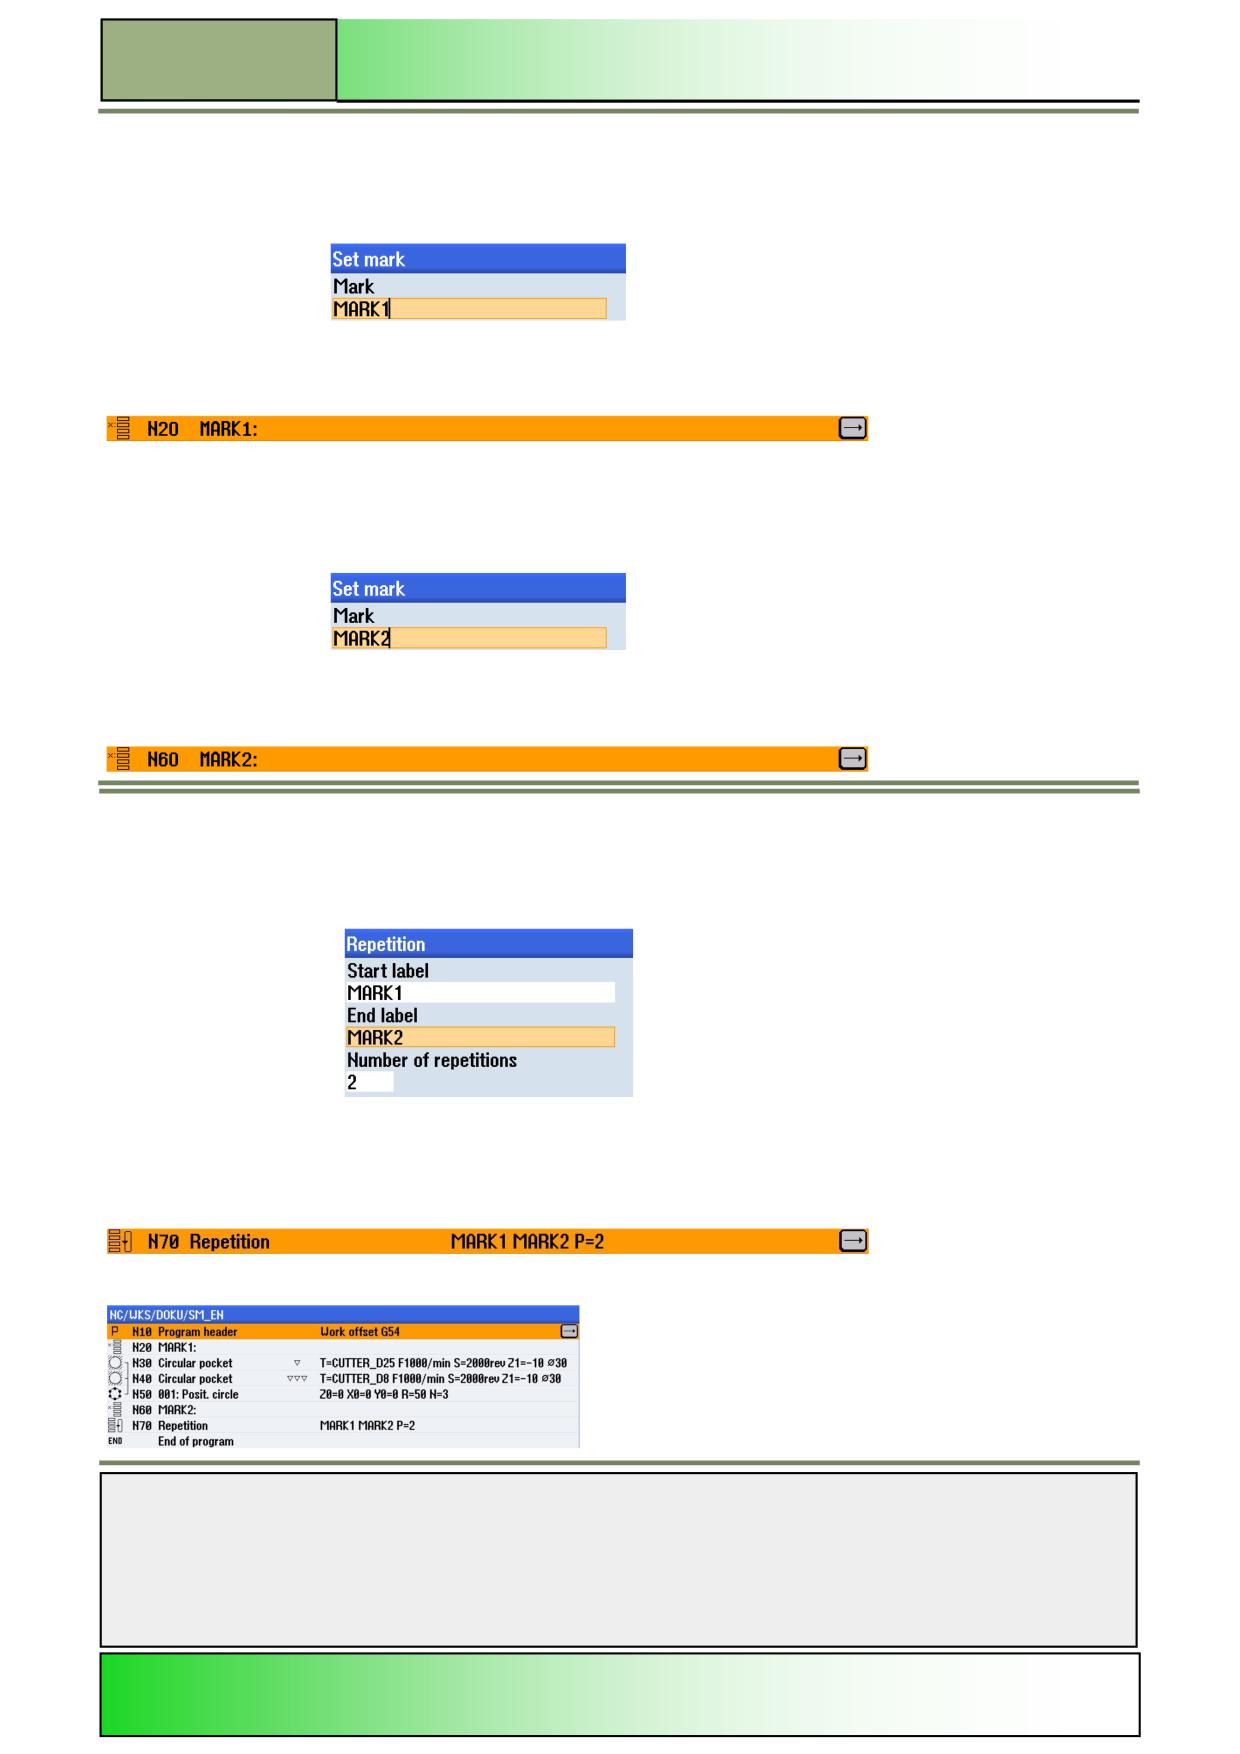
Press the VSK 1 “Set Mark” to open the input screen mask for input of the start mark.
In the “Set mark” input window, enter a unique name for the start mark (see the following pic-
ture).
With pressing the VSK 8 “Accept” a new program block “MARK1” is inserted into the work plan
(see picture below).
6.
Place the orange selection cursor on that program block in the editor window that shall be the
last block in the repetition sequence.
7.
Press the VSK 1 “Set mark” to open the input screen mask for input of the end mark.
In the “Set mark” input window, enter a unique name for the end mark (see the following picture).
With pressing the VSK 8 “Accept” A new program block “MARK2” is inserted into the work plan
(see picture below)..
8.
Place the orange selection cursor on that block, after that you want to repeat the program se-
quence.
9.
Press the VSK 2.3 “Repeat program”.
In the input mask enter the name for the start mark and the end mark as well as the number of
repetitions.
Confirm your selection by pressing the VSK 8 “Accept”.
A new program block “Repetition MARK1 MARK2” is inserted into the work plan
(see picture below).
10.
The program blocks between the marks will be repeated during machining of the program.
Notes
M600
Page 32
828D/840Dsl SINUMERIK Operate

Basics of programming with ShopMill
M600
Simulation
ShopMill provides various extensive and detailed simulation functions for displaying the simulation of the machining.
During simulation, the current program is calculated in its complete form and the result is displayed in graphic form.
You can select the following modes of representation for simulation:
Top view
3-D view
Side view
The simulation uses the correct proportions for the tools and workpiece contours. Cylindrical die-sinking cutters, bevel cut-
ters, bevel cutters with corner rounding and tapered die-sinking cutters are displayed as end milling tools.
The traverse paths for the tools are shown in colour:
Red line = tool is moving at rapid traverse
Green line = tool is moving at machining feedrate
In all views, a clock is displayed during graphical processing. The displayed machining time (in hours/minutes/seconds)
indicates the approximate time that would actually be required to execute the machining program on the machine (incl. tool
change). If a program is interrupted during simultaneous recording, the clock stops. In addition, the current axis coordinates,
the override, and the program block currently being executed are also displayed. The active tool with the cutting edge num-
ber and feedrate are also displayed in the simulation.
Transformations are displayed differently during simulation and
simultaneous recording:
Coordinate transformations (translation, scaling, …) are displayed as programmed.
Cylinder surface transformations are displayed as a developed surface.
After swivel transformation, the previous machining operations are deleted from the display and only machining of the
swivelled plane is displayed (viewing angle perpendicular to the swivelled plane).
Zero offsets (G54, etc.) do not alter the zero in the graphical display. This means that, in the case of multiple clamping,
the machining operations for each of the individual workpieces are plotted on top of one another.
Note:
If you want to display a different portion of the workpiece from the one defined in ShopMill, you can define a new blank in
the program.
Notes
828D/840Dsl SINUMERIK Operate
Page 33
M600
M600
Basics of programming with ShopMill
Selecting the function “Simulation“
The function “Simulation” can be selected from the operating mode “JOG“, “MDA“ and “AUTO“ as follows:
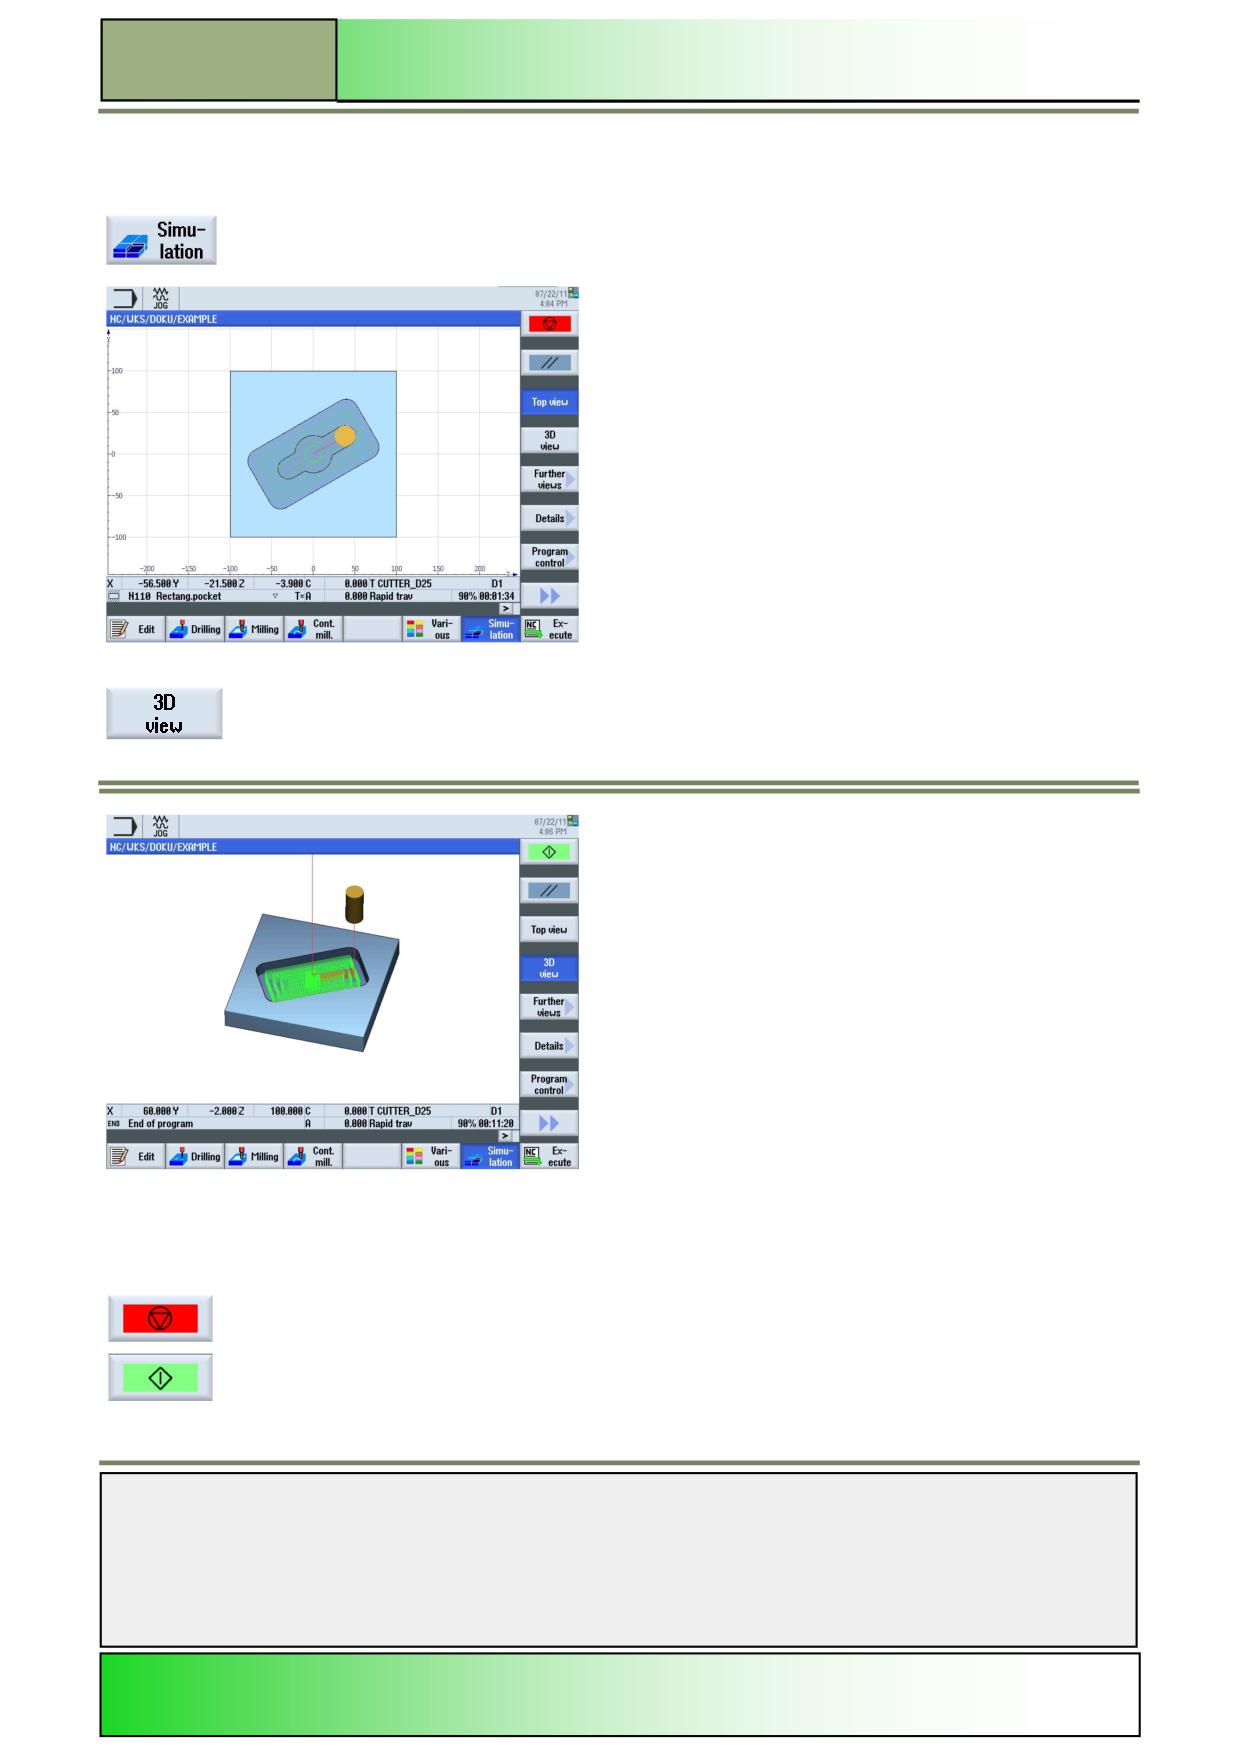
With a program loaded, press the HSK 1.7 “Simulation“ to start a simulation run.
The following screen opens.
The simulation starts after a short computing time in the top view by default.
Press the VSK 1.4 “3D view” the simulated workpiece is displayed 3-dimesionally (see picture
below).
The following functions will be available in the vertical softkey bar.
Vertical softkey bar 1 and 2
Display area
Description
By pressing the VSK 1.1 “Stop“ the simulation will be halted. The softkey will be replaced with
the VSK 1.1 “Start”, in order to continue the simulation again.
By pressing the VSK 1.1 “Start” the simulation will be started or continued. The softkey will be
replaced with the VSK “Stop”.
Notes
M600
Page 34
828D/840Dsl SINUMERIK Operate
Basics of programming with ShopMill
M600
Vertical softkey bar 1 and 2
Display area
Description
By pressing the VSK 1.1 “SBL“ the simulation will be processed block by block. This softkey
replaces the softkey “Start”, if the VSK 4 “Single block” is activated under the function “Program
control”.
By pressing the VSK 1.2 “Reset“ the simulation will be aborted, and can be started again by
pressing the VSK 1.1 “Start”.
The “Top view“ is activated by default and shows the simulation in a plan view from above
By pressing the VSK 1.4 “3D view“ the simulation will be shown in a 3-D view
By pressing the VSK 1.5 “Further views” the vertical softkey bar opens, with more options to
adjust the view on the simulation process.
By pressing the VSK 1.6 “Details“ the vertical softkey bar opens, where you can adjust the level
of details that will be shown during the simulation (see section 6.4).
By pressing the VSK 1.7 “Program control” the vertical softkey bar opens, with further functions
to control the simulation run.
By pressing the VSK 1.8 “Extend” the vertical softkey bar 2 with the following functions will be
displayed.
By pressing the VSK 2.3 “Show tool path” the display of the simulated tool path can be
switched on and off.
By pressing the VSK 2.4 “Delete tool path” the animated tool path in the simulation window will
be deleted. A new tool path is shown immediately after pressing this softkey or after running a
new simulation (if the simulation is in “Stop”- or “Reset”- mode).
By pressing the VSK 2.5 “Blank” you can change the dimensions of the simulated blank. This
softkey is active if the simulation is in “Reset” mode. (Note SK only visible in G-code)
By pressing the VSK 2.8 “Back” you switch back to the vertical softkey bar 1.
Further views
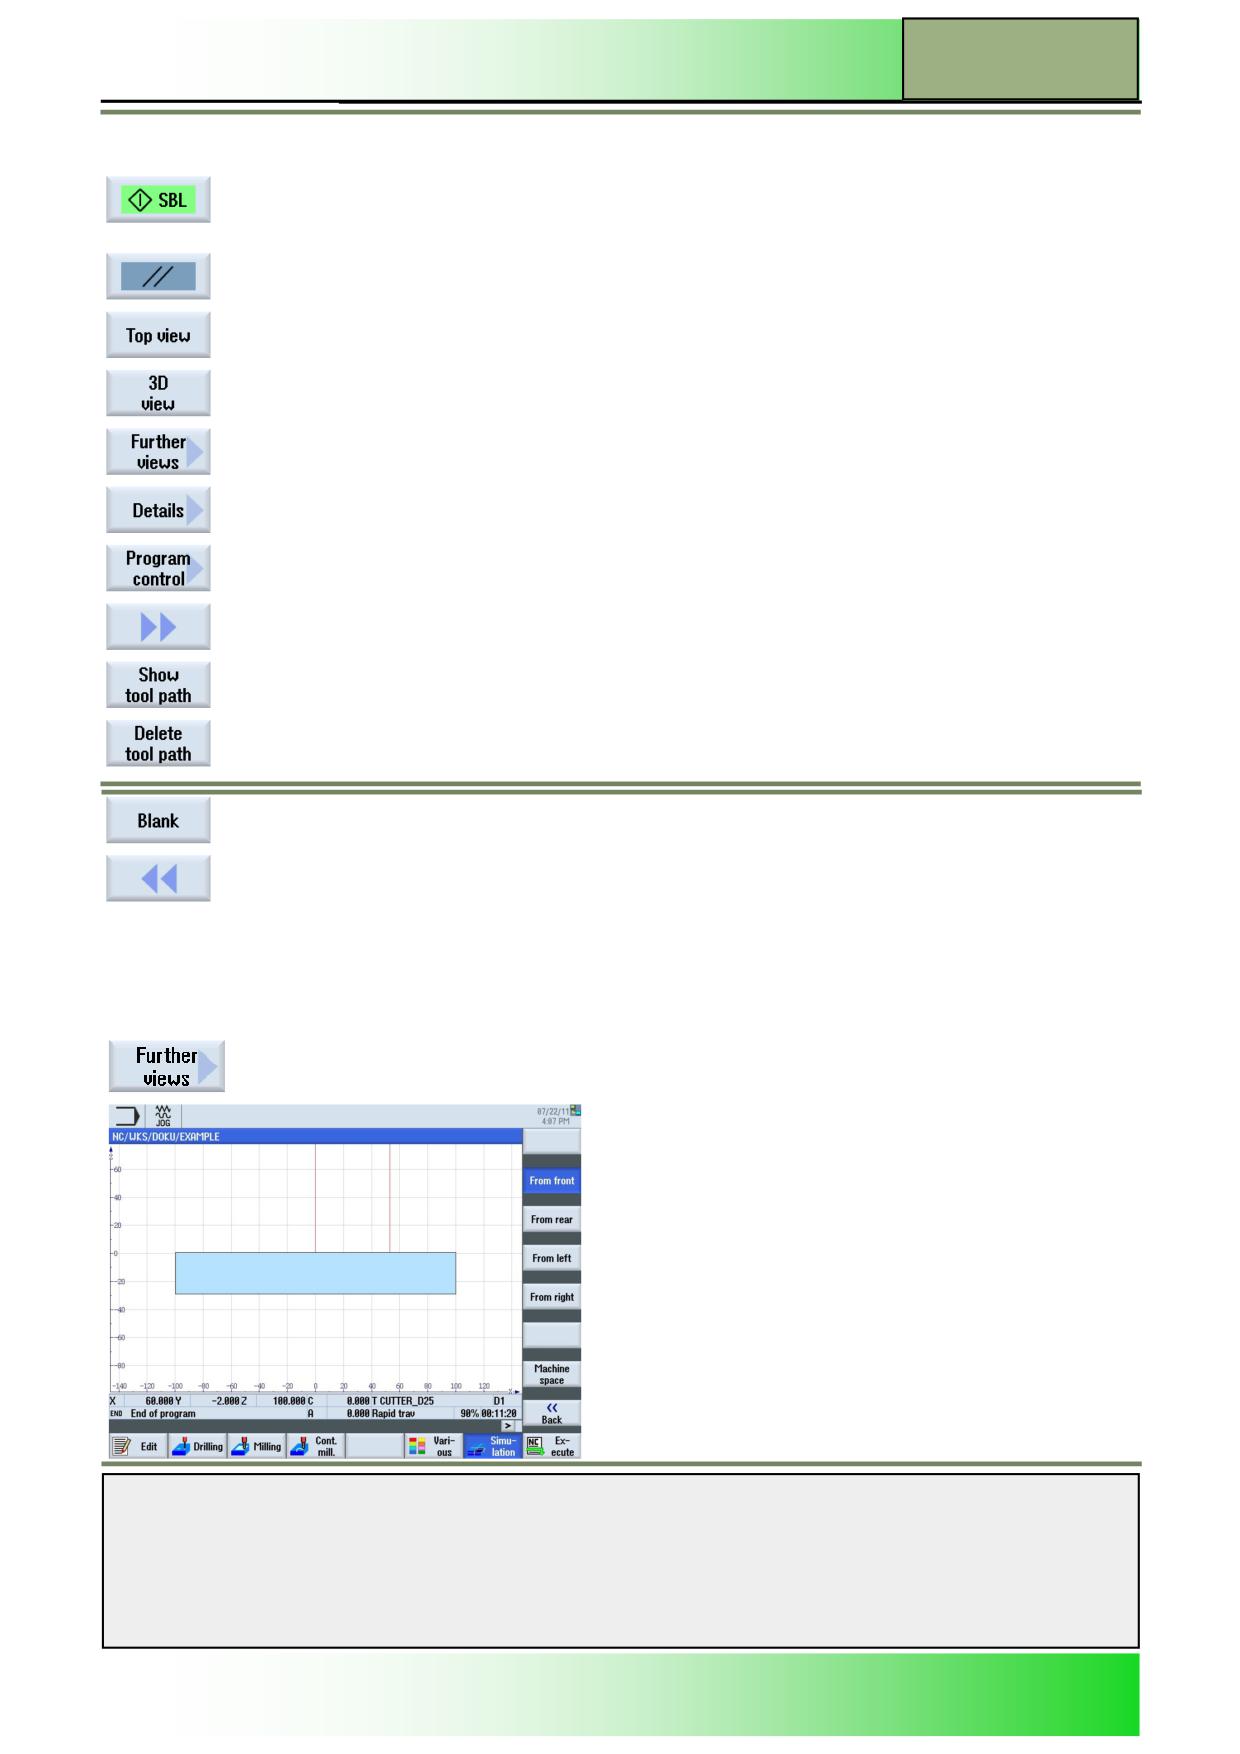
With the function “Further views” you can change the graphical side-views on the blank, to view the simulation process in
an optimal way. You can select the sides from which you want to see the simulation.
Selecting the function “Further views”
By pressing the VSK 1.5 “Further views” the following window with side views on the blank
opens.
Notes
828D/840Dsl SINUMERIK Operate
Page 35
M600
M600
Basics of programming with ShopMill
Vertical softkey bar
Display area
Description
By pressing the VSK 1 “From front” the simulated workpiece will be shown in a front view.
By pressing the VSK 2 “From rear” the simulated workpiece will be shown in a rear view.
By pressing the VSK 3 “From left” the simulated workpiece will be shown from the left side.
By pressing the VSK 4 “From right” the simulated workpiece will be shown from the right side.
By pressing the VSK 8 “Back” on the operator panel (OP) you switch back to the vertical soft-
key bar of the operating area “Details”.
Details
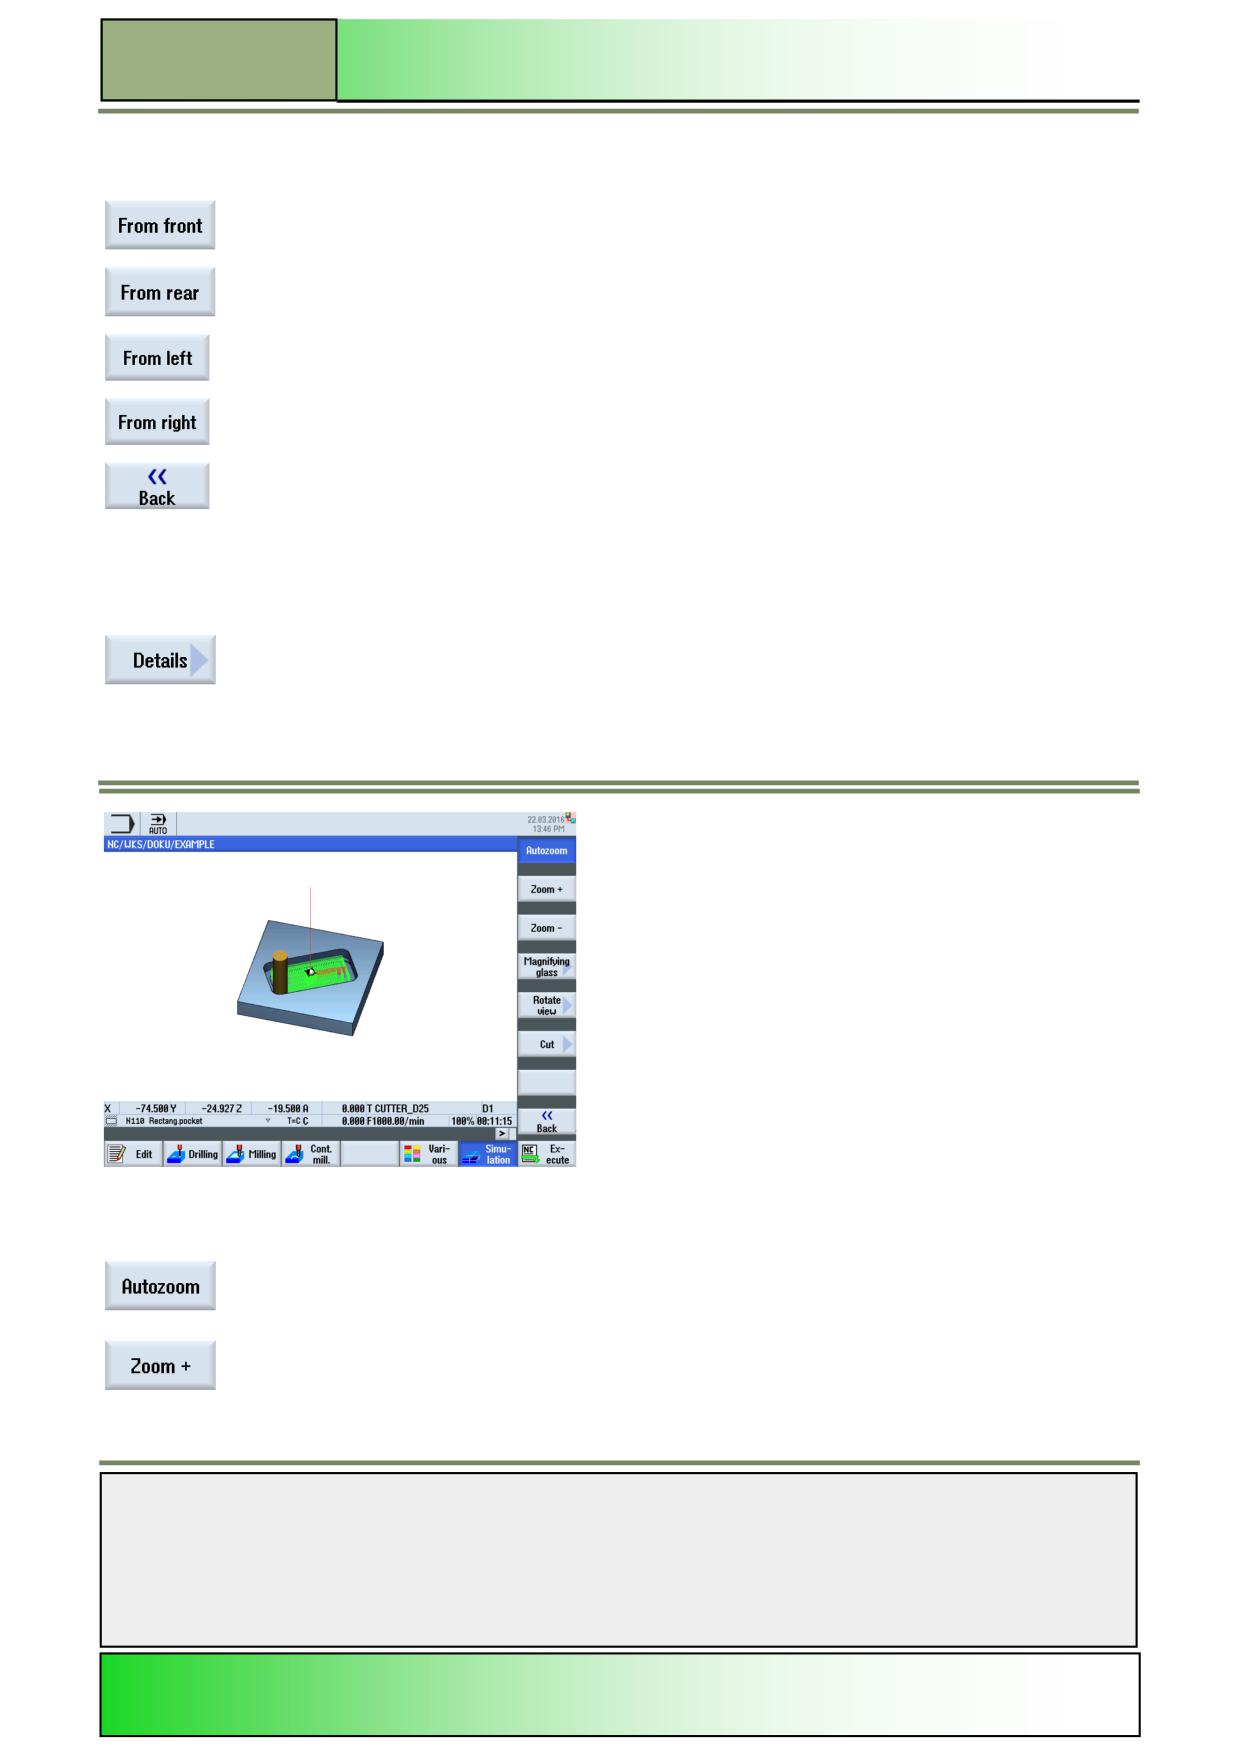
With the function “Details” you can zoom in, zoom out, rotate and cut out parts of the workpiece.
Selecting the function “Details”
By pressing the VSK 1.6 “Details“ the following functions are available in a vertical softkey bar.
Vertical softkey bar
Display area
Description
By pressing the VSK 1 “Autozoom“ the workpiece fills out the simulation window in an optimal
way.
By pressing the VSK 2 “Zoom +“ you zoom in into the simulation window. Alternatively you can
press the “+“-key on the number block of the keyboard.
Notes
M600
Page 36
828D/840Dsl SINUMERIK Operate
Basics of programming with ShopMill
M600
Details
With the function “Details” you can zoom in, zoom out, rotate and cut out parts of the workpiece.
Selecting the function “Details”
By pressing the VSK 3 “Zoom -“ you can zoom out of the simulation window. Alternatively you
can press the “-“-key on the keyboard.
By pressing the VSK 4 “Magnifying glass” a frame opens in the simulation window, that lets you
zoom in to the frame size.
Press the VSK1 “Magnifying glass +” to increase and the VSK 2 “Magnifying glass -” to de-
crease the frame size. Alternatively you can change the frame size of the zoom area with the
“+”or “-” key on the number pad of the keyboard. Move the frame with the blue cursor keys on
the keyboard.
Press the VSK 8 “Accept” to zoom to the selected extent or abort with pressing the VSK 7
“Cancel”.
Display area
Description (continuation)
By pressing the VSK 5 “Rotate view” a vertical softkey bar opens to the right, with functions to
rotate the workpiece in the simulation window.
By pressing the VSK 6 “Cut” the functions for cutting out parts of the workpiece are available in
a vertical softkey bar “.
By pressing the VSK 8 “Back” on the operator panel you switch back to the vertical softkey-bar
1.
Selecting the function “Rotate view”
By pressing the VSK 5 “Rotate view” the following functions will be displayed in a vertical soft-
key bar.
Vertical softkey bar
Display area
Description
By pressing the VSK “Arrow right” the workpiece will be turned right around the centre of the
simulation window.
By pressing the VSK “Arrow left” the workpiece will be turned left around the centre of the
simulation window.
By pressing the VSK 3 “Arrow up” the work piece will be turned up around the centre of the
simulation window.
By pressing the VSK 4 “Arrow down” the work piece will be turned down around the centre of
the simulation window.
By pressing the 5 “Arrow turns left” the workpiece will be rotated to the left, around the cen-
tre of the simulation window (counter clockwise).
By pressing the 5 “Arrow turns right” the workpiece will be rotated to the right, around the
centre of the simulation window (clockwise).
By pressing the VSK 8 “Back” you switch back to the VSK-bar “Details”.
Notes
828D/840Dsl SINUMERIK Operate
Page 37
M600
M600
Basics of programming with ShopMill
Selecting the function “Cut”
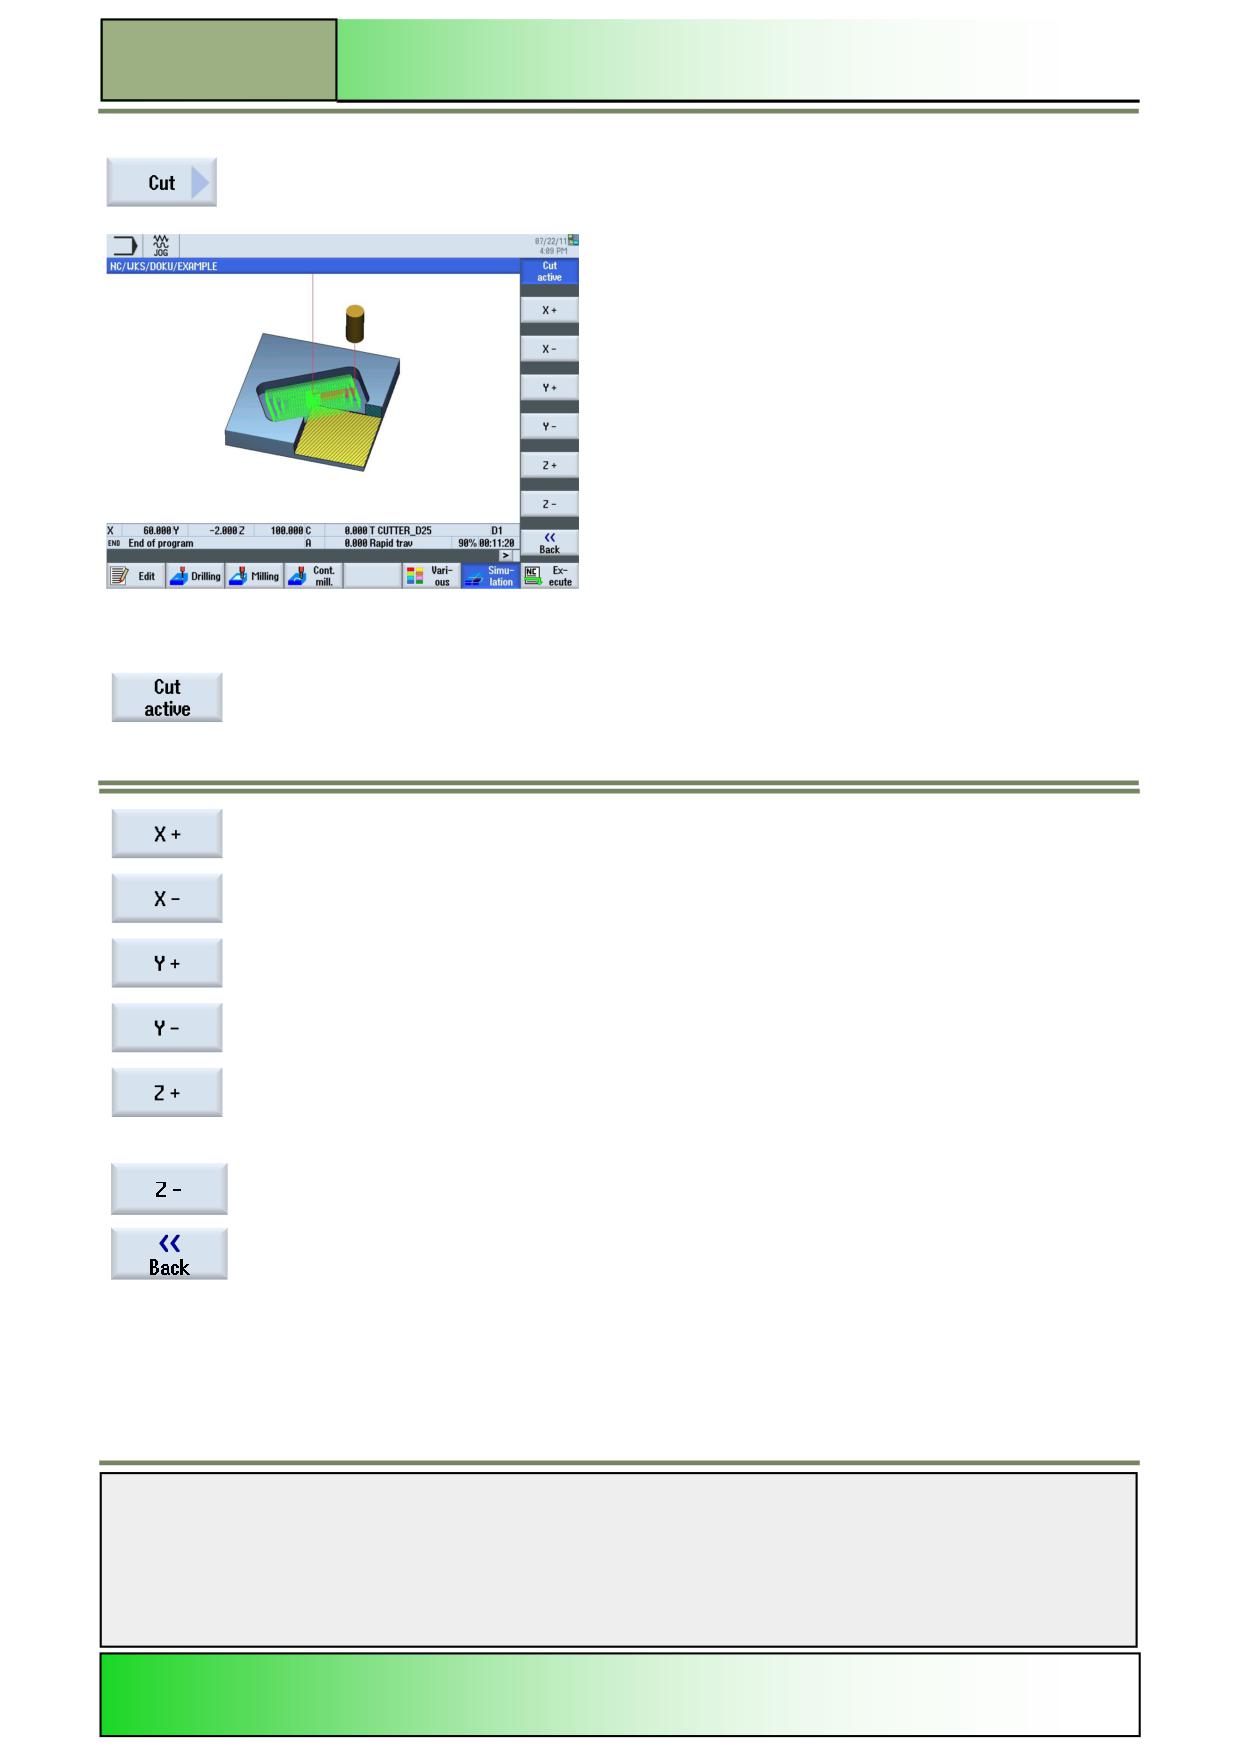
By pressing the VSK 1.7 “Cut“ the functions for cutting out parts of the simulated workpiece will
be shown in a vertical softkey bar. The cut surface areas are only displayed during simulation
run.
Vertical softkey bar
Display area
Description
By pressing the VSK 1 “Cut active” you can activate the cut surfaces on the workpiece and
activate the greyed out axes softkeys in the vertical softkey bar. The function “Cut” stays active
until the VSK “Cut active” is deactivated.
By pressing the VSK 2 “X+“ the cutting plane is shifted on the X-axis to the positive (“to the
right”).
By pressing the VSK 3 “X-“ the cutting plane is shifted on the X-axis to the negative (“to the
left”).
By pressing the VSK 4 „Y+“ the cutting plane is shifted on the y-axis (ordinate) to the positive
(„to the rear “).
By pressing the VSK 5 „Y-“ the cutting plane is shifted on the y-axis (ordinate) to the negative
(“forward”).
By pressing the VSK 6 “Z+“ the cutting plane will be shifted on the Z-axis (applicate) to the posi-
tive (“up”).
Display area
Description (continuation)
By pressing the VSK 7 “Z-“ the cutting plane will be shifted on the Z-axis (Ablikate) to the neg-
ative (“downward”).
By pressing the VSK 8 “Back” you switch back to the operating area “Details”.
Notes
M600
Page 38
828D/840Dsl SINUMERIK Operate
Basics of programming with ShopMill
M600
Program control
With the function “Program control” the override can be adjusted for the simulation, the program can be executed in single
blocks and alarm messages, that occurred during simulation, can be displayed.
Selecting the function “Program control”
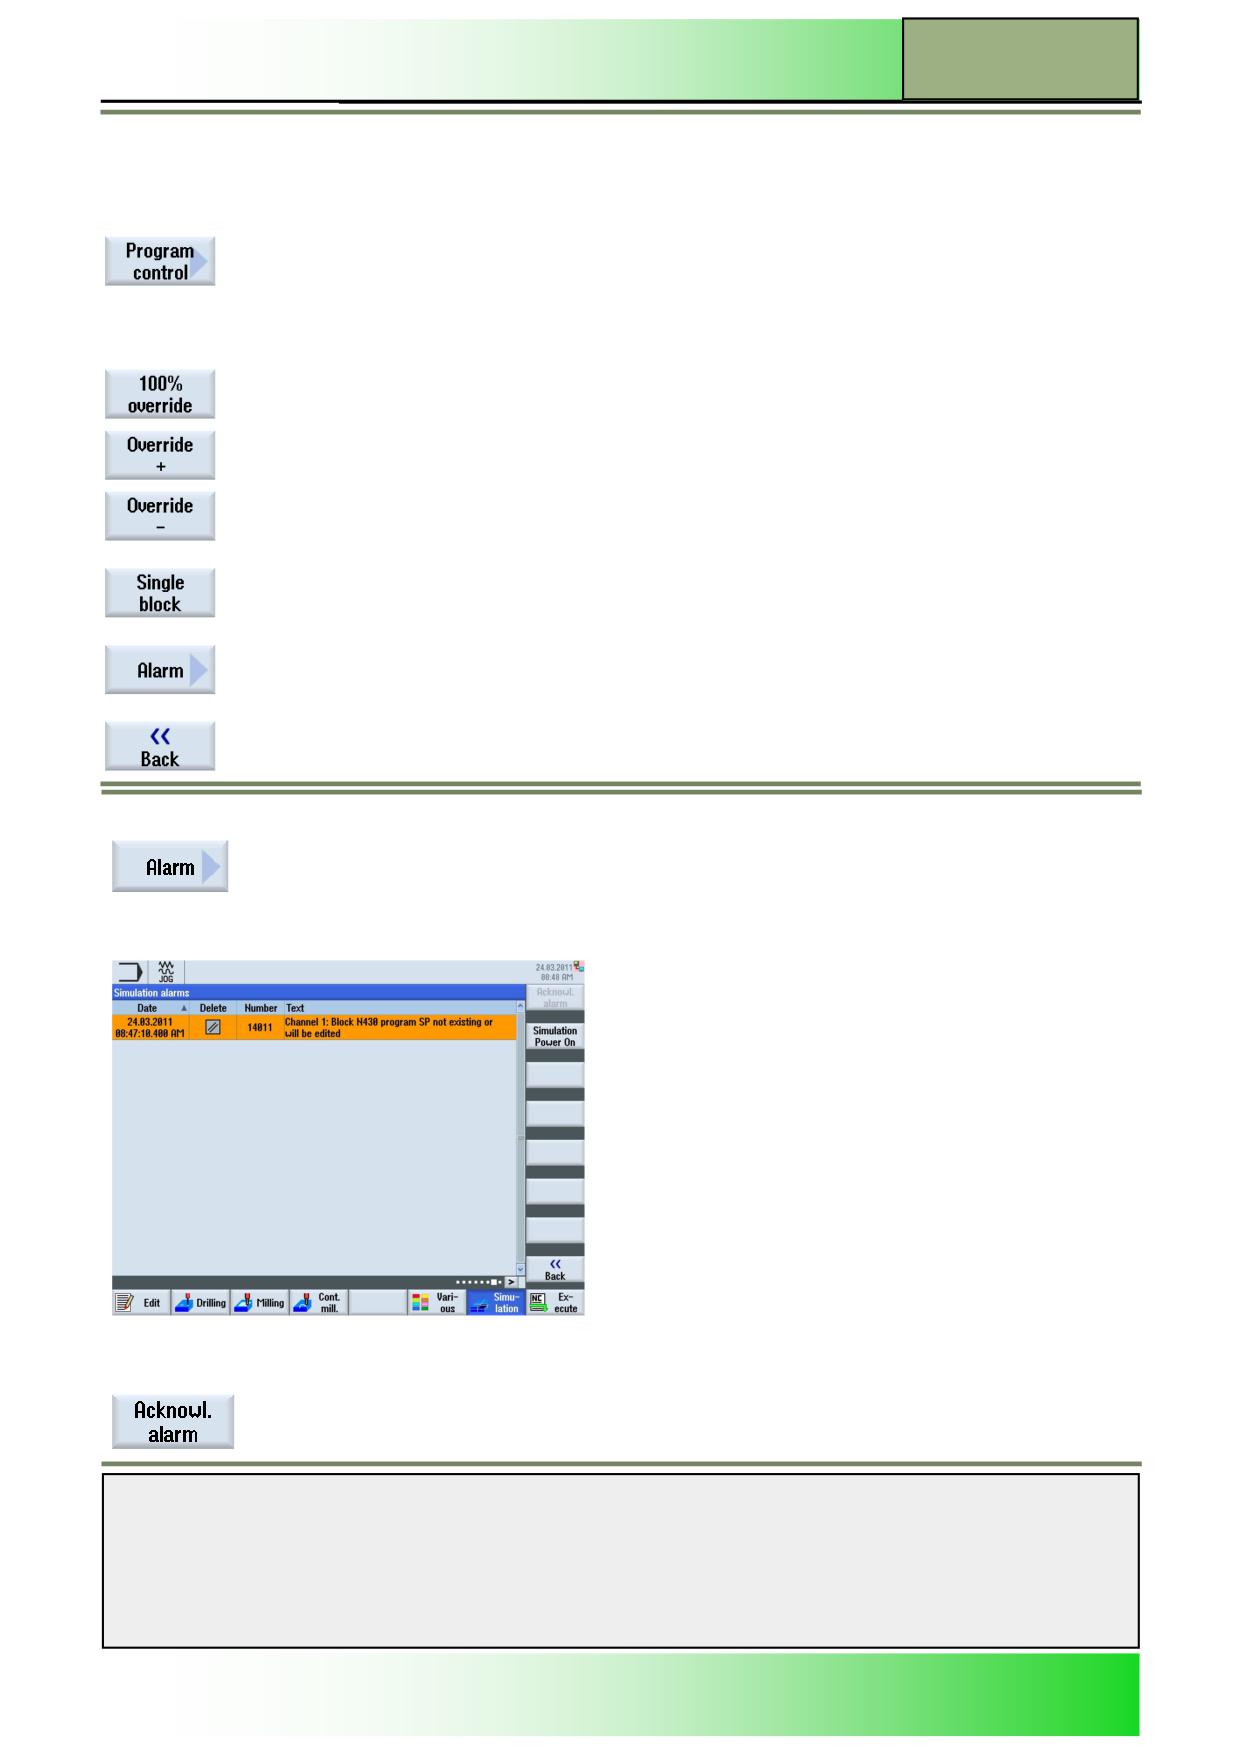
By pressing the VSK 1.7 “Program control” the following functions will be shown in a vertical
softkey bar on the right side of the screen.
Vertical softkey bar
Display area
Description
By pressing the VSK 1 “100% override” the feedrate override is set to the maximum override
of 100%.
By pressing the VSK 2 “Override +” the override will be increased in 5% steps each time you
press the softkey, until a maximum of 100% is reached.
By pressing the VSK 3 “Override -” the override will be decreased in 5% steps each time you
press the softkey until a minimum of 0% is reached.
With a feedrate override of 0% the simulation is paused.
By pressing the VSK 4 “Single block” the simulation will be executed block by block.
With pressing this softkey the VSK 1.1 “Start” in the operating area “Simulation” will be ex-
changed with the “VSK 1.1 “SBL”.
By pressing the VSK 7 “Alarm” the “Simulation alarms” window opens, with alarm messages
that have occurred during a simulation run.
This can be used for error detection.
By pressing the VSK 8 “Back” you switch back to the vertical softkey bar 1.
Selecting the function “Alarm”
By pressing the VSK 7 “Alarm” the “Simulation alarms” window opens, with a list of all current
active alarm messages that occurred during the simulation.
For error messages and acknowledgement symbols see module - M576 “Operating area Diag-
nostics”, section 3.
Vertical softkey bar
Display area
Description
By pressing the VSK 1 “Acknowl. Alarm” all with the “Reset”- or “Cancel”-symbol marked alarm
messages can be deleted. This softkey is inactive as long as no appropriate error message is
shown.
Notes
828D/840Dsl SINUMERIK Operate
Page 39
M600
M600
Basics of programming with ShopMill
Vertical softkey bar
Display area
Description
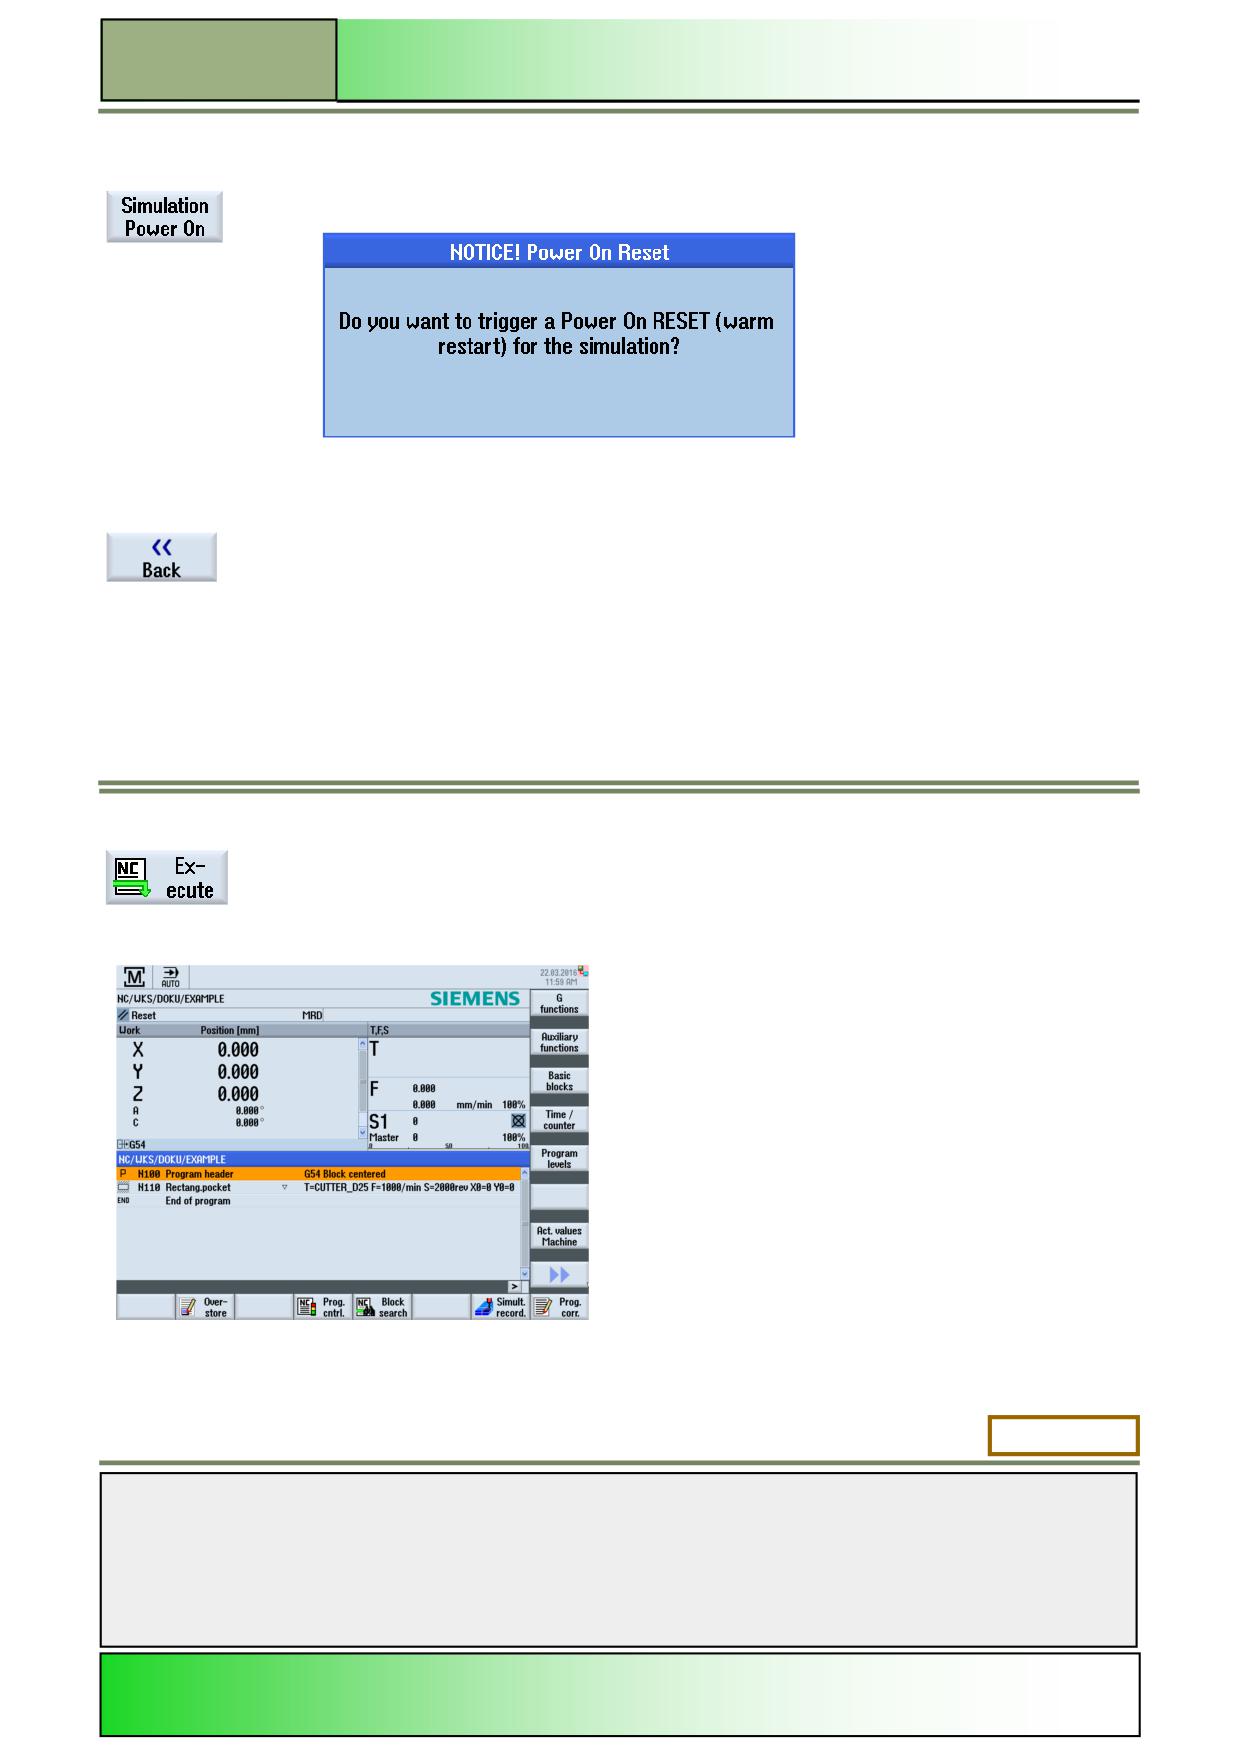
By pressing the VSK 2 “Simulation Power On” you can trigger a warm restart for the active sim-
ulation.
Press the VSK 8 “OK” to confirm or the VSK 7 “Cancel” to abort the warm restart. With a warm
start the simulation will be ended and started new.
By pressing the VSK 8 “Back” you switch back to the operating area “Program control”.
NC Execute
The function “NC Execute” lets you load the active program from the editor
to the operating area “Machine” in the operating mode “AUTO”.
Selecting the function “NC Execute”
By pressing the HSK 1.8 “NC Execute” the control, switches to the operating area “Machine”
under the operating mode “AUTO”.
The program modified in the editor is now ready for machining (see picture below).
The Softkey is deactivated if the program is running.
M600: END
Notes
M600
Page 40
828D/840Dsl SINUMERIK Operate
M615
Milling with ShopMill
Sinumerik
Operate
Module Description:
This module explains the programming of a simple milling machining with ShopMill functionality, by
means of milling cycles and a position pattern.
Module Objective:
Working through this module you become familiar with the technology “Milling” by pro-
gramming a chained sequential ShopMill program.
Content:
Simple programming example
This document was produced for training purposes.
828D/840Dsl SINUMERIK Operate v4.7
Page 1
M615
Siemens assumes no responsibility for its contents.
M615
M615
Page 2
828D/840Dsl SINUMERIK Operate
Milling with ShopMill
M615
Milling
Shopmill:
START
Simple
programming
example
Milling
Shopmill:
END
Notes
828D/840Dsl SINUMERIK Operate
Page 3
M615
M615
Milling with ShopMill
Simple programming example
Creating a new ShopMill program
A new ShopMill program can be created from within the operating modes “JOG, “MDA” and “AUTO” as follows:
1.
Press the “Program Manager”-key on the keyboard.
The program manager will be opened directly.
- OR -
1.
Press the “MENU SELECT”-key on the operator panel.
Press the yellow HSK 4 “Program Manager”.
The program manager opens.
2.
Select a drive, where you want to create the program (“NC”, “Local drive”, “USB”).
3.
Press the VSK 2 “New“.
The vertical softkey bar for creating new programs opens.
4.
Press the VSK 3 “ShopMill” to open the input mask for creating a new ShopMill sequential
program.
Enter a name for the program in the “Name” field and accept with pressing the VSK 8 “OK”.
The program is loaded to the “editor” and the parameter window for the program header is
opened by default.
Description:
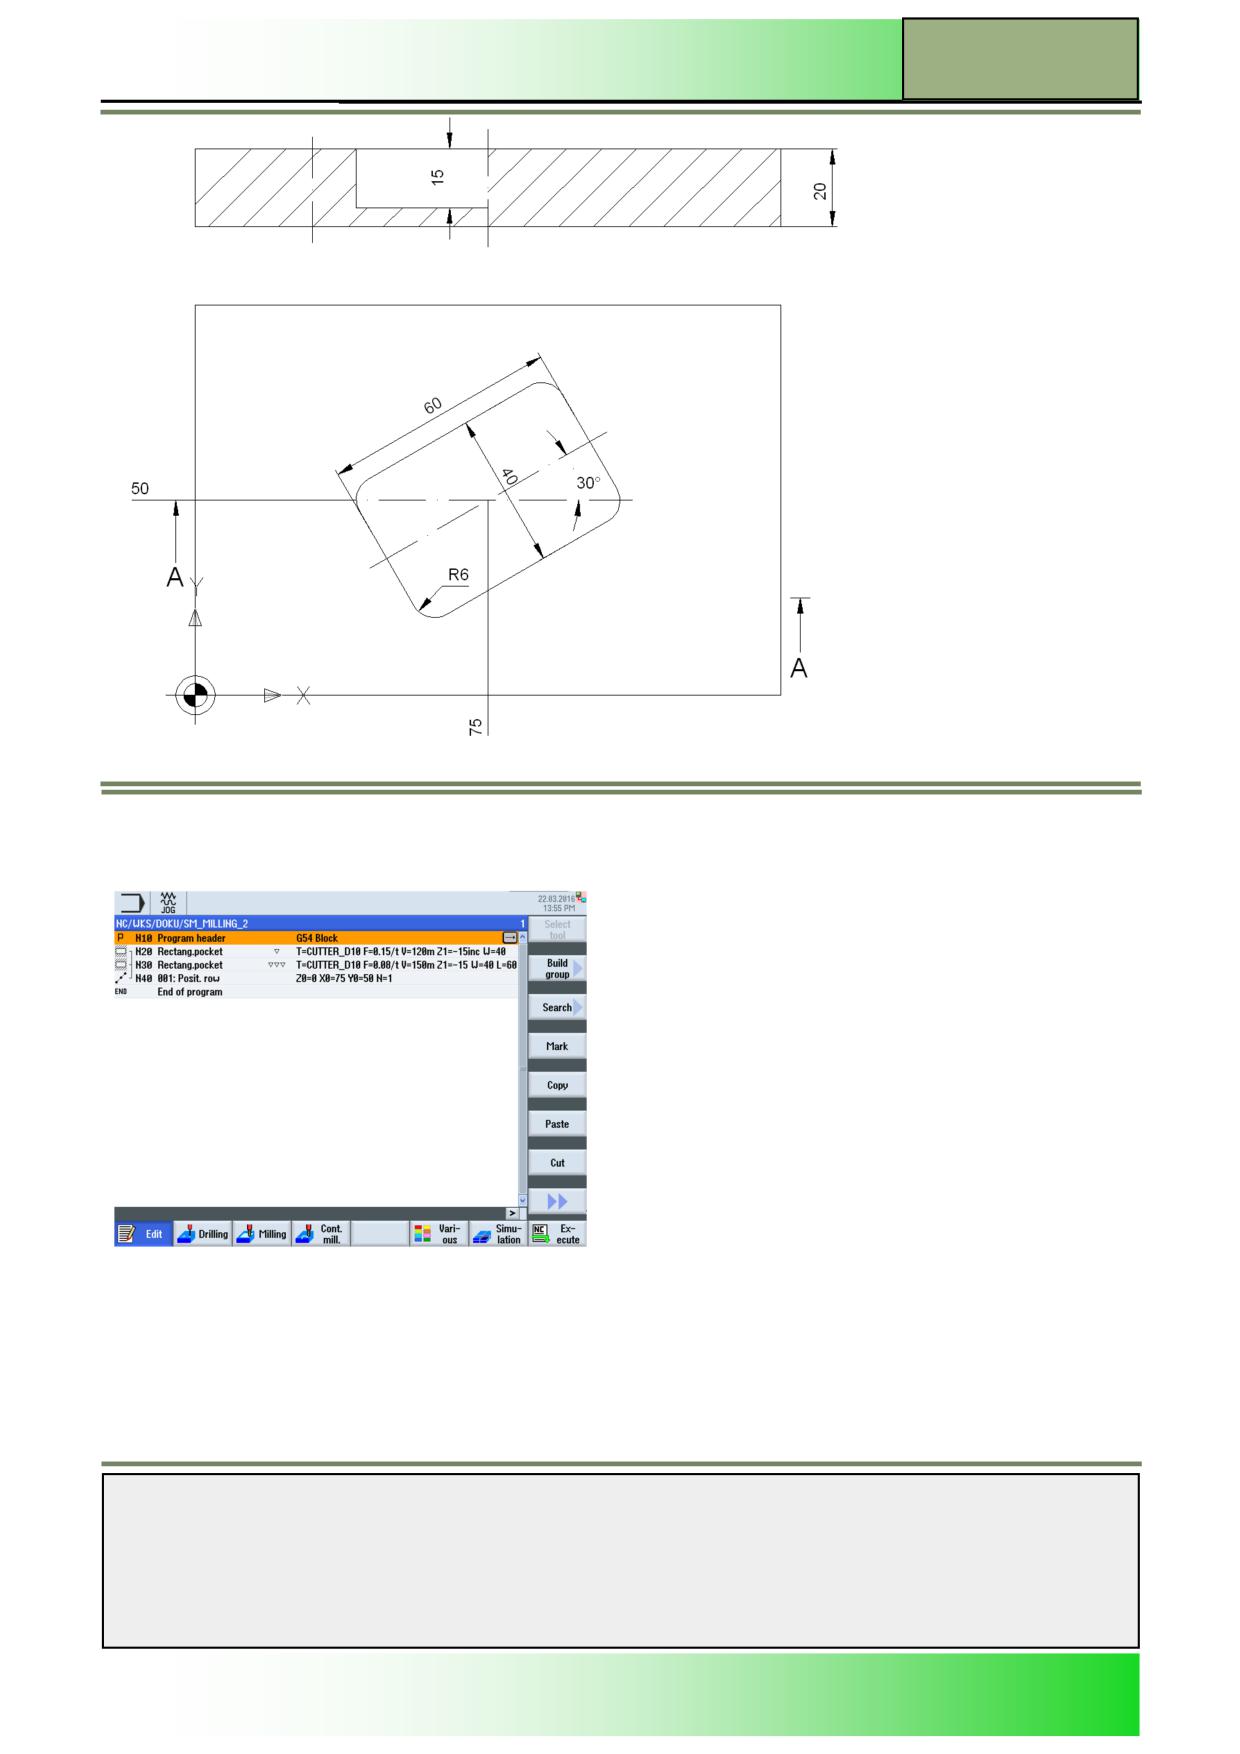
A simple program (a slanted rectangular pocket) with chained program blocks is to be created in ShopMill.
Objective:
The workpiece shown below is to be programmed and simulated.
For this, the tool and technology data below are to be used:
The following tool- and technology data are needed for the programming:
Tool data:
Milling tool Ø 10 mm (CUTTER_D10)
Technology data:
F 0,15 mm/tooth, V 120 m/min (roughing) and
F 0,08 mm/tooth, V 150 m/min (finishing)
The pocket is to be roughed first and finished afterwards.
Notes
M615
Page 4
828D/840Dsl SINUMERIK Operate
Milling with ShopMill
M615
Example: Slanted rectangular pocket
The following program, with the call up of rectangular pocket cycles and a position pattern, is to be programmed.
Creating a new ShopMill program.
Give the program a name, for example "SM_MILLING_2.MPF".
The window for the program header is automatically opened.
Notes
828D/840Dsl SINUMERIK Operate
Page 5
M615
M615
Milling with ShopMill
1.
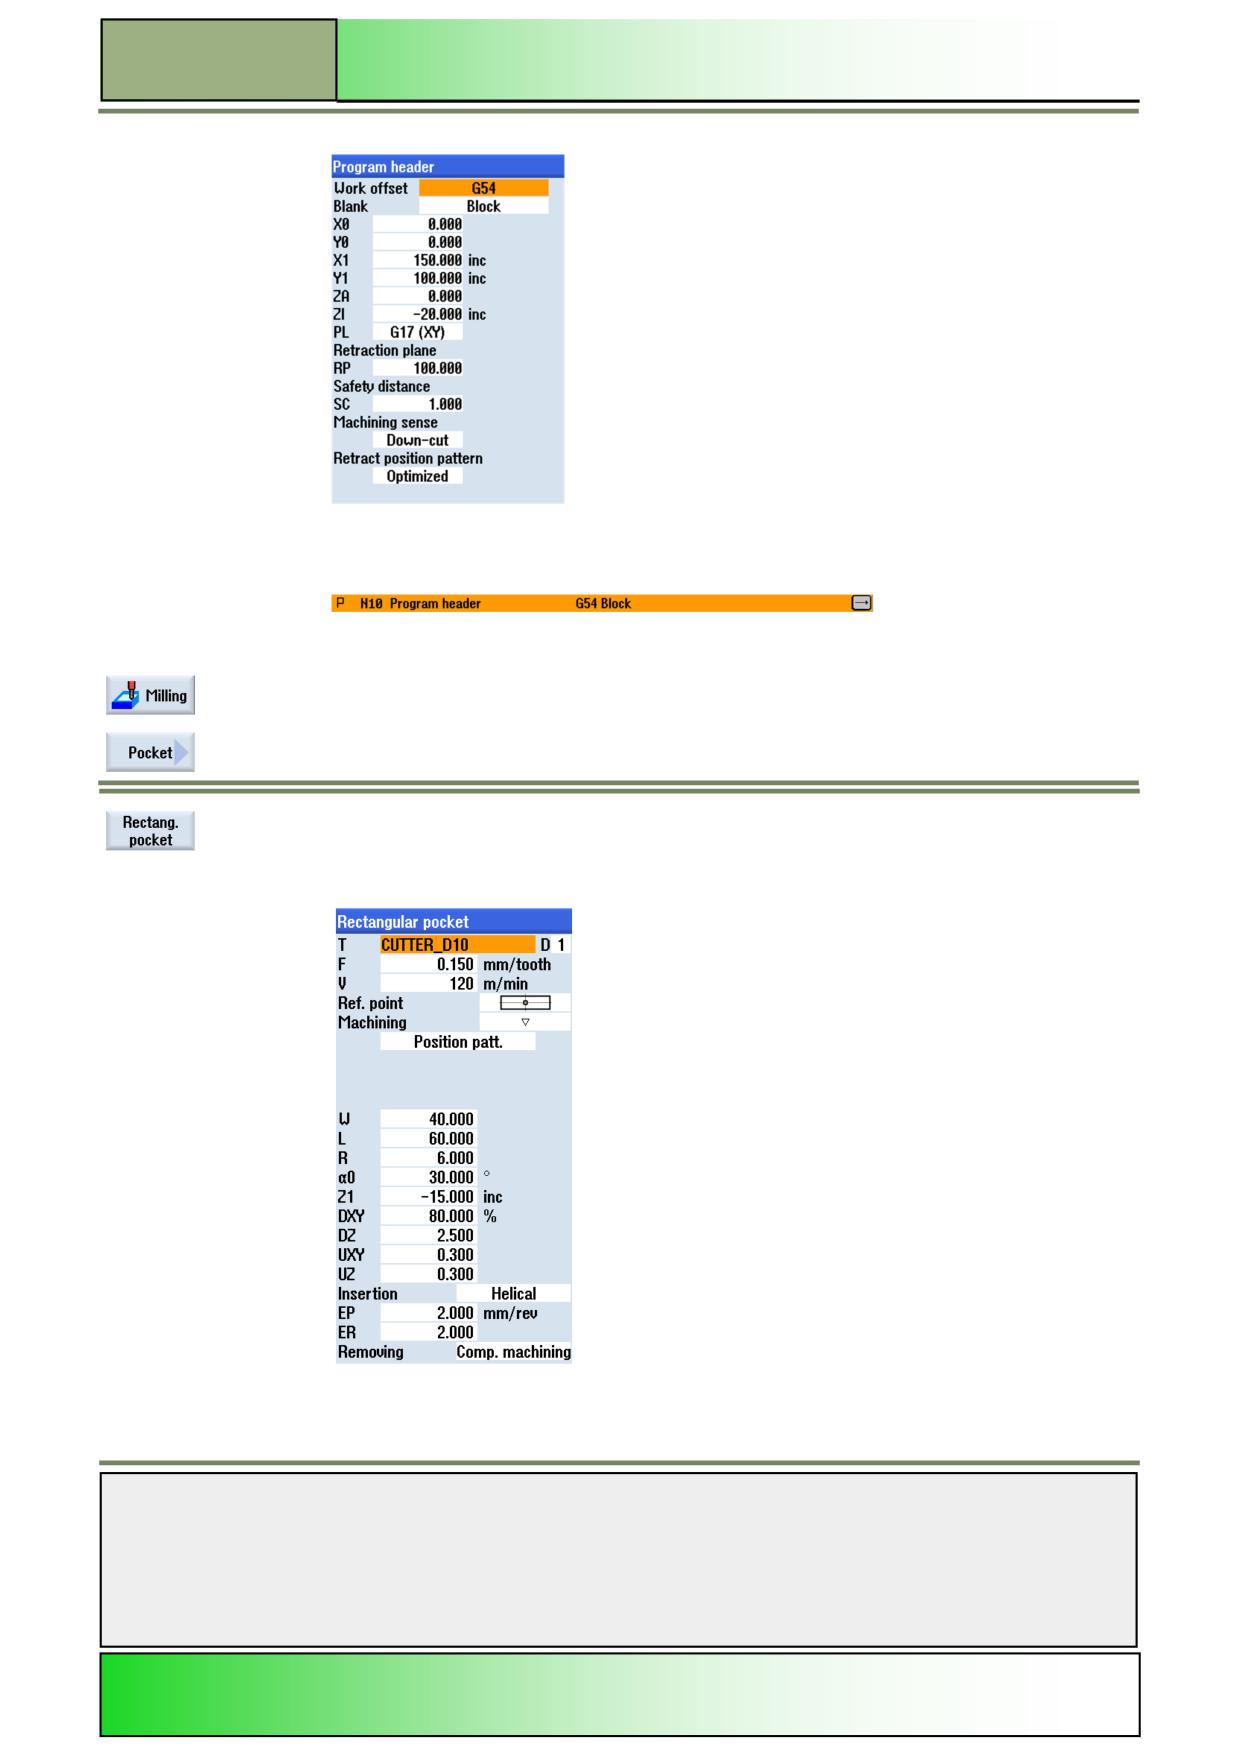
Program the program header like displayed below:
Confirm your inputs by pressing the VSK 8 “Accept”.
The following program block will be inserted into the program.
2.
Rough the rectangular pocket.
Press the HSK 1.3 “Mill.” to open the technology “Milling”.
Press the VSK 2 “Pocket”.
Press the VSK 3 “Rectang. pocket”.
The parameter mask for the rectangular pocket cycle opens.
3.
Insert the following values and confirm your inputs by pressing the VSK 8 “Accept”.
:
Notes
M615
Page 6
828D/840Dsl SINUMERIK Operate
Milling with ShopMill
M615
To insert a tool into the program, press the VSK 1 “Select tool”, in to opening tool selection list,
select the tool “CUTTER_D10” with the orange selection cursor and press the VSK 8 “OK”.
Confirm your inputs by pressing the VSK 8 “Accept”.
The program block “Rectang. Pocket” is inserted into the program:
The program chain starts (see chain symbol).
4.
After this finish the rectangular pocket.
Press the VSK 2 “Pocket”.
Press the VSK 3 “Rectang. pocket”.
The parameter mask for the rectangular pocket cycle opens.
5.
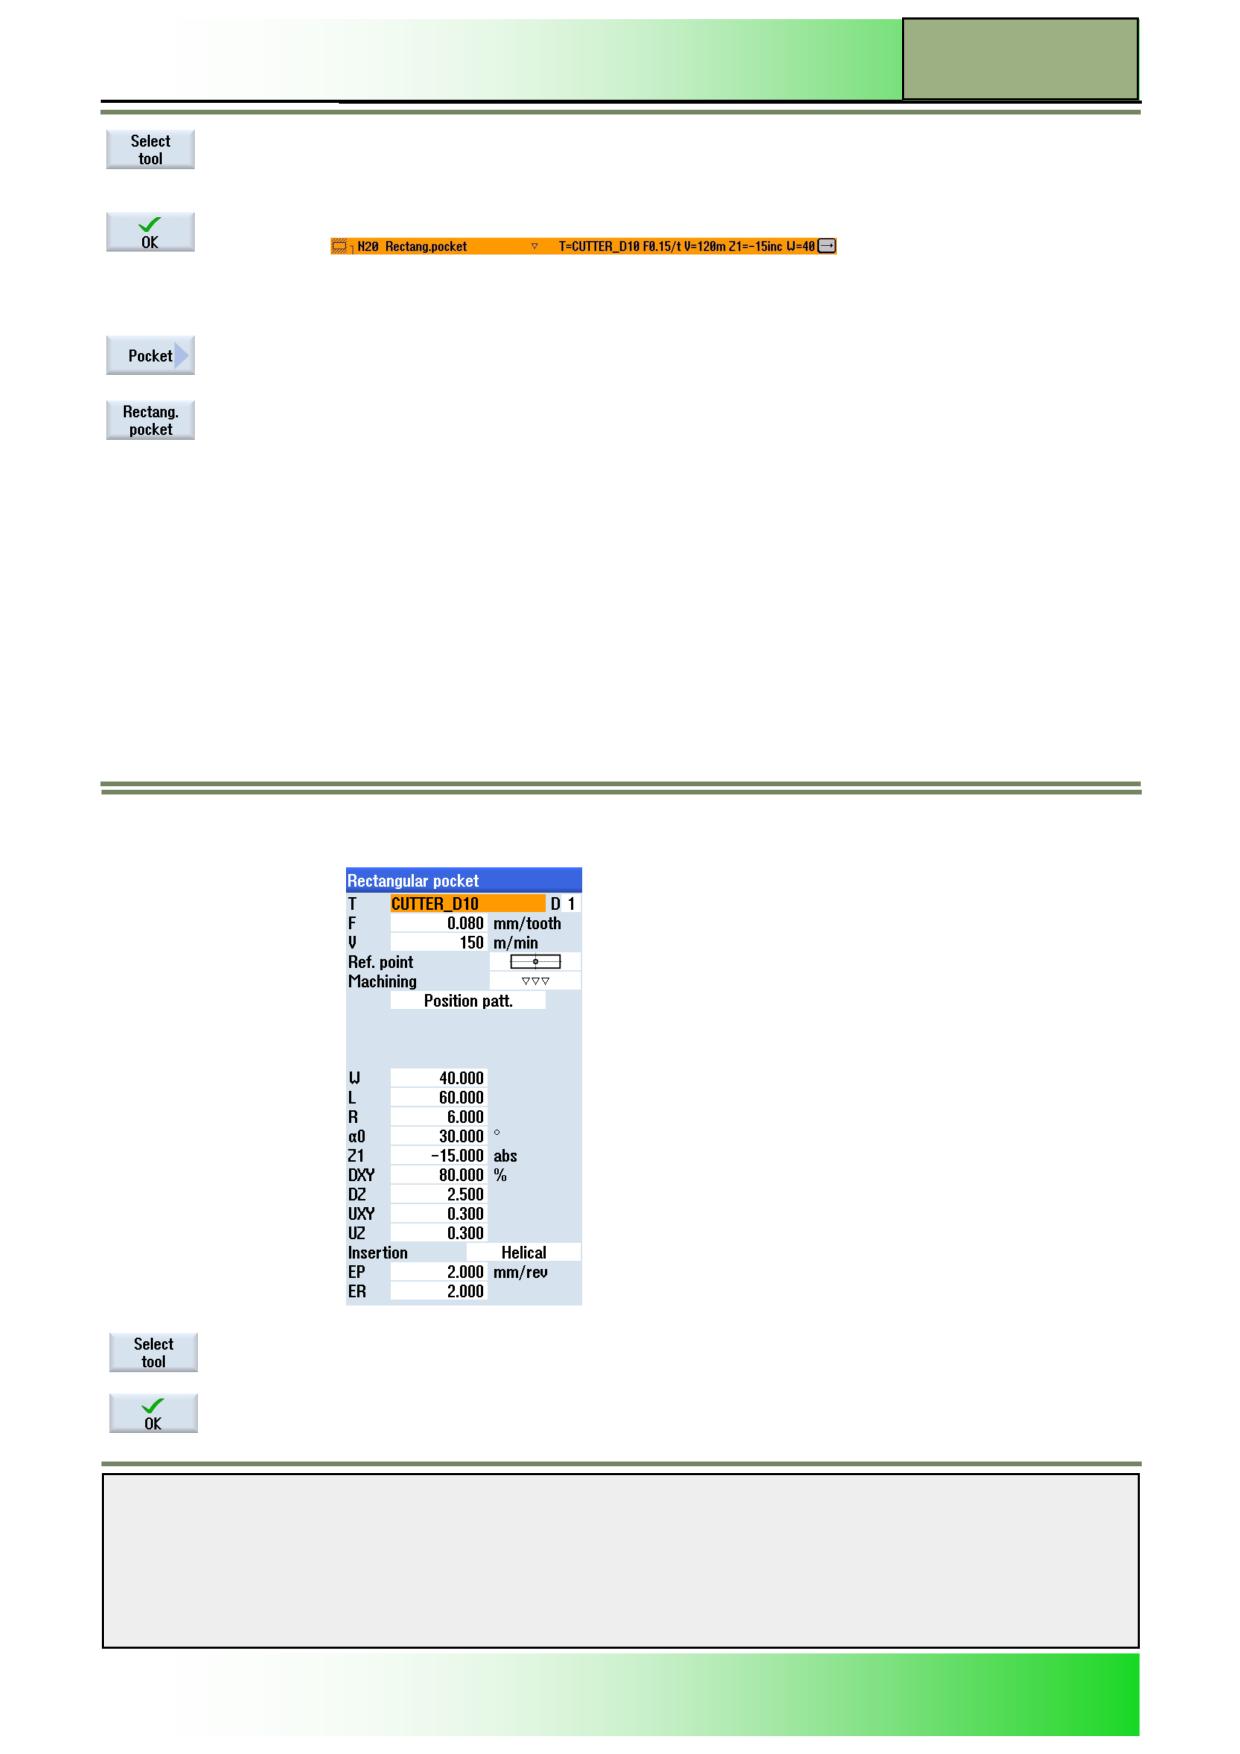
Insert the following values into the parameter mask and confirm your inputs by pressing the
VSK 8 “Accept”:
To insert a tool into the program, press the VSK 1 “Select tool”, in opening tool selection list,
select the tool “CUTTER_D10” with the orange selection cursor and press the VSK 8 “OK”.
Confirm the input with the VSK 8 “Accept”.
Notes
828D/840Dsl SINUMERIK Operate
Page 7
M615
M615
Milling with ShopMill
The program block “Rectang. Pocket” is inserted into the program:
The program chain is extended (see chain symbol).
6.
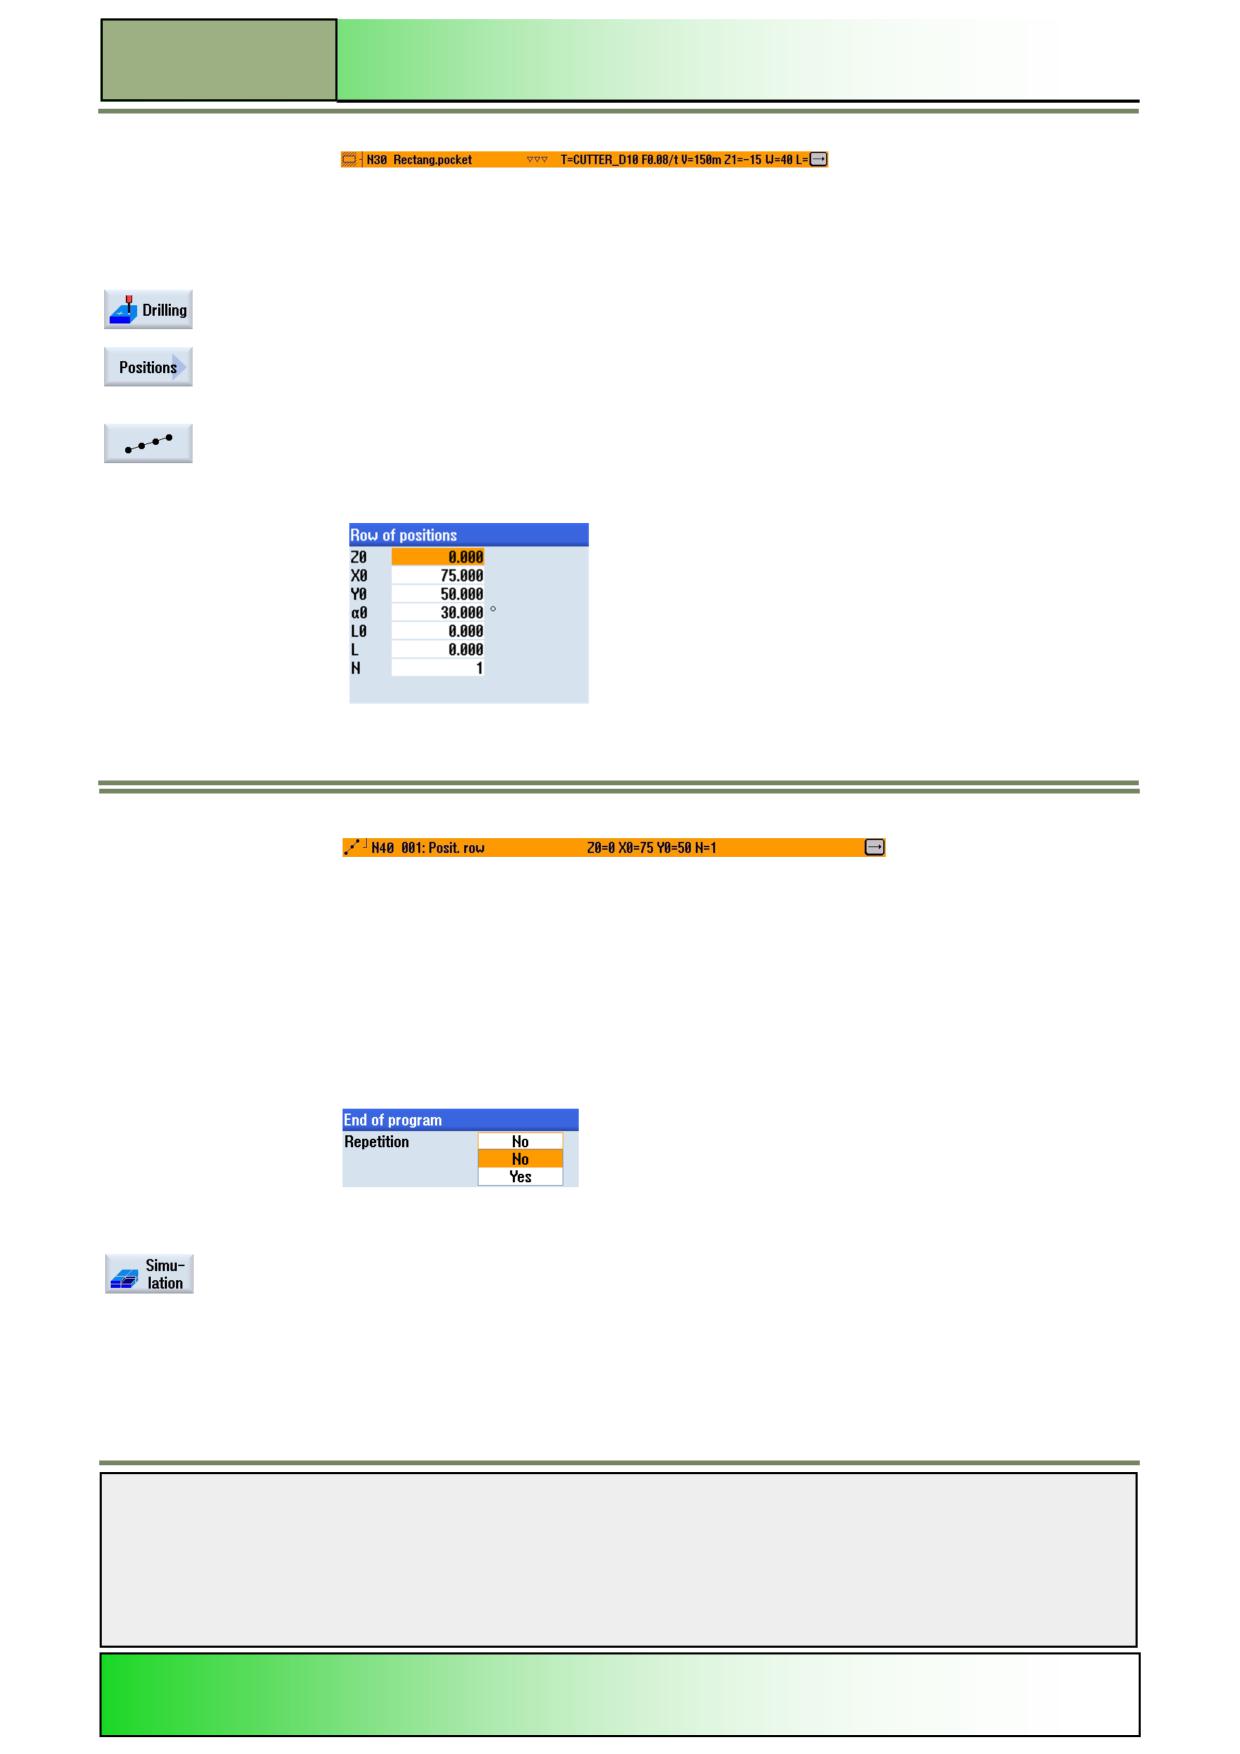
Insert now a position pattern for the rectangular pocket.
Press the HSK 1.2 “Drill.”.
Press the VSK 7 “Positions“.
The window for setting a position patterns for the rectangular pocket opens.
Press the VSK 2 “Position pattern” to open the position pattern input mask for the pocket
positions.
7.
Enter the following values into the parameter window:
Confirm your inputs by pressing the VSK 8 “Accept”.
The program block “Row of positions” is inserted into the program:
The program chain closes.
8.
Program now the program end and simulate the machining.
Place the orange selection cursor on the program block “Program end” and open the parame-
ter list by pressing the blue “cursor-to-the-right”-key on the keyboard.
The input mask for the “End of program” settings opens.
9.
Here you can define to repeat the program for multiple workpieces.
Take over the default value and press the VSK 8 “Accept”.
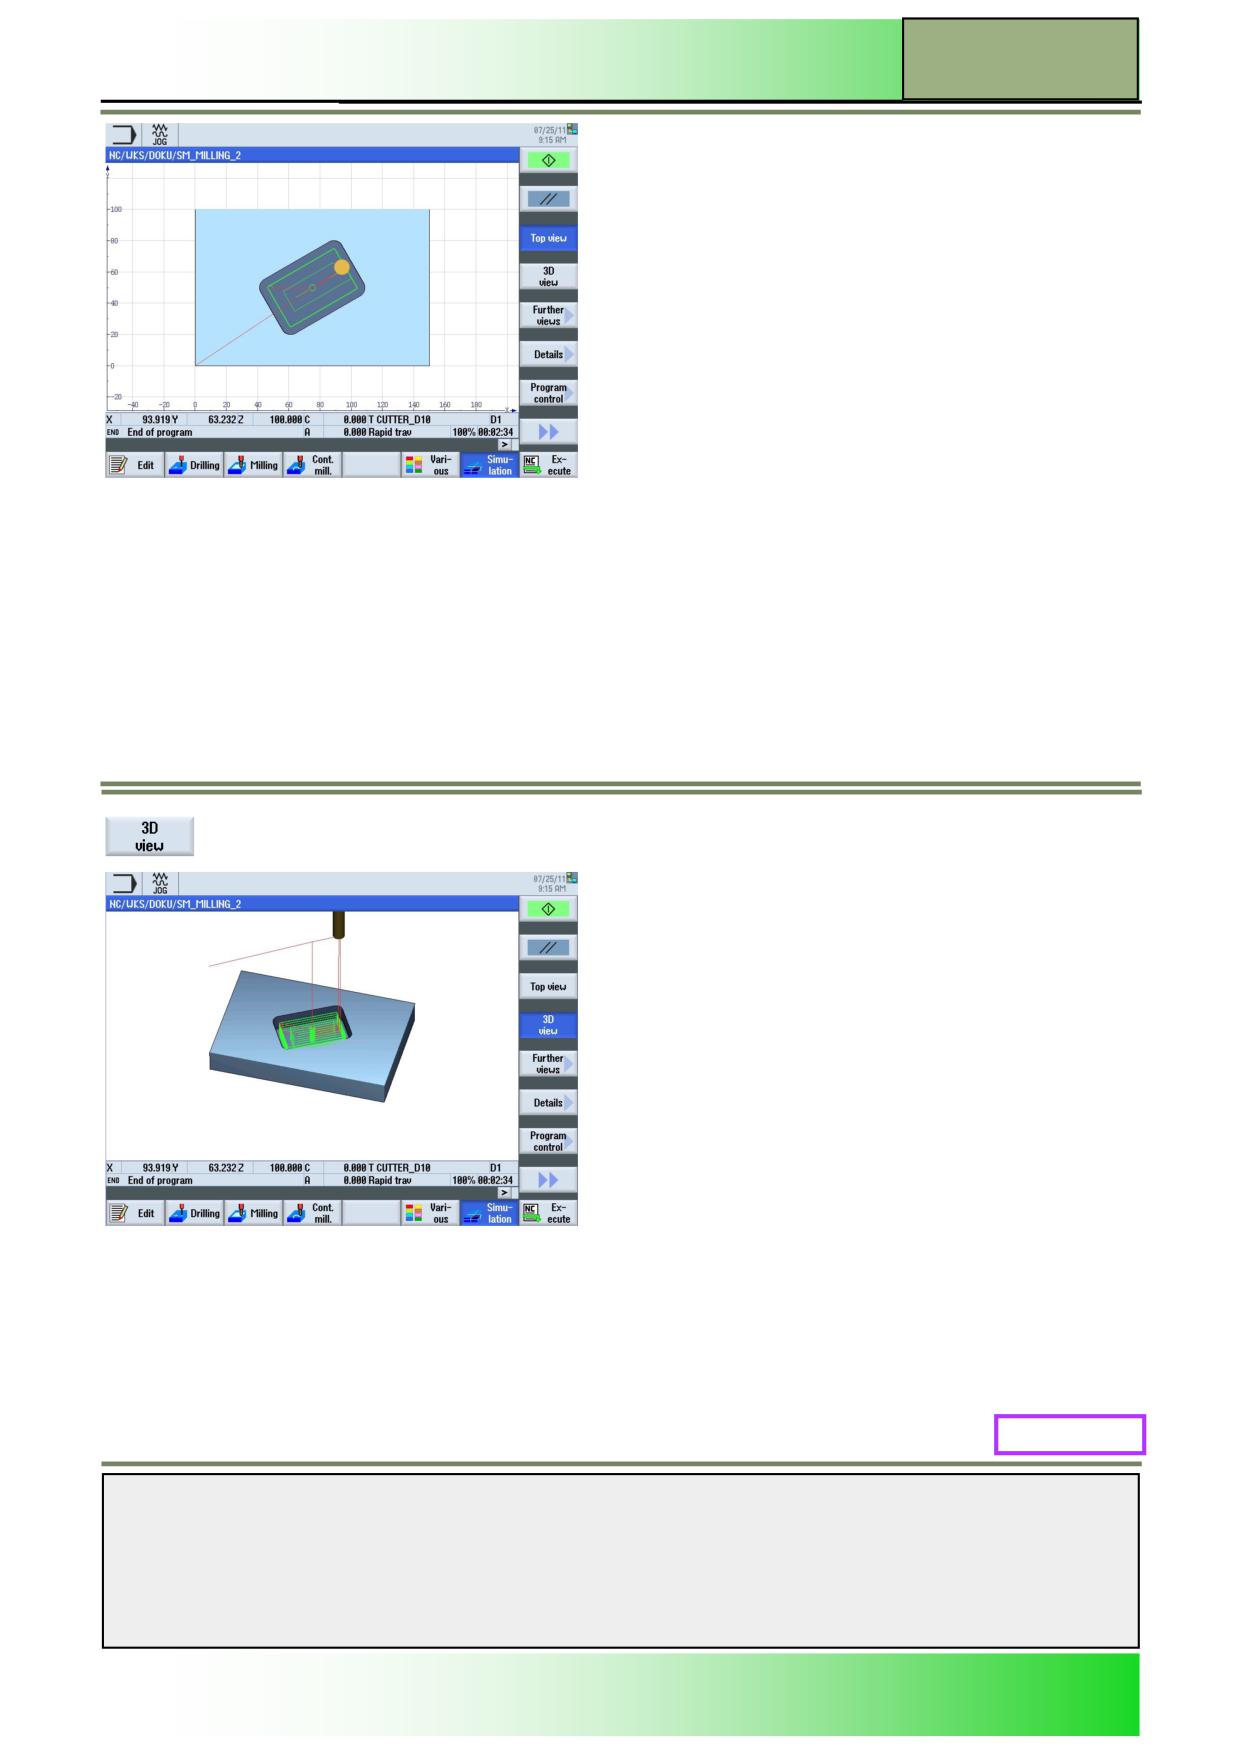
Press the HSK 1.7 “Simulation” to start the simulation of the program run.
The control calculates the simulation parameters and opens the simulation in the simulation
window in “Top view”.
Notes
M615
Page 8
828D/840Dsl SINUMERIK Operate
Milling with ShopMill
M615
To view the simulation 3-dimensional, press the VSK 1.4 “3D view”.
M615: END
Notes
828D/840Dsl SINUMERIK Operate
Page 9
M615

M615
Milling with ShopMill
Notes
M615
Page 10
828D/840Dsl SINUMERIK Operate
M608
Drilling with ShopMill
Sinumerik
Operate
Module Description:
This module explains the programming of a simple drilling example with ShopMill functionality, by
means of chained drilling cycles and position patterns.
Module Objective:
Working through this module you become familiar with the technology “Drilling” by pro-
gramming a chained sequential ShopMill program.
Content:
Simple programming example
This document was produced for training purposes.
828D/840Dsl SINUMERIK Operate v4.7
Page 1
M608
Siemens assumes no responsibility for its contents.
M608
M608
Page 2
828D/840Dsl SINUMERIK Operate
Drilling with ShopMill
M608
Drilling
Shopmill:
START
Simple
programming
example
Drilling
Shopmill:
END
Notes
828D/840Dsl SINUMERIK Operate
Page 3
M608
M608
Drilling with ShopMill
Simple programming example
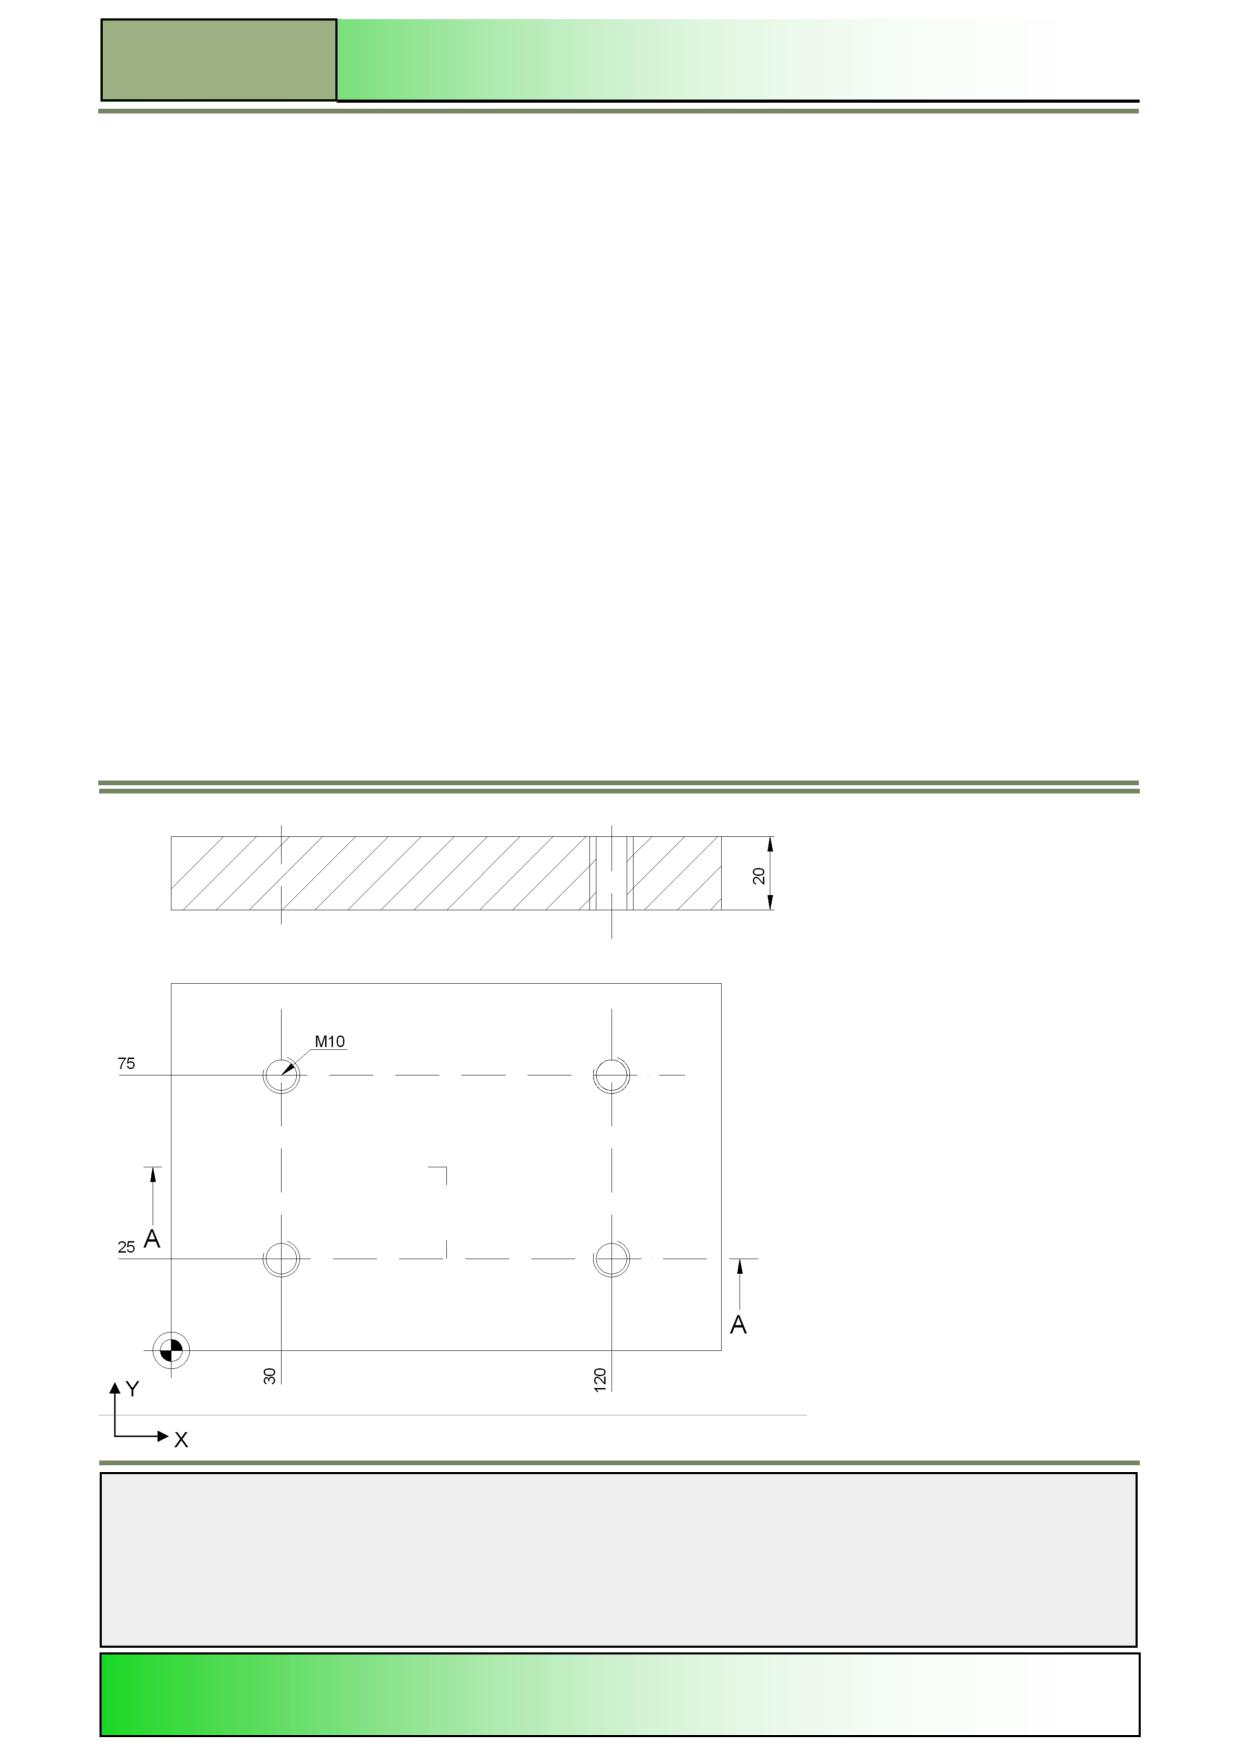
Description:
A simple program (hole pattern) with chained program blocks is to be created in ShopMill.
For this, different drilling cycles and a position pattern cycle will be called up and chained to a sequential program.
Objective:
The following workpiece is to be programmed and simulated.
For this, the tool data and technology data shown below shall be used.
The following tool- and technology data are needed for the programming:
Tool data:
Center drill 12 mm (CENTERDRILL_D12)
Drill Ø 8,5 mm (DRILL_D8.5)
Tap M10 (TAP_M10)
Approach strategy:
As a start position for the machining, the first programmed drill
hole is to be used.
This position is approached in rapid traverse.
Notes
M608
Page 4
828D/840Dsl SINUMERIK Operate
Drilling with ShopMill
M608
Example: Hole pattern
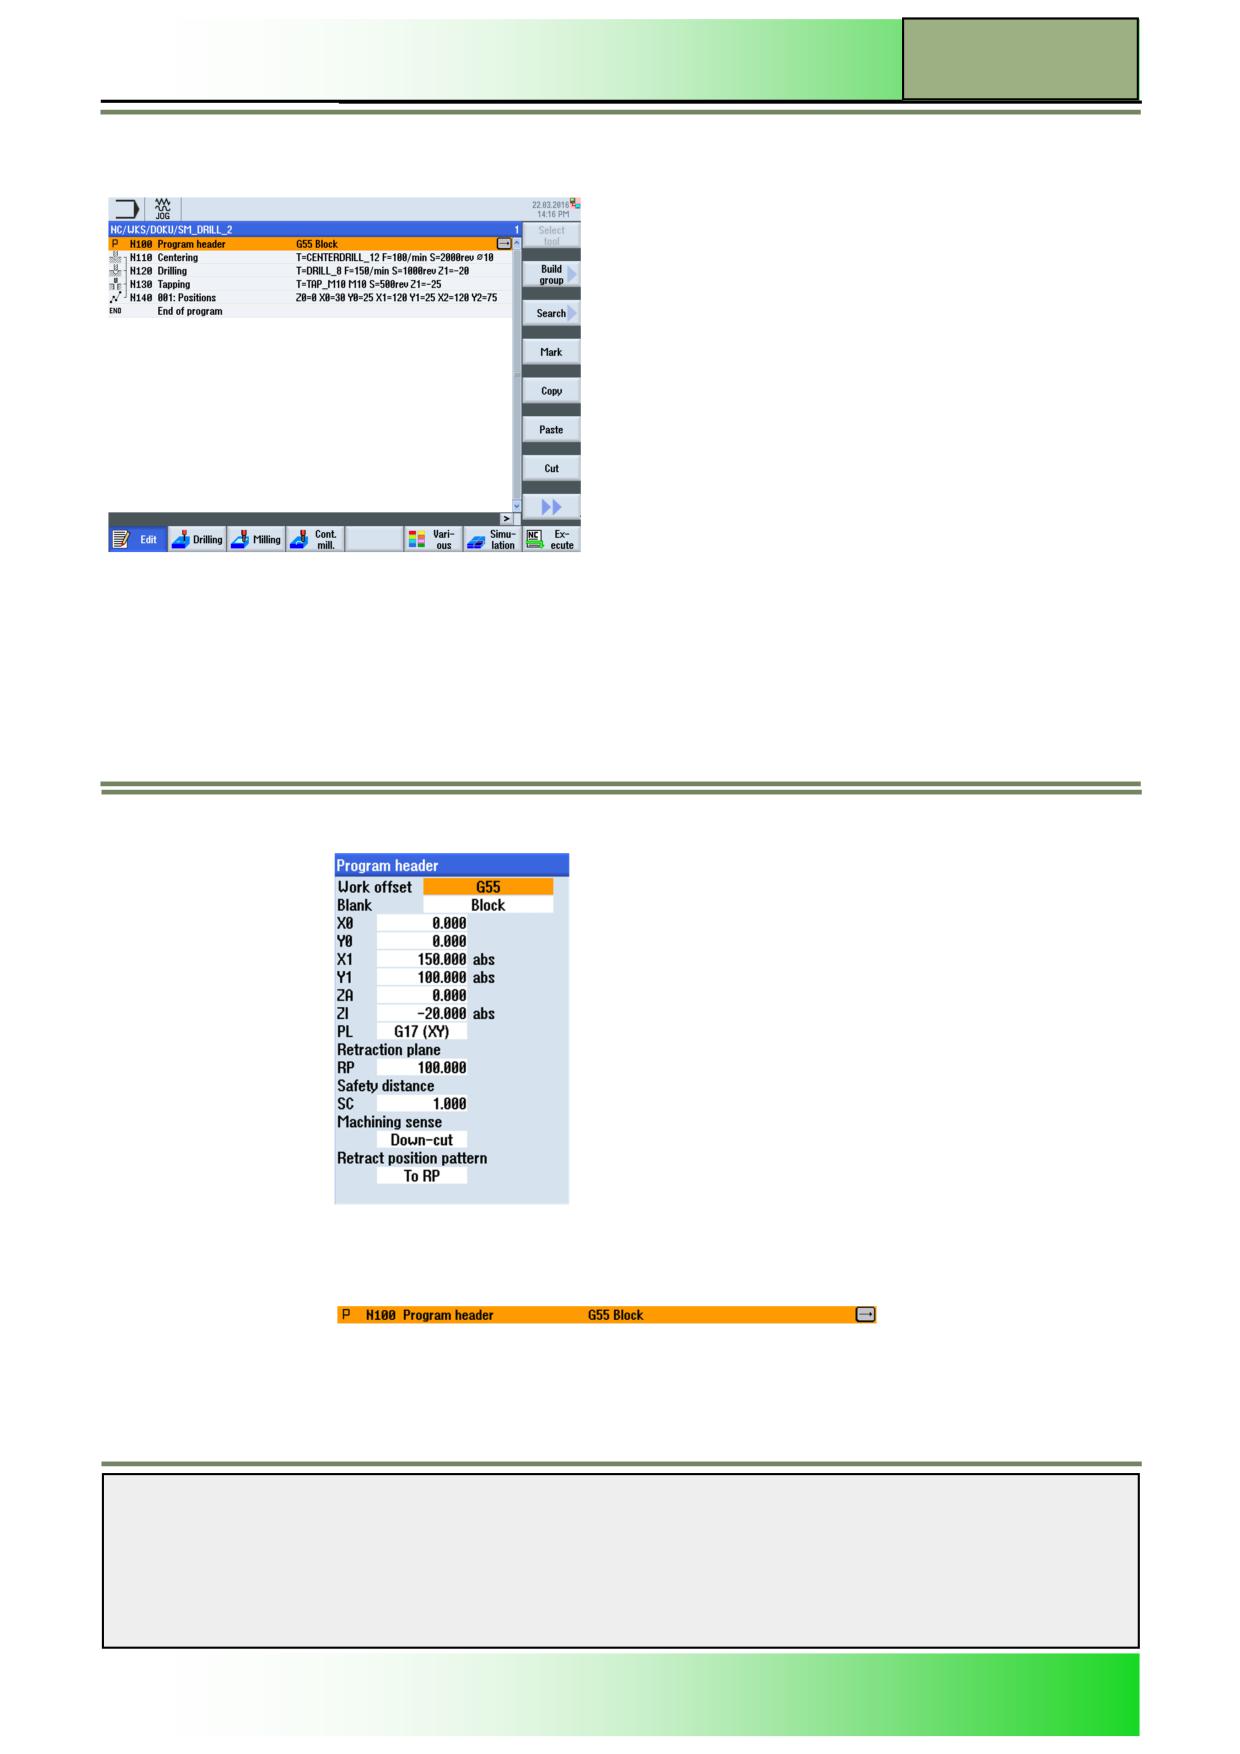
The following program with call of the drilling cycles “Centring”, “Drilling”, “Taping” and a hole pattern is to be programmed.
Create a new ShopMill program.
Give the program a name, for example “SM_DRILL_2.MPF”.
The program with the parameter mask for the program header opens automaticlly.
1.
Program the “Program header”, by taking over the following values:
Confirm your inputs by pressing the VSK 8 “Accept”.
The following program block “Program header” will be inserted into the program:
Notes
828D/840Dsl SINUMERIK Operate
Page 5
M608
M608
Drilling with ShopMill
2.
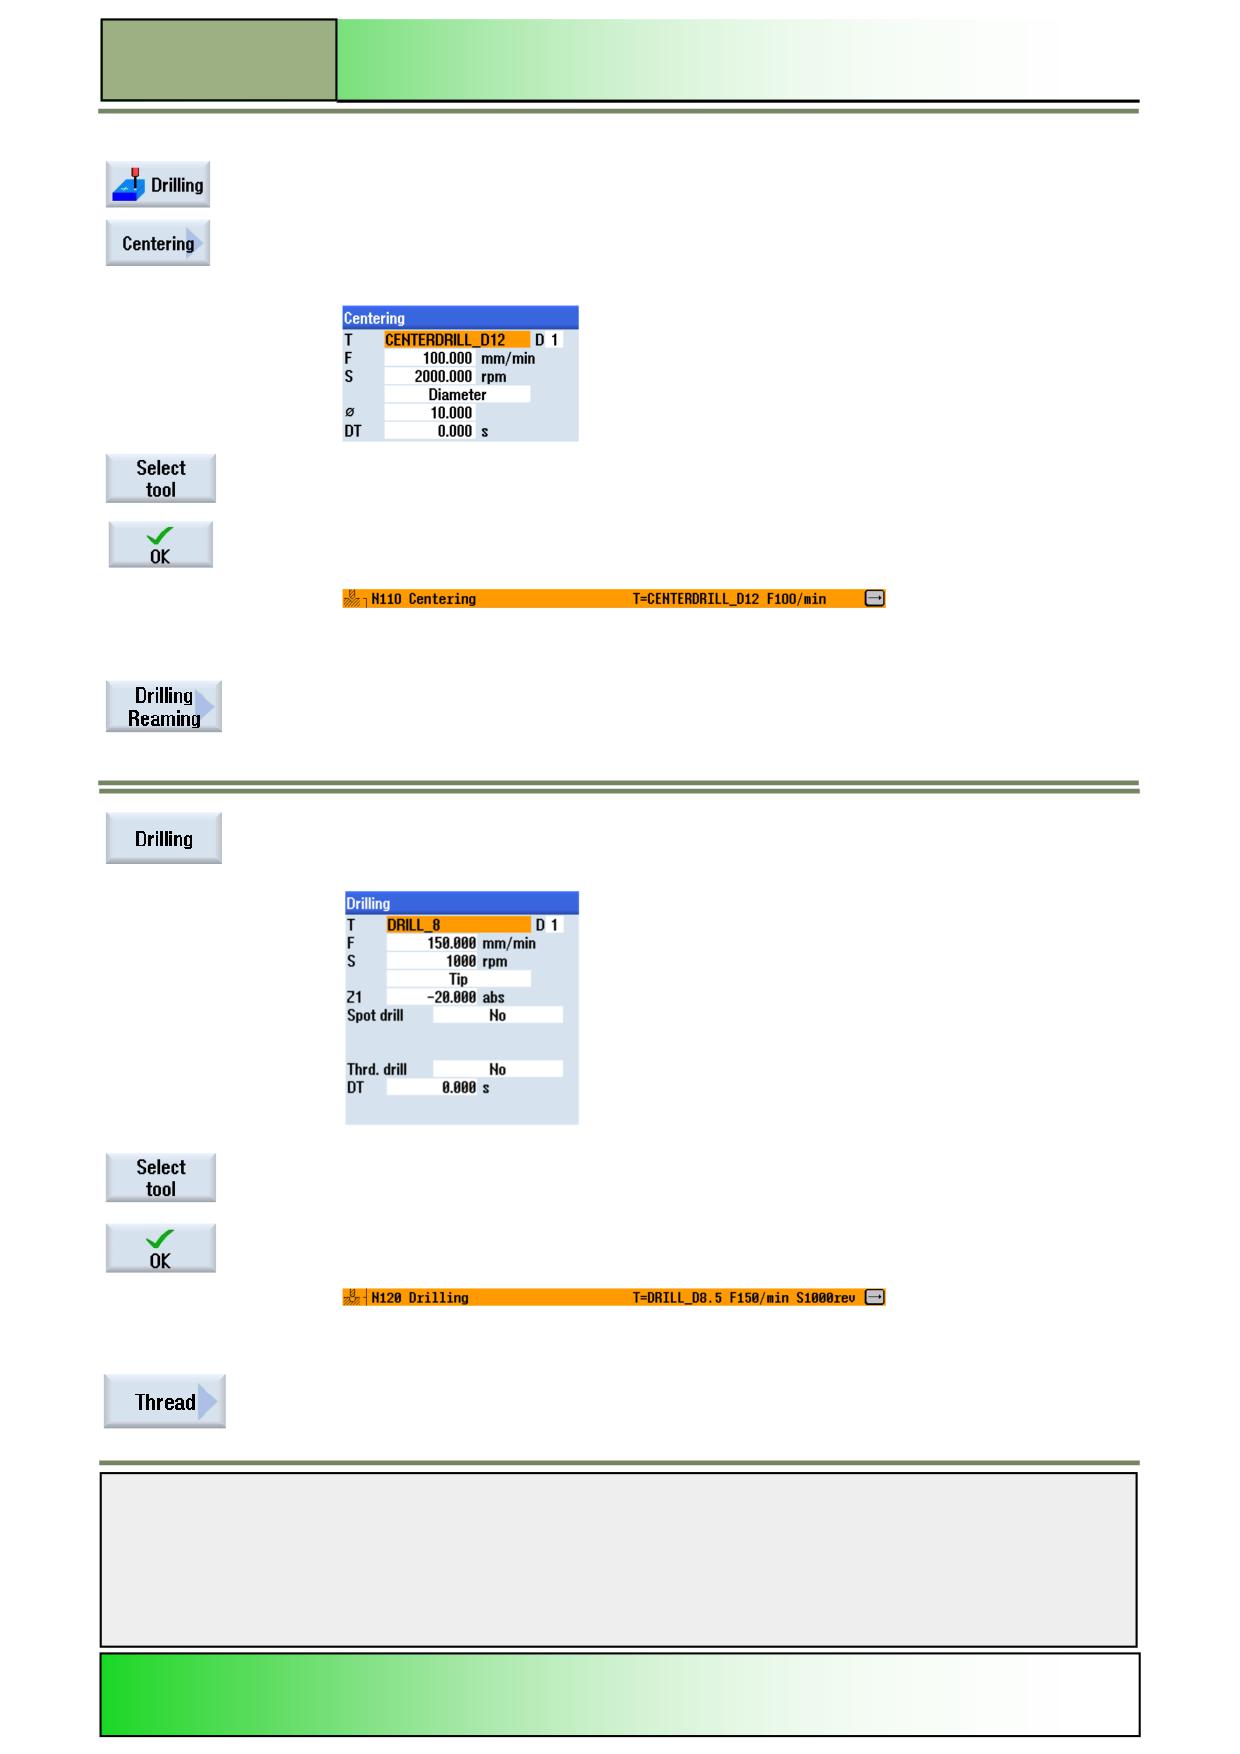
Program the center drilling cycle.
Press the HSK 1.2 “Drill.”.
Press the VSK 1 “Centering”.
The parameter mask for the “Centering” opens.
3.
Insert the following values for centering in the parameter input mask, like displayed below.
To insert a tool into the parameter window, press the VSK 1 “Select tool”, mark the desired
tool (here CENTERDRILL_D12) in the tool selection list with the orange selection cursor and
press the VSK 8 “OK”.
Confirm the input with the VSK 8 “Accept”.
The following program block “Centring” will be inserted into the program.
The program chain starts (see bracket symbol).
4.
Program the drill cycle.
Press the VSK 2 “Drilling Reaming”.
Select the VSK 3 “Drilling” to open the input mask for the drilling.
5.
Fill out the input mask like displayed below:
To insert a tool into the parameter window, press the VSK 1 “Select tool”, mark the desired
tool (here DRILL_D8.5) in the tool selection list with the orange selection cursor and press the
VSK 8 “OK”.
The following program block “Drilling” will be inserted into the program.
The program chain will be extended.
6.
Now program the tapping cycle.
Press the VSK 5 “Thread”.
The “Tapping” window opens.
Notes
M608
Page 6
828D/840Dsl SINUMERIK Operate
Drilling with ShopMill
M608
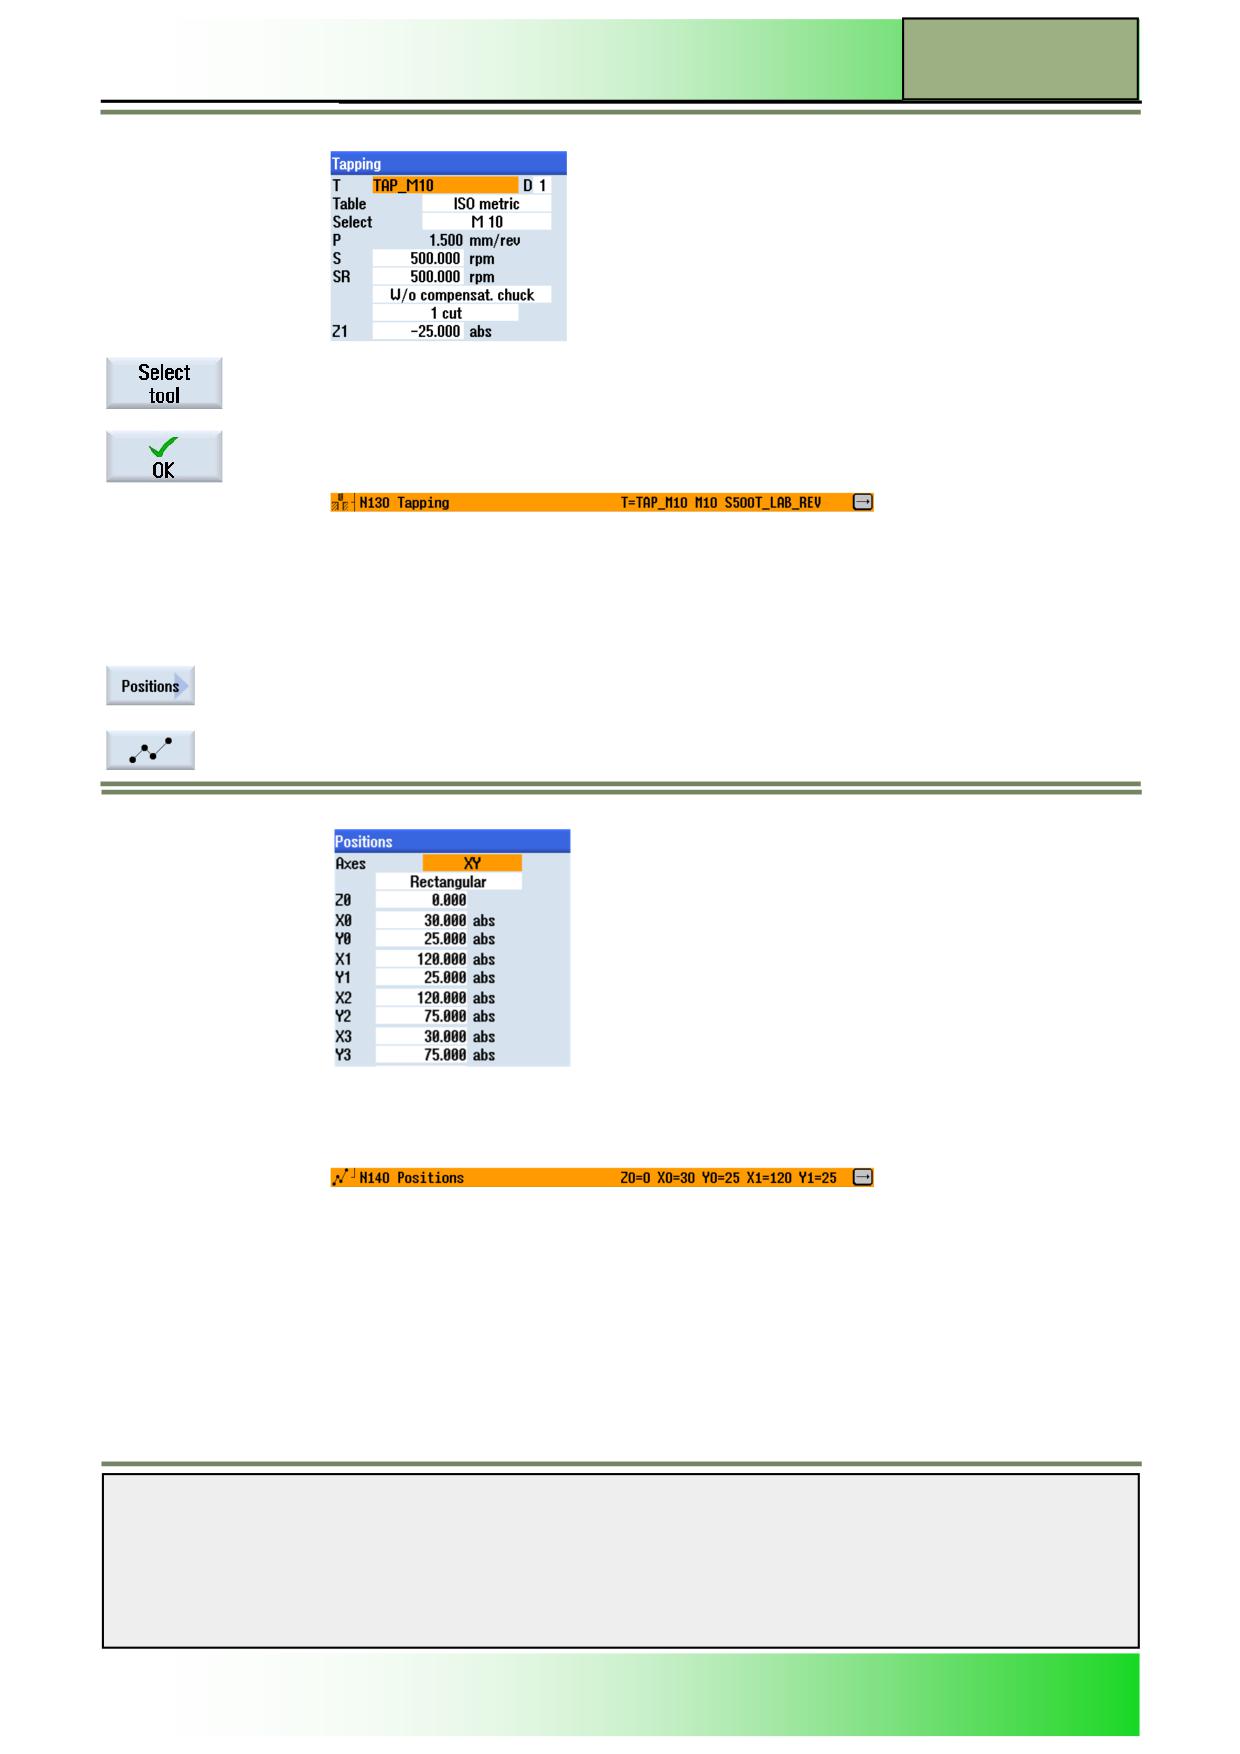
7.
Insert the following values into the input mask:
To insert a tool into the parameter window, press the VSK 1 “Select tool”, mark the desired tool
(here TAP_M10)) in the tool selection list with the orange selection cursor and press the VSK 8
“OK”.
Confirm the input with the VSK 8 “Accept”.
The following program block “Tapping” will be inserted into the program.
The chaining of the program blocks will be extended.
8.
Program now the position pattern for the drilling, in order to close the program block chain.
Press the VSK 7 „Positions“.
The positions window opens.
To set the positions for the drillings press the VSK 1 “Positions”.
The drill position window opens.
9.
Insert following values:
Confirm your inputs by pressing the VSK 8 “Accept”.
The following program block “Positions” will be inserted:
The program block chain will be closed.
10.
Program the program end and simulate the machining.
Place the orange selection cursor on the “End of Program” program block. Extend the pro-
gram block by pressing the blue “cursor-to-the-right”-key on the keyboard.
The input mask for the “End of program” opens.
Notes
828D/840Dsl SINUMERIK Operate
Page 7
M608
M608
Drilling with ShopMill
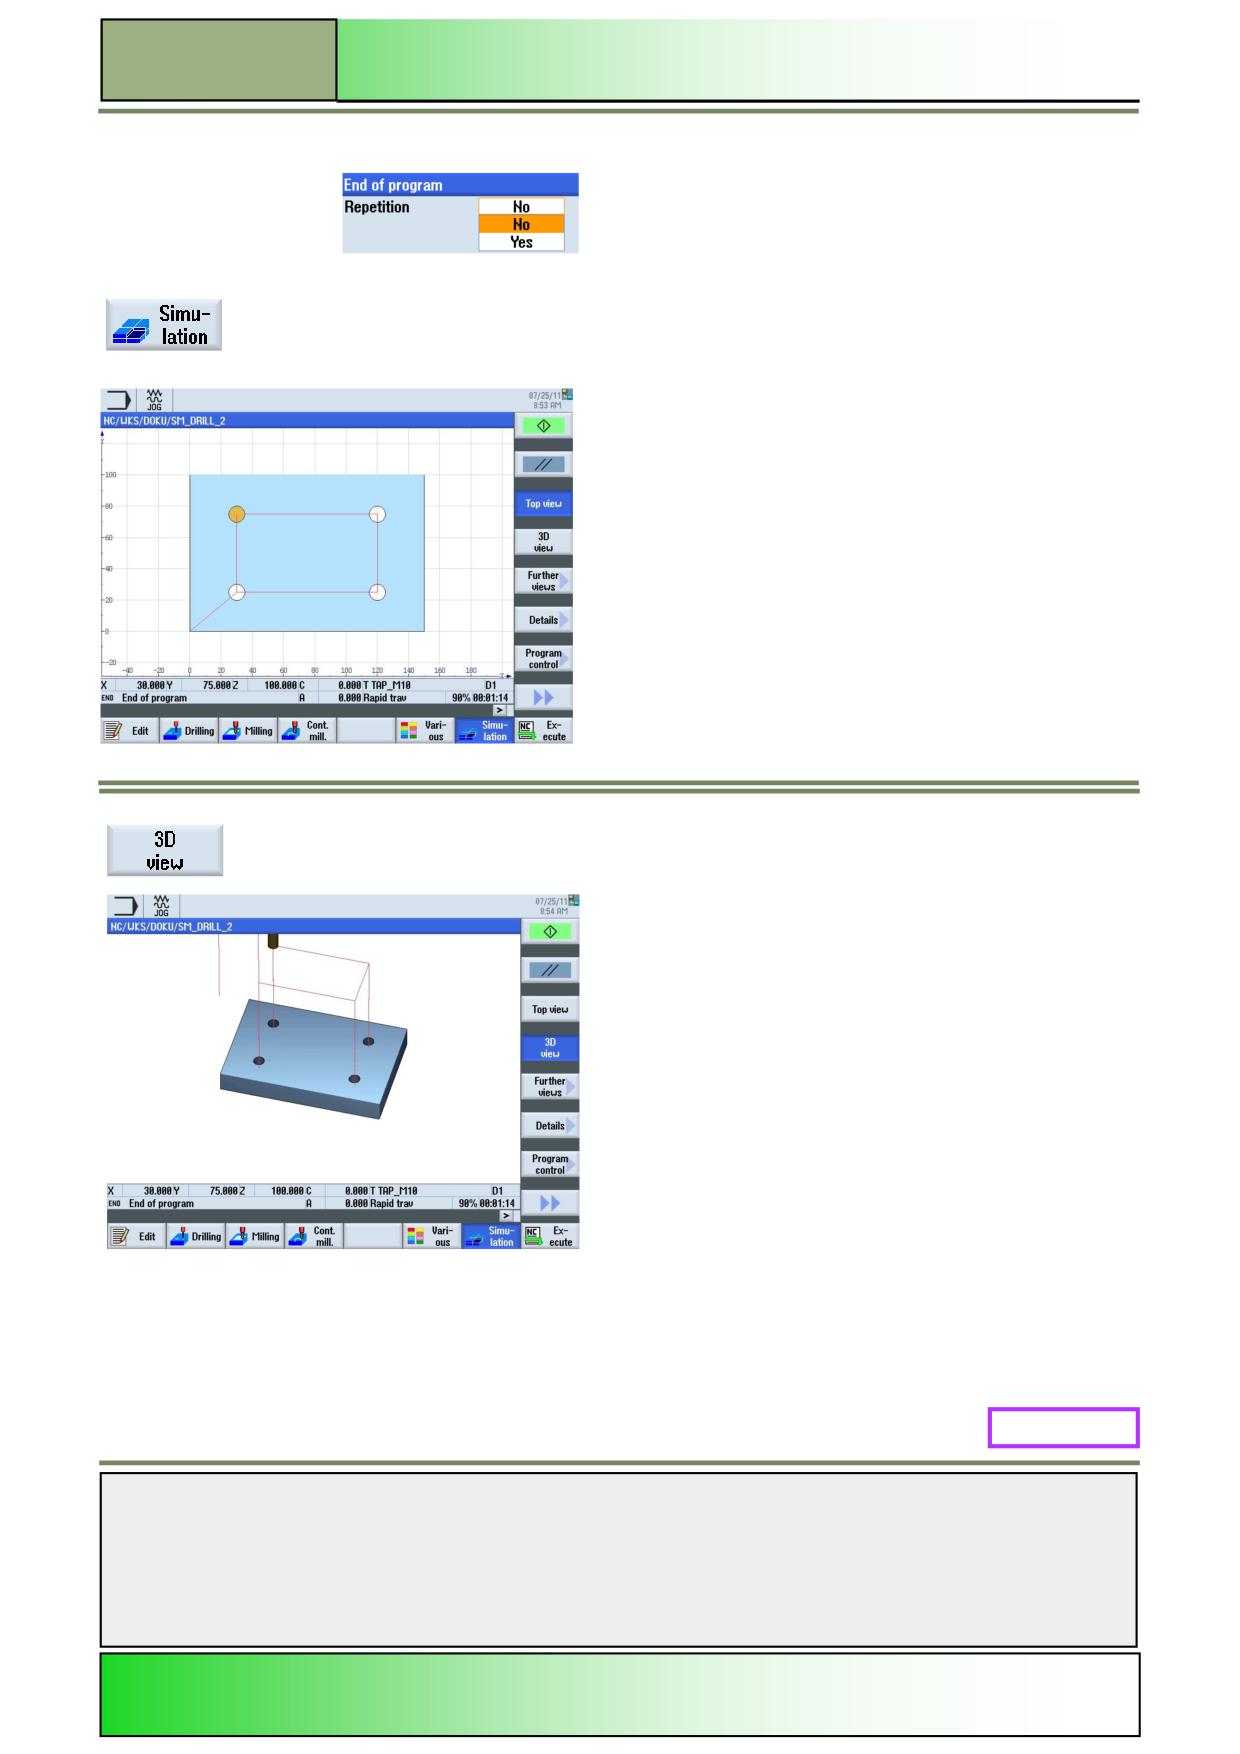
11.
The settings window for the program end opens, where you can define to repeat the workpiece.
Accept the default value by pressing the VSK 8 “Accept”.
Press the HSK 1.7 “Simulation” to start the simulation of the program.
The control calculates the simulation parameters and opens the simulation in the simulation
window in “Top view”.
To view the simulation 3-dimesional press the VSK 1.4 “3D View”.
M608: END
Notes
M608
Page 8
828D/840Dsl SINUMERIK Operate
M623
Contour milling with ShopMill
Sinumerik
Operate
Module Description:
This module explains the programming of a complex contour in ShopMill, with the technology contour
milling and with help of the contour editor.
Module Objective:
Working with this module you become familiar with the technology “Contour milling” by
programming a chained sequential ShopMill program.
Content:
Complex programming example
This document was produced for training purposes.
828D/840Dsl SINUMERIK Operate v4.7
Page 1
M623
Siemens assumes no responsibility for its contents.
M623
M623
Page 2
828D/840Dsl SINUMERIK Operate
Contour milling with ShopMill
M623
Contour milling
Shopmill:
START
Complex
programming
example
Contour milling
Shopmill:
END
Notes
828D/840Dsl SINUMERIK Operate
Page 3
M623
M623
Contour milling with ShopMill
Complex programming example
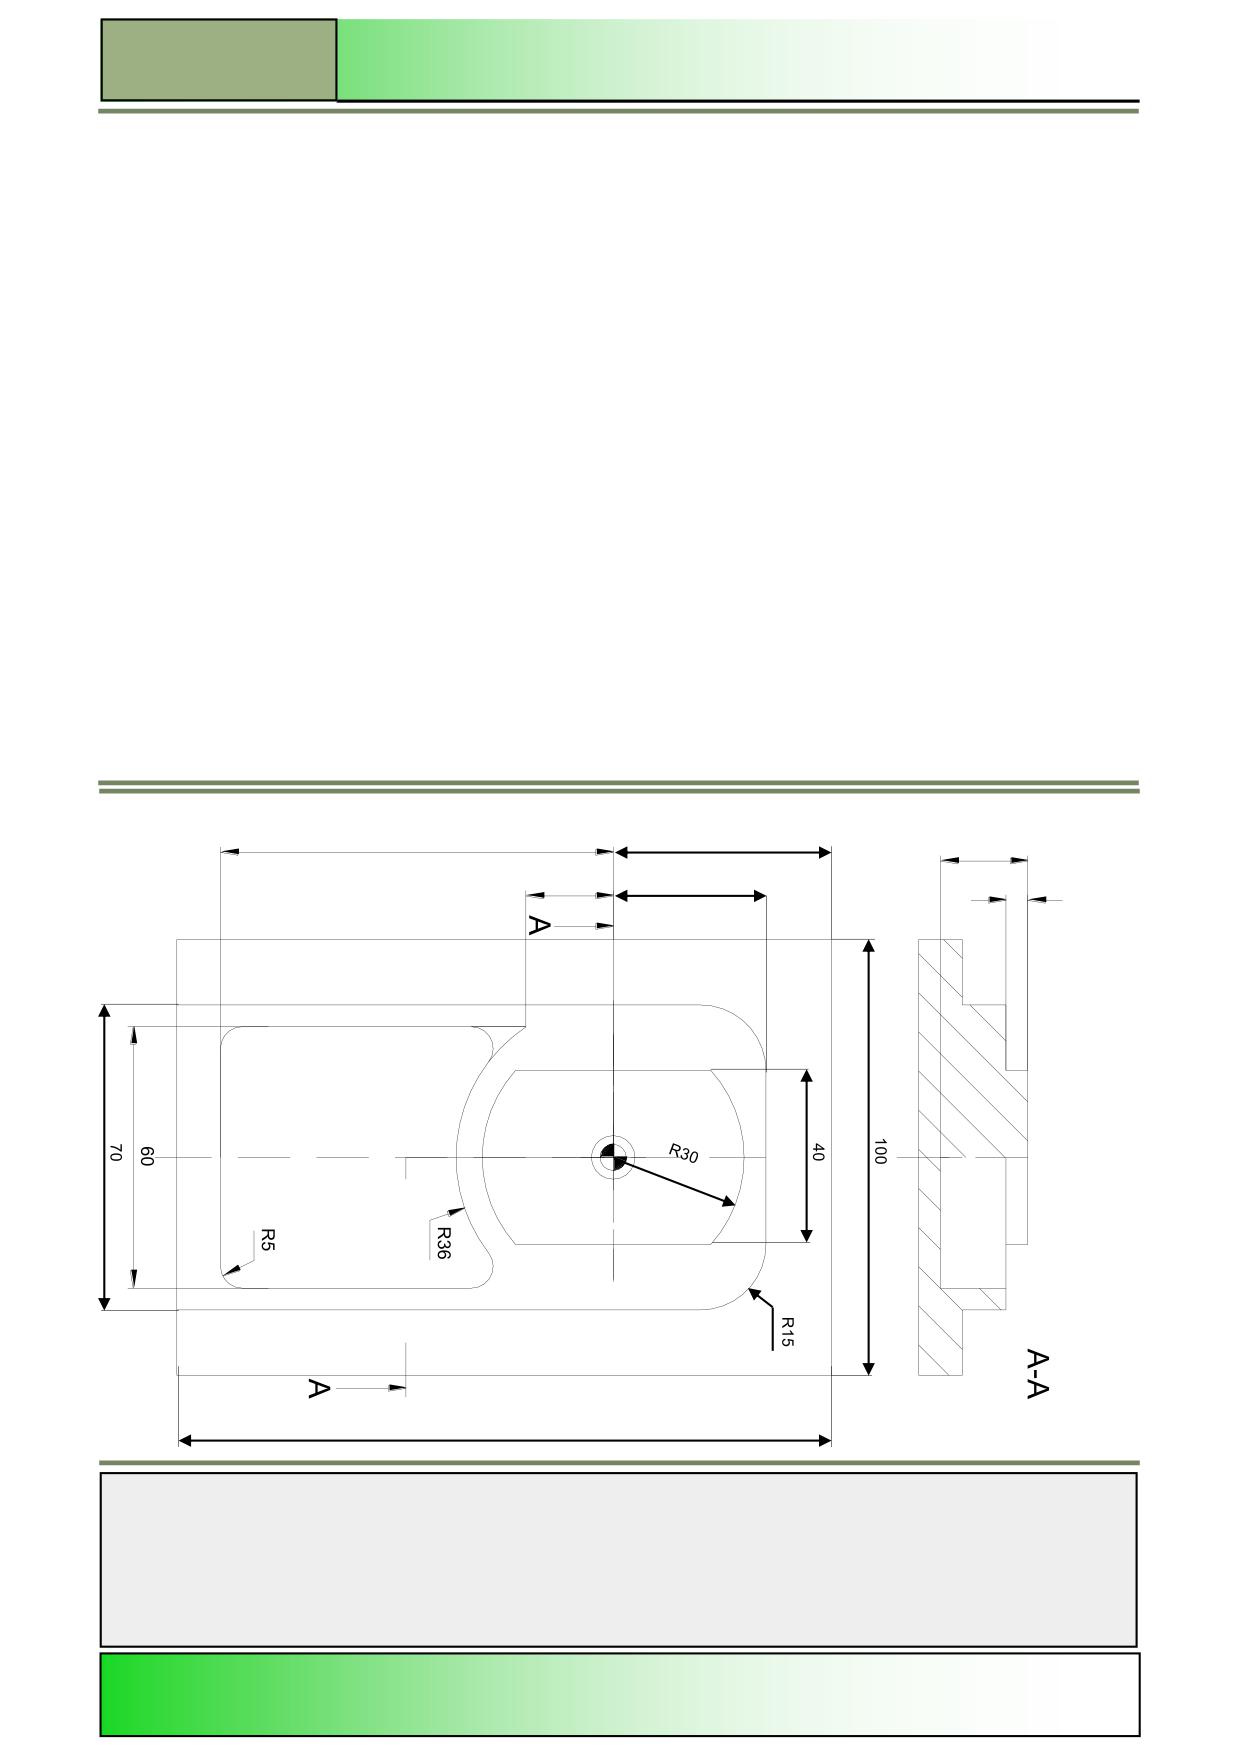
Description:
A complex program (moulding plate) with chained program blocks is to be created in ShopMill with the technology “Contour
milling”.
Objectives:
Following workpiece is to be programmed and simulated.
50
90
20
20
35
5
150
erate
Contour milling with ShopMill
M623
Programming example: Moulding plate
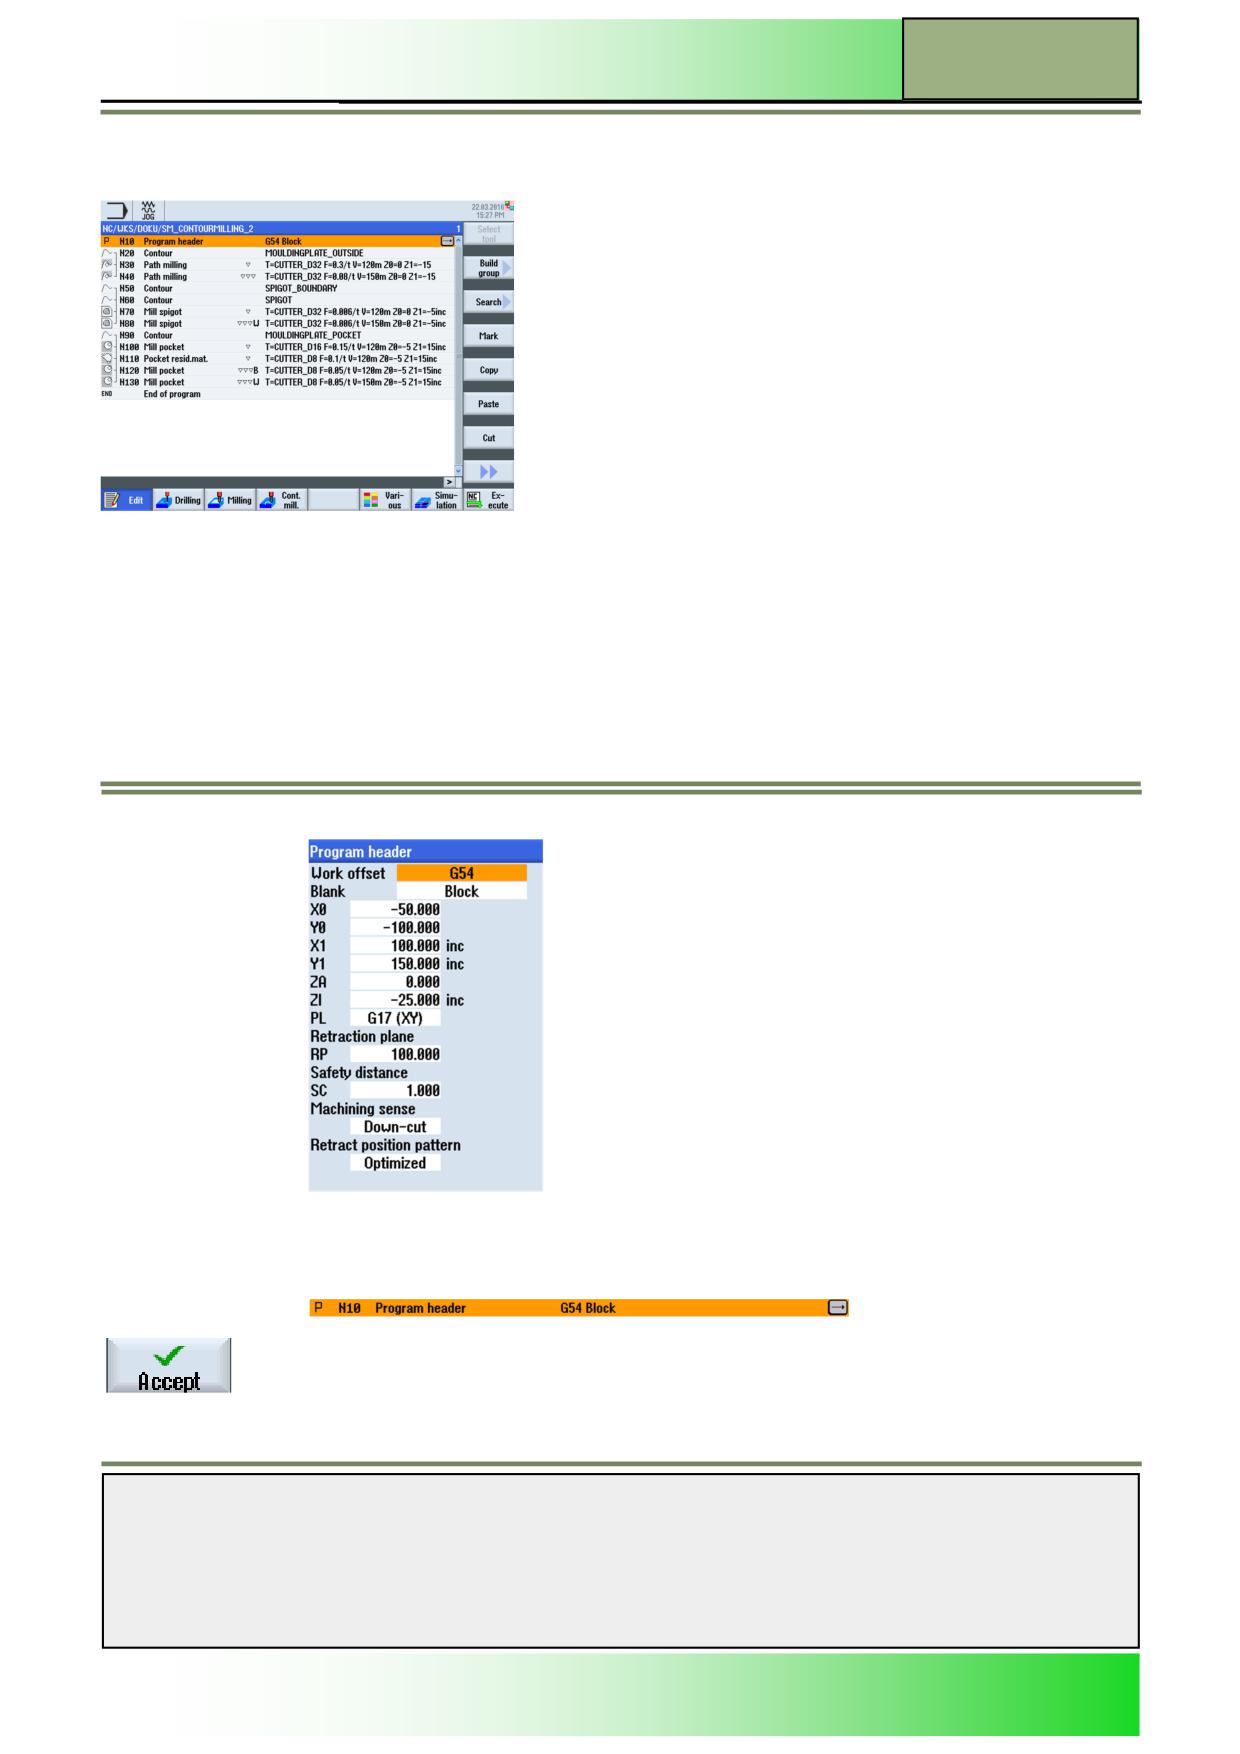
The following program is to be programmed with the technology “Contour milling”.
1.
Create a new ShopMill program with the name “SM_CONTOURMILLING_2.MPF”.
The program with the parameter mask for the program header opens automatically.
2.
Insert following values for the program header. Use the “Select” key where indicated.
Confirm your inputs by pressing the VSK 8 “Accept”.
The following program block is inserted into the program:
Notes
828D/840Dsl SINUMERIK Operate
Page 5
M623
M623
Contour milling with ShopMill
3.
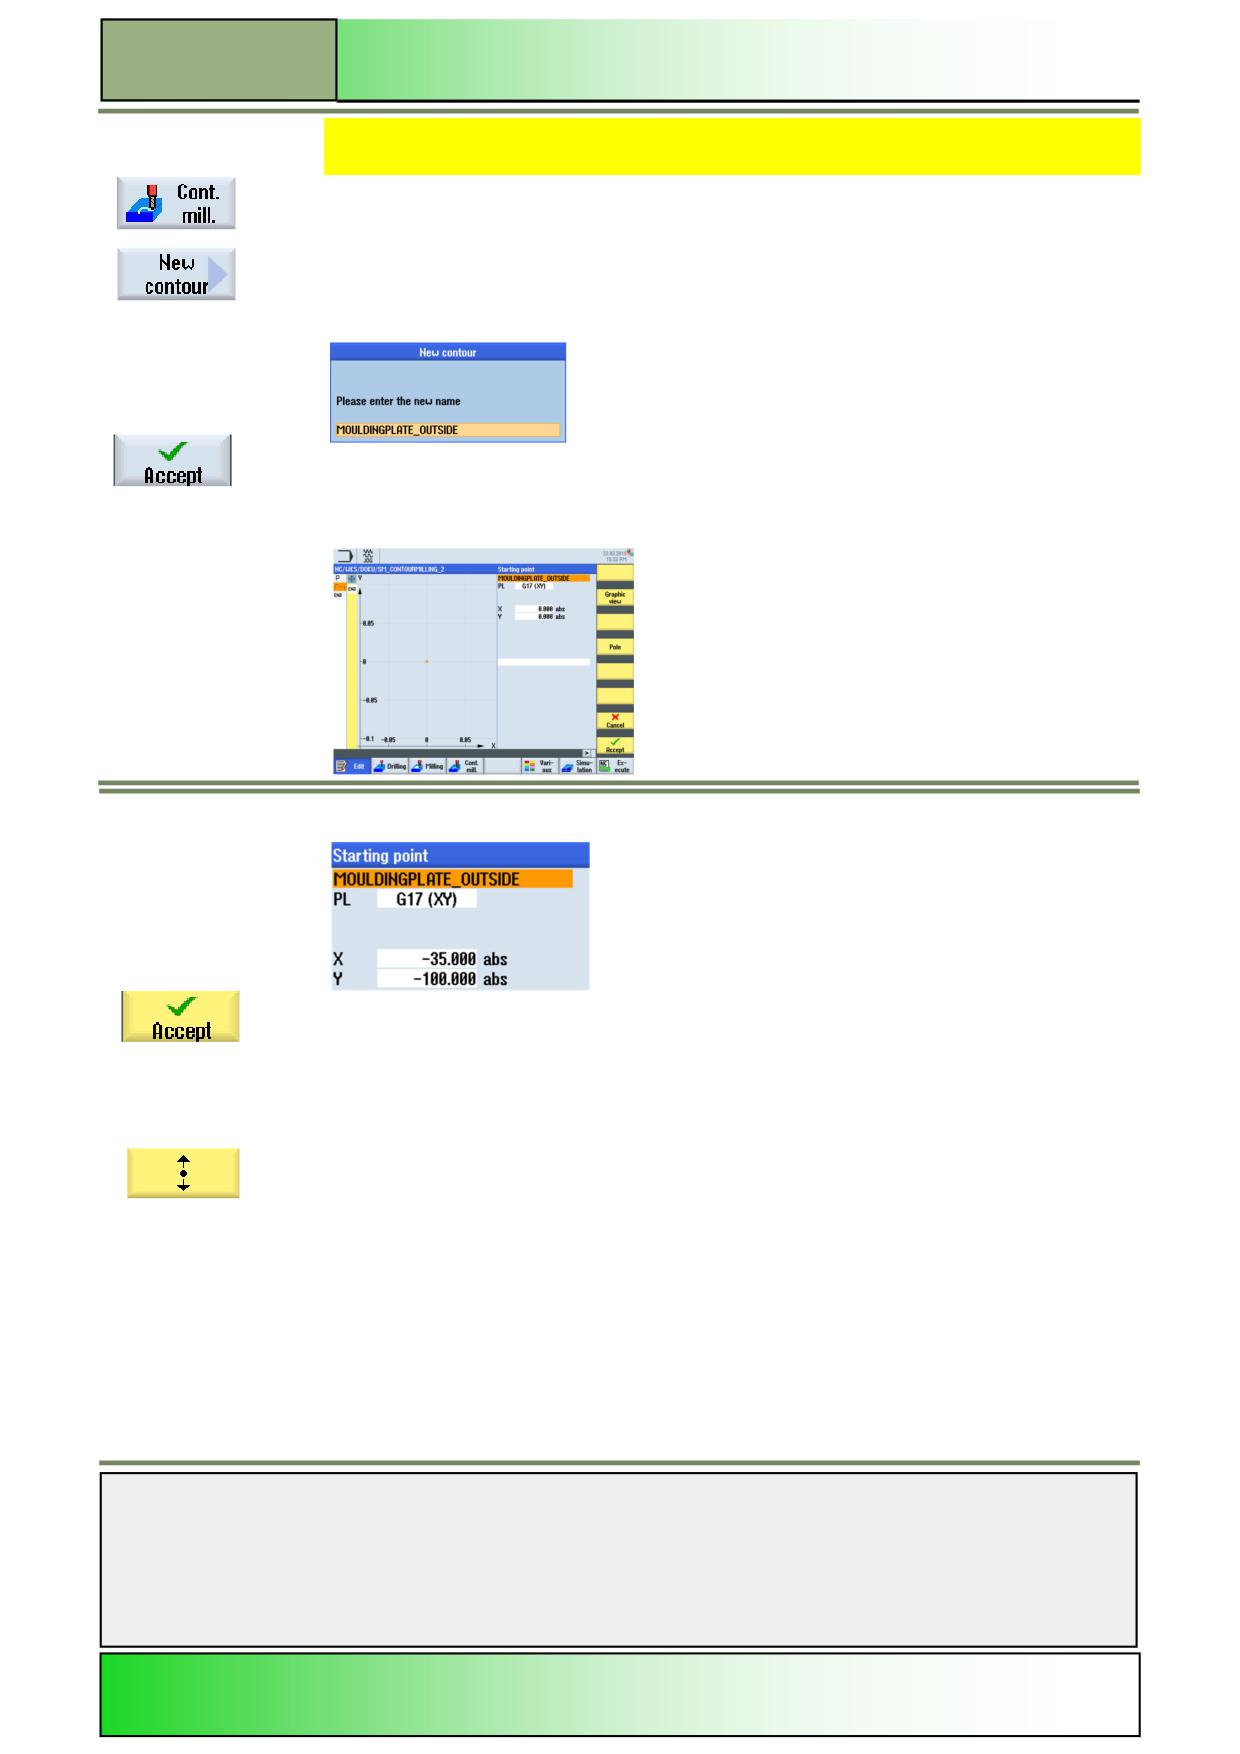
Start programming the contour description for the “Moulding plate outside” with help of the con-
tour editor.
Press the HSK 1.4 “Cont. mill.”, to open the technology “Contour milling”.
Press the VSK 1 “New contour”.
A parameter mask where you can enter a name for the new contour opens.
4.
Enter a name for the new contour, e.g. “MOULDINGPLATE_OUTSIDE”,
Confirm your input by pressing the VSK 8 “Accept”.
The contour editor opens automatically and the parameter mask for entering a start point for the
contour is active by default.
5.
Enter the following coordinates for the starting point:
Confirm your input by pressing the VSK 8 “Accept”.
The contour description starts and new functions
for defining a contour are available as yellow vertical softkeys on the right side of the screen.
6.
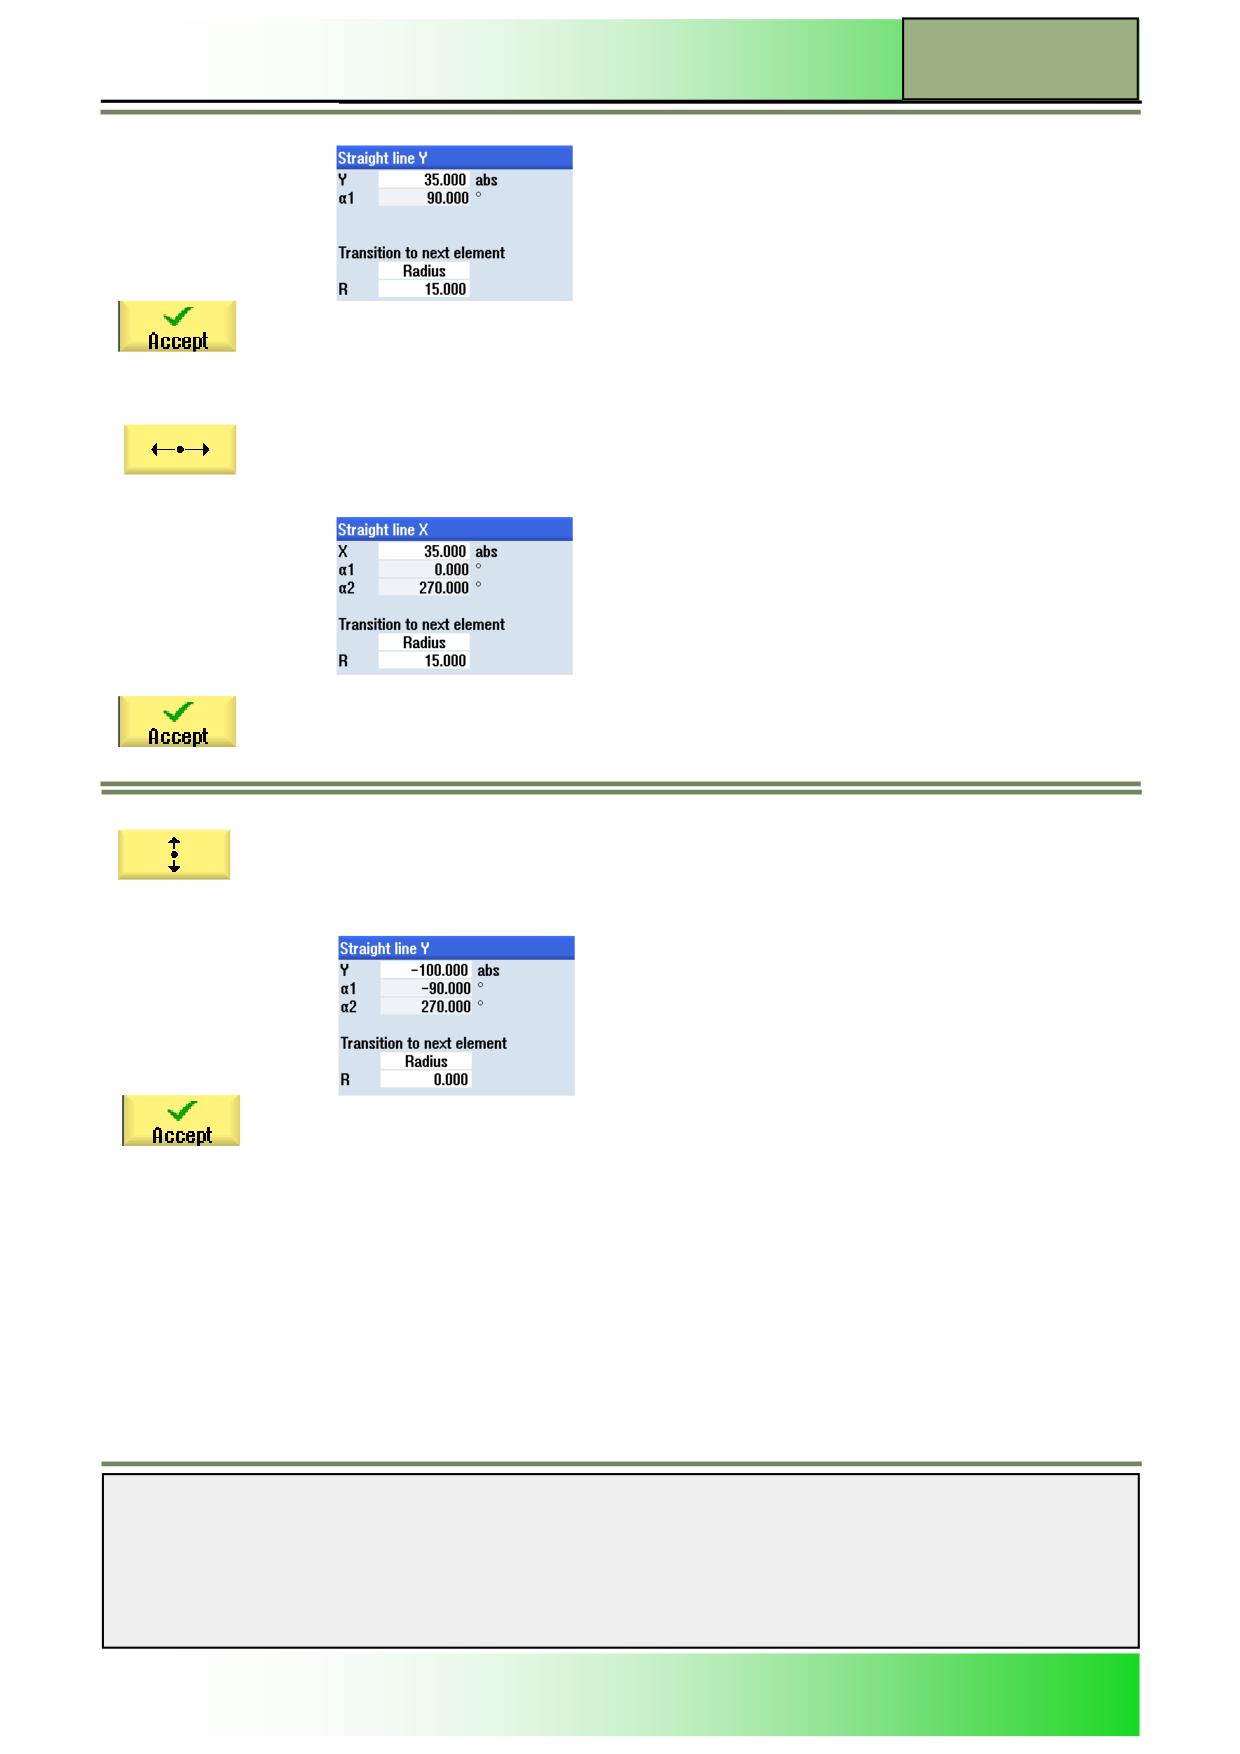
Extend the contour description by adding a straight line in Y-direction.
Press the VSK 3 “Straight line Y”.
The input window for the “Straight line Y” opens.
Notes
M623
Page 6
828D/840Dsl SINUMERIK Operate
Contour milling with ShopMill
M623
Enter following values into the parameter mask:
Confirm your input by pressing the VSK 8 “Accept”.
A straight line in Y-direction is added to your contour description.
7.
Extend the contour description by adding a straight line in X-direction.
Press the VSK 2 “Straight line X”.
The input window for the “Straight line X” opens.
Enter the following values into the parameter mask:
Confirm your input by pressing the VSK 8 “Accept”.
A straight line in X-direction is added to your contour description.
8.
Now finish the programming of the contour path by adding a straight line in Y-direction.
Press the VSK 3 “Straight line Y”.
The input window for the straight line in Y-direction opens.
Enter the following values into the parameter mask:
Confirm your inputs by pressing the VSK 8 “Accept”.
The contour description is finished.
Notes
828D/840Dsl SINUMERIK Operate
Page 7
M623
M623
Contour milling with ShopMill
9.
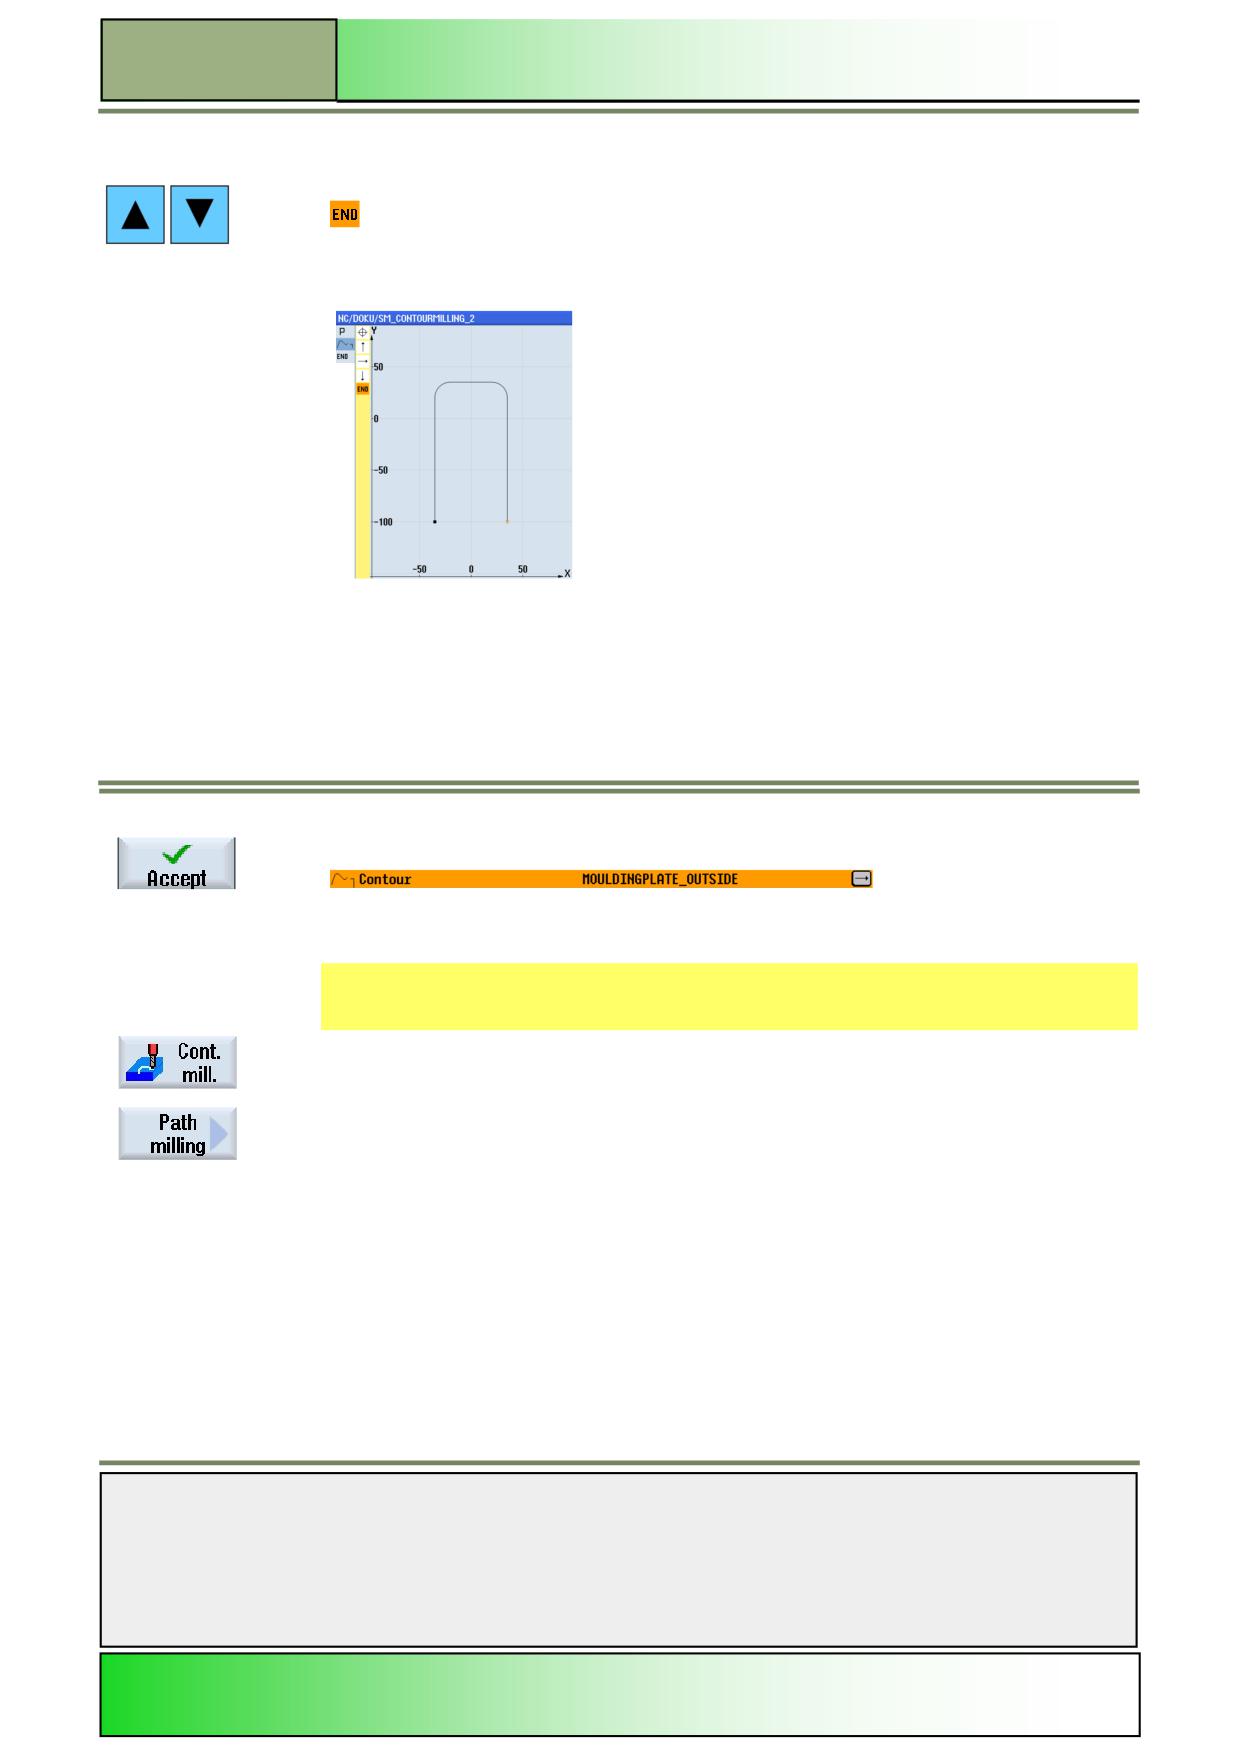
Now, check the outline of the contour path.
For this, place the orange selection cursor on the
-symbol in the yellow column on the left side of the screen, by using the blue cursor keys on
the keyboard.
The contour is displayed graphically.
Note:
The white column on the left side of the help screen shows all the program blocks programmed
as symbols (representing the technology). The yellow column next to it shows all the pro-
grammed contour elements as symbols.
10.
Finish now the programming of the contour by pressing the VSK 8 “Accept”.
The program editor opens and the following program block is inserted into the program:
The program chain opens.
11.
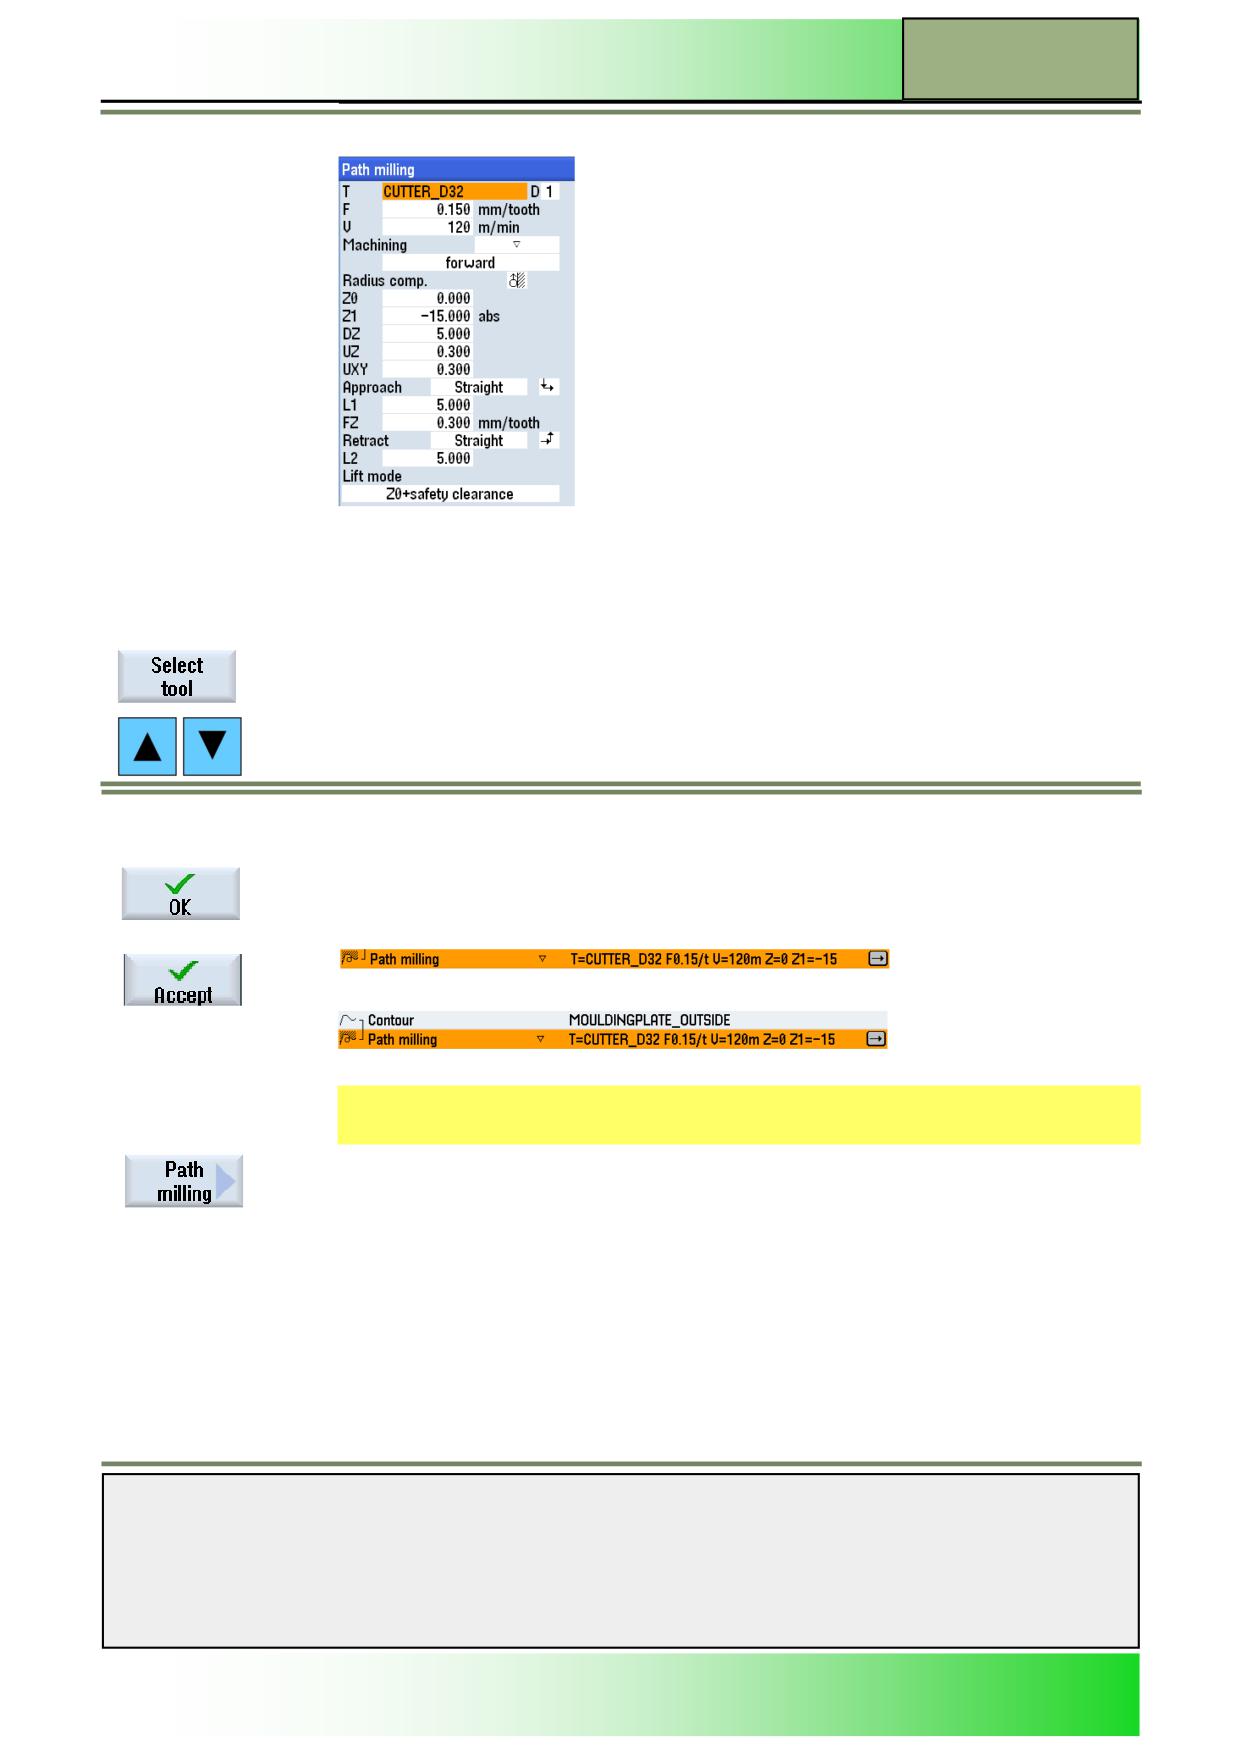
Insert now a “path milling” cycle into the program for “roughing” the moulding plate.
Press the HSK 1.4 “Cont. mill.” to open the
technology “Contour milling”.
Press the VSK 1.2 “Path milling”.
The input window for the path milling cycle opens.
Notes
M623
Page 8
828D/840Dsl SINUMERIK Operate
Contour milling with ShopMill
M623
12.
Insert the following parameter values. Use the blue “Select” key where indicated.
Note:
In the input field “F” you can switch between
“mm/tooth” or “mm/min” . The input field for Speed can either be set to cutting speed “V” in “m/
min” or Spindle speed “S” in “rpm”.
The machining depth “Z1” can be “inc” or “abs”.
To insert a tool into the cycle input mask, press the VSK 1 “Select tool”.
The “Tool selection” List window opens.
Use the blue cursor keys on the keyboard, to mark the tool “CUTTER_D32”, with the orange
selection cursor.
Press the VSK 1.8 “OK”.
The tool “CUTTER_D32" will be inserted into the cycle input mask.
The following program block will be added to the program chain.
The program chain closes.
13.
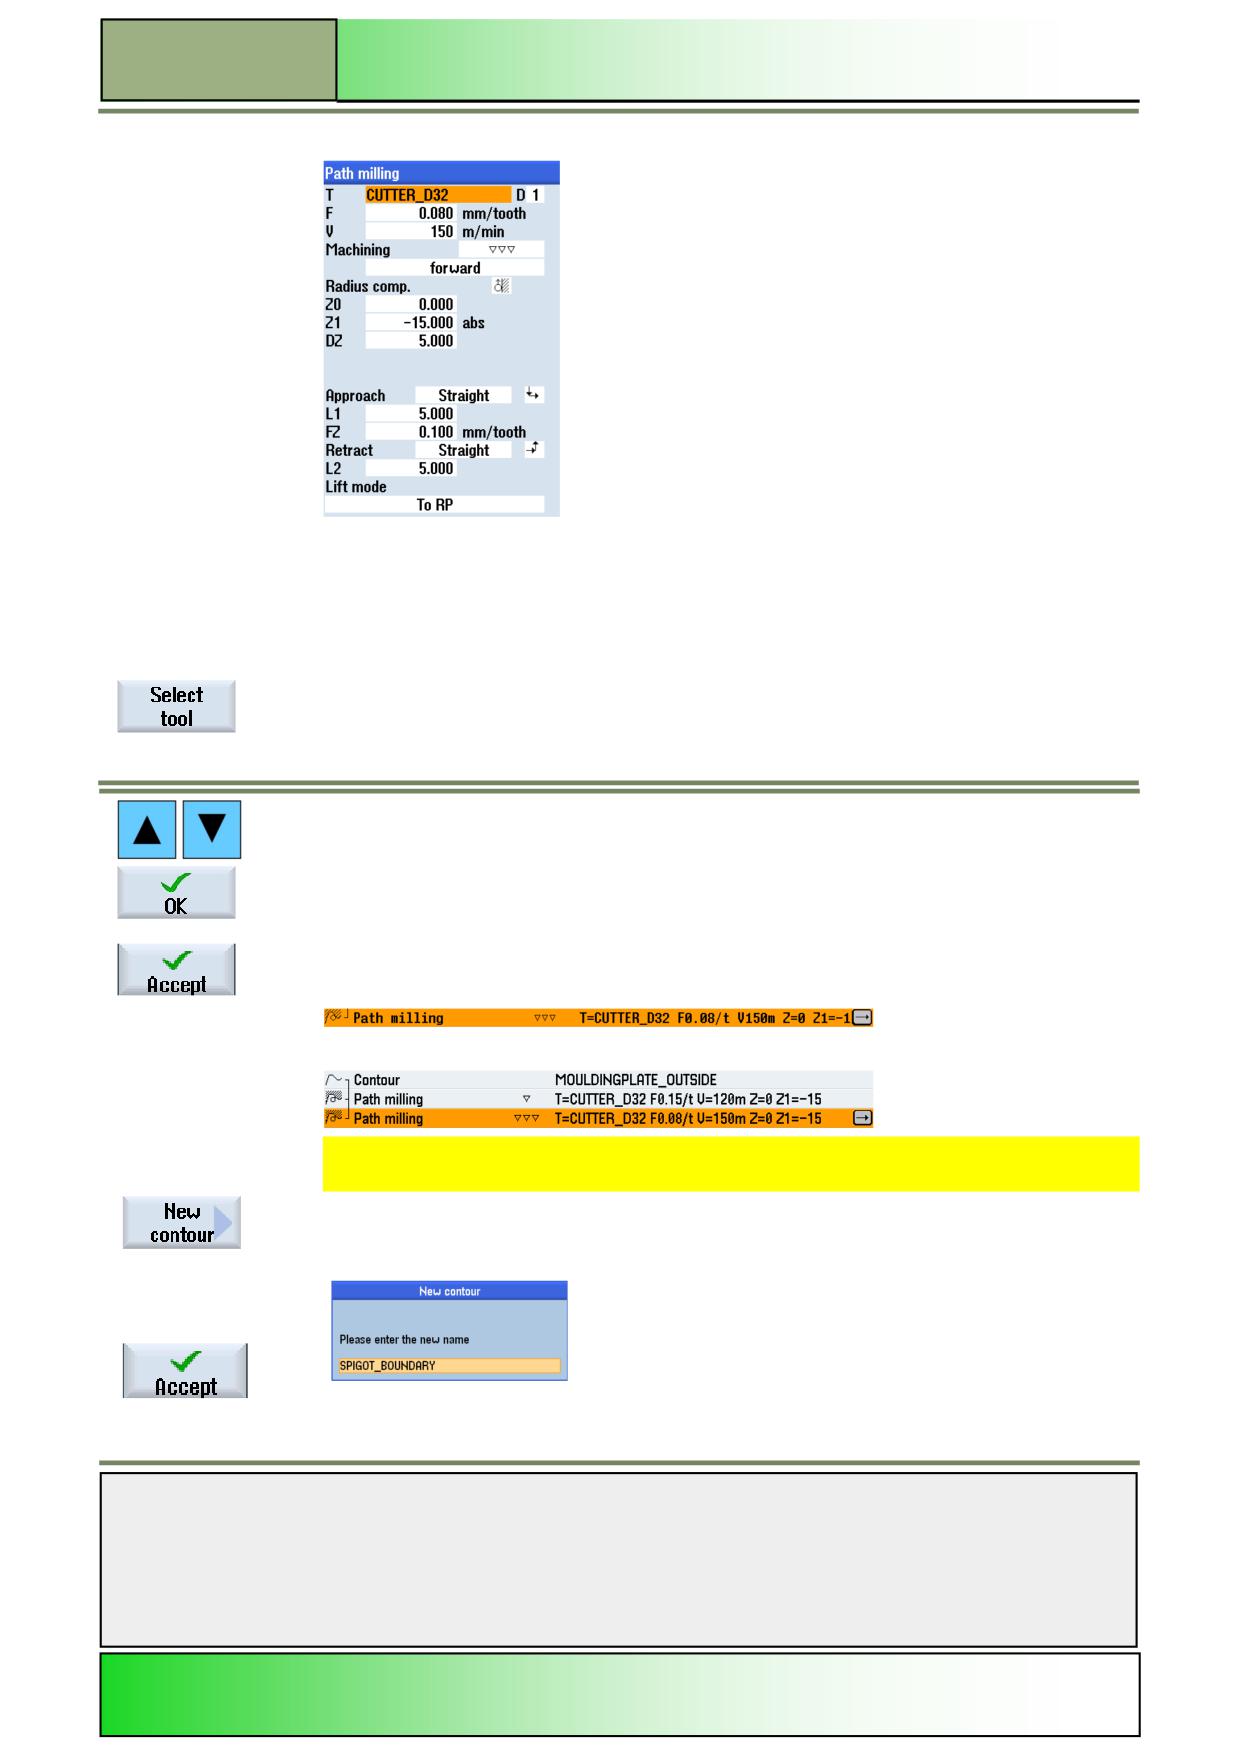
Extend now the program chain by inserting another “path milling” cycle for “finishing” the
outside.
Press the VSK 1.2 “Path milling”.
The input window for the path milling cycle opens.
Notes
828D/840Dsl SINUMERIK Operate
Page 9
M623
M623
Contour milling with ShopMill
14.
Insert the following parameter values. Use the blue “Select” key where indicated.
Note:
In the input field “F” you can switch between
“mm/tooth” or “mm/min” . The input field for Speed can either be set to cutting speed “V” in “m/
min” or Spindle speed “S” in “rpm”.
The machining depth “Z1” can be “inc” or “abs”.
To insert a tool into the cycle input mask, press the VSK 1 “Select tool”.
The “Tool selection” list window opens.
Use the blue cursor keys on the keyboard, to mark the tool “CUTTER_D32”, with the orange
selection cursor.
Press the VSK 1.8 “OK”.
The tool “CUTTER_D32" will be inserted into the cycle input mask.
Confirm your inputs by pressing the VSK 8 “Accept”.
The following program block will be added to the program chain.
The program chain is now complete and closed.
15.
Start programming the contour description for the “Spigot boundary” with help of the contour
editor.
Press the VSK 1 “New contour”.
A parameter mask where you can enter a name for the new contour opens.
16.
Enter a name for the new contour, e.g. “SPIGOT_BOUNDARY”.
Confirm your input by pressing the VSK 8 “Accept”.
The contour editor opens automatically and the parameter mask for entering a start point for the
contour is active by default.
Notes
M623
Page 10
828D/840Dsl SINUMERIK Operate
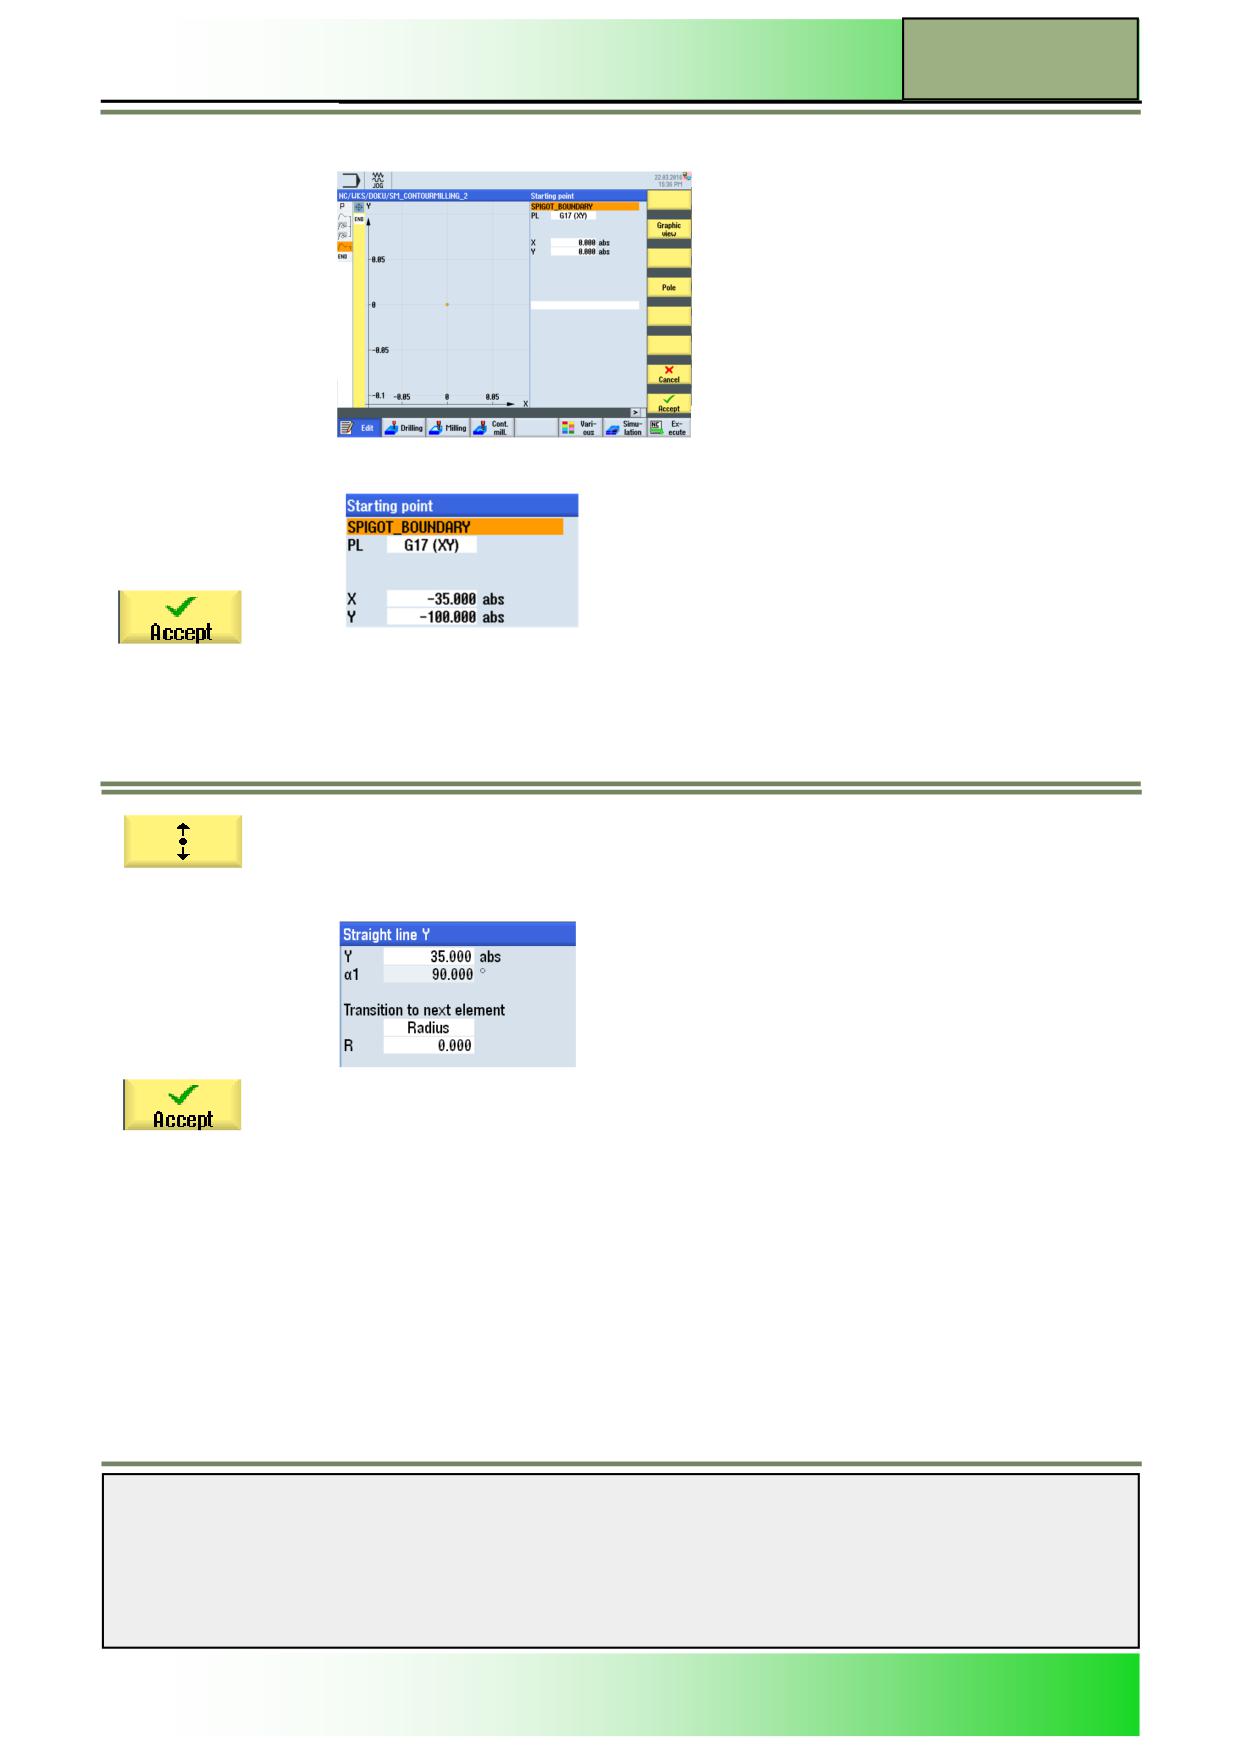
17.
Enter the following coordinates for the starting point:
Contour milling with ShopMill
M623
The contour editor opens automatically and the parameter mask for entering a start point for
the contour is active by default.
17.
Enter the following coordinates for the starting point:
Confirm your inputs by pressing the VSK 8 “Accept”.
The contour description starts and new functions
for defining a contour are available as yellow vertical softkeys on the right side of the screen.
18.
Enter the first contour element by adding a straight line in Y-direction.
Press the VSK 3 “Straight line Y”.
The input window for the “Straight line Y” opens.
Enter following coordinates into the parameter mask:
Confirm your inputs by pressing the VSK 8 “Accept”.
A straight line in Y-direction is added to your contour description.
Notes
828D/840Dsl SINUMERIK Operate
Page 11
M623
M623
Contour milling with ShopMill
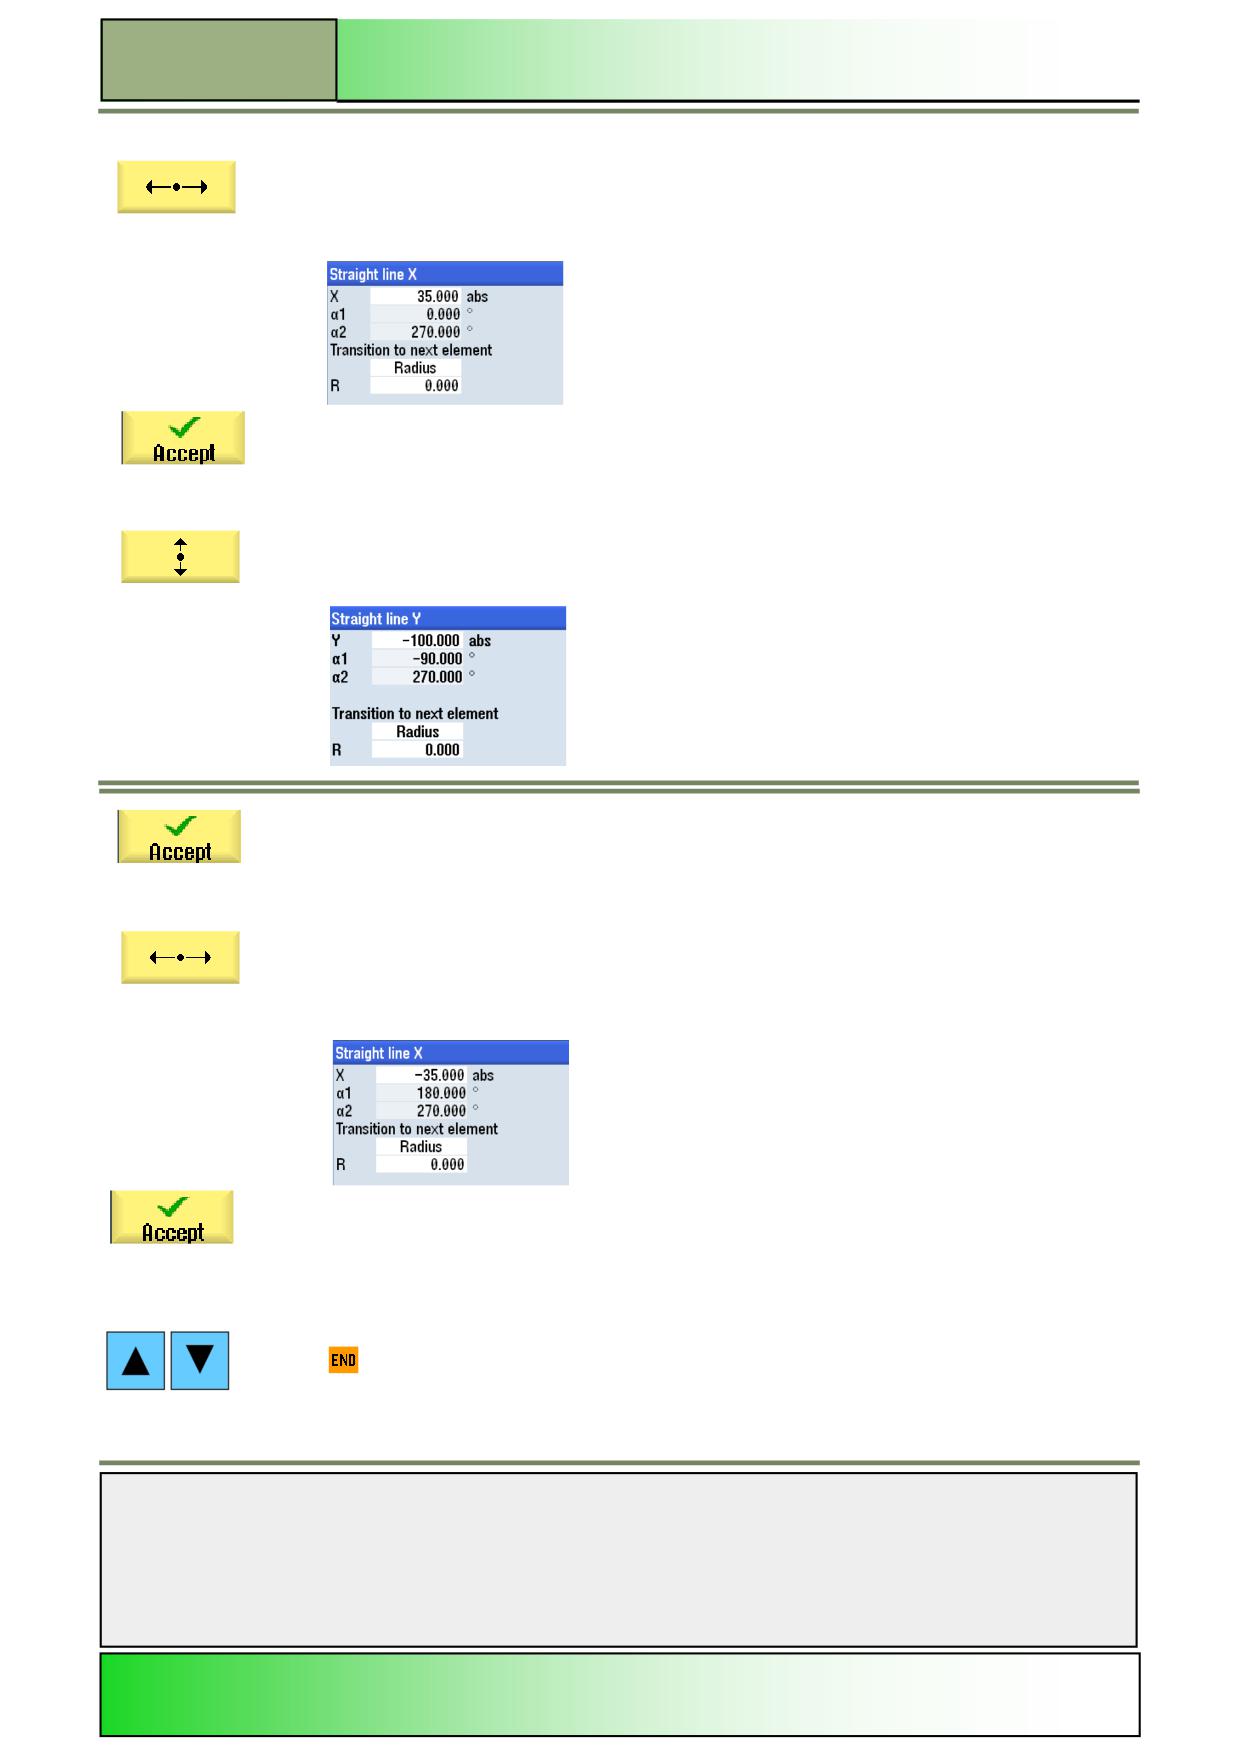
19.
Extend the contour description by adding a straight line in X-direction.
Press the VSK 2 “Straight line X”.
The input window for the “Straight line X” opens.
Enter following coordinates into the parameter mask:
Confirm your inputs by pressing the VSK 8 “Accept”.
A straight line in X-direction is added to your contour description.
20.
Extend the contour description by adding a straight line in Y-direction.
Press the VSK 3 “Straight line Y”.
The input window for the straight line in Y-direction opens.
Enter following coordinates into the parameter mask:
Confirm your inputs by pressing the VSK 8 “Accept”.
A straight line in Y-direction is added to your contour description.
21.
Now finish the contour description by adding a straight line in X-direction.
Press the VSK 2 “Straight line X”.
The input window for the straight line in X-direction opens.
Enter following coordinates into the parameter mask:
Confirm your inputs by pressing the VSK 8 “Accept”.
The contour description of the “Spigot Boundary” is finished.
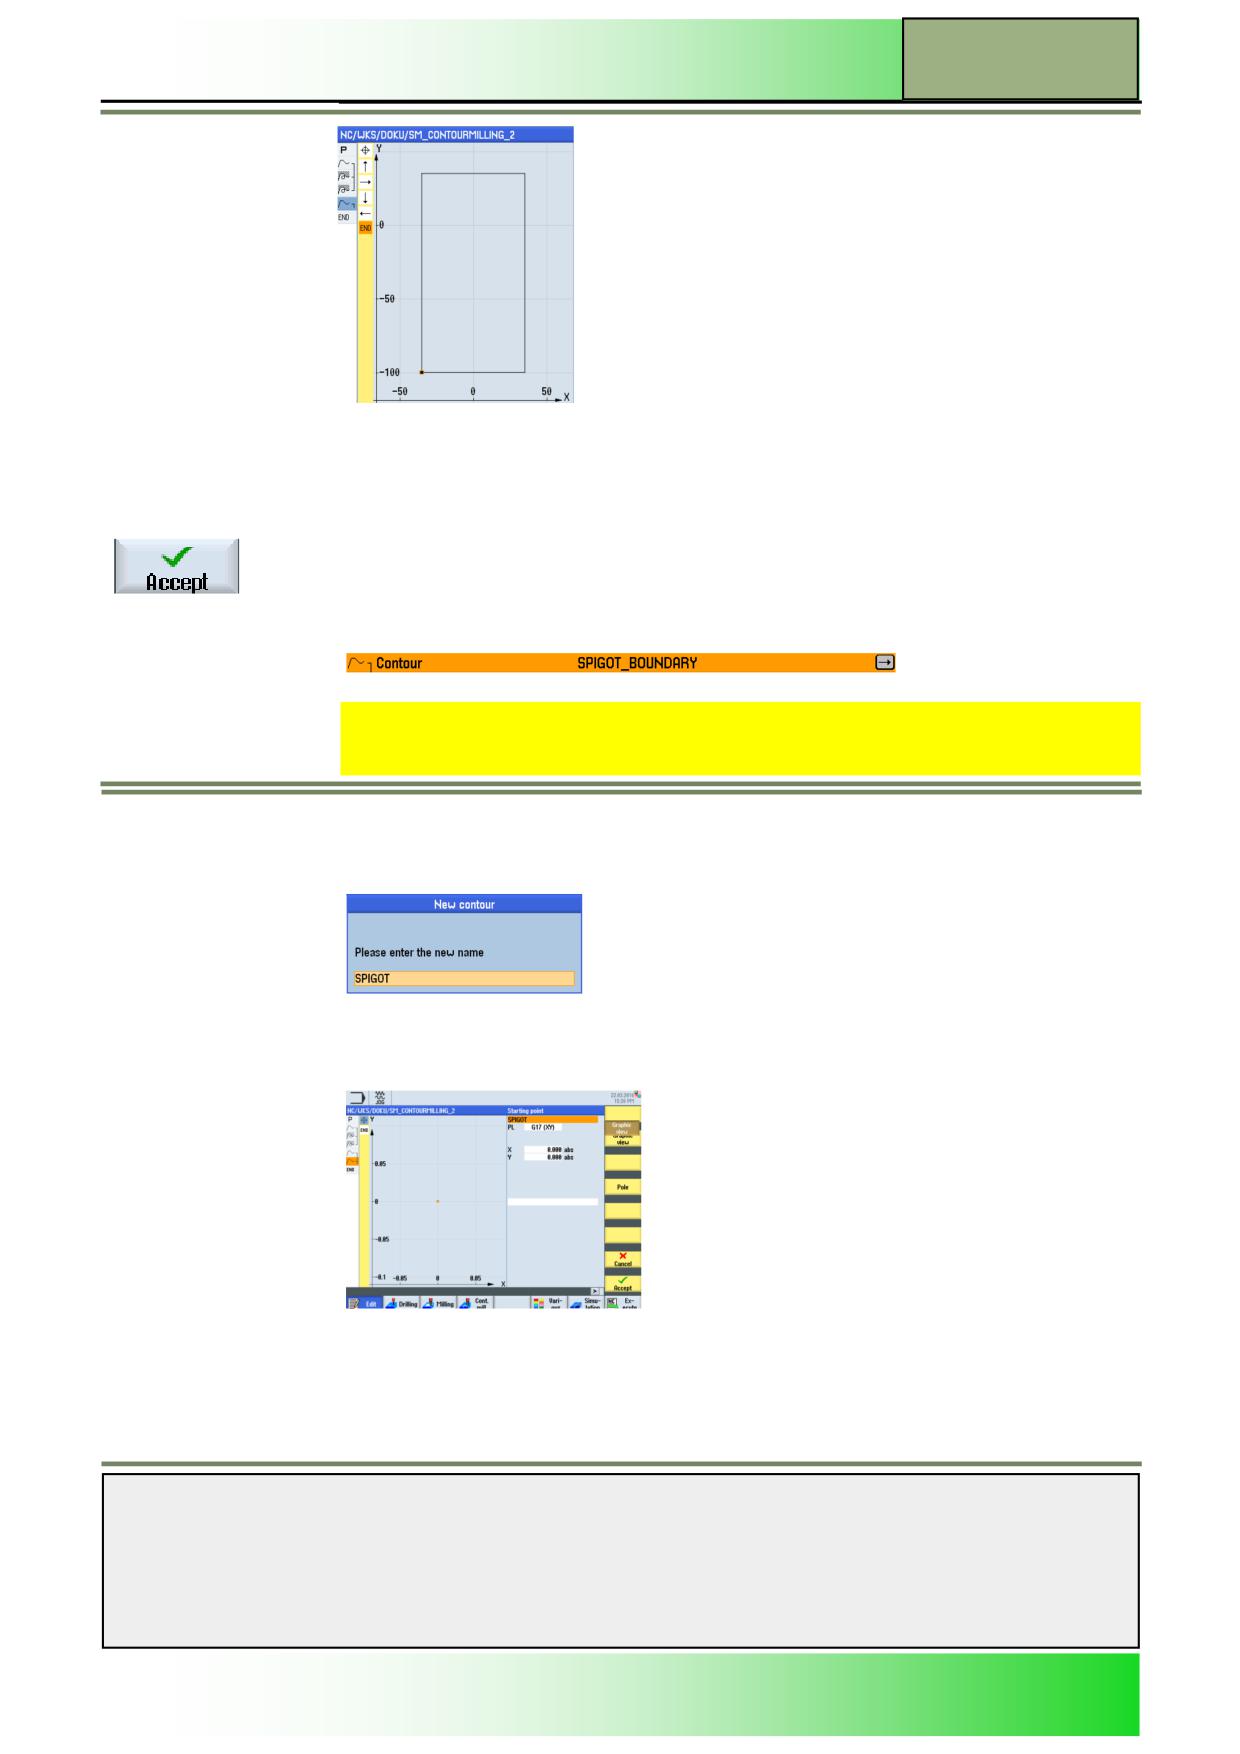
22.
Now, check the outline of the contour path.
For this, place the orange selection cursor on the
-symbol in the yellow column on the left side of the screen, by using the blue cursor keys on
the keyboard.
The contour is displayed graphically.
Notes
M623
Page 12
828D/840Dsl SINUMERIK Operate
Contour milling with ShopMill
M623
Note:
The white column on the left side of the help screen shows all the program blocks programmed
as symbols (representing the technology). The yellow column next to it shows all the pro-
grammed contour elements as symbols.
23.
Finish now the contour description by pressing the VSK 8 “Accept”.
The program editor opens again and the following program block is inserted into the program:
The program chain opens.
24.
Start programming the contour description for the “Spigot” with help of the contour editor.
Press the VSK 1 “New contour”.
A parameter mask where you can enter a name for the new contour opens.
25.
Enter a name for the new contour, e.g. “SPIGOT”,
Confirm your input by pressing the VSK 8 “Accept”.
The contour editor opens automatically and the parameter mask for entering a start point for
the contour is active by default.
Notes
828D/840Dsl SINUMERIK Operate
Page 13
M623
M623
Contour milling with ShopMill
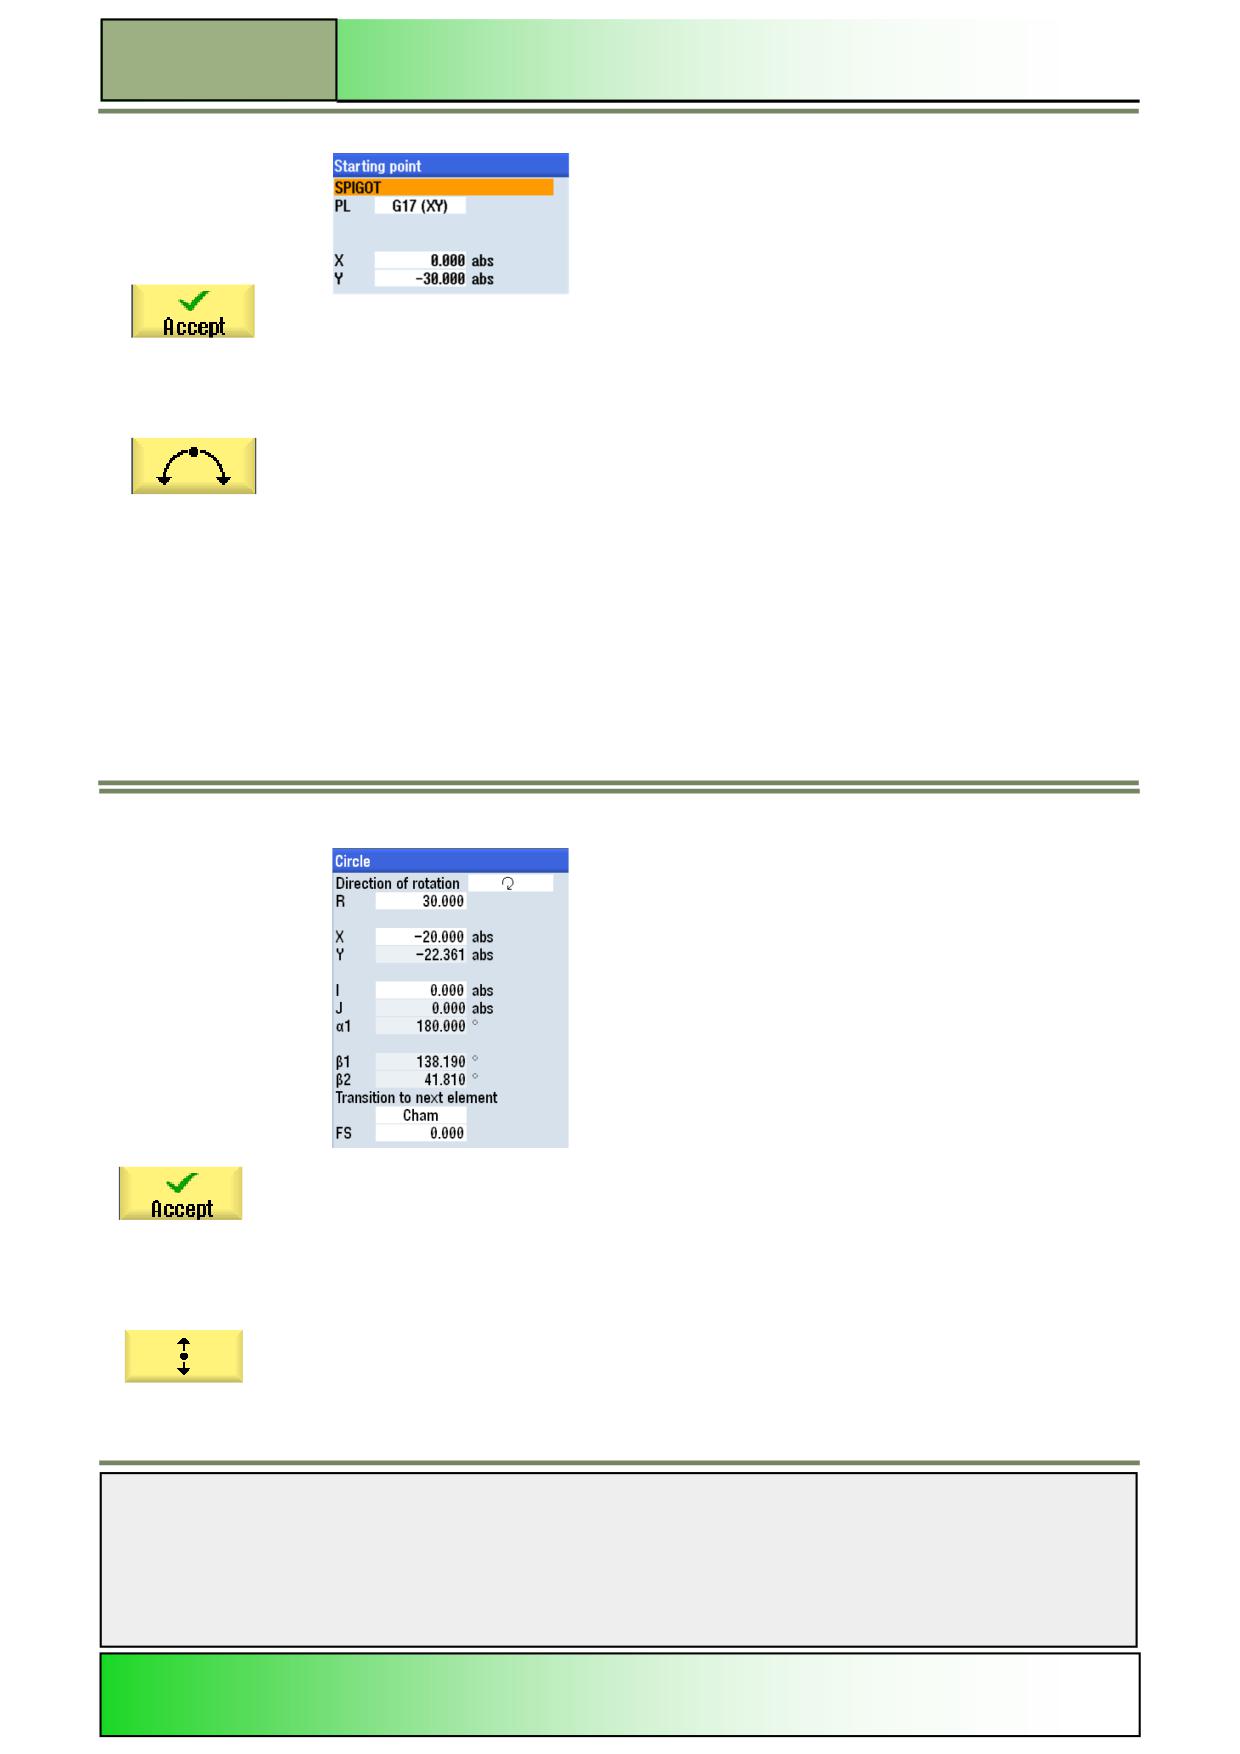
26.
Enter the following coordinates for the starting point:
Press the VSK 8 “Accept” to confirm your updates.
The contour description starts and new functions
for defining a contour are available as yellow vertical softkeys on the right side of the screen.
27.
Start the contour description with a circle in clockwise direction.
Press the VSK 1.5 “Circle”.
The input window for the “Circle” opens.
Enter following coordinates into the parameter mask:
Confirm your input by pressing the VSK 8 “Accept”.
A circle in clockwise direction is added to your contour description.
28.
Extend the contour description by adding a straight line in Y-direction.
Press the VSK 3 “Straight line Y”.
The input window for the “Straight line Y” opens.
Notes
M623
Page 14
828D/840Dsl SINUMERIK Operate
Contour milling with ShopMill
M623
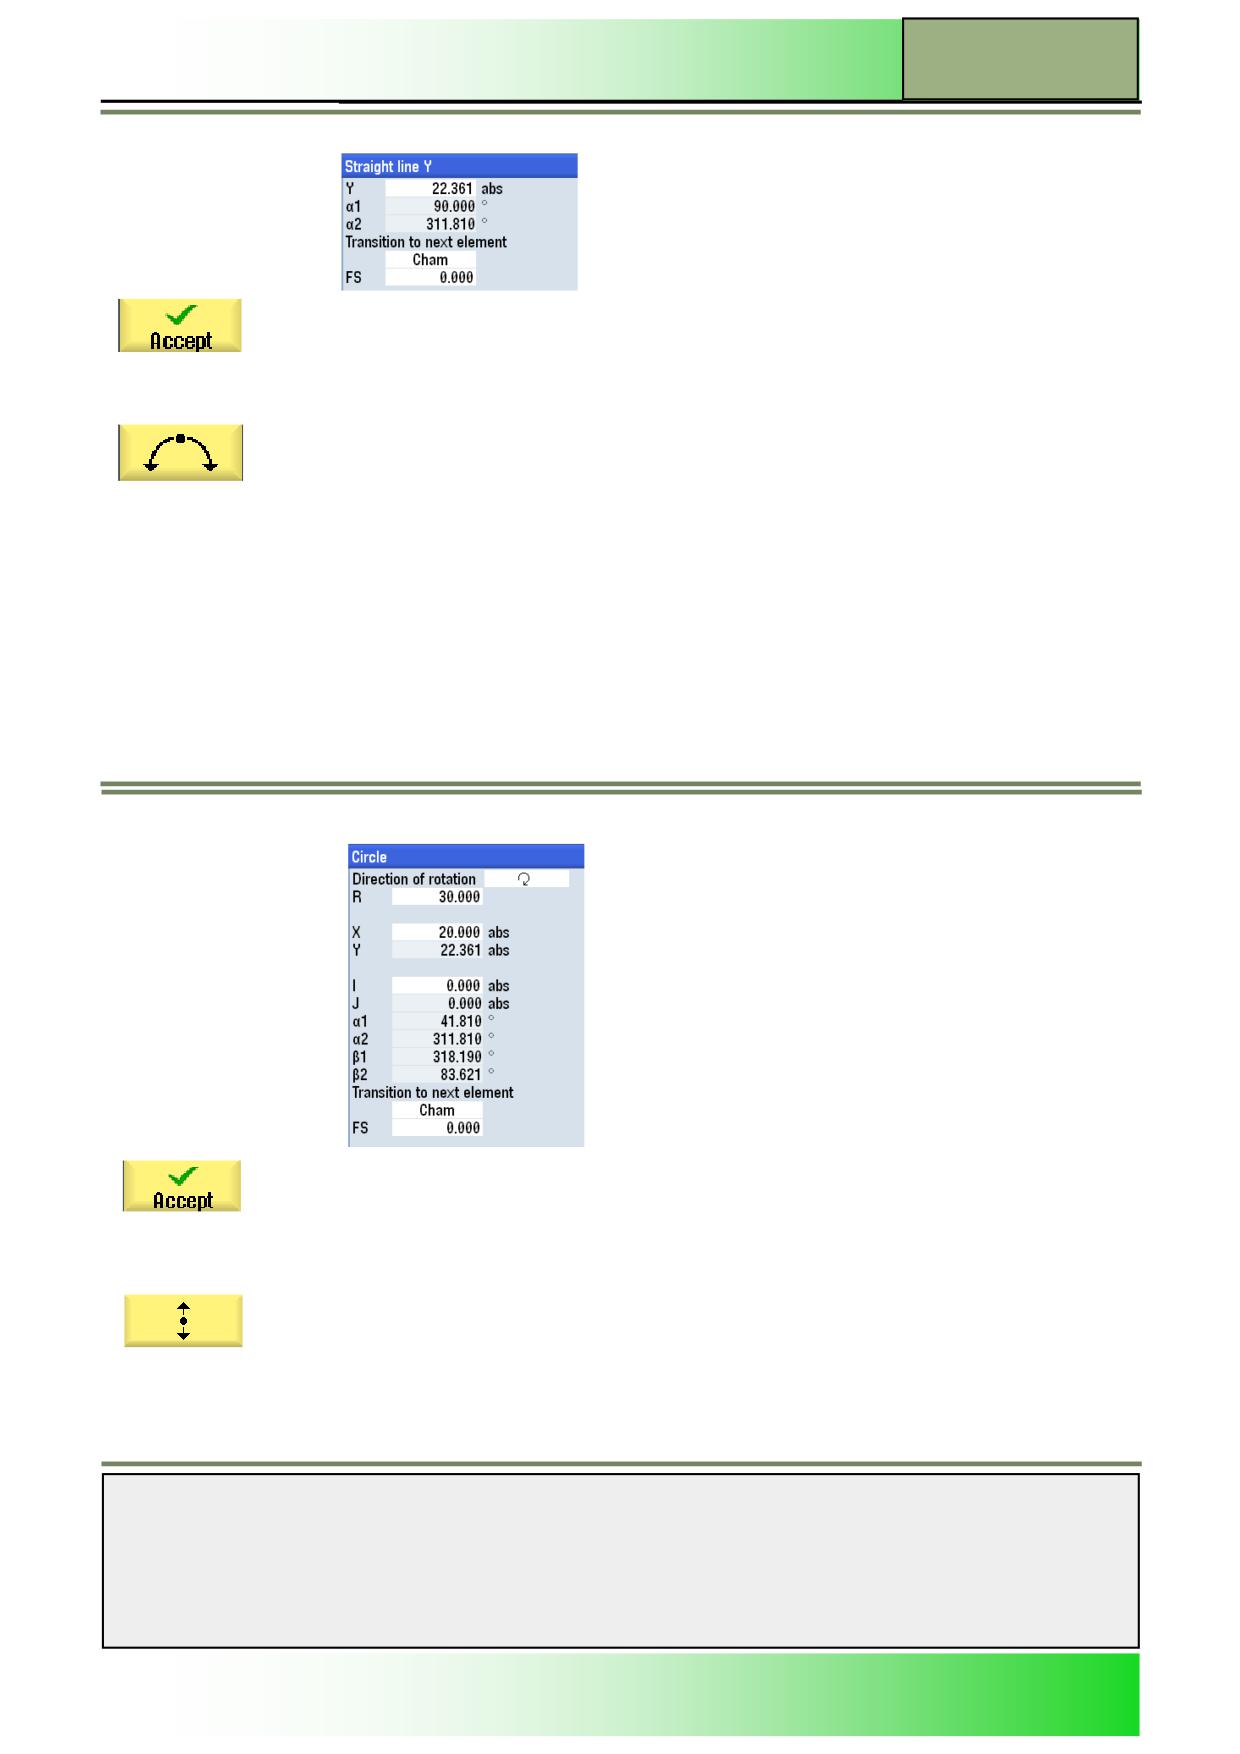
Enter following coordinates into the parameter mask:
Confirm your input by pressing the VSK 8 “Accept”.
A straight line in Y-direction is added to your contour description.
29.
Extend the contour description by adding a circle in clockwise direction.
Press the VSK 5 “Circle”.
The input window for the “Circle” opens.
Enter following coordinates into the parameter mask:
Confirm the VSK 8 “Accept”.
A circle in clockwise direction is added to your contour description.
30.
Extend the contour description by adding a straight line in Y-direction.
Press the VSK 1.3 “Straight line Y”.
The input window for the “Straight line Y” opens.
Notes
828D/840Dsl SINUMERIK Operate
Page 15
M623
M623
Contour milling with ShopMill
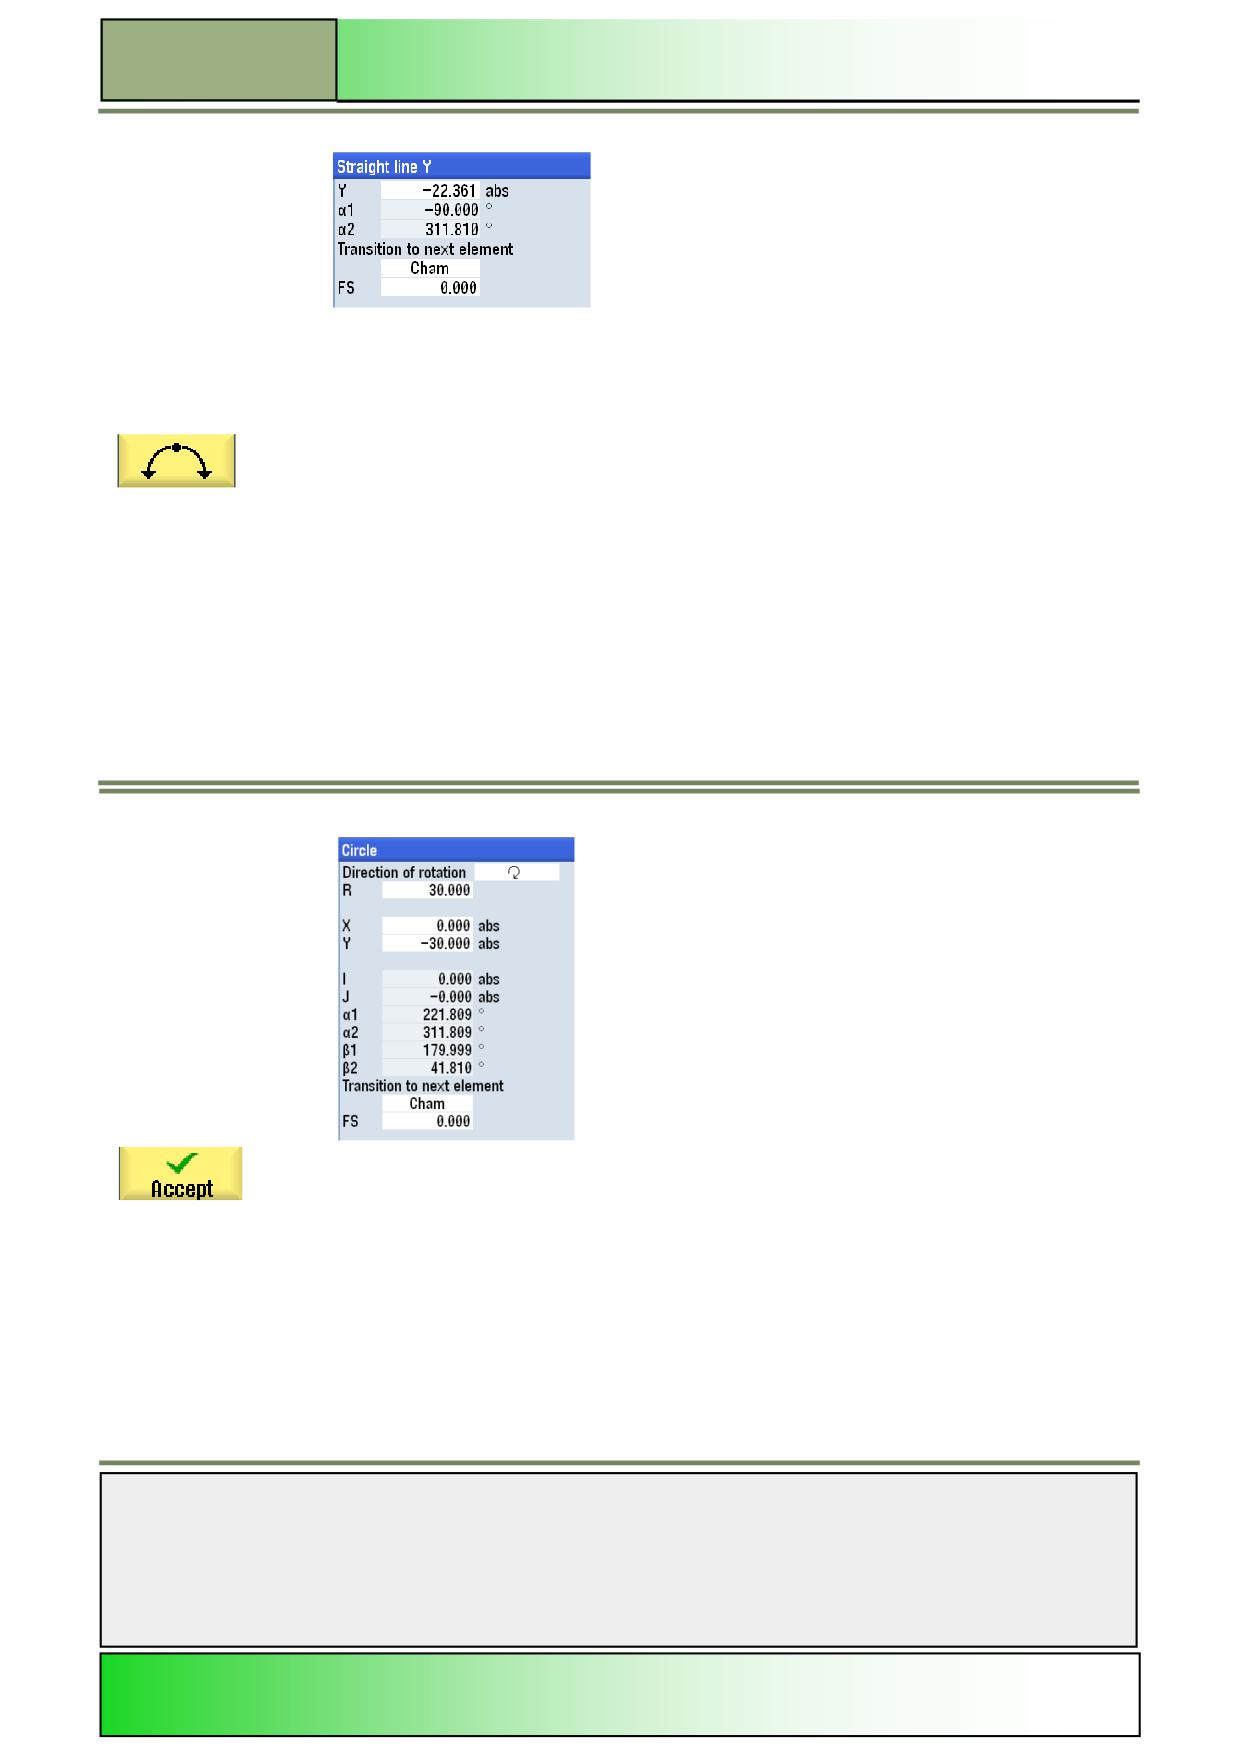
Enter following coordinates into the parameter mask:
Confirm the VSK 8 “Accept”.
A straight line in Y-direction is added to your contour description.
31.
Now finish the contour description by adding a circle in clockwise direction.
Press the VSK 5 “Circle”.
The input window for the circle opens.
Enter following coordinates into the parameter mask:
Confirm your inputs by pressing the VSK 8 “Accept”.
The contour description of the “Spigot” is finished.
Notes
M623
Page 16
828D/840Dsl SINUMERIK Operate
Contour milling with ShopMill
M623
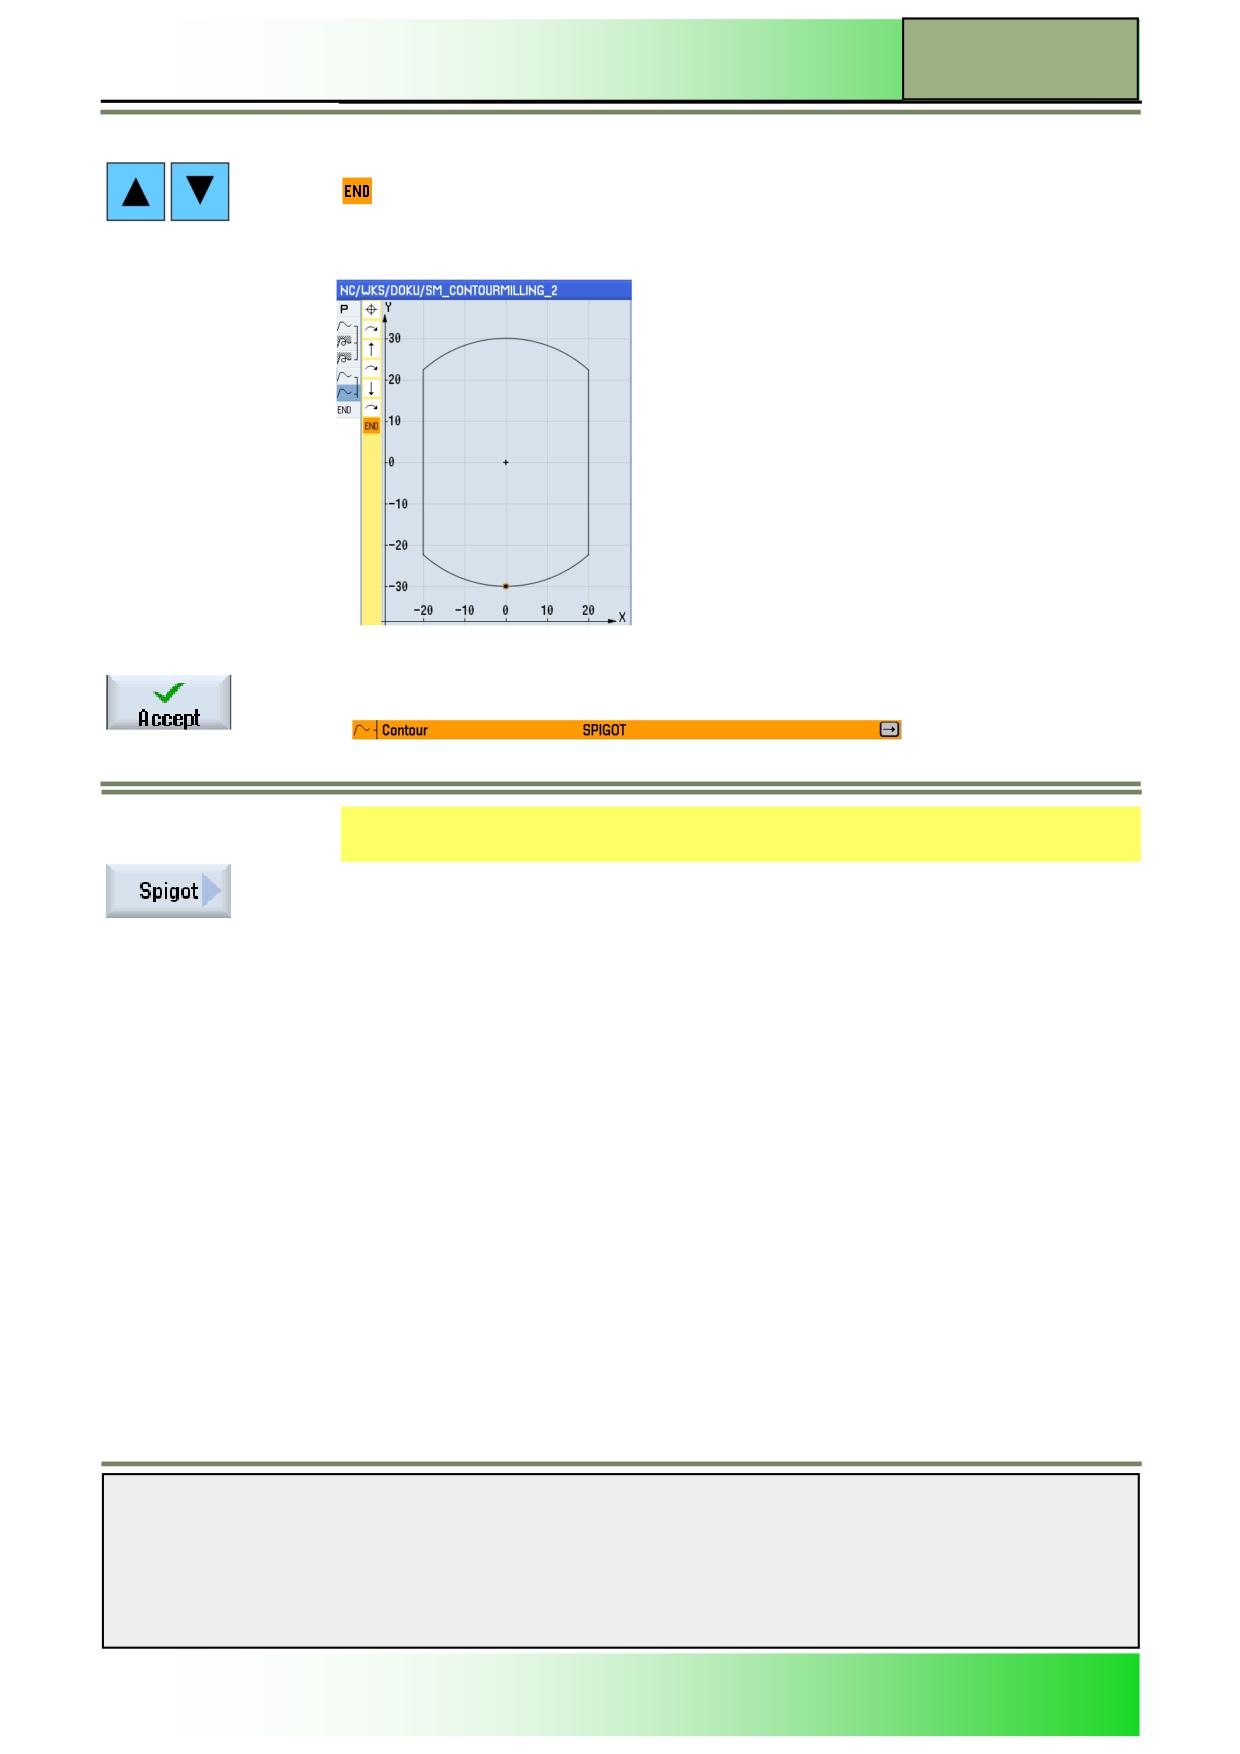
32.
Now, check the outline of the contour path.
For this, place the orange selection cursor on the
-symbol in the yellow column on the left side of the screen, by using the blue cursor keys on
the keyboard.
The contour is displayed graphically.
33.
Finish now the programming of the contour by pressing the VSK 8 “Accept”.
The program editor opens and the following program block is inserted into the program:
The program chain remains open.
34.
Insert now a “spigot milling” cycle into the program for “roughing” the spigot contour within
the defined boundary area.
Press the VSK 1.6 “Spigot”.
The input window for the spigot milling cycle opens.
Notes
828D/840Dsl SINUMERIK Operate
Page 17
M623
M623
Contour milling with ShopMill
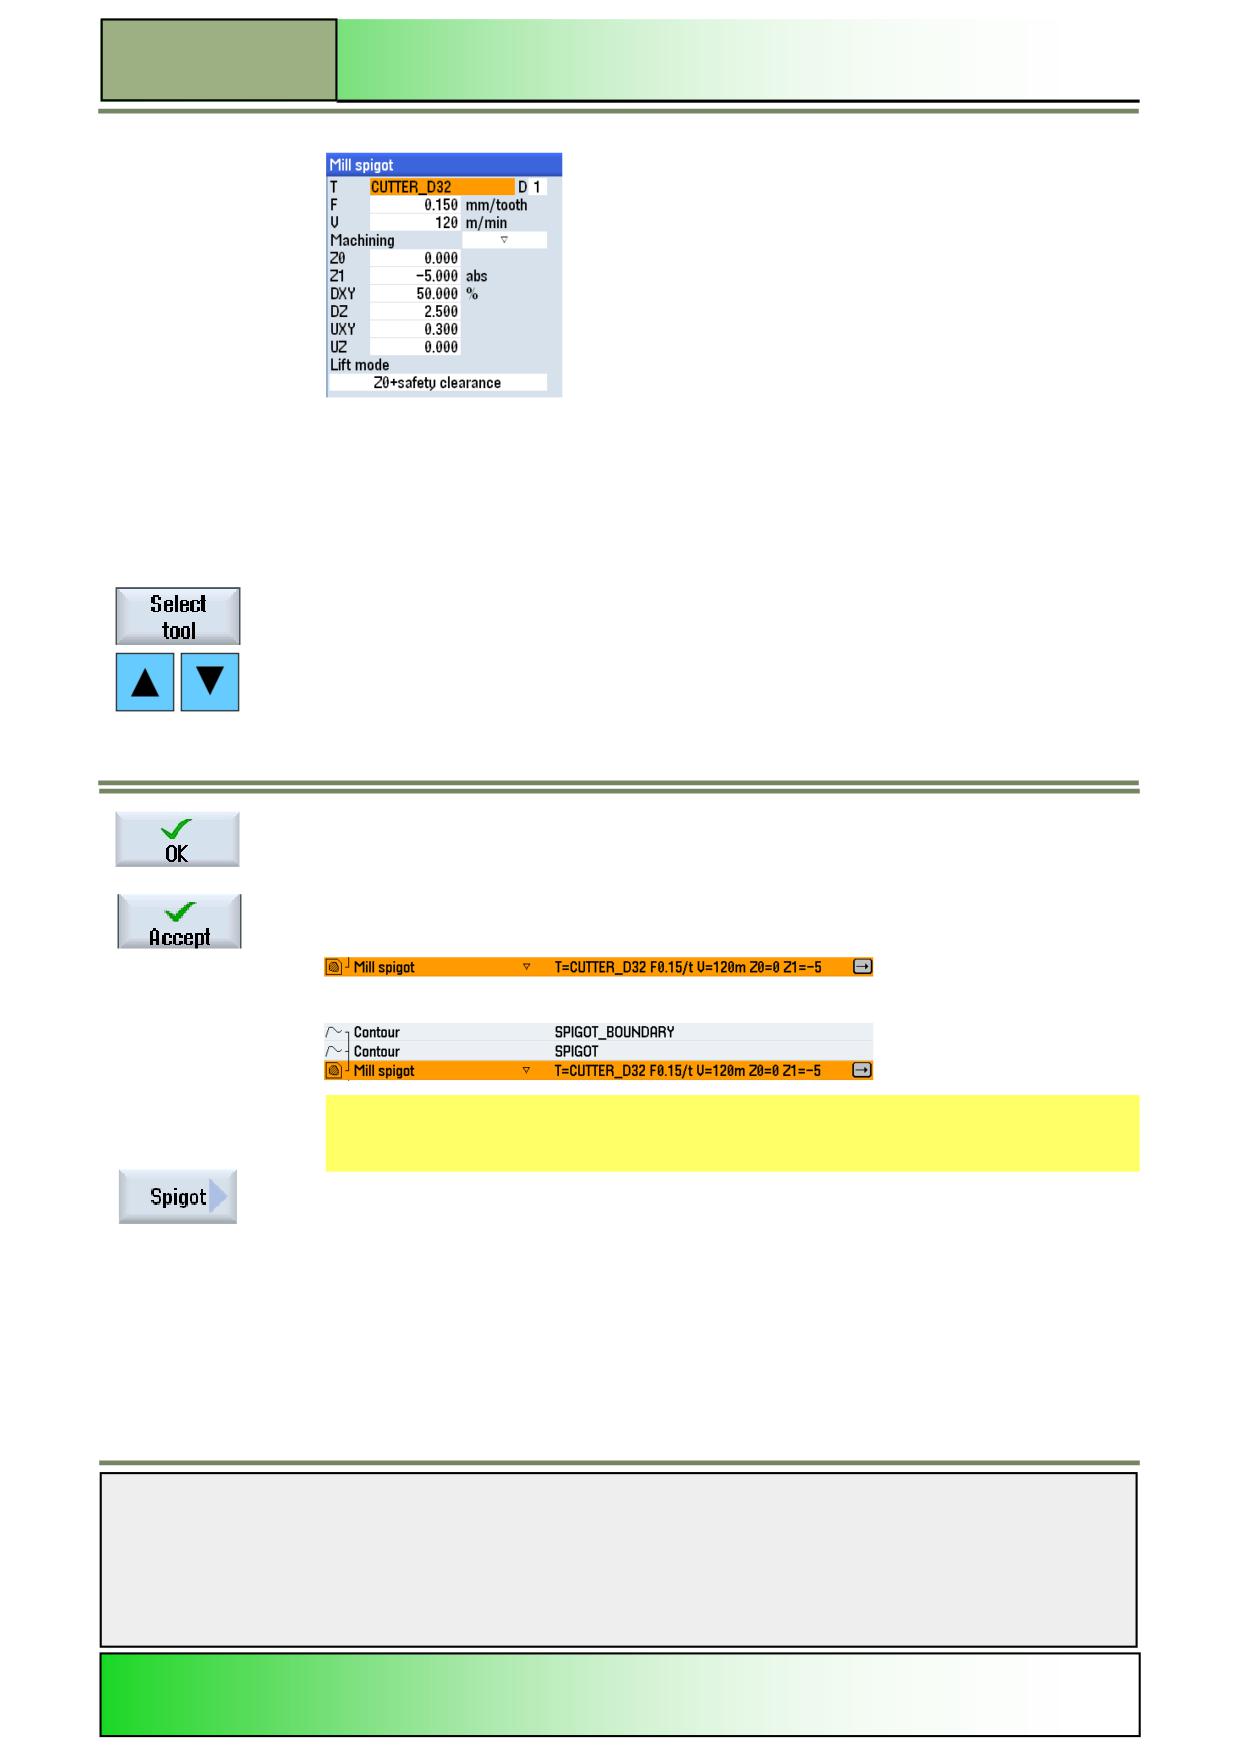
35.
Insert the following parameter values. Use the blue “Select” key where indicated.
Note:
In the input field “F” you can switch between
“mm/tooth” or “mm/min” . The input field for Speed can either be set to cutting speed “V” in “m/
min” or Spindle speed “S” in “rpm”.
The machining depth “Z1” can be “inc” or “abs”.
The tool path step over “DXY” can be set to % of tool Ø or a value in mm of the tool Ø.
To insert a tool into the cycle input mask, press the VSK 1 “Select tool”.
The “Tool selection” list window opens.
Use the blue cursor keys on the keyboard, to mark the tool “CUTTER_D32”, with the orange
selection cursor.
Press the VSK 1.8 “OK”.
The tool “CUTTER_D32" will be inserted into the cycle input mask.
Confirm your inputs by pressing the VSK 8 “Accept”.
36.
Extend the program chain by inserting another “spigot milling” cycle into the program for
“finishing” the spigot “Wall”.
Press the VSK 1.6 “Spigot”.
The input window for the spigot milling cycle opens.
Notes
M623
Page 18
828D/840Dsl SINUMERIK Operate