SINUMERIK 840D sl. Service - Functions. Manual (2018-2020) - page 80
Continue machining (retrace support)
9.2 Function description
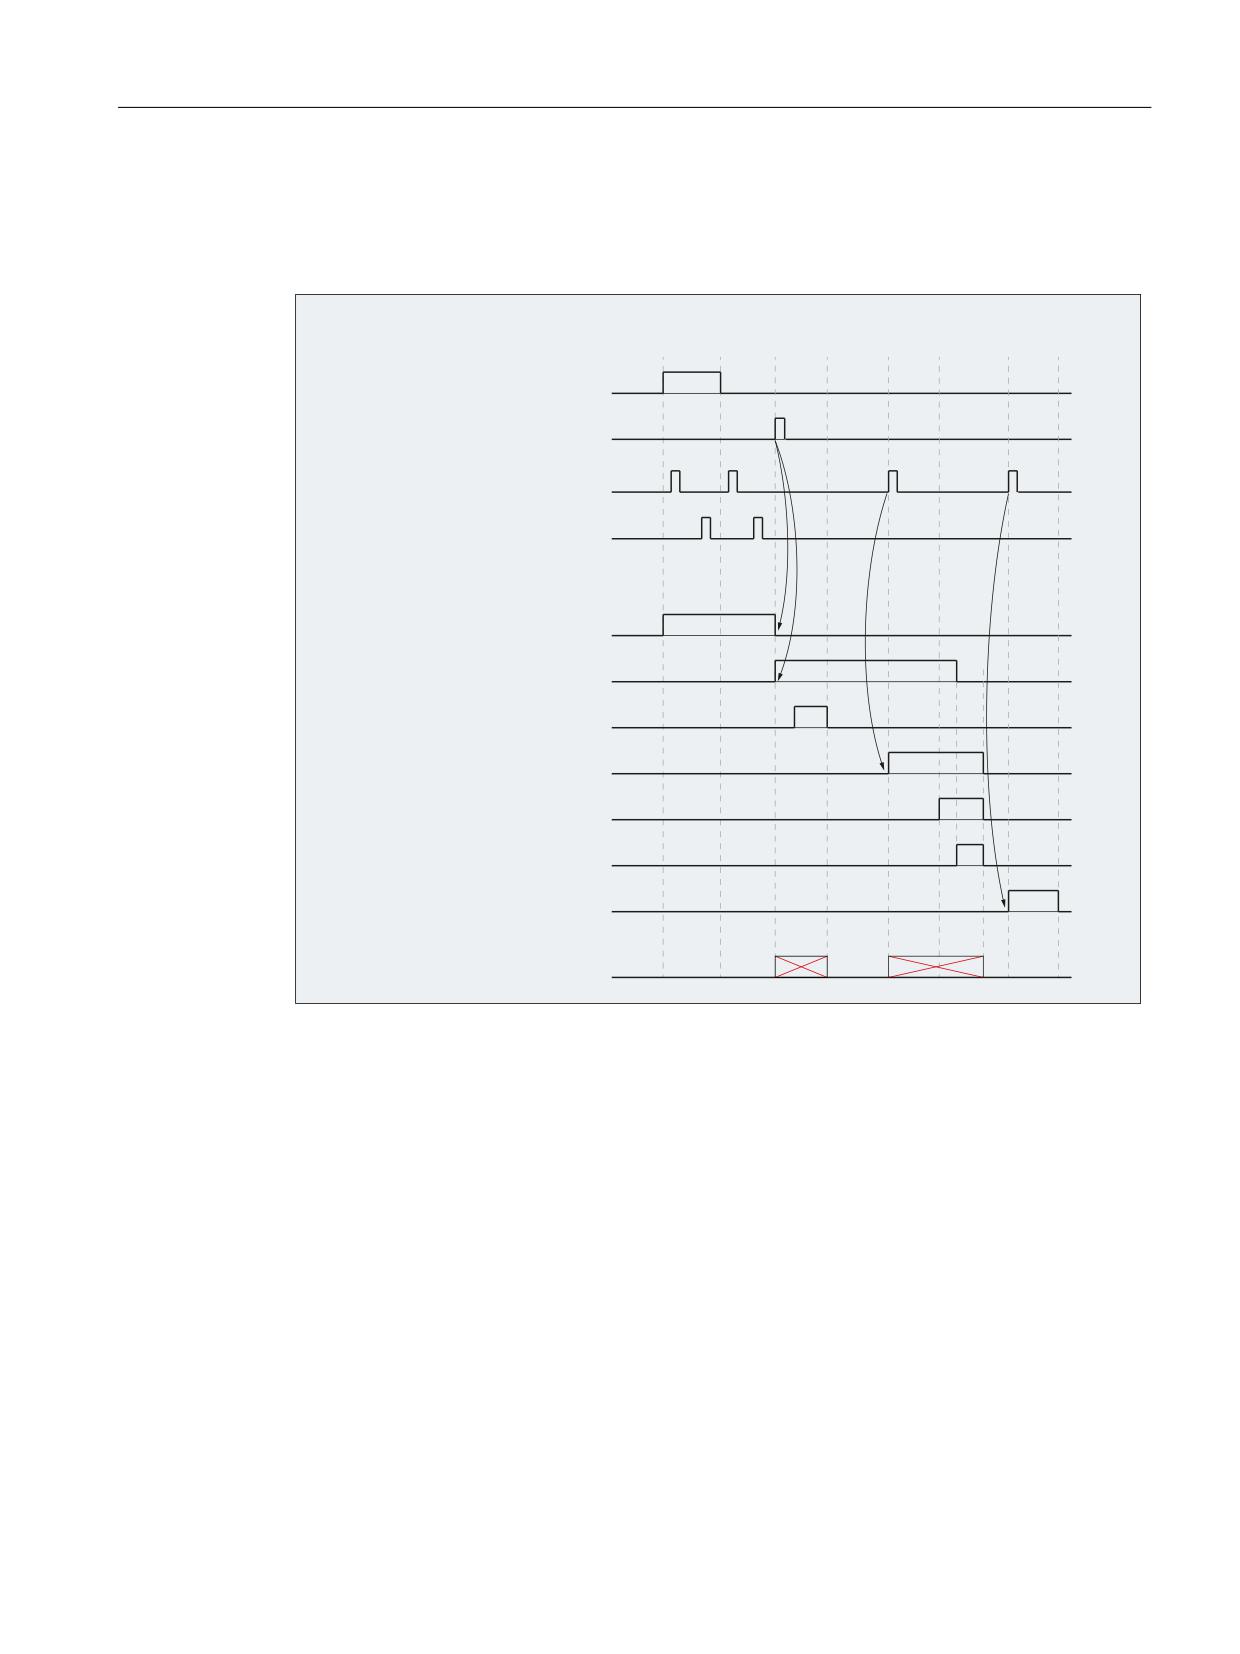
Signal characteristic of the NC/PLC interface signals
The principle sequence of the RESU function is illustrated in the following figure as a signal
characteristic of the NC/PLC interface signals involved:
,QWHUIDFH VLJQDOV
ཱ
ི
ཱི
ུ
ཱུ
ྲྀ
ཷ
WR 1& FKDQQHO 3/& ൺ 1&
'%
'%;
EDFNZDUG IRUZDUG
'%
'%;
VWDUW UHWUDFH VXSSRUW
'%
'%;
1& VWDUW
'%
'%;
1& VWRS
1& VWRS DW WKH EORFN
OLPLW
IURP 1& FKDQQHO 1& ൺ 3/&
'%
'%;
UHWUDFH PRGH DFWLYH
'%
'%;
UHWUDFH VXSSRUW DFWLYH
'%
'%;
EORFN VHDUFK DFWLYH
'%
'%;
DFWLRQ EORFN DFWLYH
'%
'%;
ODVW DFWLRQ EORFN DFWLYH
'%
'%;
$683 VWRSSHG
'%
'%;
DSSURDFK EORFN DFWLYH
1& VWDUW LV UHMHFWHG
ZLWK DODUP
①
Reverse travel is started.
②
Forward travel is started (optional).
③
Continue machining is started (block search).
④
Search destination (target block) was found.
⑤
1st NC START → Action blocks are output
⑥
Last action block is activated.
The RESU ASUP CC_RESU_BS_ASUP.SPF (Page 195) is triggered when the last action block is
activated.
⑦
2nd NC start → the approach block to the program continuation point is executed.
⑧
Part program processing (target block) resumed
Figure 9-3
Signal chart
Technologies
Function Manual, 10/2020, 6FC5397-8GP40-0BA1
183
Continue machining (retrace support)
9.3 Startup
9.2.4
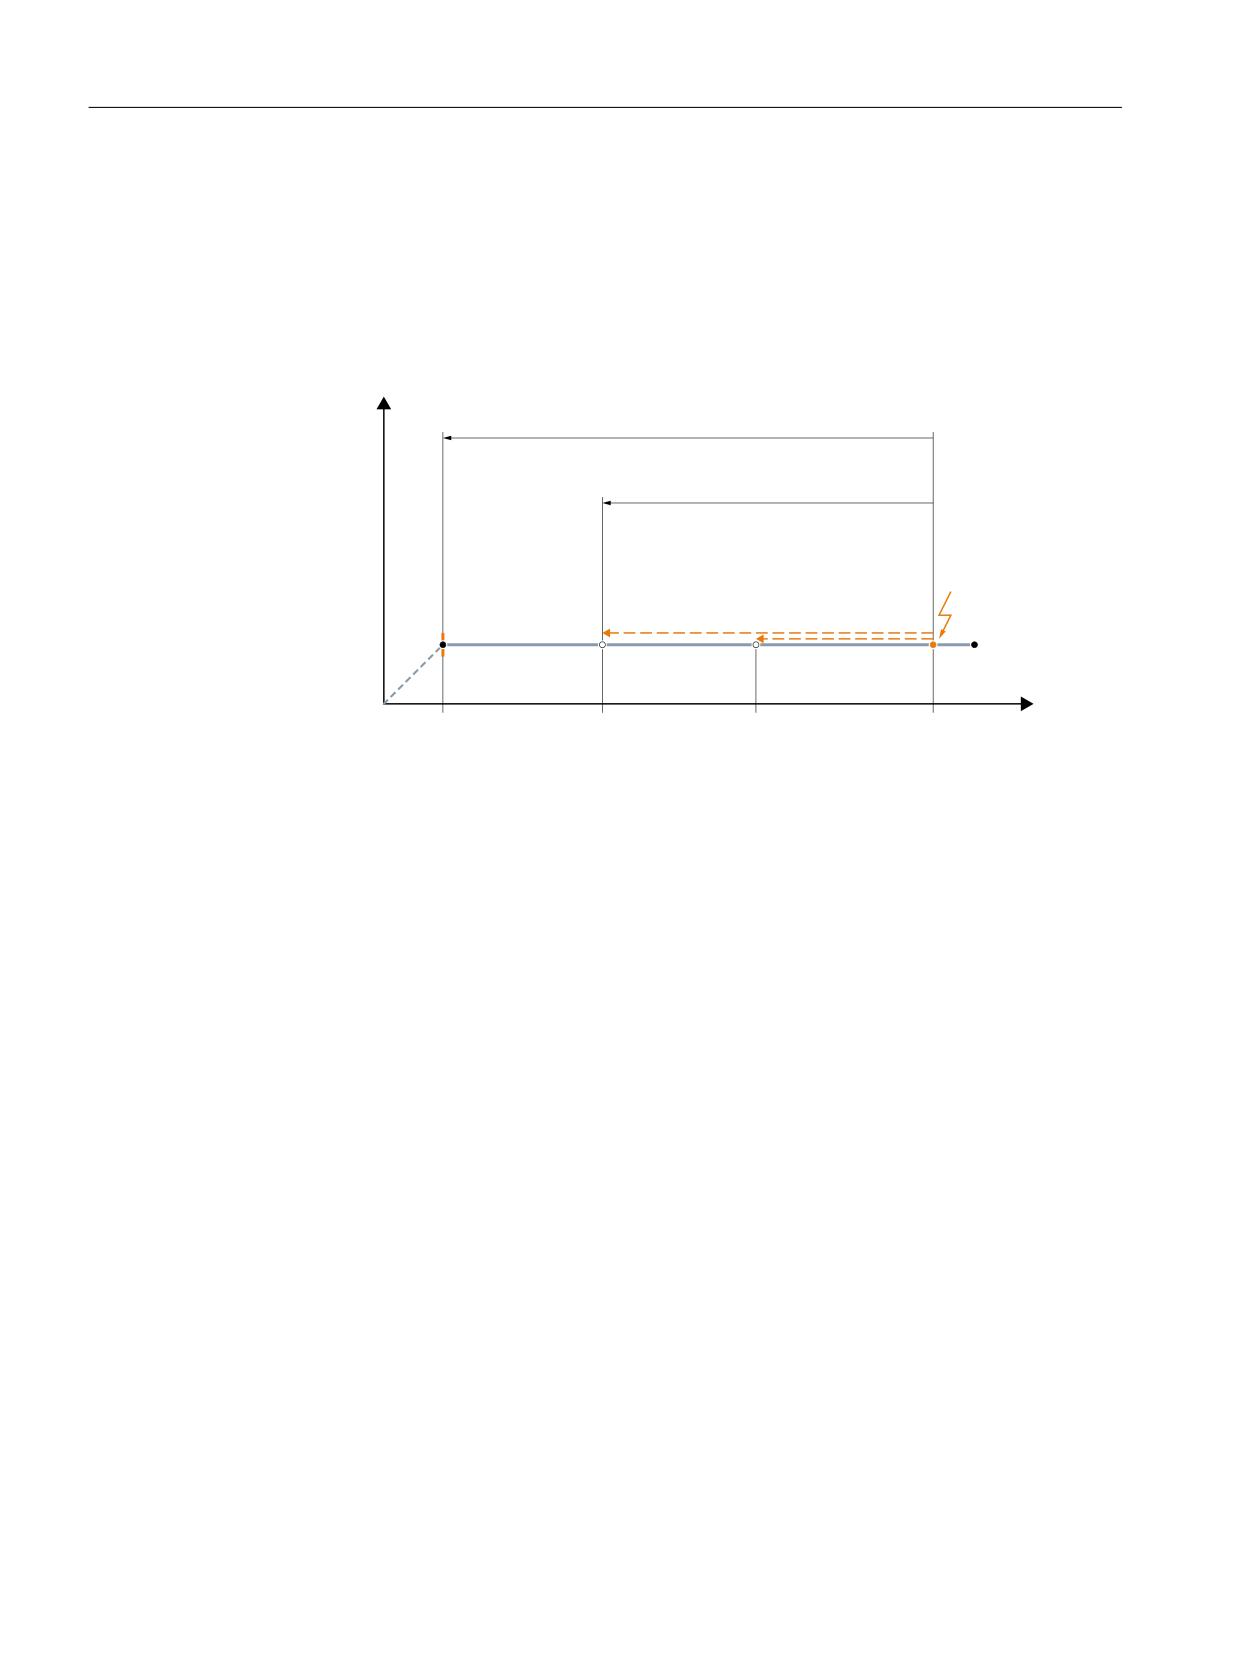
Maximum retraceable contour area
In multiple machining continuation within a contour area, the reverse travel on the contour is
always possible only up to the last machining continuation point (W). In first-time reverse travel
after RESU start, reverse travel up to the start of the contour range is possible.
This response must be illustrated via the following graph. For the sake of simplicity, the
interruption point (U) is always the same:
QG JHRPHWU\
D[LV
VW WUDYHO EDFNZDUG PD[ 5(68 UDQJH
QG WUDYHO EDFNZDUG PD[ 5(68 UDQJH
1
&&B35(35(
1
1
* ;
<
*
;
)
: PD[
:
: PD[
:
8
8
VW JHRPHWU\ D[LV
Figure 9-4
Maximum Retraceable contour range
1st reverse travel
In first-time reverse travel, reverse travel is possible maximum up to the start of the first contour
element (N20) after RESU start (N15) (W1max).
If reverse travel takes place up to the machining continuation point W1, W1 defines the
maximum RESU range for a possible further reverse travel after machining continuation and
forward travel.
2nd reverse travel
A renewed reverse travel can now be undertaken maximum only up to the last machining
continuation point W2max = W1.
If reverse travel goes as far back as program continuation point W2, the maximum RESU range
is restricted further.
9.3
Startup
9.3.1
Activation
It should be ensured prior to starting up the technology function the corresponding compile
cycle is loaded and activated (see also Function Manual Technologies, Section Installation and
activation of loadable compile cycles).
Technologies
184
Function Manual, 10/2020, 6FC5397-8GP40-0BA1

Continue machining (retrace support)
9.3 Startup
Activation
The "Continue machining - Retrace support" technology function is activated via the following
machine data:
MD60900+i $MN_CC_ACTIVE_IN_CHAN_RESU[0], bit 0 = 1
Note
The "Continue machining - Retrace support" technological function is available only in
the 1st channel of NC.
See also
Installation and activation of loadable compile cycles (Page 17)
9.3.2
Definition of the RESU working plane
Machining continuation/reverse travel is possible only for part program blocks that contain
traversing blocks in the configured RESU working plane.
The RESU working plane is defined with the following machine data:
MD62580 $MC_RESU_WORKING_PLANE
Value
Meaning
1
The RESU working plane is formed by the 1st and 2nd Geometry axes of the 1st channel
(for G17).
2
The RESU working plane is formed by the 1st and 3rd Geometry axes of the 1st channel
(for G18).
3
The RESU working plane is formed by the 2nd and 3rd Geometry axes of the 1st channel
(for G19).
9.3.3
Memory configuration: Block memory
The technological function requires additional data in the NC-internal block memory. The
values must be increased for the following memory configuring channel-specific machine data:
• MD28090 $MC_MM_NUM_CC_BLOCK_ELEMENTS += 4 (number of block elements for
compile cycles)
• MD28100 $MN_MM_NUM_CC_BLOCK_USER_MEM += 20 (size of block memory for compile
cycles (DRAM) in KB)
Technologies
Function Manual, 10/2020, 6FC5397-8GP40-0BA1
185
Continue machining (retrace support)
9.3 Startup
9.3.4
Memory configuration: Heap memory
Memory requirements
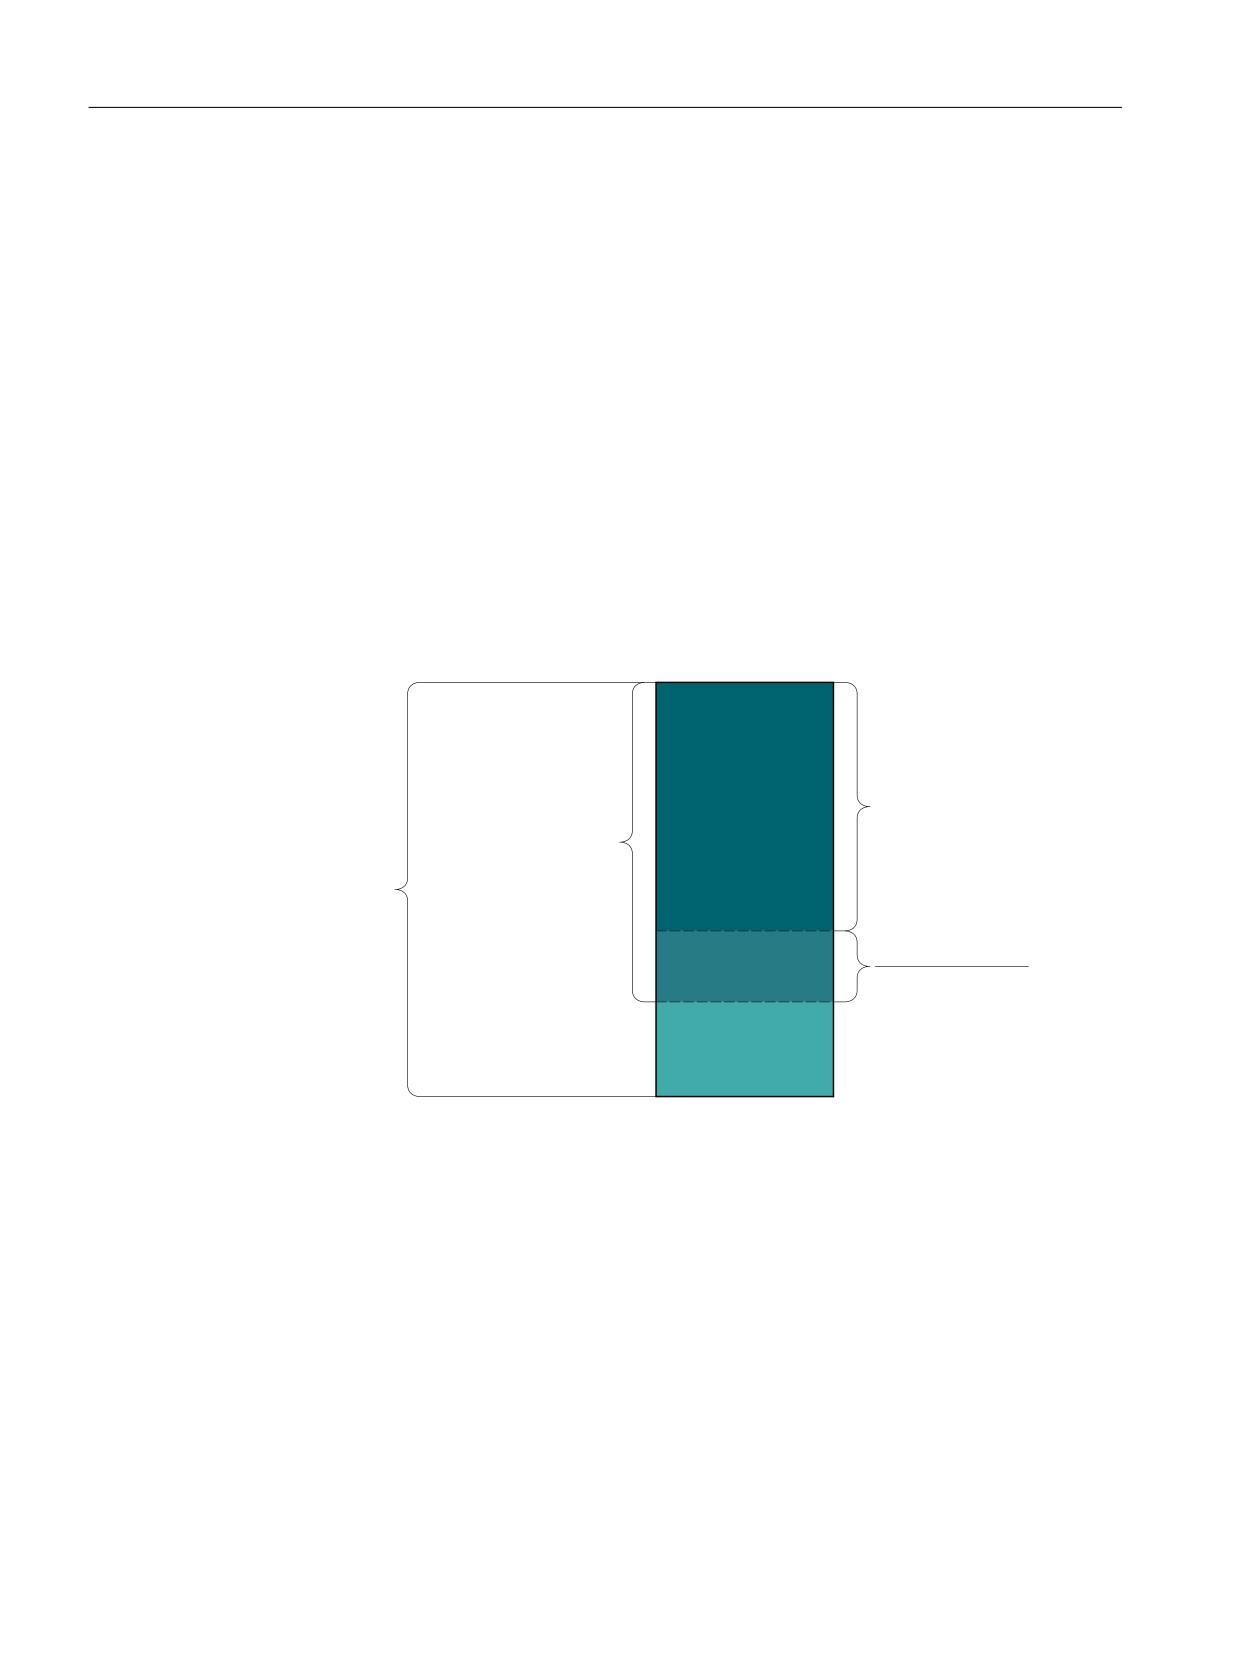
RESU requires compile cycles heap memory for the following function-specific buffers:
• Block buffer
The larger the block buffer (see "Figure 9-6 RESU-specific part programs (Page 191)"), the
larger the number of part program blocks that can be traversed backwards.
32 bytes are required per part program block.
The block buffer can be parameterized directly.
• Block search buffer
The block search buffer contains the information required for processing subprogram
searches in the context of RESU.
180 bytes are required for each subprogram. The block search buffer requires at least 2880
bytes (16 subprogram calls with 180 bytes each).
The block search buffer cannot be parameterized directly.
A function-specific GUD variable displays the size of the block search buffer (for creation of
GUD variables, see Section "Channel-specific GUD variables (Page 200)").
0'
%ORFN EXIIHU
0&B5(68B5,1*B%8))(5B6,=(
0'
0&B5(68B6+$5(B2)B
&&B+($3B0(0
0'
0&B00B180B
&&B+($3B0(0
0'
0'
%ORFN VHDUFK EXIIHU
0'
+HDS PHPRU\ IRU
DGGLWLRQDO FRPSLOH
F\FOHV
Figure 9-5
Division of the heap memory for compile cycles
Memory configuration
Size of the compile cycle heap memory
The size of the heap memory in KB that can be used by the user for compile cycles is defined via
the memory configuring channel-specific machine data:
MD28105 $MC_MM_NUM_CC_HEAP_MEM
For RESU, the already existing machine data value (x) is adjusted as follows:
MD28105 $MC_MM_NUM_CC_HEAP_MEM = x + 50
Size of the block buffer
The size of the block buffer is adjusted via the machine data:
Technologies
186
Function Manual, 10/2020, 6FC5397-8GP40-0BA1

Continue machining (retrace support)
9.3 Startup
MD62571 $MC_RESU_RING_BUFFER_SIZE
Default setting:
MD62571 $MC_RESU_RING_BUFFER_SIZE = 1000
RESU portion of the total heap memory
The RESU portion of the total heap memory that can be used for compile cycles is set via the
machine data:
MD62572 $MC_RESU_SHARE_OF_CC_HEAP_MEM
Default setting:
MD62572 $MC_RESU_SHARE_OF_CC_HEAP_MEM = 100
Error messages
The block search buffer requires at least 2880 bytes (corresponding to 16 subprogram calls with
180 bytes each). Otherwise, the following alarm will be generated during NC power-up:
Alarm 75600 "Channel 1 Retrace Support: Incorrect MD configuration, error no. 5"
If the block search buffer is not big enough during operation, the following alarm appears:
Alarm 75606 "Channel 1 retraceable contour shortened"
9.3.5
RESU main program memory area
Memory configuration
The storage location of the RESU main program CC_RESU.MPF can be set with the following
machine data (see Section "Main program (CC_RESU.MPF) (Page 192)"):
MD62574 $MC_RESU_SPECIAL_FEATURE_MASK (additional RESU features)
Bit
Value
Meaning
1
0
The RESU main program is stored in the dynamic NC memory (default).
1
The RESU main program is stored in the static NC memory (default).
Storage in the dynamic NC memory (default)
If the RESU main program is created in the dynamic NC memory, the memory area available to
the user for file storage must be increased as follows:
MD18351 $MN_MM_DRAM_FILE_MEM_SIZE = x1) + 100
1) already available machine data value
Technologies
Function Manual, 10/2020, 6FC5397-8GP40-0BA1
187

Continue machining (retrace support)
9.3 Startup
Storage in the static NC memory
If the RESU main program is created in the static memory area of the NC, it is retained even after
a POWER OFF. However, since RESU regenerates the RESU main program every time the retrace
support function is used, this parameter setting is not recommended.
9.3.6
Storage of the RESU subroutines
Storage as user or manufacturer cycles
The following RESU-specific subroutines can be stored as user cycles or manufacturer cycles:
• INI program: CC_RESU_INI.SPF
• END program CC_RESU_END.SPF
• Retrace support ASUB CC_RESU_BS_ASUP.SPF
• RESU ASUB CC_RESU_BS_ASUP.SPF
The setting is done using machine data:
MD62574 $MC_RESU_SPECIAL_FEATURE_MASK (additional RESU features)
Bit
Value
Meaning
2
0
The RESU-specific subroutines are stored as user cycles (default).
1
The RESU-specific subroutines are stored as manufacturer cycles.
Series commissioning
Due to the default setting of MD62574 Bit 2, the RESU-specific subroutines along with their
contents are stored as user cycles the first time the NC is powered up after the activation of the
technological function.
If the setting is then changed to specify that the RESU-specific subroutines are to be stored as
manufacturer cycles, the RESU-specific subroutines already created as user cycles are retained
even after a new power-up and must be deleted.
As support for series commissioning, the RESU-specific subroutines present as user cycles can be
deleted without prompting when the NC is powered up:
MD62574 $MC_RESU_SPECIAL_FEATURE_MASK, Bit 3 = 1
9.3.7
ASUB enable
Note
A requirement for using ASUBs is that the "Cross-mode actions" option must be available.
Technologies
188
Function Manual, 10/2020, 6FC5397-8GP40-0BA1
Continue machining (retrace support)
9.3 Startup
The following machine data must be set for the start enable for the RESU-specific ASUB
CC_RESU_ASUP.SPF while the channel is in the NC STOP state:
MD11602 $MN_ASUP_START_MASK, bit 0 = 1 (ignore stop reason for ASUB)
MD11604 $MN_ASUP_START_PRIO_LEVEL = 1 (priorities from which MD11602 is effective)
9.3.8
PLC user program
Requirements
The following functionality is necessary for the sequential coordination of the RESU function in
the PLC user program:
IF
DB21, … DBX32.2
"Retrace support active" == 1
THEN
DB21, … DBX0.1
"Forward/Reverse" = 0
DB21, … DBX0.2
"Start retrace support" = 0
IF
DB11, … DBX0.7
"Mode group reset" == 1
OR
DB21, … DBX7.7
"Reset" == 1
THEN
DB21, … DBX0.1
"Forward/Reverse" = 0
DB21, … DBX0.2
"Start retrace support" = 0
The following signals should be reset for safety reasons:
IF
DB21, … DBX0.2
"Start retrace support" == 1
THEN
DB21, … DBX0.1
"Forward/Reverse" = 0
IF
DB21, … DBX0.1
"Forward/Reverse" == 1
THEN
DB21, … DBX0.2
"Start retrace support" = 0
Program example
The following program extract implements the changes described above:
U
DB21, … DBX32.2
// IF
"Retrace support active" == 1
R
DB21, … DBX0.1
// THEN
"Forward/Reverse" = 0
R
DB21, … DBX0.2
//
"Start retrace support" = 0
O
DB11, … DBX0.7
// IF
"Mode group reset" == 1
O
DB21, … DBX7.7
// OR
"Reset" == 1
R
DB21, … DBX0.1
// THEN
"Forward/Reverse" = 0
R
DB21, … DBX0.2
//
"Start retrace support" = 0
U
DB21, … DBX0.2
// IF
"Start retrace support" == 1
R
DB21, … DBX0.1
// THEN
"Forward/Reverse" = 0
U
DB21, … DBX0.1
// IF
"Forward/Reverse" == 1
Technologies
Function Manual, 10/2020, 6FC5397-8GP40-0BA1
189

Continue machining (retrace support)
9.4 Programming
R
DB21, … DBX0.2
// THEN
"Start retrace support" = 0
9.4
Programming
9.4.1
RESU Start/Stop/Reset (CC_PREPRE)
Using procedure CC_PREPRE (Prepare Retrace) the "Start", "Stop" and "Reset" modes can be
activated for retracing:
Syntax
CC_PREPRE(<mode>)
Meaning
CC_PREPRE:
Retrace mode
Alone in the block:
Yes
<mode>:
Mode
Data type:
INT
Value range:
-1, 0, 1
Value
Meaning
-1
Starts logging the traversing blocks.
The information required for traversing backward is logged on a
block-specific basis in a RESU-internal block buffer. The traversing
information is related to the two geometry axes of the RESU work-
ing plane e.g. the 1st and 2nd geometry axes of the channel:
MD20050 $MC_AXCONF_GEOAX_ASSIGN_TAB[x]; with x = 0 and 1
Or, if transformation is active:
MD24120 $MC_TRAFO_GEOAX_ASSIGN_TAB[x]; with x = 0 and 1
0
Stops logging the traversing blocks.
Thus irrelevant contour areas can be excluded from the log.
These excluded contour areas are bridged by a straight line between
the starting point and end point when traversing backward.
1
Deactivates logging of the traversing blocks and deletes the func-
tion-internal block buffer. Contour areas located before the instant
of deactivation of the part program are therefore no longer availa-
ble to RESU.
Technologies
190
Function Manual, 10/2020, 6FC5397-8GP40-0BA1
Continue machining (retrace support)
9.5 RESU-specific part programs
RESET response
For the following reset events, CC_PREPRE(-1) is implicitly executed:
• Power on (warm restart)
• Channel reset
• End of program reset (M30)
9.5
RESU-specific part programs
9.5.1
Overview
The following programs are automatically generated within the scope of the retrace support
functionality (continue machining). User-specific content can be incorporated in the programs
listed.
Function
Program name
Can be changed
Main program
CC_RESU.MPF
No
INI program
CC_RESU_INI.SPF
Yes
END program
CC_RESU_END.SPF
Yes
Continue machining ASUP
CC_RESU_BS_ASUP.SPF
Yes
RESU ASUP
CC_RESU_ASUP.SPF
No
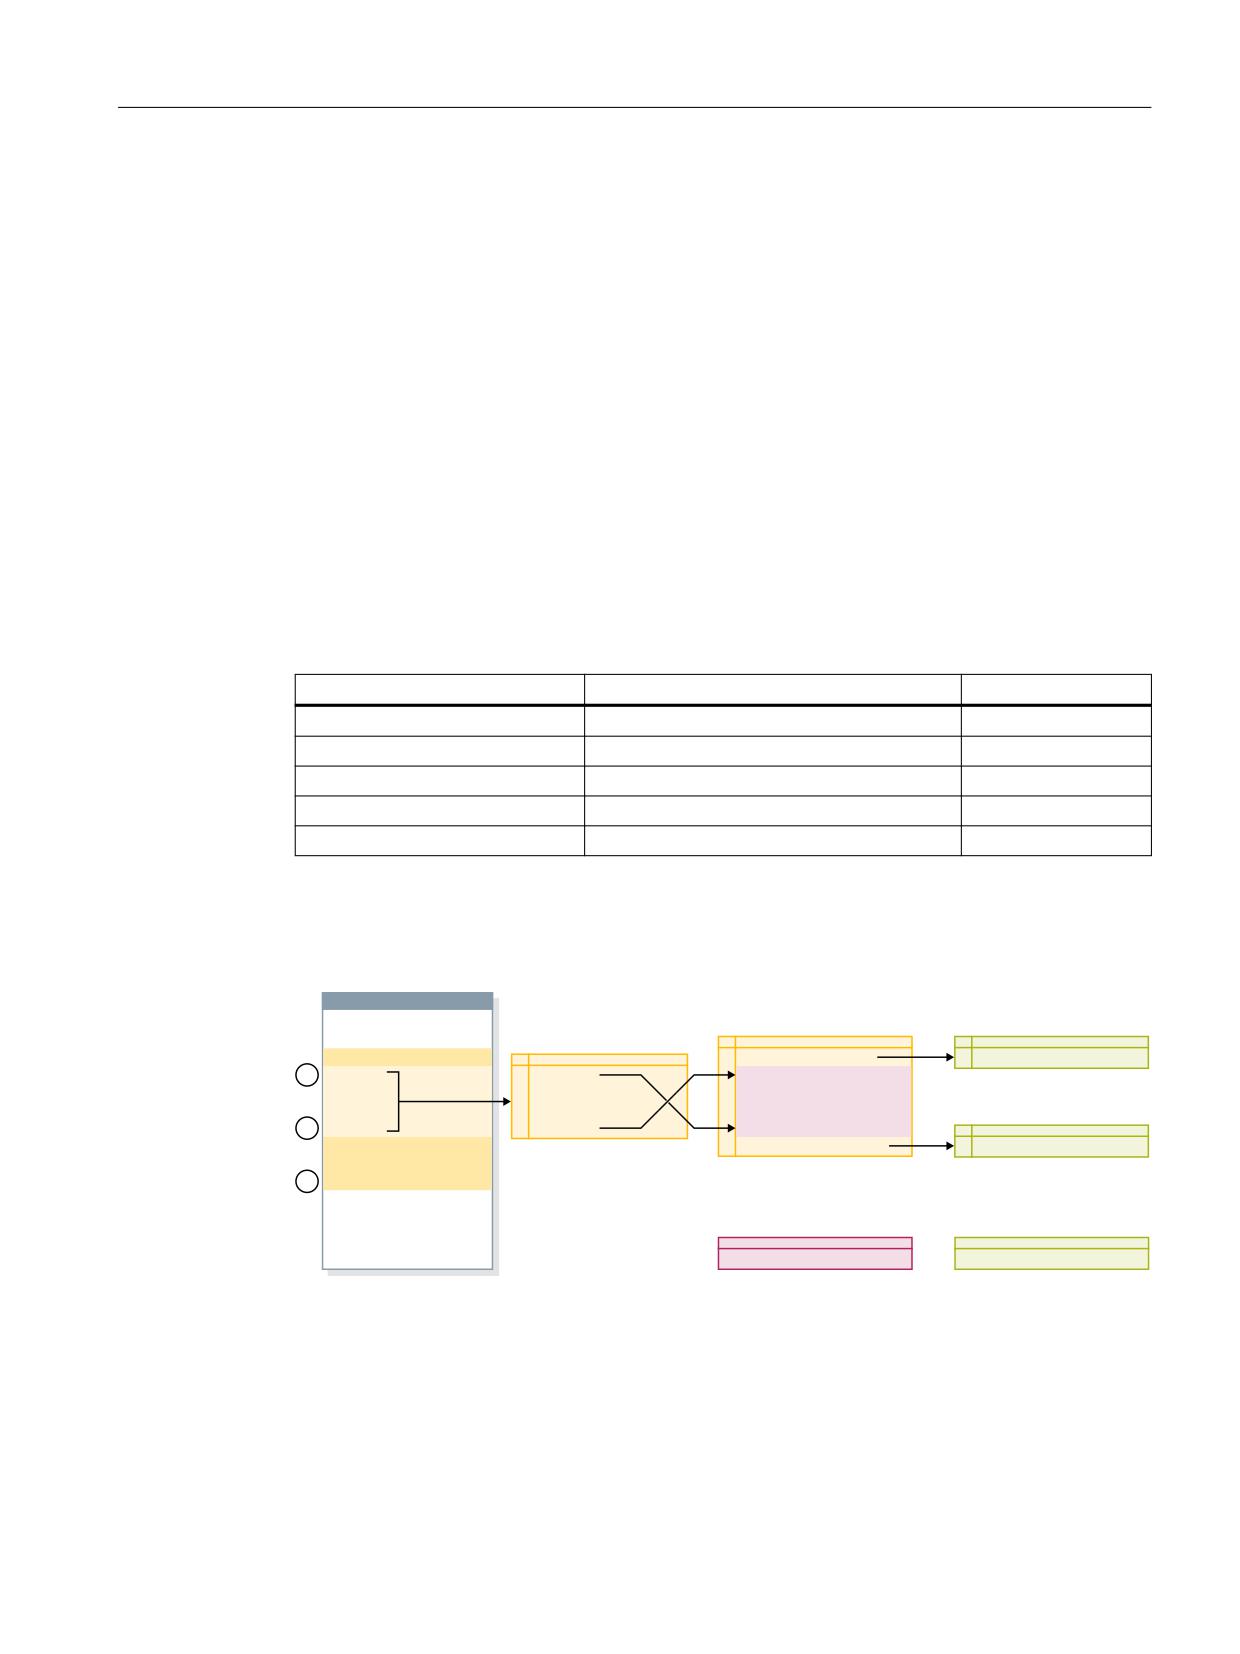
Internal structure
The following diagram provides an overview of the internal structure of the technological
function and the relationship between the various part programs.
1& SURJUDP
5(68 PDLQ SURJUDP
5(68 ,1, SURJUDP
ແ
5(68 LQWHUQDO
&&B5(68 03)
&& 5(68B,1, 63)
ແ
%ORFN EXIIHU
1
&&B35(35(
&&B5(68B,1, 63)
&DQ EH FKDQJHG
1
ಹ
1
ಹ
1
ಹ
ແ
ແ
ແ
5(68 (1' SURJUDP
QRW FKDQJHDEOH
ແ
ແ
ແ
&& 5(68B(1' 63)
1
ಹ
1
ಹ
1
ಹ
ແ
&&B5(68B(1' 63)
&DQ EH FKDQJHG
ແ
1
ಹ
1
&&B35(35(
5(68 $683
5(68 UHWUDFH VXSSRUW $68%
ແ
&& 5(68B$683 63)
&& 5(68B%6B$683 63)
ແ
1
0
QRW FKDQJHDEOH
&DQ EH FKDQJHG
Figure 9-6
RESU-specific part programs
Technologies
Function Manual, 10/2020, 6FC5397-8GP40-0BA1
191
Continue machining (retrace support)
9.5 RESU-specific part programs
9.5.2
Main program (CC_RESU.MPF)
Function
In addition to the calls for the RESU-specific subprograms, the RESU main program
"CC_RESU.MPF" contains the traversing blocks generated from the traversing blocks logged in
the block buffer for reverse/forward travel along the contour. The program is always regenerated
by the RESU function if, once the part program has been interrupted, the status of the following
interface signal changes:
DB21, … DBX0.1 (Reverse / Forward)
Note
CC_RESU.MPF must not be changed. User-specific adjustments are to be made in the
corresponding RESU-specific subprograms.
Error messages
By default, RESU generates traversing blocks for the entire retraceable contour range logged in
the block buffer. If there is not enough memory for all traversing blocks to be generated in the
parameterized memory area of the RESU main program (see Section "RESU main program
memory area (Page 187)"), RESU reduces the number of generated traversing blocks.
The lacking memory and/or reduction in the number of the generated traversing blocks is
indicated by an alarm:
RESU alarm 75608 "Channel number NC memory limit reached, RAM type type"
If the RESU main program is created in the static user memory, the following system alarm
appears at the same time as the RESU alarm:
Alarm 6500 "NC memory full"
Note
If the number of traversing blocks generated is reduced due to insufficient memory, the entire
retraceable contour can still be retraced for retrace support. To do this, proceed as follows:
• Reverse travel up to the end of the RESU main program
• Two-time change of the interface signal:
DB21, … DBX0.1 (Reverse/Forward)
Using the current position as a new interruption point enables RESU to generate a new RESU
main program.
Subsequently, travel is possible as far as the end of the retraceable contour range or, if the limits
have changed, as far as the starting point of the last traversing block that can be generated.
The procedure described can be repeated as many times as required both for reverse and
forward travel.
Technologies
192
Function Manual, 10/2020, 6FC5397-8GP40-0BA1
Continue machining (retrace support)
9.5 RESU-specific part programs
9.5.3
INI program (CC_RESU_INI.SPF)
Function
The RESU-specific subprogram "CC_RESU_INI.SPF" contains the defaults required for the reverse
travel:
• Metric input system:
G71
• Absolute dimensions:
G90
• To switch off the adjustable zero-point offsets / frames G500
(see Chapter "Frames (Page 205)"):
• To switch off the active tool offsets (see Chapter "Tool T0
offsets (Page 206)"):
• Switching off the tool radius offset:
G40
• Traversing velocity:
F200
Program structure
CC_RESU_INI.SPF has the following content by default:
PROC CC_RESU_INI
Technologies
Function Manual, 10/2020, 6FC5397-8GP40-0BA1
193

Continue machining (retrace support)
9.5 RESU-specific part programs
G71 G90 G500 T0 G40 F200
;system frames that are present are deactivated
;actual value and scratching
if $MC_MM_SYSTEM_FRAME_MASK B_AND 'H01'
$P_SETFRAME = ctrans()
endif
;external zero point offset
if $MC_MM_SYSTEM_FRAME_MASK B_AND 'H02'
$P_EXTFRAME = ctrans()
endif
;tool carrier
if $MC_MM_SYSTEM_FRAME_MASK B_AND 'H04'
PAROTOF
endif
if $MC_MM_SYSTEM_FRAME_MASK B_AND 'H08'
TOROTOF
endif
;workpiece reference points
if $MC_MM_SYSTEM_FRAME_MASK B_AND 'H10'
$P_WPFRAME = ctrans()
endif
;cycles
if $MC_MM_SYSTEM_FRAME_MASK B_AND 'H20'
$P_CYCFRAME = ctrans()
endif
;transformations
if $MC_MM_SYSTEM_FRAME_MASK B_AND 'H40'
$P_TRAFRAME = ctrans()
endif
; bit mask for global basic frames
$P_NCBFRMASK = 0
;bit mask for channel-specific basic frames
$P_CHBFRMASK = 0
;programmable frame
$P_PFRAME = ctrans()
M17
CAUTION
Program changes
By changing the content of the RESU-specific subprogram "CC_RESU_INI.SPF", the user
(machine manufacturer) takes over the responsibility for the correct sequence of the
technological function.
Note
CC_RESU_INI.SPF may be changed.
CC_RESU_INI.SPF must not contain any RESU part program commands. CC_PREPRE(x).
Technologies
194
Function Manual, 10/2020, 6FC5397-8GP40-0BA1

Continue machining (retrace support)
9.5 RESU-specific part programs
9.5.4
END program (CC_RESU_END.SPF)
Function
The task of the RESU-specific subroutine "CC_RESU_END.SPF" is to stop reverse travel once the
end of the retraceable contour is reached. If the RESU function is parameterized appropriately,
this scenario will not arise under normal circumstances.
Program structure
CC_RESU_END.SPF has the following content by default:
PROC CC_RESU_END
M0
M17
CAUTION
Program changes
By changing the content of the RESU-specific subroutine "CC_RESU_END.SPF", the user
(machine manufacturer) takes over the responsibility for the correct sequence of the
technological function.
Note
CC_RESU_END.SPF may be changed.
CC_RESU_END.SPF must not contain any RESU part program commands. CC_PREPRE(x).
9.5.5
Retrace support ASUB (CC_RESU_BS_ASUP.SPF)
Function
The NC is forced to approach the current path point during machining continuation with the help
of the RESU-specific ASUB "CC_RESU_BS_ASUP.SPF":
• Reapproach next point on path:
RMN
• Approach along line on all axes:
REPOSA
Program structure
CC_RESU_BS_ASUP.SPF has the following content by default:
PROC CC_RESU_BS_ASUP SAVE
RMN
REPOSA
Technologies
Function Manual, 10/2020, 6FC5397-8GP40-0BA1
195

Continue machining (retrace support)
9.5 RESU-specific part programs
M17
CAUTION
Program changes
By changing the content of the RESU-specific subroutine "CC_RESU_BS_ASUP.SPF", the user
(machine manufacturer) takes over the responsibility for the correct sequence of the
technological function.
Note
CC_RESU_BS_ASUP.SPF may be changed.
User-specific modifications must be inserted before the part program block RMN.
9.5.6
RESU ASUB (CC_RESU_ASUP.SPF)
Function
The RESU-specific ASUB "CC_RESU_ASUP.SPF" is required internally for the function. The ASUB is
initiated if the following RESU interface signal is switched over in the NC stop state:
DB21, … DBX0.1 (Forward/Reverse)
Program structure
CC_RESU_ASUP.SPF has the following content:
PROC CC_RESU_ASUP
; siemens system asub - do not change
G4 F0.001
M0
REPOSA
M17
Note
CC_RESU_ASUP.SPF must not be changed.
Technologies
196
Function Manual, 10/2020, 6FC5397-8GP40-0BA1
Continue machining (retrace support)
9.6 Retrace support
9.6
Retrace support
9.6.1
General information
Retrace support refers to the entire operation from initiation of retracing through the interface
signal DB21, … DBX0.2 = 1 (start machining continuation) up to to the continuation of the part
program processing of the programmed contour.
Requirement
In order for retrace support to function, the retrace mode, launched by means of the request for
reverse travel, must be active in the channel:
DB21, … DBX32.1 = 1 (retrace mode active)
(See Section "Functional sequence (principle) (Page 180)")
Subfunctions
The two essential subfunctions of retrace support are the standard NC functions:
• Block search with calculation on contour
• Repositioning on the contour via shortest route (REPOS RMN)
9.6.2
Block search with calculation on contour
Function
The block search with calculation on the contour initiated implicitly by RESU within the
framework of the retrace support has the following tasks:
• Set the program pointer on the part program block on which repositioning was done with the
help of Reverse / Forward travel
• Calculates the axis positions on the basis of the programmed traversing blocks from the start
of the part program to the target block
• Collates the instructions programmed from the start of the part program to the target block,
which are executed in the action block. These include:
- Auxiliary functions
- Tool change
- Spindle functions
- Feedrate programming
Technologies
Function Manual, 10/2020, 6FC5397-8GP40-0BA1
197
Continue machining (retrace support)
9.6 Retrace support
All part program instructions which are not executed in the action block but are required for
retrace support in the part program must be entered manually in the RESU-specific retrace
support ASUB CC_RESU_BS_ASUP.SPF, e.g.:
• Synchronized actions
• M functions
Further information see Function Manual Basic Functions.
9.6.3
Reposition
Function
Following the end of the last action block (last traversing block before repositioning), NC Start
outputs the approach block for repositioning all channel axes programmed in the part program
as far as the target block.
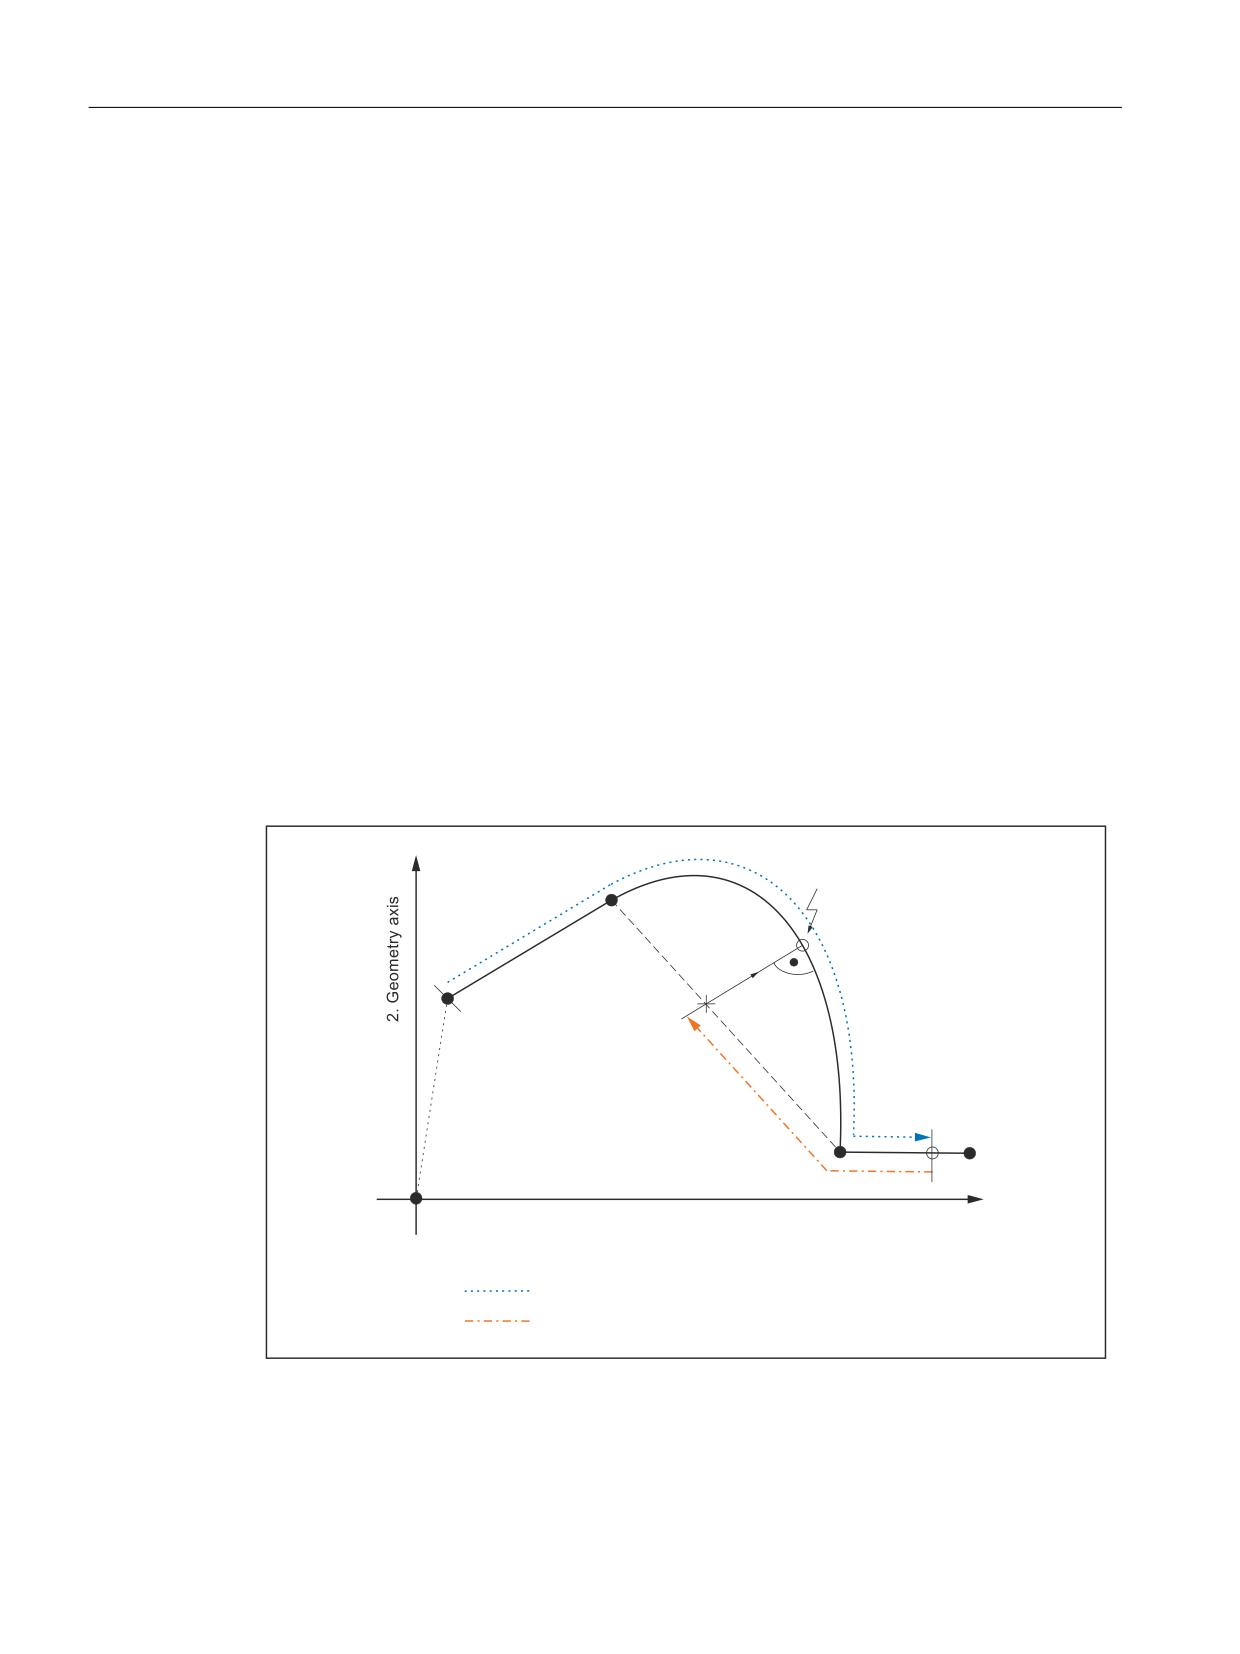
Geometry axes
In the approach block, the geometry axes of the RESU working plane (e.g. 1st and 2nd geometry
axes of the channel) traverse the shortest route along the contour to the program continuation
point.
1
H J VSOLQH EORFN
3URJUDP FRQWLQXDWLRQ SRLQW
1
5(326 VWDUWLQJ
1
&&B35(35(
SRLQW
1
1
*HRPHWU\ D[LV
3DWK VHFWLRQV WUDYHUVHG
3DUW SURJUDP SURFHVVLQJ
5HYHUVH WUDYHO
Figure 9-7
Retraceable contour ranges and REPOS
Technologies
198
Function Manual, 10/2020, 6FC5397-8GP40-0BA1
Continue machining (retrace support)
9.6 Retrace support
Channel axes
All other channel axes programmed in the part program travel to the relevant position calculated
in the block search.
9.6.4
Temporal conditions concerning NC start
NC start should be initiated twice by the machine operator within the framework of continue
machining (see Section "Functional sequence (principle) (Page 180)").
The following conditions must be met:
• In NC start for outputting the action blocks:
- The block search must be completed:
DB21, … DBX33.4 = 0 (block search active)
• In NC start for outputting the approach blocks:
- The RESU ASUB "CC_RESU_BS_ASUP" must be completed:
DB21, … DBX318.0 = 1 (ASUB stopped)
9.6.5
Block search from last main block
The block search with calculation on the contour executed within the framework of the
machining continuation via the use of the most powerful NCU in very large part programs can
itself lead to computation times of several minutes up to the reaching of the target block.
A significant reduction of this waiting period is possible through the use of the "Block search from
the last main block".
Functionality
For retrace support with block search from the last main block, the search for the target block
takes place in 2 stages:
1. Block search without calculation from start of machining program to last main block before
target block. Subprograms are ignored during this search, i.e. it takes place exclusively in the
main program.
2. Block search with calculation on contour from main block to target block. This block search
does not ignore subprograms.
Requirement
To enable a search from last main block for retrace support, at least one main block must be
programmed after the RESU start CC_PREPRE(1).
Main block
All instructions required for processing the subsequent section of the part program must be
programmed in one main block.
Technologies
Function Manual, 10/2020, 6FC5397-8GP40-0BA1
199

Continue machining (retrace support)
9.7 Function-specific display data
Main blocks must be identified by a main block number consisting of the character ":" and a
positive integer (block number).
Further information:
Programming Manual Fundamentals; Fundamentals of NC programming
Activation
Activation of the block search from the last main block is performed using the RESU-specific
machine data:
MD62575 $MC_RESU_SPECIAL_FEATURE_MASK_2, bit 0 (additional RESU features)
Bit
Value
Meaning
0
0
Retrace support is performed using block search with calculation on contour.
1
Retrace support is performed using block search from the last main block.
Boundary conditions
In order that a new retrace support operation can take place following a retrace support
operation with block search from last main block, the RESU start CC_PREPRE(1) must be
programmed in the retrace support ASUB "CC_RESU_BS_ASUP.SPF".
Programming example:
PROC CC_RESU_BS_ASUP SAVE
; (synchronized actions, M functions, etc. required for retrace support
)
CC_PREPRE(1)
RMN
REPOSA
M17
9.7
Function-specific display data
9.7.1
Channel-specific GUD variables
As display data for the size of the block search buffer, RESU provides the following channel-
specific GUD variables:
GUD variable
Meaning
Value
Access
CLC_RESU_LENGTH_BS_BUFFER
Size of block search buffer
Byte
read only
After the startup of the technological function, the GUD variable is not displayed automatically
on the operator panel.
Technologies
200
Function Manual, 10/2020, 6FC5397-8GP40-0BA1
Continue machining (retrace support)
9.8 Function-specific alarm texts
Creating and displaying the GUD variable
Perform the following steps to create and display the GUD variables in the operator panel:
1. Set password:
The password of protection level 1 (machine manufacturer) is to be input.
2. Activate the "Definitions" display
3. The file is recreated if an "SGUD.DEF" file is still not available:
Name: SGUD
Type: Global data /system
Confirm entry with OK.
This opens the file in the editor.
4. Edit the GUD variable definitions:
DEF CHAN REAL CLC_RESU_LENGTH_BS_BUFFER
M30
5. Save the file and close the editor.
6. Activate the "SGUD.DEF" file.
The GUD variable is not displayed on the operator panel.
Note
The new GUD variable, which is already being displayed, will be detected by the RESU function
and supplied with an up-to-date value only following an NC POWER ON Reset. As a consequence,
an NC POWER ON must be initiated after the creation.
Further information
The exact procedure to be following while creating and displaying GUD variables depends on the
software version of the existing operator panel and is described in the:
• Universal/Turning/Milling/Grinding Operating Manual
9.8
Function-specific alarm texts
For the procedure for creating function-specific alarm texts, see Creating alarm texts (Page 23).
Technologies
Function Manual, 10/2020, 6FC5397-8GP40-0BA1
201

Continue machining (retrace support)
9.9 Boundary conditions
9.9
Boundary conditions
9.9.1
Function-specific supplementary conditions
9.9.1.1
Continue machining within subprograms
Subprogram call outside or inside a program loop
Clear retrace support within subprograms depends on whether the subprogram call is made
outside or inside a program loop:
• Outside
Clear retrace support is possible if a subprogram is called outside a program loop.
• Inside
Clear retrace support may not be possible if a subprogram is called inside a program loop (see
Section "Continue machining within program loops (Page 202)").
Number of passes P
Subprogram repetitions using number of passes P are taken into account for retrace support.
This means that retrace support is performed in the part program with the correct reference to
the part program block and number of passes P to the program continuation point of the contour.
9.9.1.2
Continue machining within program loops
In NC high-level language, program loops can be programmed using:
• LOOP
ENDLOOP
• FOR
ENDFOR
• WHILE
ENDWHILE
• REPEAT
UNTIL
• CASE/IF-ELSE-ENDIF in conjunction with GOTOB
WARNING
Risk of collision
Significant contour deviations can occur during the machining if the programmed continuation
point at the programmed contour is the result of a loop run that is not equal to the first loop run.
If retrace support is performed within program loops, the retrace support is always effective in
the first loop run.
Technologies
202
Function Manual, 10/2020, 6FC5397-8GP40-0BA1
Continue machining (retrace support)
9.9 Boundary conditions
9.9.1.3
Machining continuation on full circles
In full circles, the block starting and end points coincide at one contour point. As no clear
differentiation is possible in this case, one always starts from the block start point during
machining continuation on this kind of a contour point. The first part program block following
retrace support is then the circular block.
A contour point just before the block end point of the circular block must be selected to avoid
traversing the circular block after the machining continuation.
9.9.1.4
Automatically generated contour elements
The automatic generation of non-linear / non-circular contour elements by the NC takes place,
for example, when programming the following NC functions in the part program:
• RND
• G641/G642
• Tool radius compensation
For reverse / forward travel as part of RESU these contour elements can be replaced by straight
lines between the start and end of the block.
9.9.2
Supplementary conditions for standard functions
9.9.2.1
Axis replacement
As long as RESU is active, the two geometry axes of the RESU working plane (e.g. the 1st and 2nd
geometry axes of the channel) must not be transferred to another channel via axis replacement
( RELEASE(x)/GET(x)).
The RESU activity:
• Starts:
- with the part program command CC_PREPRE(1)
• Ends with:
- the program end
or
- with the part program command CC_PREPRE(-1)
9.9.2.2
Traversing movements of the channel axes
Other channel axes, except the two geometry axes of the RESU working plane, are not
considered by RESU.
Technologies
Function Manual, 10/2020, 6FC5397-8GP40-0BA1
203

Continue machining (retrace support)
9.9 Boundary conditions
If traversing movements in other channel axes are required for machining continuation or
reverse travel, these can either be undertaken by the machined operator manually, or
programmed as travel block in the RESU-specific subroutine "CC_RESU_INI.SPF".
WARNING
Risk of collision when traversing
The machine operator must ensure that collision of the associated traversing movements does
not take place during the entire machining continuation operation within the framework of the
technological function of RESU.
9.9.2.3
Block numbers
The following RESU-specific subroutines and their subroutines must not contain block numbers:
• CC_RESU_INI.SPF
• CC_RESU_END.SPF
The following alarm appears in the event of an error:
Alarm 75604 "Reverse travel not possible, error no. number"
9.9.2.4
Block search
Block search with calculation
RESU is subject to the following constraints in the context of the "block search with calculation
(on contour/at end of block") standard function:
• The last block of the RESU part program command CC_PREPRE(x) run during the block
search is effective in the target block.
• The retraceable contour range starts with the REPOS approach block.
Block search without calculation
RESU part program commands CC_PREPRE(x) haveno effect in the "block searches without
calculation" function.
9.9.2.5
Transformations
RESU can also be used for active kinematic transformation (e.g. 5-axis transformation) subject
to restrictions, as the traversing movements of the two geometry axes of the RESU working
plane are recorded in the basic coordinate system (BCS) and therefore before the transformation
(see also Function Manual Technologies, Section Transformation package - handling).
Technologies
204
Function Manual, 10/2020, 6FC5397-8GP40-0BA1
Continue machining (retrace support)
9.9 Boundary conditions
Transformation changeover
While RESU is active, no transformation changes are permitted to take place and transformation
must not be activated/deactivated.
The RESU activity:
• Starts:
- with the part program command CC_PREPRE(1)
• Ends with:
- the program end
or
- with the part program command CC_PREPRE(-1)
Further information
Function Manual Transformations, Kinematics transformation
See also
Transformation package handling (Page 113)
9.9.2.6
Compensations
RESU can be used in interaction with compensations, because the traversing movements of the
two geometry axes of the RESU working plane is recorded in the basic coordinate system (BCS)
and therefore before the compensation.
A complete description of compensations can be obtained in:
Further information:
Function Manual Monitoring and Compensating; Compensations
9.9.2.7
Frames
RESU can be used in conjunction with frames.
However, as the traversing movements of the two geometry axes of the RESU working plane are
recorded in the basic coordinate system (BCS) and therefore after the frames have been taken
into account, the frame offsets must be deactivated during retrace support (reverse / forward
travel).
The frame offsets are deactivated during retrace support via the standard default settings of the
RESU-specific subprogram "CC_RESU_INI.SPF" (see Section: "INI program (CC_RESU_INI.SPF)
(Page 193)").
Further information
Function Manual Basic Functions; Axes, coordinate systems, frames
Technologies
Function Manual, 10/2020, 6FC5397-8GP40-0BA1
205

Continue machining (retrace support)
9.10 Data lists
9.9.2.8
Tool offsets
RESU can be used in conjunction with tool offsets.
However, as the traversing movements of the two geometry axes of the RESU working plane are
recorded in the basic coordinate system (BCS) and therefore after the tool offsets have been
taken into account, the tool offsets must be deactivated during retrace support (reverse /
forward travel).
The tool offsets are deactivated during retrace support via the standard default settings of the
RESU-specific subprogram "CC_RESU_INI.SPF" (see Section "INI program (CC_RESU_INI.SPF)
(Page 193)").
Specific instances of tool radius compensation, e.g. compensation on outside corners
G450 DISC=x may generate contour deviations between the contour traversed during retrace
support and the contour programmed in the machining program.
Contour deviations will always occur wherever the tool radius offset generates contour elements
which are non-linear or circular. For example, G450DISC=x with x > 0 generates parabolic or
hyperbolic contour elements.
For further information regarding the subject of tool offsets, see Function Manual Tools.
9.10
Data lists
9.10.1
Machine data
9.10.1.1
General machine data
Number Identifier: $MN_
Meaning
11602
ASUP_START_MASK
Ignore stop reasons if an ASUB is running.
11604
ASUP_START_PRIO_LEVEL
Defines the ASUB priority from which MD11602 is effec-
tive.
18351
MM_DRAM_FILE_MEM_SIZE
Size of the part program memory in DRAM (in kByte)
9.10.1.2
Channelspecific machine data
Number Identifier: $MC_
Description
20050
AXCONF_GEOAX_ASSIGN_TAB
Assignment 'geometry/channel axis'
24120
TRAFO_GEOAX_ASSIGN_TAB_1
Assignment of geometry - channel axes for transforma-
tion 1
28090
MM_NUM_CC_BLOCK_ELEMENTS
Number of block elements for compile cycles (CC)
28100
MM_NUM_CC_BLOCK_USER_MEM
Size of block memory for CC in KB
28105
MM_NUM_CC_HEAP_MEM
Heap memory in KB for CC applications (DRAM)
62571
RESU_RING_BUFFER_SIZE
Size of ring buffer (RESU-internal block buffer)
Technologies
206
Function Manual, 10/2020, 6FC5397-8GP40-0BA1

Continue machining (retrace support)
9.10 Data lists
Number Identifier: $MC_
Description
62572
RESU_SHARE_OF_CC_HEAP_MEM
RESU portion of the total CC heap memory
62573
RESU_INFO_SA_VAR_INDEX
Indices of the synchronized action variables
62574
RESU_SPECIAL_FEATURE_MASK
Additional RESU features
62575
RESU_SPECIAL_FEATURE_MASK_2
Additional RESU properties
62580
RESU_WORKING_PLANE
Selection of the RESU working plane
Technologies
Function Manual, 10/2020, 6FC5397-8GP40-0BA1
207
Continue machining (retrace support)
9.10 Data lists
Technologies
208
Function Manual, 10/2020, 6FC5397-8GP40-0BA1
Cycle-independent path-synchronous switching
signal output (HSLC)
10
10.1
Brief description
Function
The "Cycle-independent path synchronized switching signal output" technological function
serves the purpose of switching time-critical, position-based machining processes on and off
quickly, e.g. high speed laser cutting (HSLC; High Speed Laser Cutting).
The switching signal output can be block-related or path length-related:
• Block-related switching signal output
The switching signal output and therefore, the activation / deactivation of the machining is
undertaken independently of the status changes:
- Rapid travel mode G00 active / inactive
- Programmed feed threshold fell short / exceeded
• Path length-related switching signal output
The switching signal output and therefore, the activation / deactivation of the machining
takes place in a continuous change and is monitored along the traversed path.
This enables a regular machining without the individual switching positions having to be
programmed explicitly.
The activation or selection of the mentioned options leads to the monitoring of the output of the
digital signal which is programmed with a part program command.
I/Os
Only the on-board I/Os of the NC module can be used as the digital I/O via which the switching
signal is output: The switching signal can only be output via one of the 4 on-board digital outputs
on the NCU module.
Restrictions
The use of the "Cycle-independent path synchronized switching signal output" technological
function is subject to the following restriction:
• The technological function is available only in one channel of NC.
Further information
The "cycle-independent path-synchronous switching signal output" technological function is a
compile cycle. For the handling of compile cycles (see Section "Installation and activation of
loadable compile cycles (Page 17)").
Technologies
Function Manual, 10/2020, 6FC5397-8GP40-0BA1
209

Cycle-independent path-synchronous switching signal output (HSLC)
10.2 Functional description
10.2
Functional description
10.2.1
General information
Note
The functionality is described with examples, with the help of the "High speed laser cutting
technology (HSLC, High Speed Laser Cutting).
10.2.2
Calculating the switching positions
10.2.2.1
Block-related switching signal output
Switching criteria
During high-speed laser cutting, e.g. as used to manufacture perforated sheets, it is absolutely
essential to switch the laser beam on/off exactly at the programmed setpoint positions during
the machining process.
In order to minimize programming overheads, the switching positions of the technology
function are calculated using the velocity of the geometry axes programmed in the part program
block.
The following criteria define the setpoint position programmed in the part program block (end
of block position) as a switching position:
1. G0 edge change
2. Overshooting/undershooting a freely programmable velocity threshold
G0 edge change as switching criterion
If G0 (rapid traverse) is active in a part program block (programmed or modal), the switching
signal is switched off. On the other hand: If G0 (rapid traverse) is not active in a part program
block, the switching signal is switched on. The G0 edge change marks the programmed end of
block position of the previous block as the switching position.
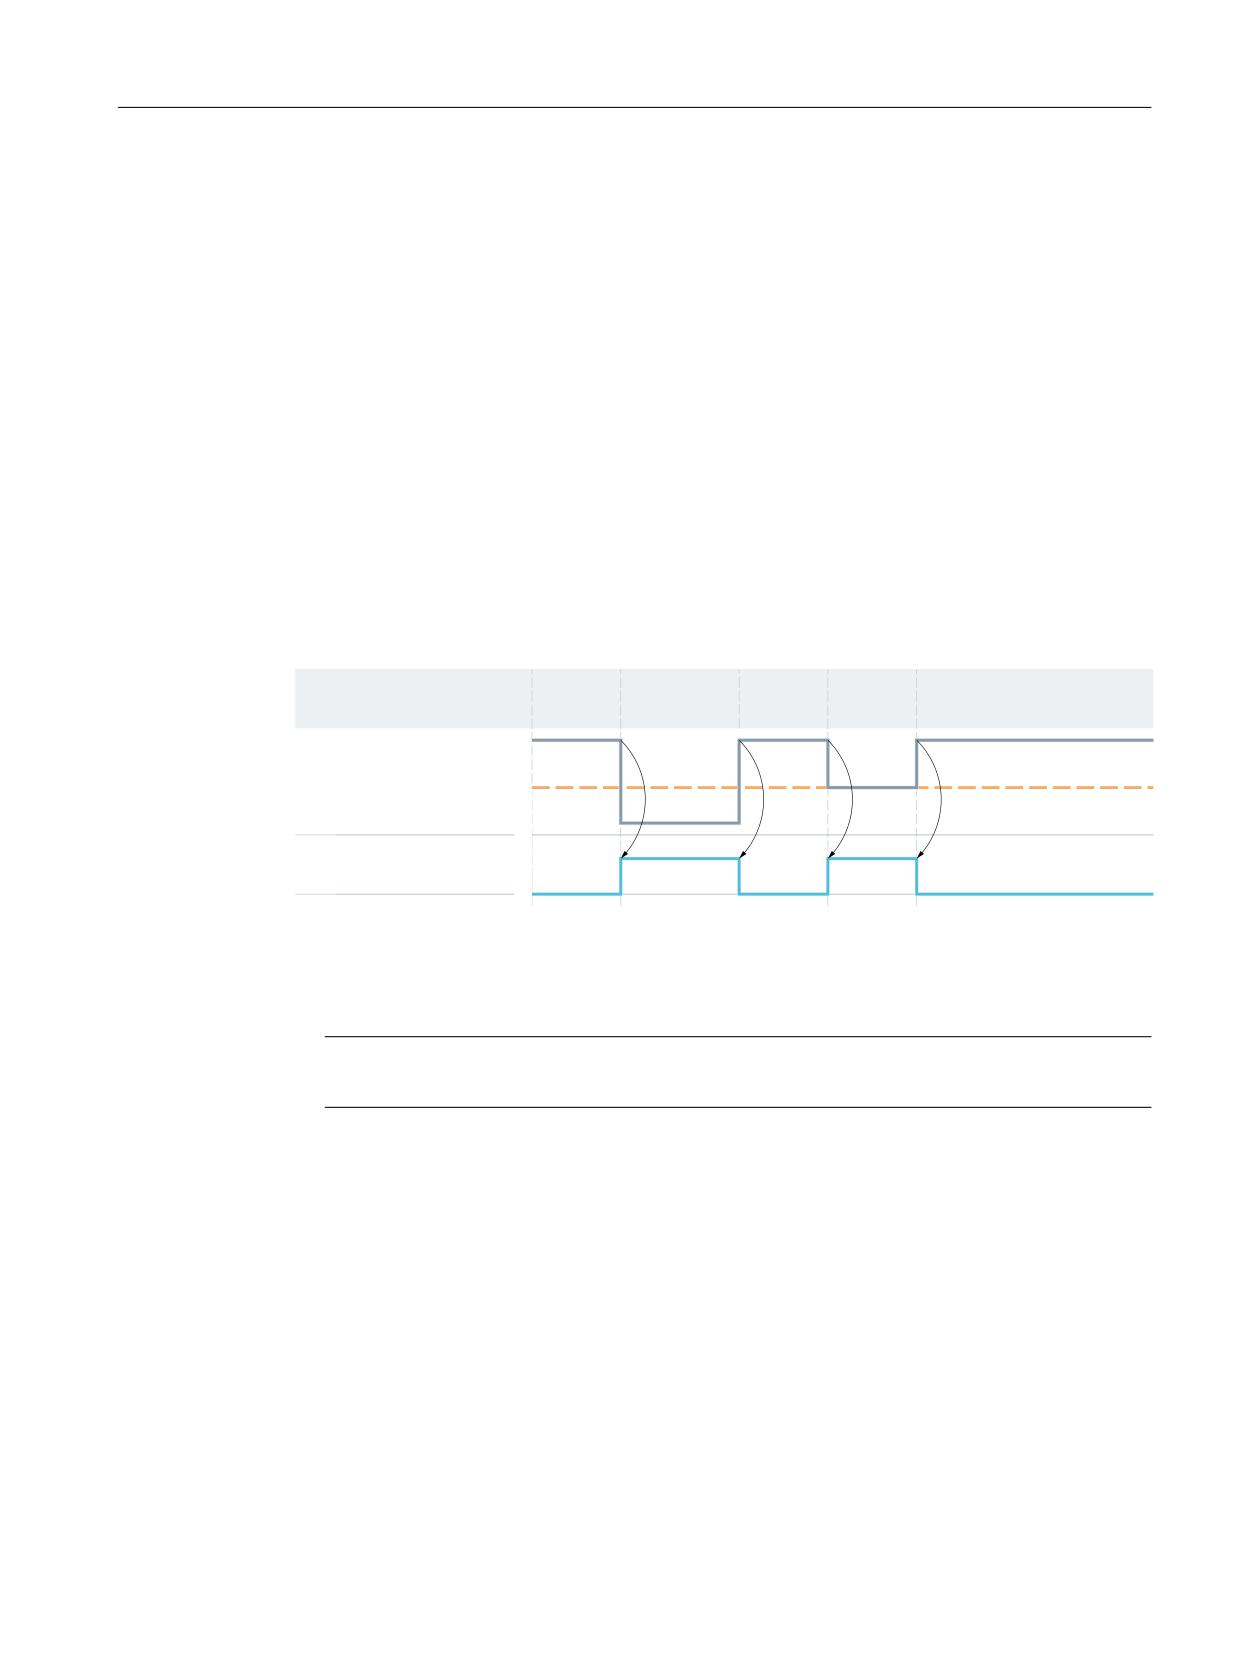
Example:
1
1
1
1
1
3DUW SURJUDP EORFN
* ;
* )
;
;
* ;
;ಹ
*
6ZLWFKLQJ VLJQDO
Technologies
210
Function Manual, 10/2020, 6FC5397-8GP40-0BA1
Cycle-independent path-synchronous switching signal output (HSLC)
10.2 Functional description
The following block positions function as switching positions:
• Position X30 for G0-edge change from N10 to N20
• Position X100 for G0-edge change from N30 to N40
Freely programmable velocity threshold value as switching criterion
A freely programmable velocity threshold value is used to define the setpoint velocity
programmed in the part program block at and above which the switching signal is activated/
deactivated.
• If the setpoint velocity programmed in the part program block is above the programmed
threshold, the switching signal is switched off.
• If the setpoint velocity is at or below the threshold value, the switching signal is switched on.
The edge change marks the programmed end of block position of the previous block as the
switching position.
Example:
1
1
1
1
1
3DUW SURJUDP EORFN
* ;
* )
;
)
;
)
;
* ;ಹ
7KUHVKROG
9HORFLW\ VHWSRLQW
6ZLWFKLQJ VLJQDO
The following block positions function as switching positions:
• Position X30 for edge change from N10 to N20
• Position X70 for edge change from N20 to N30
Note
G0 always deactivates the switching signal, regardless of the threshold value.
10.2.2.2
Path length-related switching signal output
Programmable paths as the switching criterion
In path-related switching signal output, the switching positions are defined with the help of the
two freely programmable paths s1 and s2.
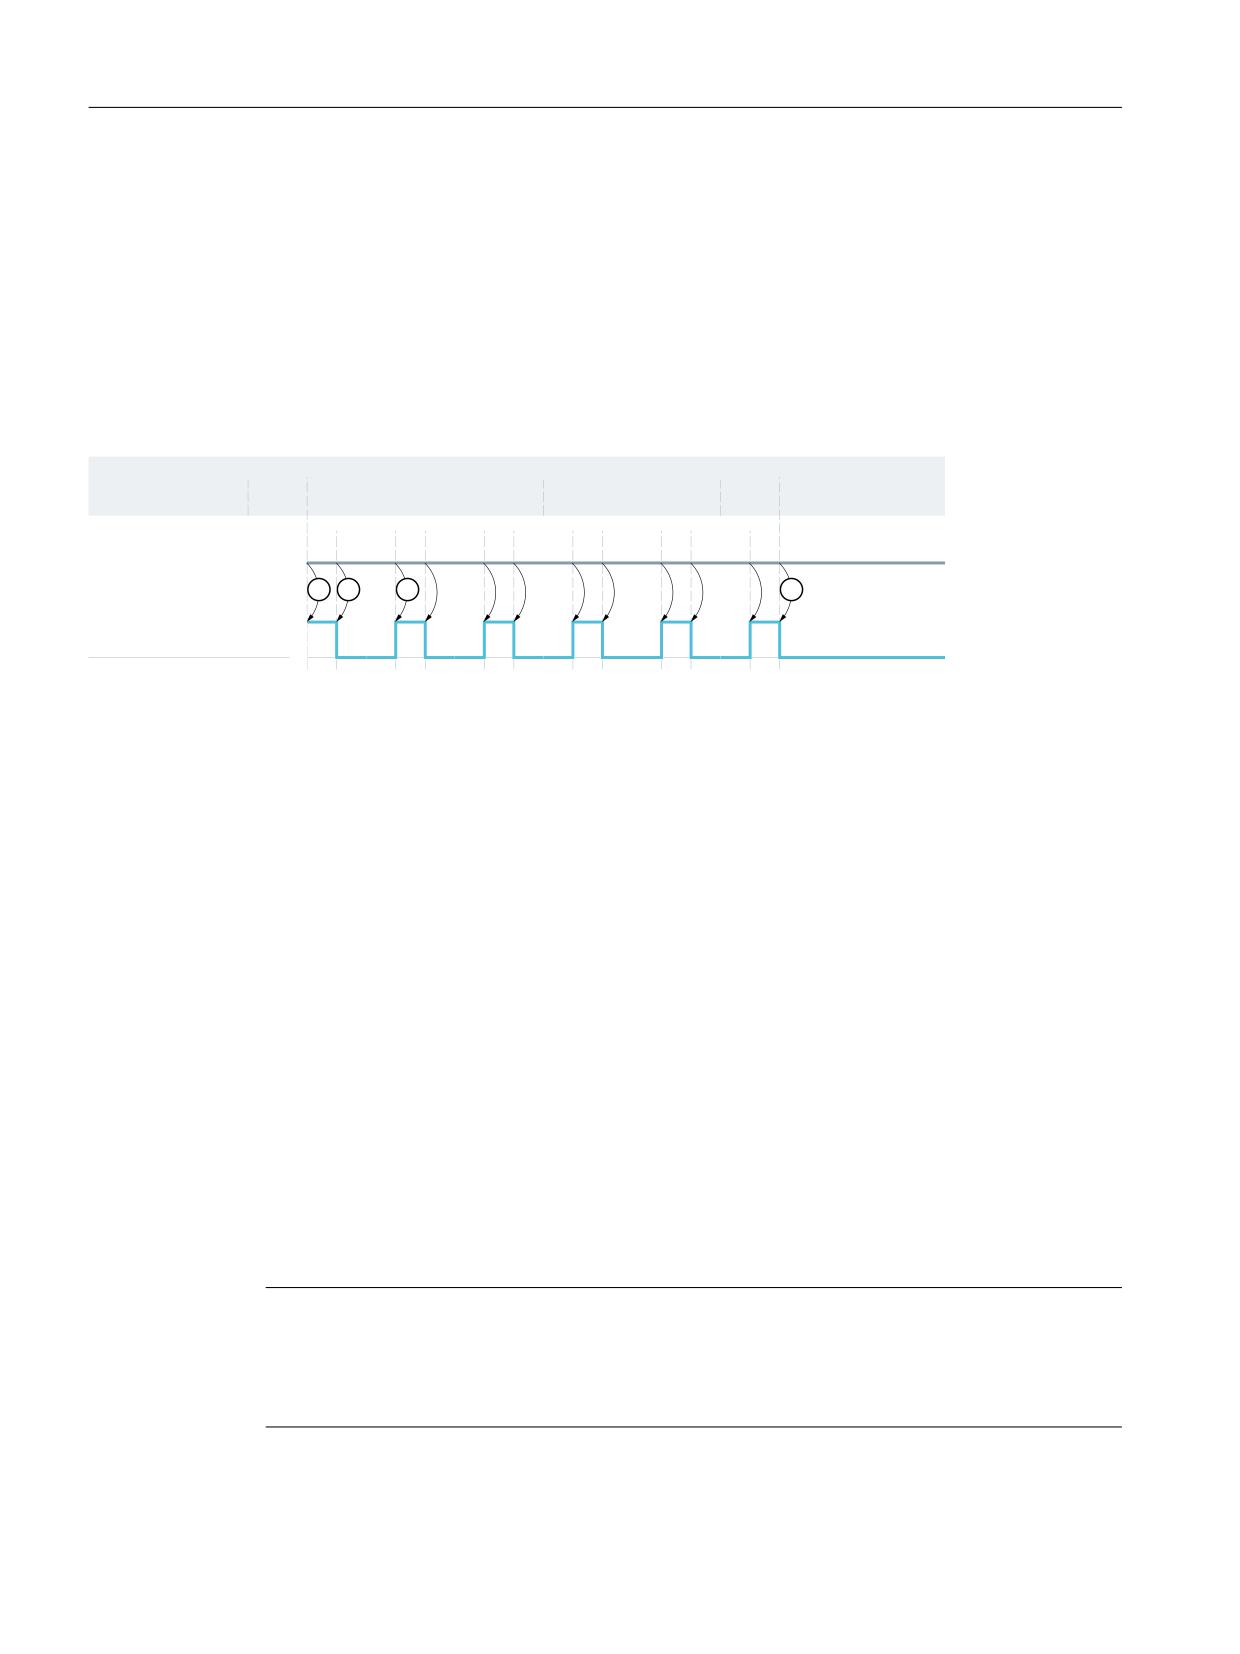
Functional sequence
The path length-related switching signal output starts with a switch on signal at the beginning
of the first traversing block after activation with CC_FAST_CONT (refer to ① in the screen).
Technologies
Function Manual, 10/2020, 6FC5397-8GP40-0BA1
211
Cycle-independent path-synchronous switching signal output (HSLC)
10.2 Functional description
The processing is active till a deactivation signal is set after the traversing of a programmable
path s1 (refer to ② in screen). This way the processing is interrupted till a switch on signal is set
again after the traversing of a programmable path s2 (refer to ③ in screen).
The changeover between activation and deactivation signal, and therefore between processing
and interruption phase is path length dependent at the end of either of the stretch sections s1
and s2. This enables a continuous and regular machining without the individual switching
positions having to be programmed explicitly.
The path length-related switching signal output ends with the start of the first traversing block
(or of another executable block) after deactivation with CC_FASTOFF (refer to ④ in screen).
3DUW SURJUDP
1
*
* * )ಹ
1ಹ
1
&&B)$6721B&217 V V
1
* ;ಹ <ಹ =ಹ
1ಹ
1
&&B)$672))
1
;ಹ <ಹ =ಹ
1
* ;ಹ <ಹ =ಹ
1
* ;ಹ <ಹ =ಹ
V
V
V
V
V
V
V
V
V
V
V
7UDYHUVLQJ SDWK
6ZLWFKLQJ VLJQDO
Figure 10-1
Path length-related switching signal output
10.2.3
Calculating the switching instants
In order for the switching to be as precise as possible at the switching positions calculated, the
control calculates the positional difference between the actual position of the geometry axes
involved and the switching difference in every position controller cycle.
If the positional difference is less than 1.5 position controller cycles, the control converts it into
a temporal difference taking into account the current path velocity and acceleration rate of the
geometry axes.
With the temporal difference specified, a hardware timer is started, which triggers the switching
signal at exactly the instant calculated in advance regardless of the position controller cycle.
10.2.4
Switching frequency and switching position distance
Maximum switching frequency
The maximum switching frequency is: 1 signal edge change per IPO cycle
Note
Special case: IPO cycle time = position controller cycle time
In this case, the maximum switching frequency is:
1 signal edge change per 2 IPO cycles
Technologies
212
Function Manual, 10/2020, 6FC5397-8GP40-0BA1
Cycle-independent path-synchronous switching signal output (HSLC)
10.2 Functional description
Minimum switching position clearance
The minimum possible distance between the switching positions placed one above the other
depends on:
• The duration of an IPO cycle
• The feed rate
The theoretically possible minimum distance can be determined from these dimensions as
follows:
0LQLPXP VZLWFKLQJ SRVLWLRQ FOHDUDQFH 3URJUDPPHG IHHG UDWH
,32 F\FOH WLPH
Example:
For IPO cycle times of 2 ms and position controller cycle times of 1 ms as well as a feed rate of
20000 mm/min, the theoretically possible minimum distance between switching positions one
above the other is limited to:
20000 mm/min * 2 ms = 0.667 mm
Value below minimum switching position distance
For path length-related switching signal output, the value may fall below the minimum
switching position distance, e.g. due to:
• Increase in feed rate
• Decrease in programmable switching position distance s1 and s2
The following reactions take place if the value falls below the minimum:
• Alarm 75501 "Channel %1 HSLC: CC_FASTON_CONT speed too high" is displayed.
• The switching signal at the current switching position is omitted. To maintain the machining
rhythm, the function also suppresses the switching signal at the following switching
position.
The position of all the following switching positions is not affected by this. In the further
course of the path, one can witness alternating output and suppression of two switching
signals following each other.
Technologies
Function Manual, 10/2020, 6FC5397-8GP40-0BA1
213
Cycle-independent path-synchronous switching signal output (HSLC)
10.2 Functional description
10.2.5
Approaching switching position
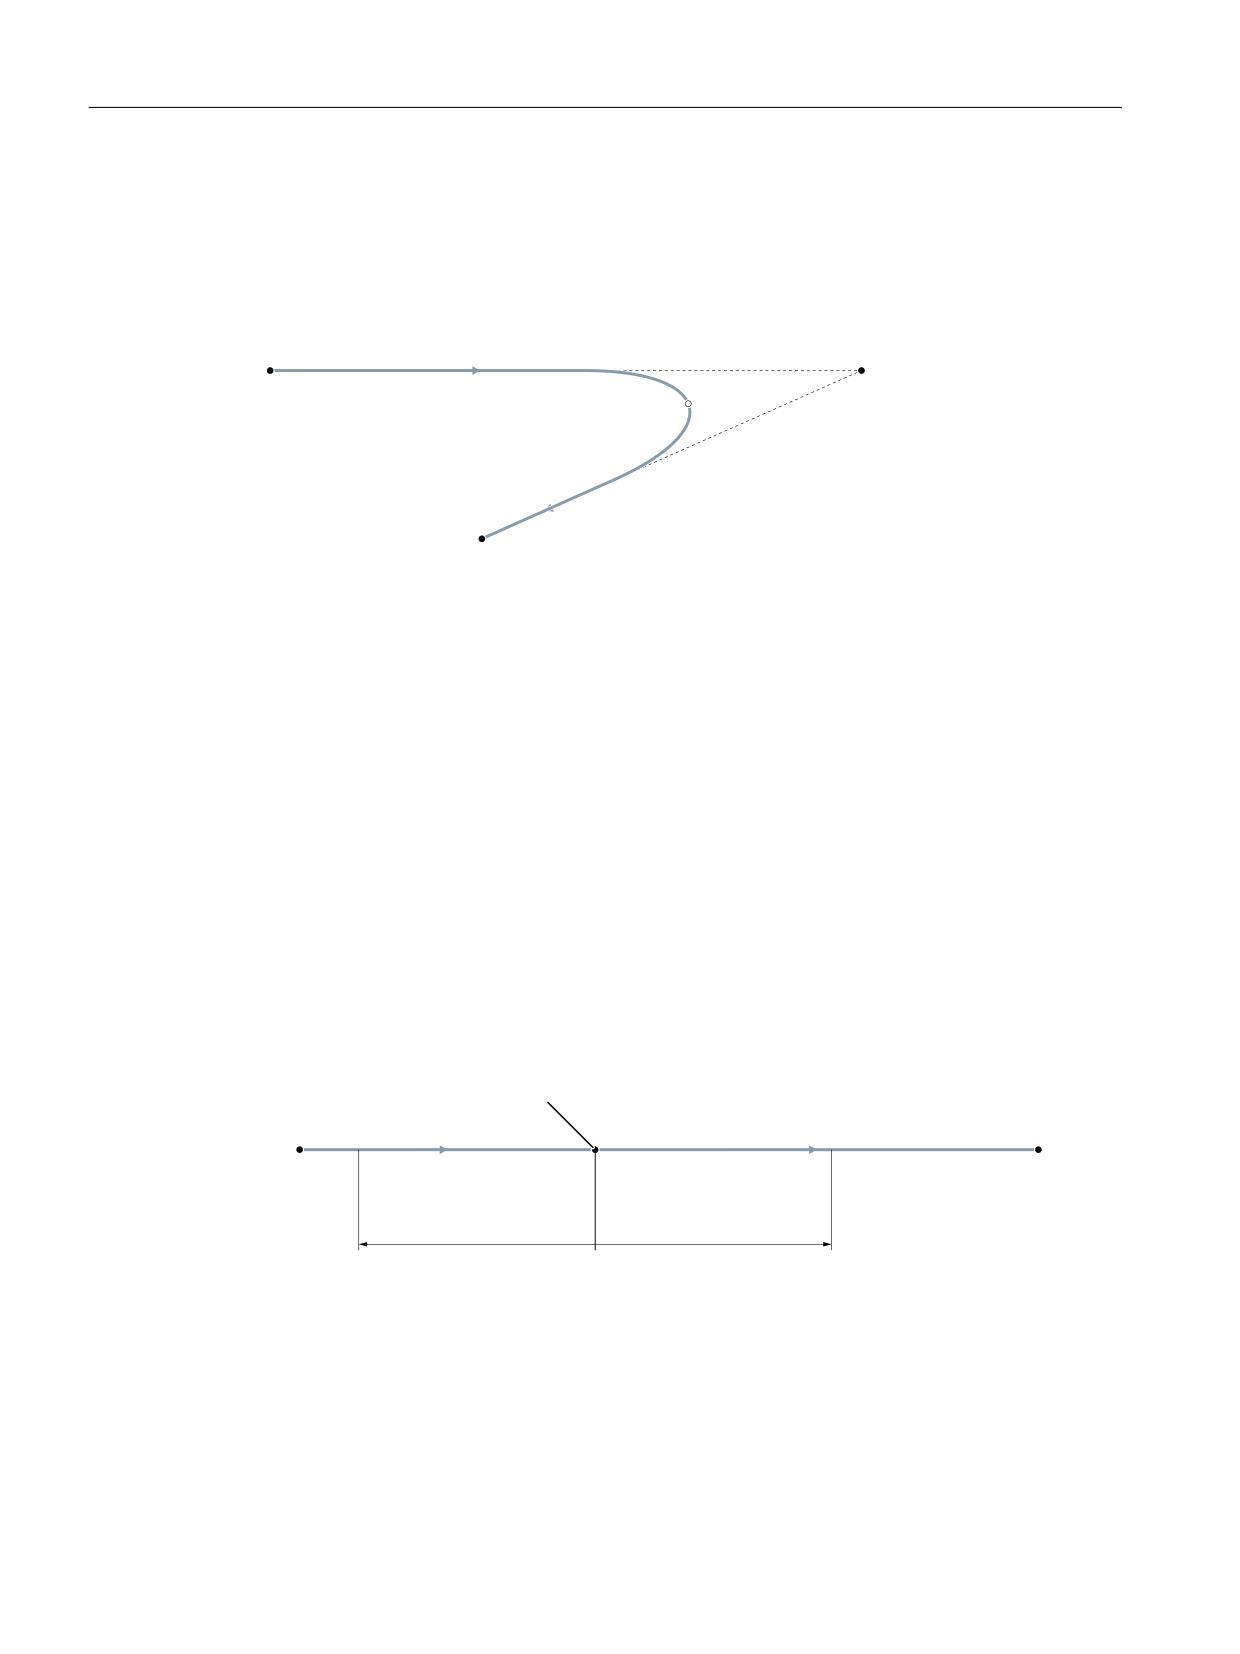
If in block-related switching signal output a switching position is not reached exactly, e.g. in
continuous-path mode and travel in more than one geometry axis, then switching takes place
at the instant at which the positional difference between the actual position of the geometry
axes involved and the programmed switching position increases again.
1
* *
)
;
3URJUDPPHG
VZLWFKLQJ SRVLWLRQ
$FWXDO VZLWFKLQJ
SRVLWLRQ
Figure 10-2
Switching position offset in path control mode
10.2.6
Programmed switching position offset
Programmed switching position offset
For block-related switching signal output, a positional offset of the switching position can be
programmed :
• Offset distance negative = lead
With a negative offset distance, the switching position is offset before the set point position
programmed in the part program block.
If an excessively large negative offset distance is programmed, i.e. the setpoint has already
been exceeded by the time the edge is detected, the signal is switched immediately.
• Offset distance positive = follow-up
With a positive offset distance, the switching position is offset behind the set point position
programmed in the part program block.
6ZLWFKLQJ SRVLWLRQ
;
ZLWKRXW
RIIVHW
1
* ;
1
* )
;
1HJDWLYH RIIVHW GLVWDQFH OHDG
3RVLWLYH RIIVHW GLVWDQFH
IROORZ XS
Figure 10-3
Programmed switching position offset
Path reference
The offset distance is a positional specification that refers to the programmed path. This way one
can start from a simplified linear motion. Path curves are not taken into account.
Technologies
214
Function Manual, 10/2020, 6FC5397-8GP40-0BA1
Cycle-independent path-synchronous switching signal output (HSLC)
10.3 Startup
Response to single block and G60
Due to the internal motion logic, negative offset distances (lead) have no effect when used with
the following standard functions:
• Single Block
• Exact stop at block end (G60)
10.2.7
Response to part program interruption
Following an interruption in the part program (NC-STOP) and subsequent change to JOG mode,
the technological function is deactivated or switching signals cease to be output.
The technology function is reactivated or switching signals are output again only after switching
to the AUTOMATIC mode and continuing the part program (NC-START).
10.3
Startup
10.3.1
Activation
Before commissioning the technological function, ensure that the corresponding compile cycle
has been loaded and activated (see also Section "Installation and activation of loadable compile
cycles (Page 17)").
Activation
The "Cycle-independent path synchronized switching signal output" technology function is
activated via the following machine data:
MD60948 $MN_CC_ACTIVE_IN_CHAN_HSLC[0], Bit 0 = 1
Note
The "Cycle-independent path-synchronized switching signal output" is available only in one
channel of NC.
10.3.2
Memory configuration
The technological function requires additional data in the NC-internal block memory. The
values must be increased for the following memory configuring channel-specific machine data:
• MD28090 $MC_MM_NUM_CC_BLOCK_ELEMENTS += 1 (number of block elements for
compile cycles)
• MD28100 $MN_MM_NUM_CC_BLOCK_USER_MEM += 10 (size of block memory for compile
cycles (DRAM) in KB)
Technologies
Function Manual, 10/2020, 6FC5397-8GP40-0BA1
215
Cycle-independent path-synchronous switching signal output (HSLC)
10.3 Startup
10.3.3
Parameterizing the digital on-board outputs
Parameter assignment
A digital output from the local I/O is required for the switching signal.
For this, at least 1 digital output byte must be defined through the following machine data:
MD10360 $MN_FASTIO_DIG_NUM_OUTPUTS ≥ 1 (number of active digital output bytes)
Further information
A full description of the parameterization of a digital output can be found in:
• Function Manual Basic Functions; Digital and Analog NC I/O
10.3.4
Parameterizing the switching signal
Output number of the switching signal
Once the compile cycle has started up, the following function-specific machine data appears in
the channel-specific machine data:
MD62560 $MC_FASTON_NUM_DIG_OUTPUT (number of the digital output of the switching
signal)
The number n of the on-board digital output through which the switching signal is to be output,
must be entered in it:
n = 1, 2, 3 or 4
Disable
Entering the number of the digital output n = 0 deactivates the function. No message or alarm
is output.
Effect on other output signals
The hardware-timer-controlled output of the switching signal at the parameterized output
delays the signal output for the other digital on-board outputs, e.g. due to synchronized actions,
by 2 IPO cycles.
Technologies
216
Function Manual, 10/2020, 6FC5397-8GP40-0BA1

Cycle-independent path-synchronous switching signal output (HSLC)
10.4 Programming
10.3.5
Parameterization of the geometry axes
Default setting
Machines for high-speed laser cutting normally have two geometry axes that are configured in
the following two machine data:
MD20050_$MC_AXCONF_GEOAX_ASSIGN_TAB[0]
MD20050_$MC_AXCONF_GEOAX_ASSIGN_TAB[1]
The calculation of the switching instants is derived from these two geometry axes.
Note
The configured axis selection for calculating the switching instants can be changed by
redefining the first and second geometry axes in the part program with the help of program
instructions GEOAX(1,<axis name>) and GEOAX(2,<axis name>).
Important:
For the function change to be considered correctly, it should occur before the interpretation of
the CC_FASTON command.
Changing the default setting
For a deviating machine configuration (e.g. definition of a third geometry axis), the default
setting can be adjusted via the following machine data:
MD60948 $MN_CC_ACTIVE_IN_CHAN_HSCL[1]
Value
Meaning
$MN_CC_ACTIVE_IN_CHAN_HSCL[1]='H3'
Default setting.
The calculation of the switching instants is derived
from the first and second geometry axis.
$MN_CC_ACTIVE_IN_CHAN_HSCL[1]='H7'
The calculation of the switching instants is derived
from the first, second and third geometry axis.
Any change is effective only after the NC has powered up the next time.
10.4
Programming
10.4.1
Activating the block-related switching signal output (CC_FASTON)
Syntax
CC_FASTON (DIFFON, DIFFOFF [,FEEDTOSWITCH])
CC_FASTON() is a procedure call and must therefore be programmed in a dedicated part
program block.
Technologies
Function Manual, 10/2020, 6FC5397-8GP40-0BA1
217

Cycle-independent path-synchronous switching signal output (HSLC)
10.4 Programming
Parameter
The parameters for the CC_FASTON() procedure have the following meaning:
Parameter
Meaning
<DIFFON>
Length* of the offset distance for setting the switching signal.
<DIFFOFF>
Length* of the offset distance for deactivating the switching signal.
<FEEDTOSWITCH>
This parameter is optional.
If the parameter is not specified in the procedure call, the G0 edge change is
used as the switching criterion.
If the parameter is specified in the procedure call, it contains as a switching
criterion the velocity threshold value, which, when undershot or exceeded,
activates or deactivates the switching signal accordingly.
* The basic unit (inch or mm) depends on the current dimensions programming (G70 / G71 / G700 /
G710).
Programming example
Programming
Comment
DEF REAL DIFFON= -0.08
; Length* of the offset distance for
activating the switching signal =
-0.08
DEF REAL DIFFOFF= 0.08
; Length* of the offset distance for
deactivating the switching signal =
0.08
DEF REAL FEEDTOSWITCH= 20000
; Speed threshold value = 20000
CC_FASTON(DIFFON,DIFFOFF,FEEDTOSWITCH)
; Activating block-related switching
signal output (with speed threshold
value as switching criterion)
Changing parameters
The parameters for the CC_FASTON() procedure can be modified at any time during the
execution of the part program. To do this, enter the procedure call again with the new parameter
values. The switching criterion (G0 edge change / velocity threshold value) may also be changed.
Reset response
A reset (NC RESET or end of program) deactivates the function.
10.4.2
Activating the path length-related switching signal output
(CC_FASTON_CONT)
Syntax
CC_FASTON_CONT (PATH_DISTANCE_ON, PATH_DISTANCE_OFF)
Technologies
218
Function Manual, 10/2020, 6FC5397-8GP40-0BA1

Cycle-independent path-synchronous switching signal output (HSLC)
10.4 Programming
CC_FASTON_CONT() is a procedure call and must therefore be programmed in a dedicated part
program block.
Parameter
The parameters for the CC_FASTON_CONT() procedure have the following meaning:
Parameter
Meaning
< PATH_DISTANCE_ON >
Length* of the stretch section with machining (s1).
< PATH_DISTANCE_OFF>
Length* of the stretch section without machining (s2).
* The basic unit (inch or mm) depends on the current dimensions programming (G70 / G71 / G700 /
G710).
Programming example
Programming
Comment
DEF REAL PATH_DISTANCE_ON = 0.5
; Length* of the stretch section with
machining = 0.5
DEF REAL PATH_DISTANCE_OFF = 1.0
; Length* of the stretch section
without machining = 1.0
CC_FASTON_CONT (PATH_DISTANCE_ON, PATH_DISTANCE_OFF)
; Activating path
length-related
switching signal out-
put.
Changing parameters
The parameters for the CC_FASTON_CONT( ) procedure can be modified at any time during
the execution of the part program. For this, the procedure call must be specified again with the
new parameter values.
Reset response
A reset (NC RESET or end of program) deactivates the function.
10.4.3
Deactivation (CC_FASTOFF)
Syntax
CC_FASTOFF
CC_FASTOFF is a procedure call and must therefore be programmed in a dedicated part
program block.
Technologies
Function Manual, 10/2020, 6FC5397-8GP40-0BA1
219
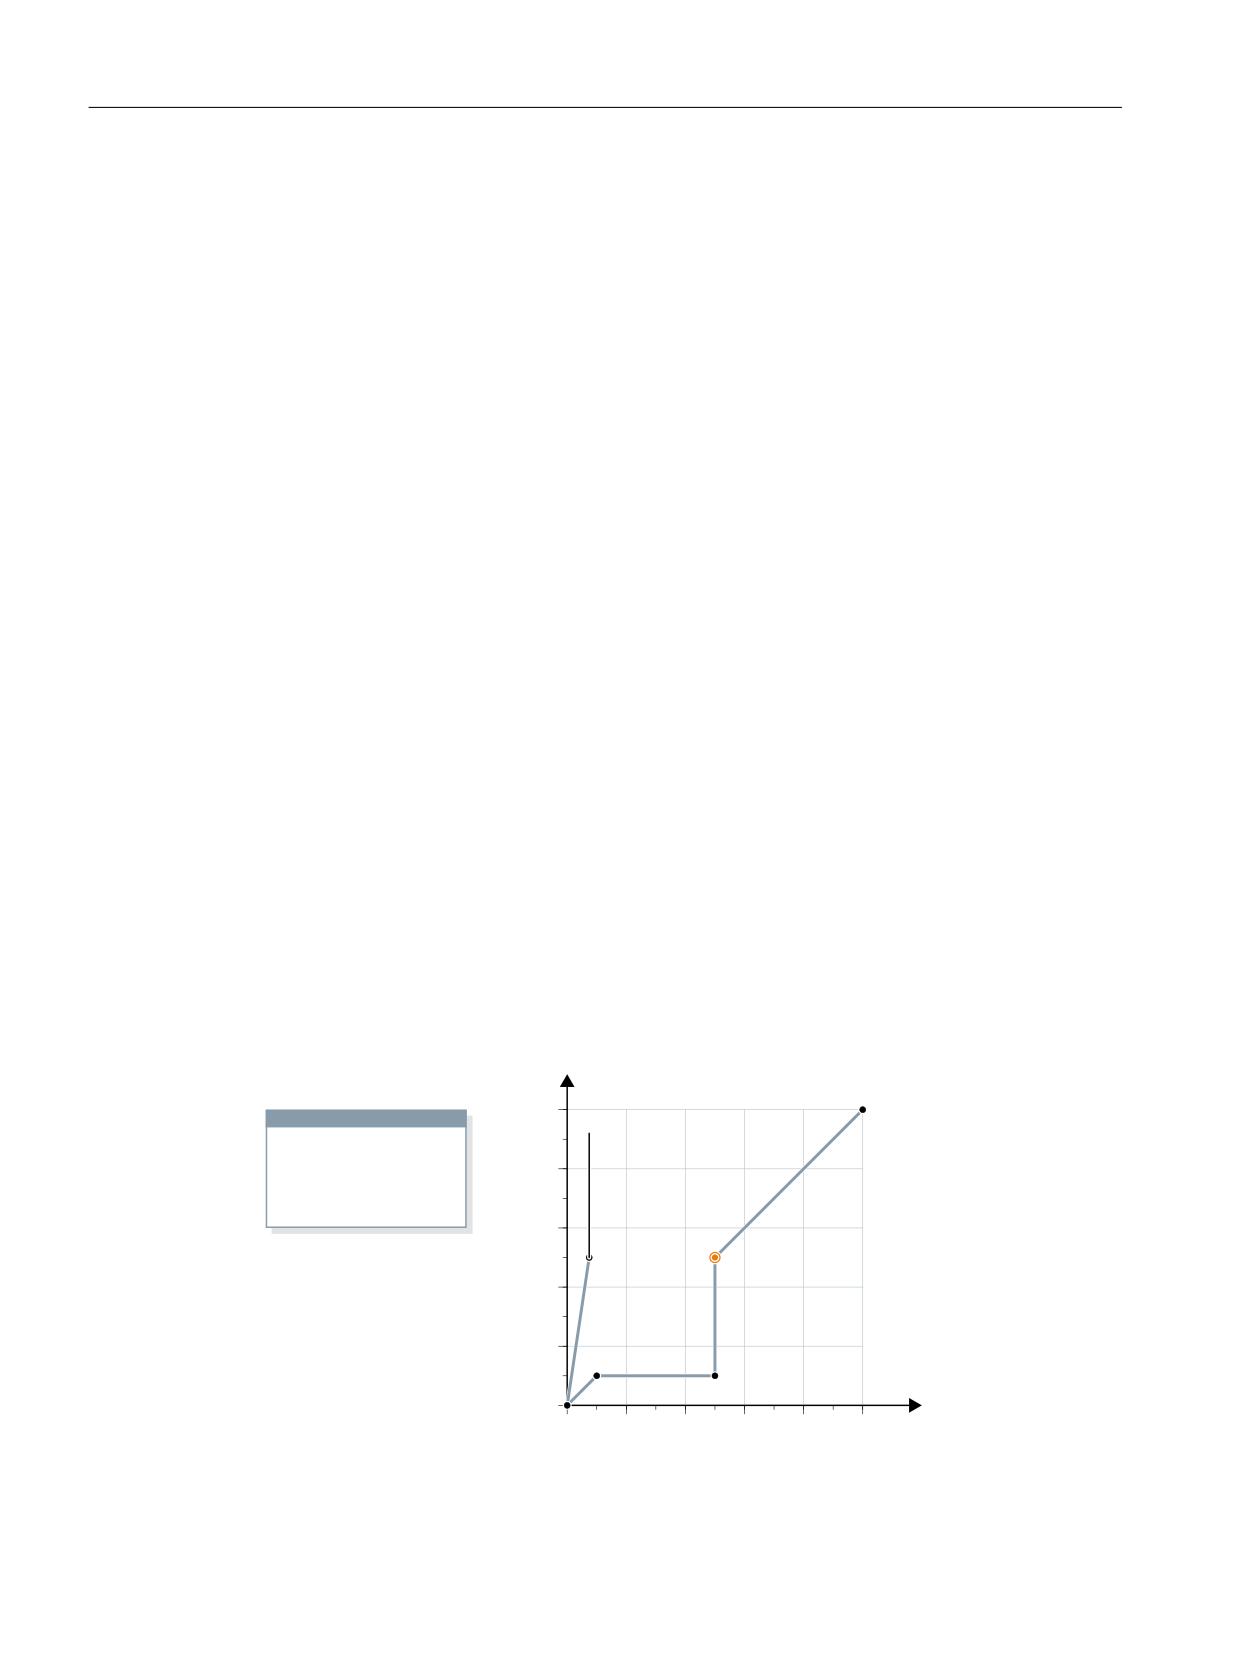
Cycle-independent path-synchronous switching signal output (HSLC)
10.6 Supplementary conditions
Functionality
The CC_FASTOFF procedure call deactivates the "Cycle independent, path synchronized
switching signal output" function.
10.5
Function-specific alarm texts
For the procedure for creating function-specific alarm texts, see Creating alarm texts (Page 23).
10.6
Supplementary conditions
10.6.1
Block search
Switching signal output for block search
If a block search is on a part program block which lies after a CC_FASTON() procedure call for
activating the technology function, then the switching signal is activated with the next
traversing motion. One of the specific consequences of this is to initiate travel along the contour
from the start position of the geometry axes back to the program continuation point with an
activated switching signal.
Example
Normal process:
In the normal process of the part program machining, the switching signal is activated for the
first time at the beginning of part program block N60.
\
3DUW SURJUDP
6WDUWLQJ SRVLWLRQ
1
* ; <
1
* )
;
<
1
* ;
1
&&B)$6721
1
<
1
1
* ;
<
6ZLWFKLQJ VLJ
QDO 2Q
1
1
1
1
1
[
Figure 10-4
Switching signal for part program machining operation
Technologies
220
Function Manual, 10/2020, 6FC5397-8GP40-0BA1
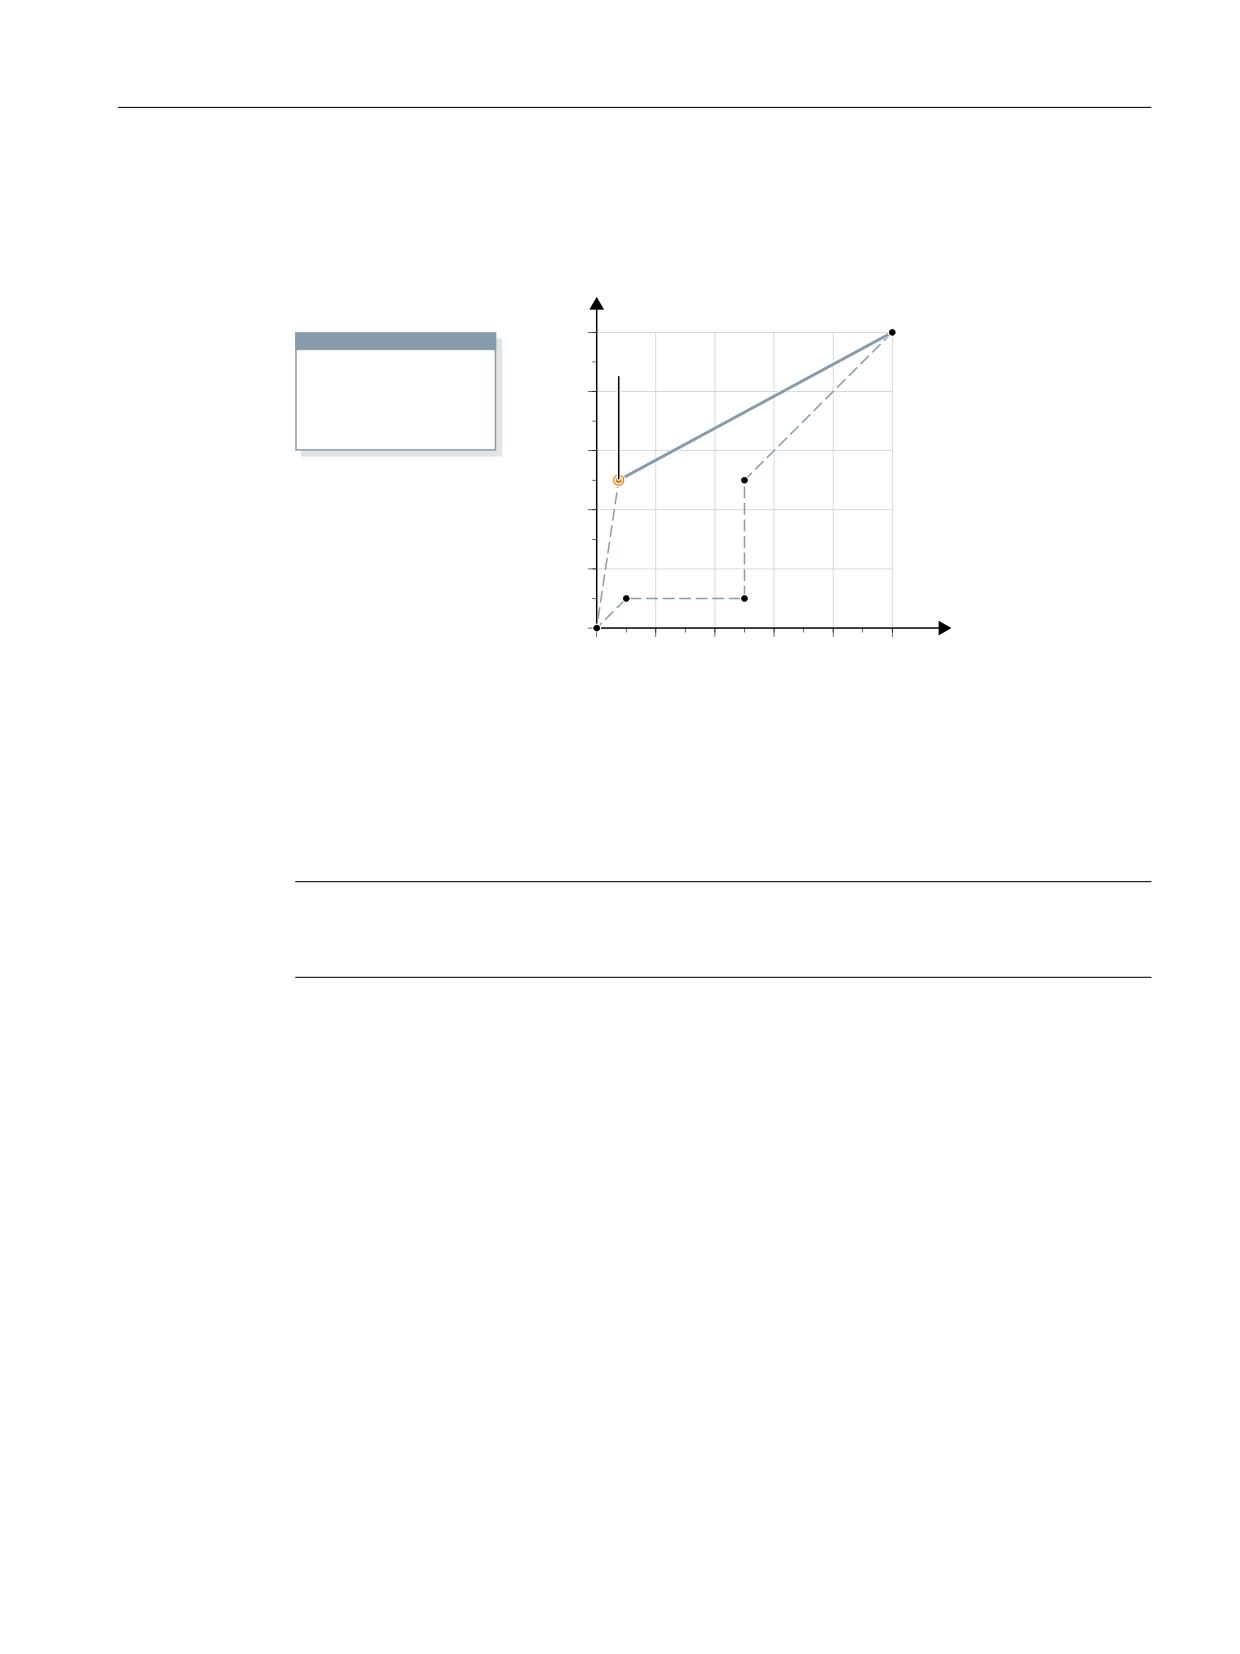
Cycle-independent path-synchronous switching signal output (HSLC)
10.6 Supplementary conditions
Process sequence after block search:
If a block search is executed for the block end point of part program block N60 the switching
signal is activated on reaching the start position of the geometry axes.
\
3DUW SURJUDP
6WDUWLQJ SRVLWLRQ
1
* ; <
6ZLWFKLQJ VLJQDO 2Q
1
* )
;
<
1
* ;
1
&&B)$6721
1
<
1
1
* ;
<
1
1
1
1
1
[
Figure 10-5
Switching signal after block search
Suppressing the switching signal output
The user (machine manufacturer) must take appropriate measures, e.g. disable the switching
signal, in order to suppress the activation of the switching signal in the REPOS block in the
constellation described above.
Note
It is the sole responsibility of the user (machine manufacturer) to suppress the output of the
switching signal during repositioning, e.g. after a block search.
Further information
You will find a description of the block search in:
Function Manual Basic Functions; Mode Group, Channel, Program Operation, Reset Response
10.6.2
Transformations
The function will only run correctly with deactivated transformation. There is no monitoring
function.
Further information
Function Manual Transformations; Kinematic Transformation
Technologies
Function Manual, 10/2020, 6FC5397-8GP40-0BA1
221
Cycle-independent path-synchronous switching signal output (HSLC)
10.6 Supplementary conditions
10.6.3
Transformations
The function will only run correctly with deactivated transformation. There is no monitoring
function.
For a description of the transformations (see Section "Transformation package handling
(Page 113)").
Further information
Function Manual Transformations; Kinematic Transformation
10.6.4
Compensations
The following compensations are considered while calculating the switching positions:
• Temperature compensation
• Sag compensation
A description of the compensations can be found in:
For further information
Function Manual Monitoring and Compensating; Compensations (K3)
10.6.5
Tool radius compensation (TRC)
As part of tool radius compensation, control-internal part program blocks (compensation
blocks) are inserted into the part program. With reference to the switching signal output, a
compensation block is always added to the next programmed part program block.
A description of the tool radius compensation can be found in:
Further information:
Function Manual Tools; Tool Offset, Tool Radius Compensation
10.6.6
Continuous-path mode
Continuous-path mode
Although the CC_FASTON(), CC_FASTON_CONT() and CC_FASTOFF procedure calls must be
programmed in dedicated part program blocks, this will not lead to a drop in velocity while
continuous-path mode is active (G64, G641, ...).
Continuous-path mode (ADIS)
If in continuous-path mode with programmable rounding response (G641 ADIS) a part
program block is inserted in the part program, then the originally programmed switching
position is not reached and the switching signal output takes place nevertheless in the center of
the rounding block.
Technologies
222
Function Manual, 10/2020, 6FC5397-8GP40-0BA1

Cycle-independent path-synchronous switching signal output (HSLC)
10.7 Data lists
Further information
You will find a description of the continuous-path mode in:
Function Manual Basic Functions; Continuous-Path Mode, Exact Stop and LookAhead
10.6.7
Software cams
Because the hardware timer is also used for the "software cam" function, it is not possible to use
the "clock-independent switching signal output" function with software cams at the same time.
The following alarm appears in the event of an error:
Alarm 75500 "Channel Channel No., wrong configuration of function: clock-independent
switching signal output"
A description of the software cams can be found in:
Further information:
Function Manual Axes and Spindles; Position Switching Signals
10.7
Data lists
10.7.1
Machine data
10.7.1.1
General machine data
Number Identifier: $MN_
Description
10360
FASTO_NUM_DIG_OUTPUTS
Number of digital output bytes
10.7.1.2
Channelspecific machine data
Number Identifier: $MC_
Description
20050
AXCONF_GEOAX_ASSIGN_TAB
Assignment of geometry axis to channel axis
28090
MM_NUM_CC_BLOCK_ELEMENTS
Number of block elements for CC
28100
MM_NUM_CC_BLOCK_USER_MEM
Size of block memory for CC
62560
FASTON_NUM_DIG_OUTPUT
Number of the on-board digital output for the switching
signal
Technologies
Function Manual, 10/2020, 6FC5397-8GP40-0BA1
223
Cycle-independent path-synchronous switching signal output (HSLC)
10.7 Data lists
Technologies
224
Function Manual, 10/2020, 6FC5397-8GP40-0BA1
Axis pair collision protection
11
11.1
Brief description
Note
Compile cycle
It should be ensured prior to starting up the function that the corresponding compile cycle is
loaded and activated (see Function Manual "Technologies", Section "Installation and activation
of loadable compile cycles").
Function
The "axis pair collision protection" function enables machine axes, which are arranged on the
same guide element of a machine, to be monitored in pairs to ensure that no collisions occur and
that the maximum distance between the two axes is not exceeded.
Function code
The code for function-specific identifiers of machine data, system variables etc., is:
PROTECT (axial collision PROTECTion)
Maximum number of axis pairs
A maximum of 20 axis pairs can be parameterized.
11.2
Functional description
The "axis pair collision protection" function is a protection function for machine axes which are
arranged in a machine tool in such a way (on the same guide rail, for example) that incorrect
operation or programming could cause them to collide with one another.
The machine axes are always monitored in pairs, i.e. parameters always need to be assigned for
two machine axes in each case, which are then monitored in relation to one another. The
machine axes being monitored may be located in different machine coordinate systems.
Technologies
Function Manual, 10/2020, 6FC5397-8GP40-0BA1
225
Axis pair collision protection
11.3 Commissioning
Collision protection
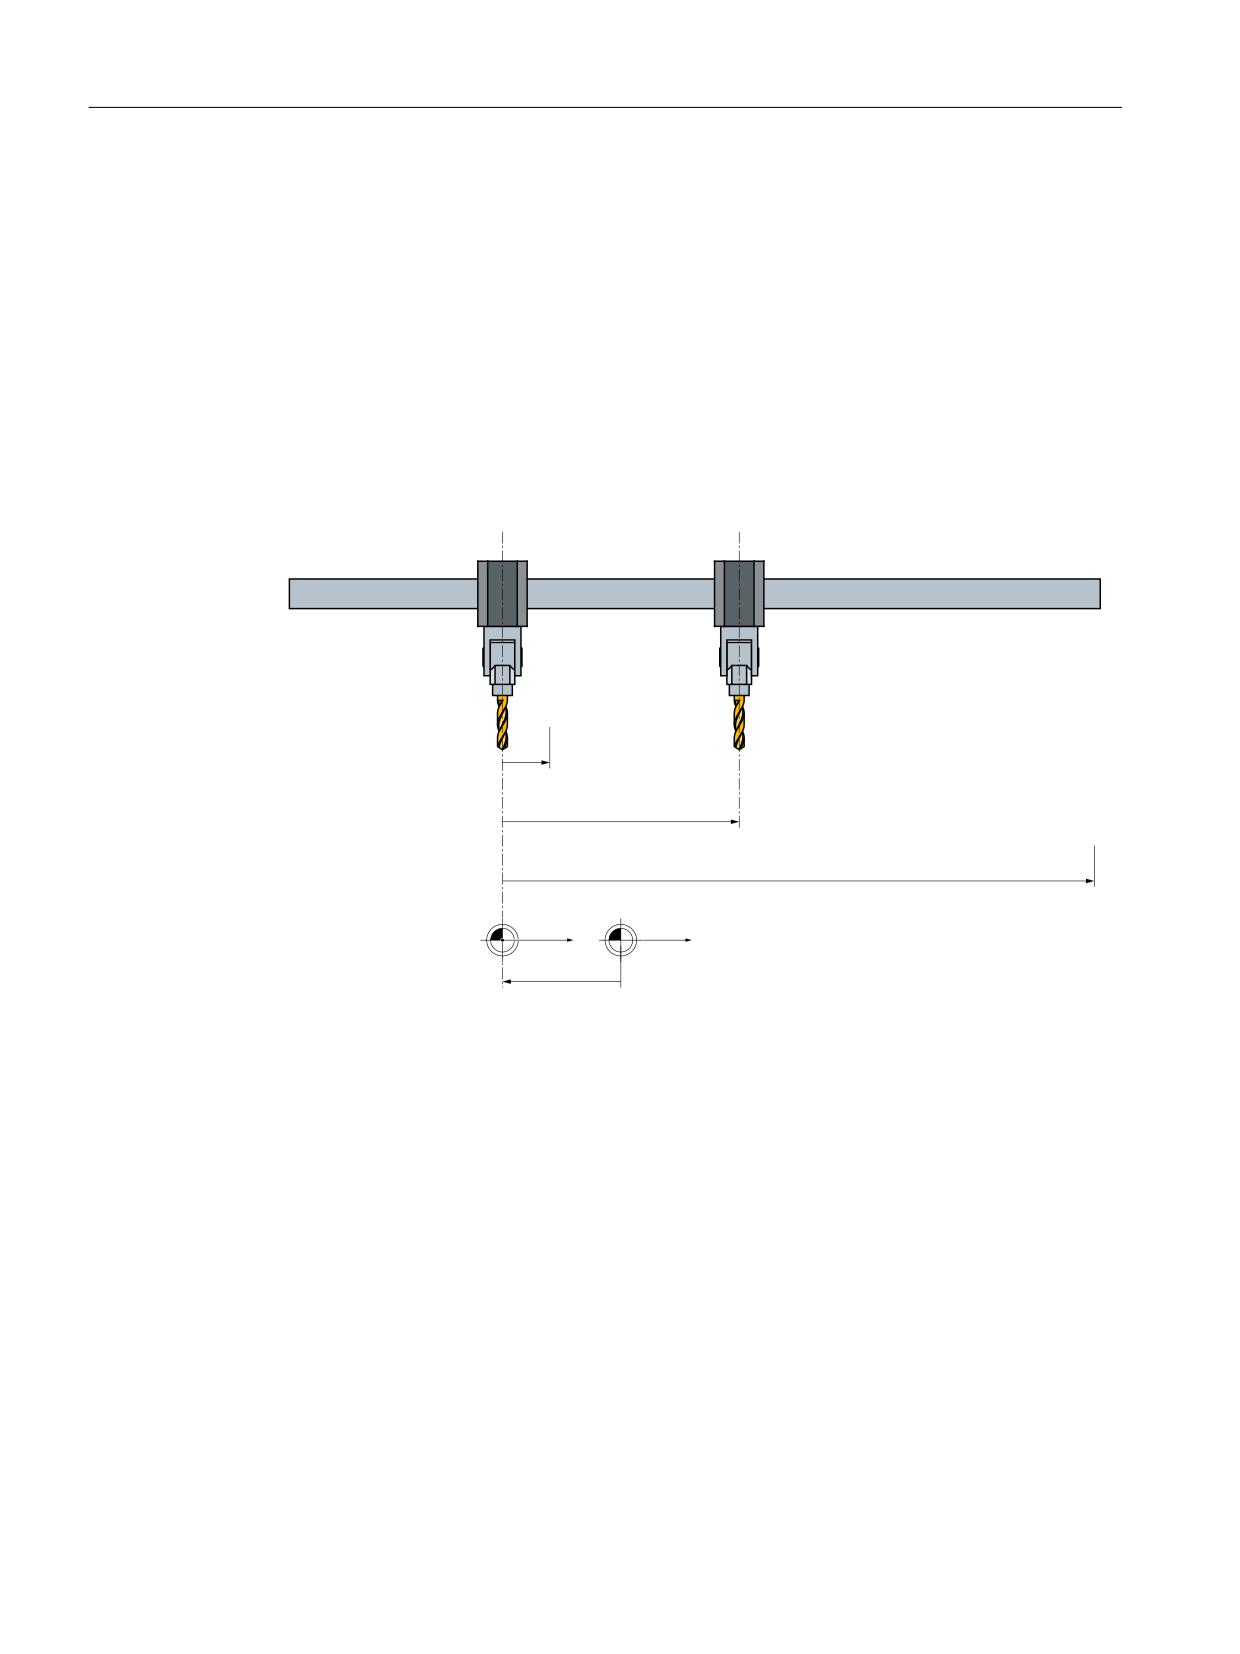
The function uses the current actual positions and actual velocities, as well as the offset for the
machine coordinate systems and the axis-specific brake acceleration values, to calculate the
distance between the standstill positions of the machine axes, on a cyclical basis. If the resulting
distance is shorter than the protection window that has been set, the machine axes are
decelerated to a standstill. This ensures that the minimum distance defined using the protection
window is not undershot.
Distance monitoring
If the offset vector is selected accordingly, the function can also be used to monitor the
maximum distance between the two machine axes (maximum distance vector).
0DFKLQH D[LV $
0DFKLQH D[LV $
0LQ FOHDUDQFH YHFWRU
&XUUHQW FOHDUDQFH YHFWRU
0D[ FOHDUDQFH YHFWRU
0.6B$
0.6B$
0&6BRIIVHW YHFWRU
Figure 11-1
Basic design
Monitoring status
The actual status of an axis pair can be read out of _PROTECT_STATUS (Page 232), optionally
defined global user variables in the NC program (GUD).
11.3
Commissioning
11.3.1
Enabling the technology function (option)
The function is an option, which must be assigned to the hardware via the license management.
6FC5800-0AN06-0YB0, "RMCC/PROT axis collision avoidance"
For test purposes, the function can be enabled by setting the option data:
Technologies
226
Function Manual, 10/2020, 6FC5397-8GP40-0BA1

Axis pair collision protection
11.3 Commissioning
MD19610 $ON_TECHNO_EXTENSION_MASK[ 2 ], BIT4 = 1
11.3.2
Activating the technology function
Activation rule
The function must be activated on a channel-for-channel basis for the following NC channels:
• Independent of which channels are assigned to the machine axes to be monitored, always in
the 1st channel of the NC
• In all channels that are assigned to the machine axes to be monitored (by the function) by
parameterizing the machine data
• In all channels that are assigned at a later point in time to the machine axes to be monitored
(by the function), e.g. as a result of axis replacement
Activation
The function is activated on a channel-for-channel basis using machine data:
MD60972 $MN_CC_ACTIVE_IN_CHAN_PROT[ 0 ], bit n = 1
with n = 0, 1, 2, ..., corresponding to the (n+1)th channel of the NC
11.3.3
Activating the supplementary functions
The supplementary functions are activated for specific axis pairs using option data:
MD61535 $MN_CC_PROTECT_OPTIONS[ <a> ]
with a = 0, 1, 2, ... (maximum number of axis pairs - 1) corresponding axis pair 1, 2, 3, ...
Bit
Value
Meaning
0
1
Axis pair-specific activation/deactivation of the function "Axis pair collision protection"
via the NC/PLC interface signal (Page 234)"
Note
After activating this supplementary function, the protection function is in the monitor-
ing status (Page 232) == 1 (selected, but still not active)
11.3.4
Definition of an axis pair
A machine axis pair to be monitored is defined on an axis pair-specific basis in machine data:
MD61516 $MN_CC_PROTECT_PAIRS[ <a> ] = <yyxx>
with a = 0, 1, 2, ... (maximum number of axis pairs - 1) corresponding axis pair 1, 2, 3, ...
<yyxx>
Meaning
xx
1st and 2nd decimal place ⇒ axis number of the 1st machine axis
yy
3rd and 4th decimal place ⇒ axis number of the 2nd machine axis
Technologies
Function Manual, 10/2020, 6FC5397-8GP40-0BA1
227

Axis pair collision protection
11.3 Commissioning
Example
Definition of the 1st axis pair:
• 1st axis: 4th machine axis
• 2nd axis: 12th machine axis
MD61516 $MN_CC_PROTECT_PAIRS[ 0 ] = 1204
11.3.5
Retraction direction
The direction of travel for retracting the corresponding machine axis is set using machine data:
MD61517 $MN_CC_PROTECT_SAFE_DIR[ <a> ] = <yyxx>
with a = 0, 1, 2, ... (maximum number of axis pairs - 1) corresponding axis pair 1, 2, 3, ...
<yyxx>
Meaning
xx
Retraction direction for the 1st axis of the axis pair
yy
Retraction direction for the 2nd axis of the axis pair
Retraction in the positive direction of travel of the machine axis: xx or yy > 0
Retraction in the negative direction of travel of the machine axis: xx or yy = 0
Note
Changing the retraction direction
Changing the retraction direction in machine data MD61517
$MN_CC_PROTECT_SAFE_DIR[<axis pair>] may only be carried out if the protection function for
the axis pair is not active (MD61516 $MN_CC_PROTECT_PAIRS[<axis pair>] == 0).
11.3.6
Offset for the machine coordinate systems
If the machine axes of the axis pair are located in different machine coordinate systems, then the
appropriate offset vector must be specified in the following machine data:
MD61518 $MN_CC_PROTECT_OFFSET[ <a> ] = <offset vector>
with a = 0, 1, 2, ... (maximum number of axis pairs - 1) corresponding axis pair 1, 2, 3, ...
The offset vector should be specified as vector from the origin of the machine coordinate system
of the 2nd axis of the axis pair to the origin of the machine coordinate system of the 1st axis,
referred to the machine coordinate system of the 1st axis.
If both machine axes are located in the same machine coordinate system, an offset vector of 0
must be specified.
Technologies
228
Function Manual, 10/2020, 6FC5397-8GP40-0BA1
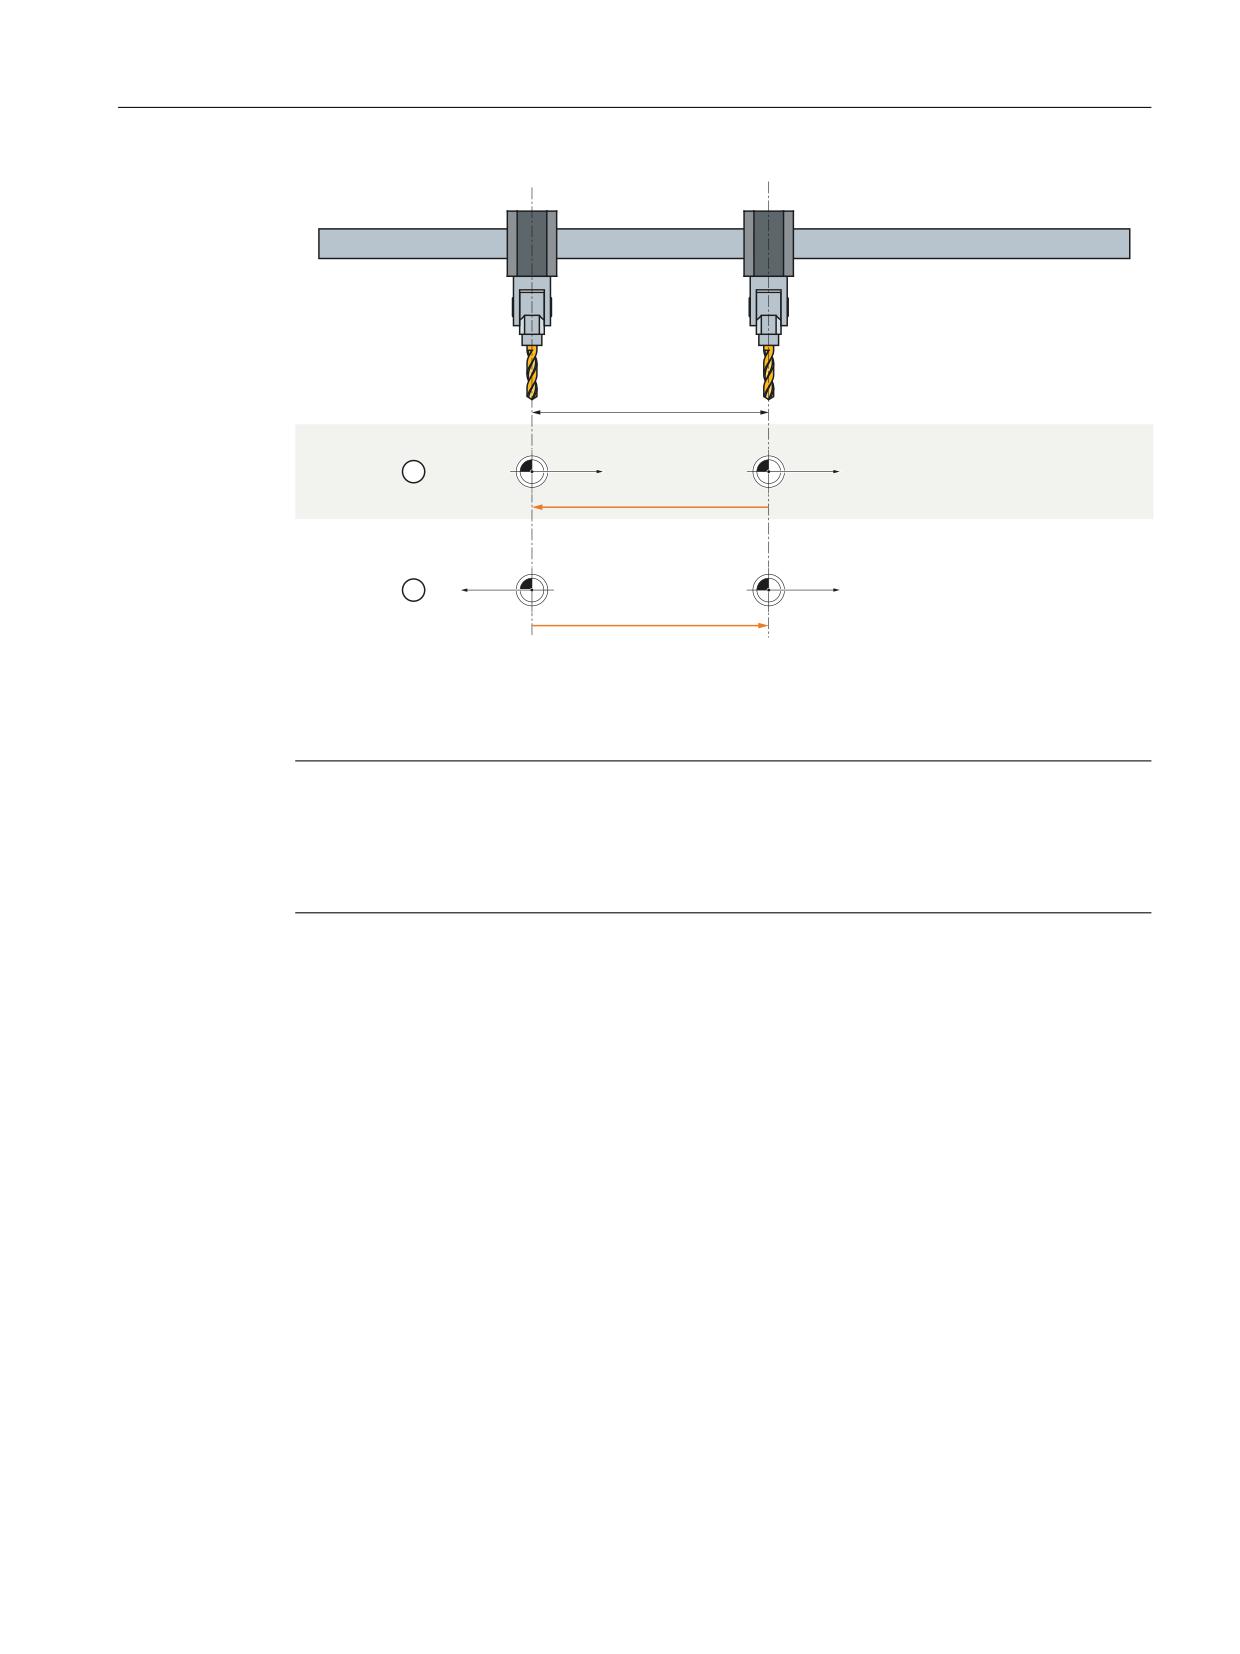
Axis pair collision protection
11.3 Commissioning
$FKVH
$FKVH
0.6
0.6
Y
0.6
0.6
Y
① Case 1: Equidirectional MCS orientation
② Case 2: Counterdirectional MCS orientation
V Offset vector
Note
Changing the offset vector
Changing the offset vector in machine data MD61518 $MN_CC_PROTECT_OFFSET[<axis pair>]
may only be carried out if the protection function for the axis pair is not active (MD61516
$MN_CC_PROTECT_PAIRS[<axis pair>] == 0).
11.3.7
Protection window
The protection window and/or the minimum clearance is defined which the axes of the axis pair
may not fall below using the machine data:
MD61519 $MN_CC_PROTECT_WINDOW[ <a> ] = <minimum clearance>
with a = 0, 1, 2, ... (maximum number of axis pairs - 1) corresponding axis pair 1, 2, 3, ...
When the clearance approaches the minimum clearance, the axes are braked with the function-
specific acceleration (Page 232).
Technologies
Function Manual, 10/2020, 6FC5397-8GP40-0BA1
229

Axis pair collision protection
11.3 Commissioning
The protection window can be dynamically extended, e.g. in an NC P program using
theprotection window extension (Page 230).
Note
Changing the protection window
Changing the protection window in machine data MD61519
$MN_CC_PROTECT_WINDOW[<axis pair>] may also be carried out if the protection function for
the axis pair is active (MD61516 $MN_CC_PROTECT_PAIRS[<axis pair>] ≠ 0).
11.3.8
Orientation
The orientation of the axes of the axis pair to one another is specified in the following machine
data:
MD61532 $MN_CC_PROTECT_DIR_IS_REVERSE[ <a> ] = <value>
with a = 0, 1, 2, ... (maximum number of axis pairs - 1) corresponding axis pair 1, 2, 3, ...
<value>
Meaning
0
Equidirectional orientation
1
Counterdirectional orientation
Note
Changing the orientation
Changing the orientation in machine data MD61532
$MN_CC_PROTECT_DIR_IS_REVERSE[<axis pair>] may only be carried out if the protection
function for the axis pair is not active (MD61516 $MN_CC_PROTECT_PAIRS[<axis pair>] == 0).
11.3.9
Protection window extension
The protection window (Page 229) can be dynamically extended using machine data:
MD61533 $MN_CC_PROTECT_WINDOW_EXTENSION[ <a> ] = <extension>
with a = 0, 1, 2, ... (maximum number of axis pairs - 1) corresponding axis pair 1, 2, 3, ...
The resulting effective protection window of an axis pair is as follows:
Effective protection window[<axis pair>] =
MD61519 $MN_CC_PROTECT_WINDOW[<axis pair>] +
MD61533 $MN_CC_PROTECT_WINDOW_EXTENSION[<axis pair>]
Technologies
230
Function Manual, 10/2020, 6FC5397-8GP40-0BA1
Axis pair collision protection
11.3 Commissioning
It is not possible to reduce the protection window by entering a negative value.
Note
Changing the protection window extension
Changing the protection window extension in machine data MD61533
$MN_CC_PROTECT_WINDOW_EXTENSION[<axis pair>] may also be carried out when the
protection function is active, e.g. from the NC program - and can be activated by initiating
"Activate machine data".
11.3.10
Activating the protection function
Static activation using machine data
The protection function for an axis pair is statically activated as soon as the following
preconditions are fulfilled:
• Both machine axes of the axis pair have been referenced
• Valid machine axes have been parameterized for the axis pair:
MD61516 $MN_CC_PROTECT_PAIRS[<axis pair>] = <valid machine axis pair>
• The supplementary function "Axis pair-specific activation/deactivation via axis-specific NC/
PLC interface signals" is not active:
MD61535 $MN_CC_PROTECT_OPTIONS[<axis pair>], bit 0 = 0
Dynamic activation via NC/PLC interface signal
The protection function for an axis pair is dynamically activated as soon as the following
preconditions are fulfilled:
• Both machine axes of the axis pair have been referenced
• Valid machine axes have been parameterized for the axis pair:
MD61516 $MN_CC_PROTECT_PAIRS[<axis pair>] = <valid machine axis pair>
• The supplementary function "Axis pair-specific activation/deactivation via axis-specific NC/
PLC interface signals" is active:
MD61535 $MN_CC_PROTECT_OPTIONS[<axis pair>], bit 0 = 1
• The axis-specific NC/PLC interface signal to activate the protection function is set for one of
the two machine axes of the axis pair:
DB31,
DBX24.3 == 1
Clearance less than the protection window
If, at the time when the protection function is activated, the distance between the two machine
axes is less than the minimum distance of the protection window which has been
parameterized, then the machine operator must retract the machine axes. In this particular
state, the control only allows traversing motion in the parameterized retraction direction
(Page 228) of the machine axes.
Technologies
Function Manual, 10/2020, 6FC5397-8GP40-0BA1
231

Axis pair collision protection
11.3 Commissioning
Monitoring status
The actual monitoring status of an axis pair can be read using global user
variable _PROTECT_STATUS (Page 232).
11.3.11
Axis-specific acceleration
The acceleration with which the two machine axes of the axis pair are braked by the protection
function when a critical distance is approached is set using:
MD63514 $MA_CC_PROTECT_ACCEL[<axis>] = <acceleration>
with <axis>: Machine axis name, e.g. AX1, AX2, ...
Note
Without jerk limitation
The braking acceleration set using MD63514 $MA_CC_PROTECT_ACCEL acts without jerk
limiting.
Priority of the function-specific acceleration
The protection function only uses the function-specific acceleration of the machine axes from
MD63514 $MA_CC_PROTECT_ACCEL to calculate the time at which the axis should be braked.
The protection function does not take the actual acceleration of the machine axis in the channel
into account.
Note
Path reference
If machine axes being monitored by the protection function are traversed by a channel with a
path reference to other axes, this path reference is lost as soon as the protection function causes
the axis grouping to decelerate. The machine axes being monitored by the protection function
are decelerated using their function-specific acceleration values from machine data item
MD63514 $MA_CC_PROTECT_ACCEL. The remaining axes in the axis grouping are decelerated
using the current path acceleration value of the channel.
11.3.12
Monitoring status (GUD)
The actual status of one axis pair is displayed using the global user variable _PROTECT_STATUS.
The variable is not available in the default setting. When required, it must be defined in the
GUD.DEF definition window.
Definition
DEF NCK INT _PROTECT_STATUS[ <number of parameterized axis pairs> ]
with <number of parameterized axis pairs> = 1, 2, 3, ... (maximum number of axis pairs)
Technologies
232
Function Manual, 10/2020, 6FC5397-8GP40-0BA1

Axis pair collision protection
11.3 Commissioning
Range of values
Value
Meaning: The monitoring of the axis pair is ...
0
Not active
1
selected, but not yet active
2
active, the axes are currently not being braked
3
active, the axes are currently being braked
4
deselected, however still active
11.3.13
PLC interface: Axis-specific braking operations
Within the general system variable field $A_DBD, a double word (four bytes) can be used to
define an axes-specific braking interface. When the axes of the axis pair critically approach one
another, the actual braking of the machine axes is displayed via the braking interface.
MD61534 $MN_CC_PROTECT_A_DBD_INDEX = <value>
<value>
Meaning
-1
Deactivation of the output.
≥ 0
Braking interface index within the system variable field:
$A_DBD[ <index> ] with index = 0, 4, 8, 12, ...
Note
Double word index
The starting index can be specified in the machine data, byte-by-byte (0, 1, 2, ...). System
variable $A_DBD is accessed from the PLC using a double word. This means that a starting index,
which is not located at a double word boundary (0, 4, 8, ...), is rounded off to the next double
word boundary (0, 4, 8, 12, ...): Index = (index DIV 4) * 4
Braking interface
Each bit of the braking interface is assigned a machine axis:
Bit n → (n+1)th machine axis, with n = 0, 1, 2, ...
Bit
31
30
29
28
3
2
1
0
MA 1)
---
31
30
29
4
3
2
1
1) Machine axis number
Bit n
Meaning
0
Machine axis (n+1) is not braked
1
Machine axis (n+1) is braked
Further information
Block FC21, function 3 is available to read the braking interface from the PLC user program.
Technologies
Function Manual, 10/2020, 6FC5397-8GP40-0BA1
233
Axis pair collision protection
11.4 Boundary conditions
Function Manual PLC; FC21: Transfer data exchange NC/PLC > Function 3, 4: PLC-NC fast data
exchange
11.3.14
PLC interface: Axis pair-specific activation of the protection function
If the supplementary function "Activation/deactivation of function "Axis pair collision
protection" via NC/PLC interface signal (Page 227)" is active, using the axis-specific interface
signal, the protection function for the axis pair can be activated and deactivated from the PLC
user program:
DB31,
DBX24.3 (activate collision protection)
Activating
The protection function is activated if the axis-specific interface signal for one of the two
machine axes of the axis pair is set.
Deactivating
The protection function is deactivated if the axis-specific interface signal for both machine axes
of the axis pair is reset.
11.4
Boundary conditions
11.4.1
Axes
Same axis types
Both machine axes of an axis pair must be of the same axis type:
• Linear axis:
- MD30300 $MA_IS_ROT_AX = 0
- MD30310 $MA_ROT_IS_MODULO = 0
• Rotary axis:
- MD30300 $MA_IS_ROT_AX = 1
- MD30310 $MA_ROT_IS_MODULO = 0
Modulo rotary axes
None of the machine axes of an axis pair may be a modulo rotary axis:
• MD30300 $MA_IS_ROT_AX = 1 (rotary axis)
• MD30310 $MA_ROT_IS_MODULO = 1 (error: modulo rotary axis !)
Technologies
234
Function Manual, 10/2020, 6FC5397-8GP40-0BA1
Axis pair collision protection
11.4 Boundary conditions
11.4.2
Axis container
If the assignment of the machine axes to be monitored changes dynamically during the course
of a machining process - for example when using axis containers - the function must be
deactivated, its parameters reassigned, and then reactivated prior to the change (e.g. axis
container rotation) being made.
Example
The protection function is to monitor logical machine axes 1 and 13. These relate to slots 1 and
2 of axis container CT1. The associated real machine axes are AX1 and AX13.
In an axis container rotation, the axis container makes a transition by one step, which causes the
real machine axes to be changed.
Machine axis AX13 is retracted in the positive direction of travel. Machine axis AX1 is retracted
in the negative direction of travel.
Assigning parameters for the NC
Logical machine axes: axis numbers 1 and 13
• MD10002 $MN_AXCONF_LOGIC_MACHAX_TAB [ 0 ] = "CT1_SL1" (log. mach. axis 1)
• MD10002 $MN_AXCONF_LOGIC_MACHAX_TAB [ 12 ] = "CT1_SL2" (log. mach. axis 13)
Axis container CT1, slot 1 and slot 2
• MD12750 $MN_AXCT_NAME_TAB[ 0 ] = "CT1"
• MD12701 $MN_AXCT_AXCONF_ASSIGN_TAB1[ 0 ] = "AX1" (slot 1)
• MD12701 $MN_AXCT_AXCONF_ASSIGN_TAB1[ 1 ] = "AX13" (slot 2)
Real machine axes: machine axis names AX1 and AX13
• MD10000 $MN_AXCONF_MACHAX_NAME_TAB[ x ] = "AX1"
• MD10000 $MN_AXCONF_MACHAX_NAME_TAB[ y ] = "AX13"
Parameterizing the "axis pair collision protection" function before axis container rotation
• MD61516 $MN_CC_PROTECT_PAIRS[0] = 01 13
• MD61517 $MN_CC_PROTECT_SAVE_DIR[0] = 01 00
Performing the axis container rotation
1. Deactivate the protection function
MD61516 $MN_CC_PROTECT_PAIRS[0] = 00 00
2. Trigger a reset in the 1st NC channel in order to adopt the change made to the machine data
MD60972 $MN_CC_ACTIVE_IN_CHAN_PROT[0], BITx, ...
3. Execute the axis container rotation
AXCTSWED(CT1)
Re-parameterizing the "axis pair collision protection" function after axis container
rotation:
• MD61516 $MN_CC_PROTECT_PAIRS[0] = 13 01
• MD61517 $MN_CC_PROTECT_SAFE_DIR[0] = 01 00
Technologies
Function Manual, 10/2020, 6FC5397-8GP40-0BA1
235
Axis pair collision protection
11.4 Boundary conditions
or
• MD61516 $MN_CC_PROTECT_PAIRS[0] = 01 13
• MD61517 $MN_CC_PROTECT_SAFE_DIR[0] = 00 01
Trigger a "reset" in the 1st NC channel in order to adopt the change made to the machine data.
11.4.3
Link axes
If the axes of an axis pair are link axes, i.e. the setpoints of machine axes from channels of various
NCUs are generated via the "NCU link" function, then the axes can neither be monitored with
respect to one another nor protected.
11.4.4
Interpolatory couplings
Assumption
1. A machine axis is part of an interpolatory coupling, e.g.:
- Generic coupling (CP)
- Coupled motion(TRAIL)
- Master value coupling (LEAD)
- Electronic gear (EG)
- Synchronous spindle(COUP)
2. The machine axis is not traversed in the first channel of the NC.
3. The machine axis is monitored using the "axis pair protection" function.
Effect
If the machine axis is not traversed in the first channel of the NC, then the components, created
from the interpolatory couplings for the position and velocity setpoint are only available after a
deadtime of one interpolator clock cycle of the "axis pair collision protection" function.
Therefore, the machine axes are monitored, offset by these components. The absolute value of
the components is independent of the interpolator clock cycle and the actual velocity and
acceleration of the machine axis.
Technologies
236
Function Manual, 10/2020, 6FC5397-8GP40-0BA1
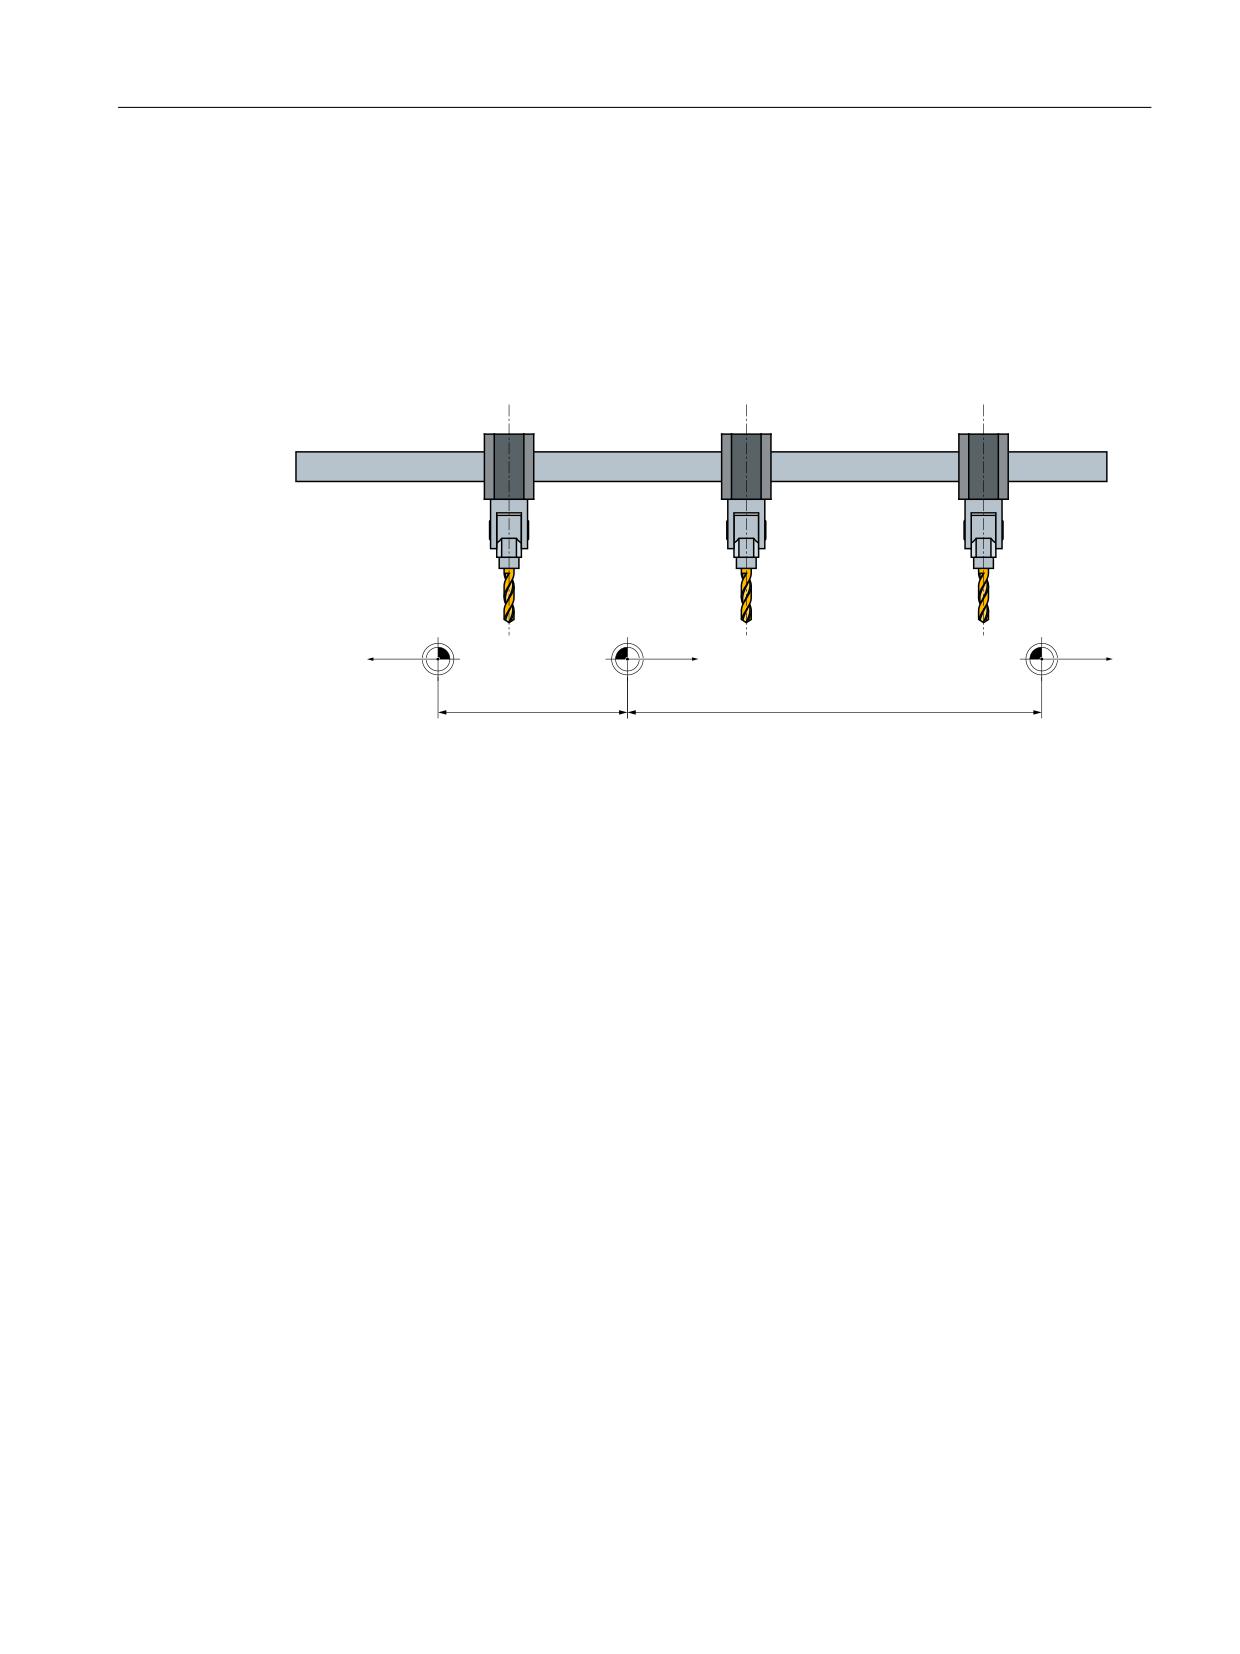
Axis pair collision protection
11.5 Examples
11.5
Examples
11.5.1
Collision protection
The figure shows the arrangement of 3 machine axes and the offset and orientation of the
machine coordinate systems (machine).
$
$
$
0.6B$
0.6B$
0.6B$
0.6B2IIVHWYHNWRU
0.6B2IIVHWYHNWRU
Figure 11-2
Collision protection for 2 axis pairs
Parameter assignment: Protection function 1
Axis pair: 1st machine axis A3, 2nd machine axis A1
• MD61516 $MN_CC_PROTECT_PAIRS[0] = 01 03
Retraction direction: A1 in negative direction, A3 in positive direction
• MD61517 $MN_CC_PROTECT_SAFE_DIR[0] = 00 01
Offset vector from machine coordinate system machine_A1 to machine_A3 with reference to
machine_A3
• MD61518 $MN_CC_PROTECT_OFFSET[0] = 70.0
Example protection window, 10.0 mm
• MD61519 $MN_CC_PROTECT_WINDOW[0] = 10.0
Orientation of the machine coordinate systems to one another: same direction
• MD61532 $MN_CC_PROTECT_DIR_IS_REVERSE[0] = 0
Protection window extension: none
• MD61533 $MN_CC_PROTECT_WINDOW_EXTENSION[0] = 0.0
Parameter assignment: Protection function 2
Axis pair: 1st machine axis A1, 2nd machine axis A12
• MD61516 $MN_CC_PROTECT_PAIRS[1] = 12 01
Technologies
Function Manual, 10/2020, 6FC5397-8GP40-0BA1
237
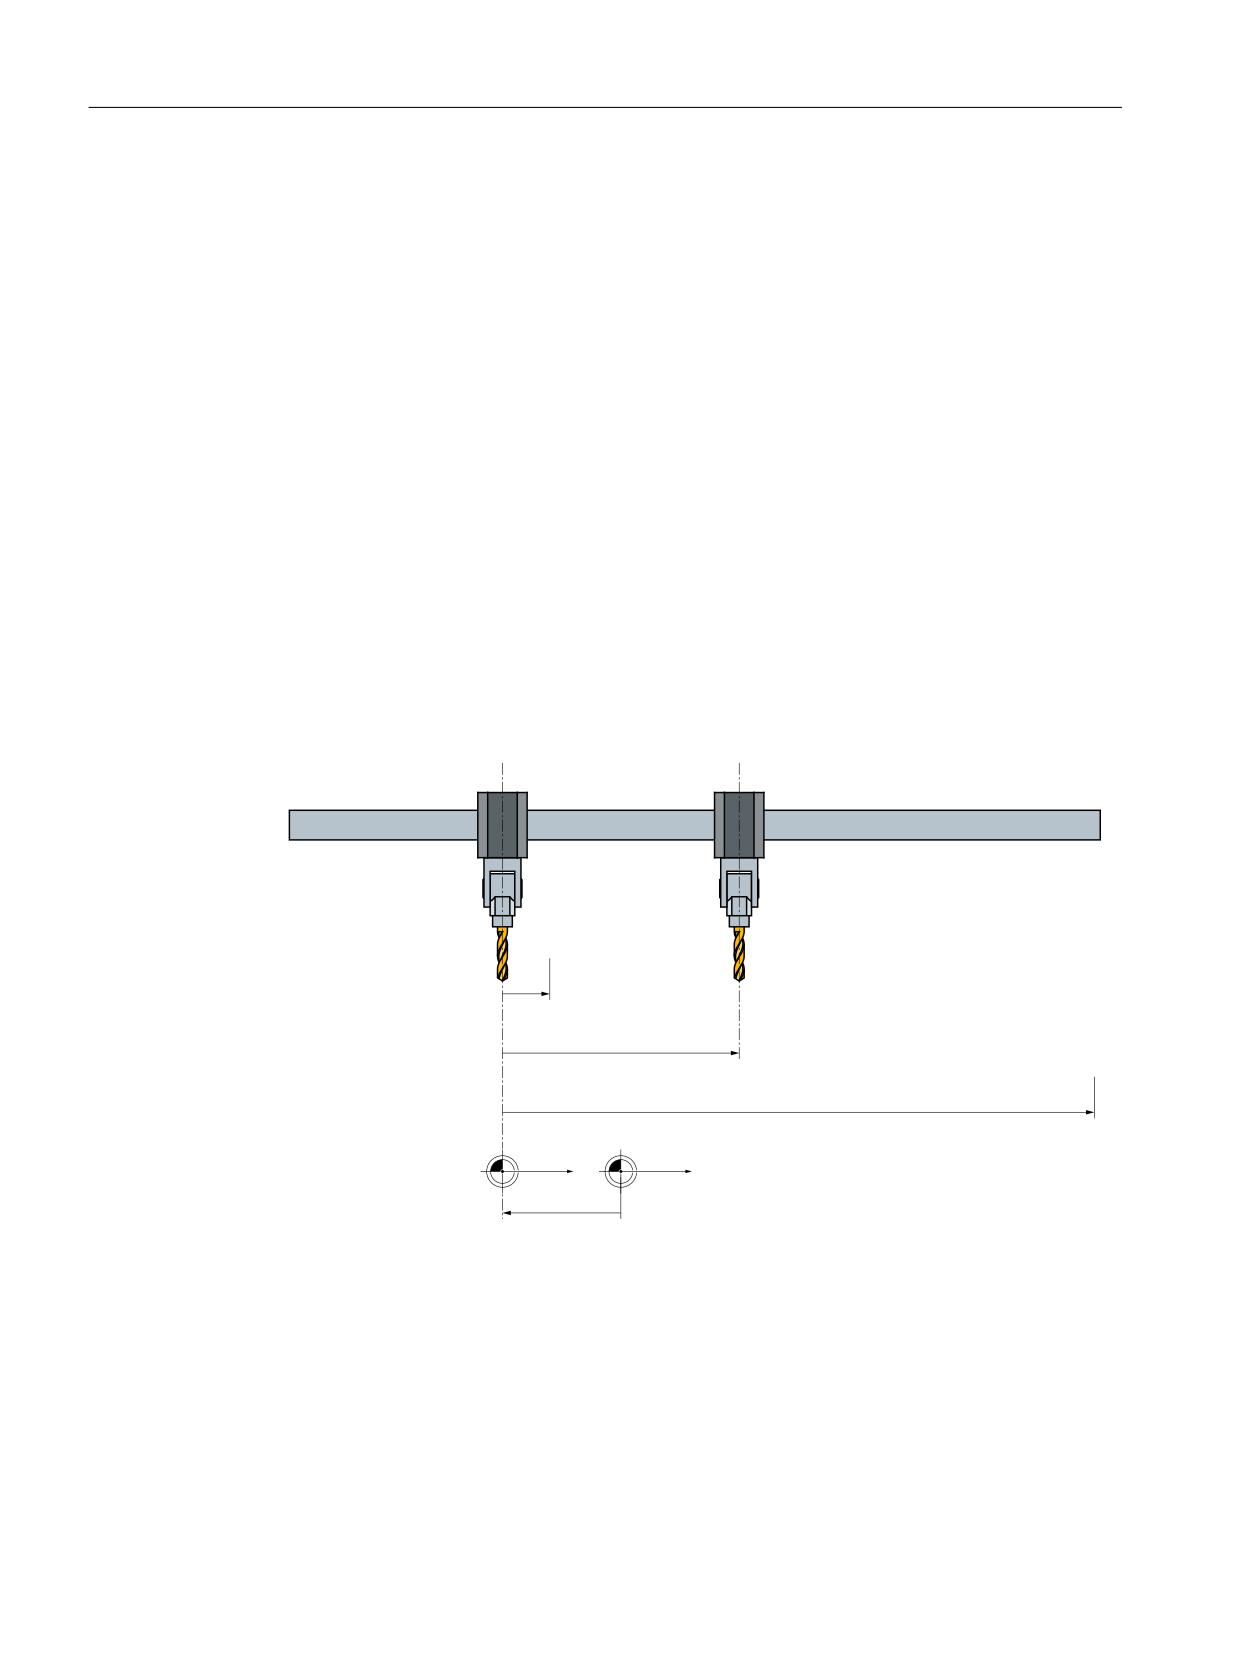
Axis pair collision protection
11.5 Examples
Retraction direction: A12 in positive direction, A1 in positive direction
• MD61517 $MN_CC_PROTECT_SAFE_DIR[1] = 01 01
Offset vector from machine coordinate system machine_A12 to machine_A1 with reference to
machine_A1
• MD61518 $MN_CC_PROTECT_OFFSET[1] = 32.0
Example protection window, 5.0 mm
• MD61519 $MN_CC_PROTECT_WINDOW[1] = 5.0
Orientation of the machine coordinate systems to one another: opposite direction
• MD61532 $MN_CC_PROTECT_DIR_IS_REVERSE[1] = 1
Protection window extension: by 5.0 mm to give a total of 10.0 mm
• MD61533 $MN_CC_PROTECT_WINDOW_EXTENSION[1] = 5.0
11.5.2
Collision protection and distance limiter
The figure shows the arrangement of two machine axes, the offset and orientation of the
machine coordinate systems (machine), and the minimum and maximum distance vectors.
$FWXDO YDOXHB$
$FWXDO YDOXHB$
0LQ FOHDUDQFH YHFWRU
&XUUHQW FOHDUDQFH YHFWRU
0D[ FOHDUDQFH YHFWRU
0.6B$
0.6B$
0.6B2IIVHWYHNWRU
Figure 11-3
Collision protection and distance limiter for one axis pair
Parameter assignment: Protection function 1 - Collision protection
Axis pair: 1st machine axis A1, 2nd machine axis A3
• MD61516 $MN_CC_PROTECT_PAIRS[0] = 03 01
Retraction direction: A1 in negative direction, A3 in positive direction
• MD61517 $MN_CC_PROTECT_SAFE_DIR[0] = 01 00
Technologies
238
Function Manual, 10/2020, 6FC5397-8GP40-0BA1
Axis pair collision protection
11.5 Examples
Offset vector from machine coordinate system machine_A3 to machine_A1 with reference to
machine_A1
• MD61518 $MN_CC_PROTECT_OFFSET[0] = -100.0
Example protection window, 40.0 mm
• MD61519 $MN_CC_PROTECT_WINDOW[0] = 40.0
Orientation of the machine coordinate systems to one another: same direction
• MD61532 $MN_CC_PROTECT_DIR_IS_REVERSE[0] = 0
Protection window extension: none
• MD61533 $MN_CC_PROTECT_WINDOW_EXTENSION[0] = 0.0
Parameter assignment: Protection function 2 - Distance limiter
Axis pair: 1st machine axis A1, 2nd machine axis A3
• MD61516 $MN_CC_PROTECT_PAIRS[1] = 03 01
Retraction direction: A1 in positive direction, A3 in negative direction
• MD61517 $MN_CC_PROTECT_SAFE_DIR[1] = 00 01
Offset vector = "offset vector from machine coordinate system machine_A3 to machine_A1 with
reference to machine_A1" - "maximum distance vector with reference to machine_A1"
Note
Maximum distance vector
The maximum distance vector from the 1st machine axis to the 2nd machine axis is the vector
from the origin of the machine coordinate system for the 1st machine axis to the maximum
permissible position of the 2nd machine axis, with reference to the machine coordinate system
for the 1st machine axis.
• MD61518 $MN_CC_PROTECT_OFFSET[1] = -100.0 - 500.0 = 400.0
Example protection window, 20.0 mm
• MD61519 $MN_CC_PROTECT_WINDOW[1] = 20.0
Orientation of the machine coordinate systems to one another: same direction
• MD61532 $MN_CC_PROTECT_DIR_IS_REVERSE[1] = 0
Protection window extension: none
• MD61533 $MN_CC_PROTECT_WINDOW_EXTENSION[1] = 0.0
If machine axis A1 has a value of 0, the settings above will limit the traversing range of machine
axis A3 to between -60.0 and 380.0, with reference to machine_A3.
Technologies
Function Manual, 10/2020, 6FC5397-8GP40-0BA1
239

Axis pair collision protection
11.6 Data lists
11.6
Data lists
11.6.1
Option data
Number
Identifier: $ON_
Description
19610
TECHNO_EXTENSION_MASK[6]
Enable the technology function via BIT4 = 1
11.6.2
Machine data
11.6.2.1
NC-specific machine data
Number
Identifier: $MN_
Description
60972
CC_ACTIVE_IN_CHAN_PROT[ 0 ]
Channel-specific activation of the technology function
61516
CC_PROTECT_PAIRS[ <a> ]
Axis pair-specific definition of both machine axes
61517
CC_PROTECT_SAFE_DIR[ <a> ]
Axis pair-specific definition of the retraction direction
61518
CC_PROTECT_OFFSET[ <a> ]
Axis pair-specific definition of the offset of both machine coordi-
nate systems
61519
CC_PROTECT_WINDOW[ <a> ]
Axis pair-specific definition of the protection window or minimum
clearance
61532
CC_PROTECT_DIR_IS_REVERSE[ <a> ]
Axis pair-specific definition of the orientation of the machine co-
ordinate systems of both machine axes to one another
61533
CC_PROTECT_WINDOW_EXTENSION[ <a> ]
Axis pair-specific definition of the protection window extension
61534
CC_PROTECT_A_DBD_INDEX
Braking interface window within the system variable field $A_DBD
61535
CC_PROTECT_OPTIONS[ <a> ]
Axis pair-specific activation of supplementary functions
11.6.2.2
Axis/Spindle-specific machine data
Number
Identifier: $MA_
Description
61514
CC_PROTECT_ACCEL
Protection function-specific brake acceleration
11.6.3
User data
11.6.3.1
Global user data (GUD)
Identifier
Description
_PROTECT_STATUS[n]
Status of the protection function (optional)
Technologies
240
Function Manual, 10/2020, 6FC5397-8GP40-0BA1
Punching and nibbling
12
12.1
Brief Description
Subfunctions
The functions specific to punching and nibbling operations comprise the following:
• Stroke control
• Automatic path segmentation
• Rotatable punch and die
• Clamp protection
They are activated and deactivated via language commands.
12.2
Stroke control
12.2.1
General information
Functionality
The stroke control is used in the actual machining of the workpiece. The punch is activated via
an NC output signal when the position is reached. The punching unit acknowledges its punching
motion with an input signal to the NC. No axis may move within this time period. Repositioning
takes place after the punching operation.
High-speed signals
"High-speed signals" are used for direct communication between the NC and punching unit.
Combined with the punch, they allow a large number of holes to be punched per minute since
the punch positioning times are interpreted as machining delays.
PLC signals
PLC interface signals are used for non-time-critical functions such as enabling and monitoring.
Technologies
Function Manual, 10/2020, 6FC5397-8GP40-0BA1
241
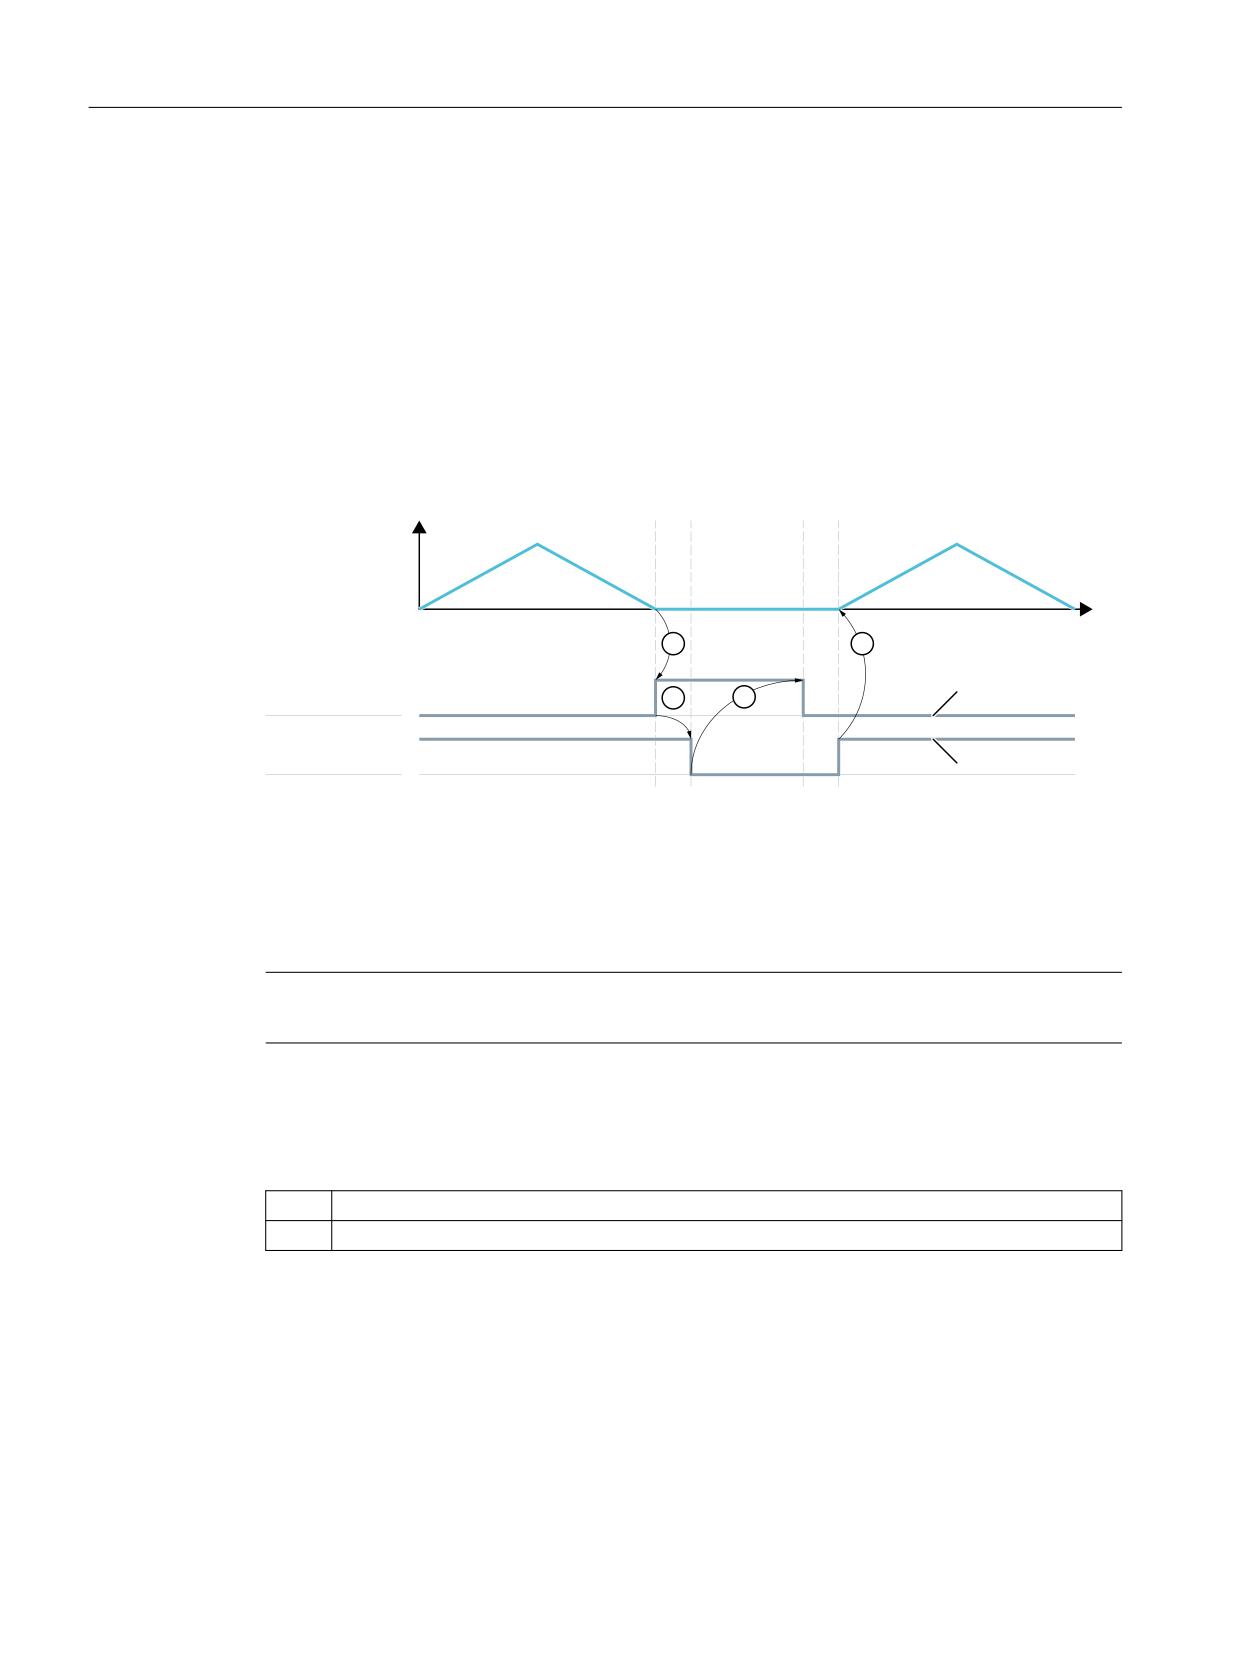
Punching and nibbling
12.2 Stroke control
12.2.2
High-speed signals
Functionality
High-speed signals are used to synchronize the NC and punching unit. On the one hand, they are
applied via a high-speed output to ensure that the punch stroke is not initiated until the metal
sheet is stationary. On the other, they are applied via a high-speed input to ensure that the sheet
remains stationary while the punch is active.
The high-speed digital inputs and outputs on the control are used to drive the punching unit.
The following signal chart illustrates the signal sequence.
W
W
W
W
Y
$[LV PRYHPHQW
RI WKH PDFKLQH
W
6WURNH LQLWLDWLRQ
$
6WURNH DFWLYH
(
(a)
Axis motion of the machine as function v(t)
(b)
"Stroke initiation" signal
(c)
"Stroke active" signal
Figure 12-1
Signal chart
Note
The "Stroke active" signal is high-active for reasons relating to open-circuit monitoring.
The chronological sequence of events for punching and nibbling is controlled by the two signals
A0 and E0:
A0
Set by the NC and identical to stroke initiation.
E0
Defines the status of the punching unit and identical to the "Stroke active" signal.
Technologies
242
Function Manual, 10/2020, 6FC5397-8GP40-0BA1

Punching and nibbling
12.2 Stroke control
The signal states characterize and define times t
1
to t4 in the following way:
t1
The motion of the workpiece (metal sheet) in relation to the punch is completed at instant t1.
Depending on the criterion defined for stroke initiation (see Section "Criteria for stroke initiation
(Page 243)"), the high-speed output O0 is set for punch initiation ①.
t2
The punching unit signals a punch movement via high-speed input E0 at instant t2.
This is triggered by signal A0②.
For safety reasons, signal E0 is high-active (in the case of an open circuit, "Stroke active" is always
set and the axes do not move).
The "Stroke active" signal is not reset again until the tool has moved away from the metal sheet (t4).
t3
The NC reacts to the "Stroke active" signal at instant t3 by canceling the "Stroke initiation" signal ③.
From this point in time onwards, the NC is in a waiting state. It simply waits for cancellation of the
"Stroke active" signal so it can initiate the next axis motion.
The next stroke can be initiated only after signal A0 has disappeared.
t4
The punching operation is complete at instant t4, i.e. the punch has exited from the metal sheet
again.
The NC reacts to a signal transition in signal E0 by starting an axis motion ④.
The reaction of the NC to a signal edge change ④ is described in the section headed "Axis start
after punching".
Note
The stroke time is determined by the period Δth = t4 - t1.
Reaction times at instant t4 between the signal transition of E0 and the start of the axis motion
must also be added.
12.2.3
Criteria for stroke initiation
Initiate a stroke
The stroke initiation must be set, at the earliest, for the point in time at which it can be
guaranteed that the axes have reached a standstill. This ensures that at the instant of punching,
there is absolutely no relative movement between the punch and the metal sheet in the
machining plane.
The following diagram shows the various criteria that can be applied to stroke initiation.
Technologies
Function Manual, 10/2020, 6FC5397-8GP40-0BA1
243
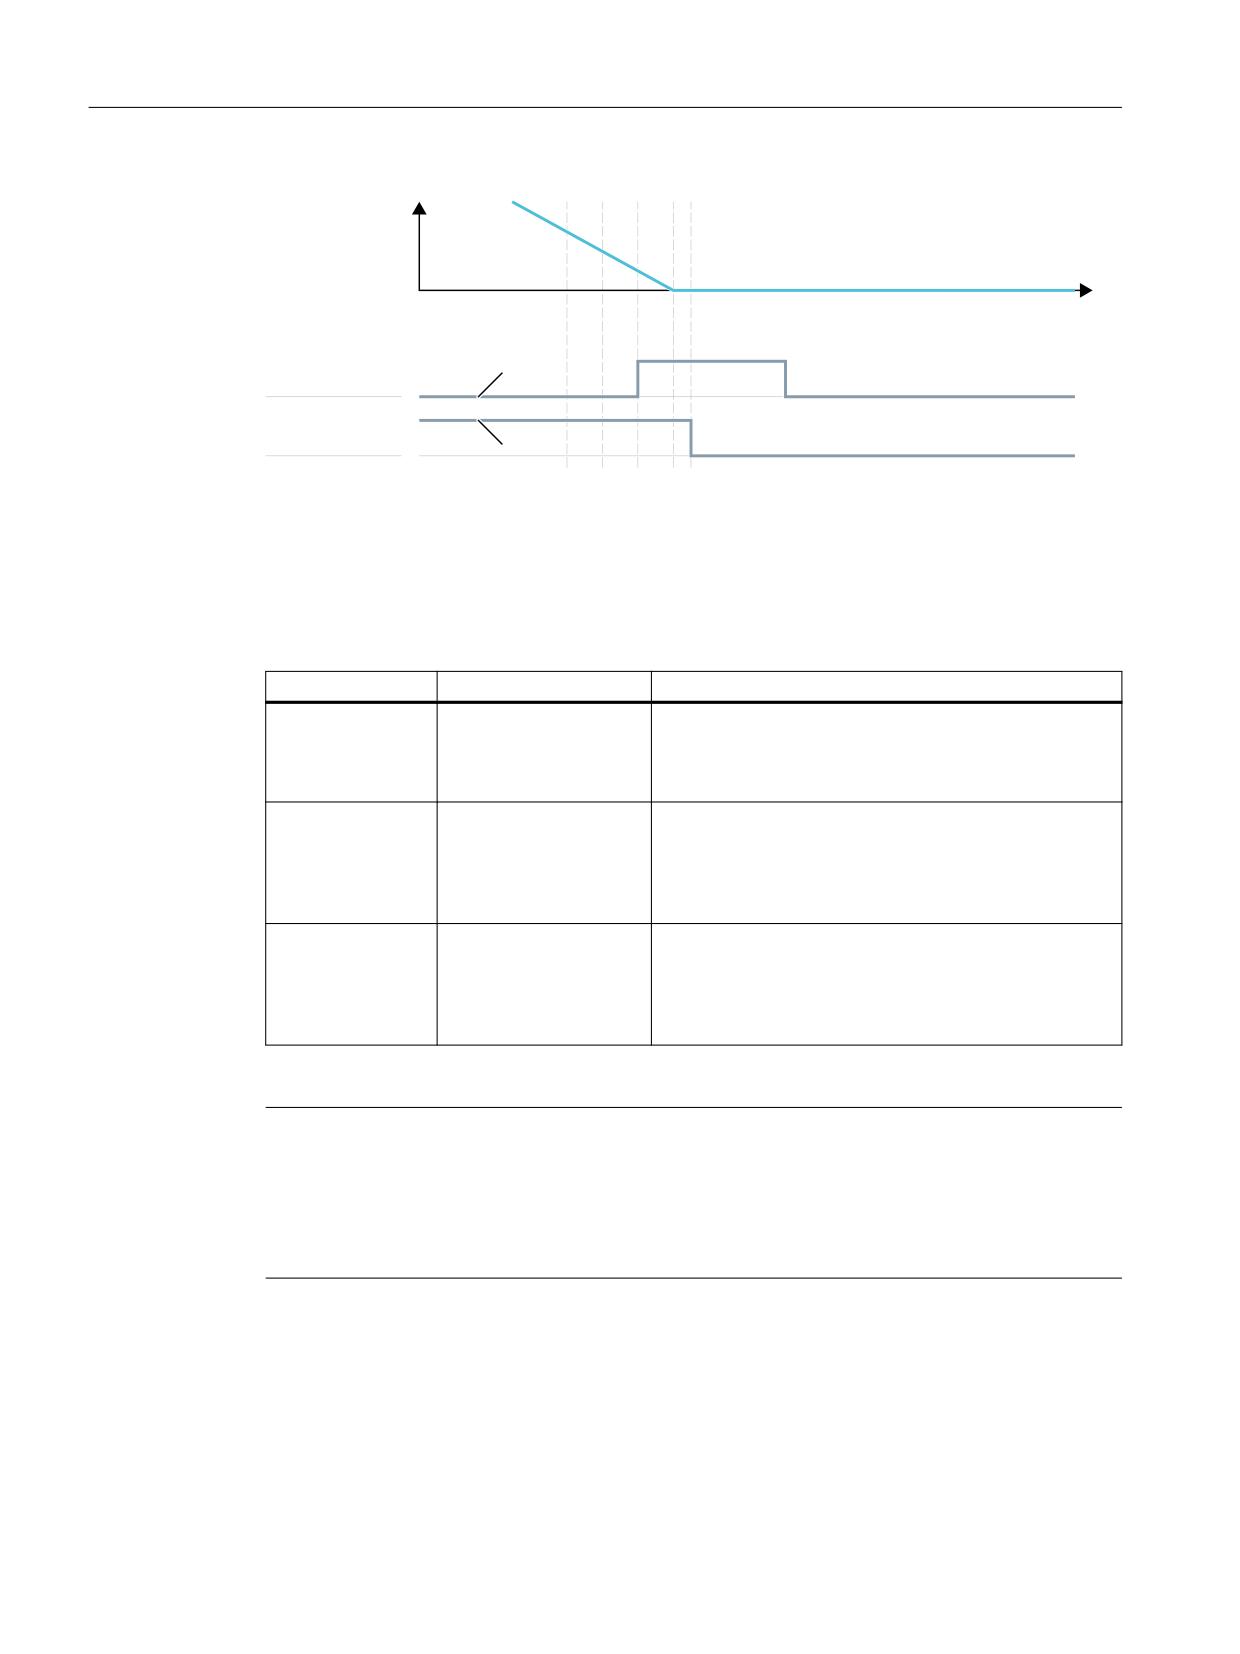
Punching and nibbling
12.2 Stroke control
Wೀ
Wಿ
W
W
Y
$[LV PRYHPHQW
RI WKH PDFKLQH
W
6WURNH LQLWLDWLRQ
$
6WURNH DFWLYH
(
Figure 12-2
Signal chart: Criteria for stroke initiation
The time interval between t1 and t2 is determined by the reaction of the punching unit to setting
of output A0. This cannot be altered, but can be utilized as a lead time for minimizing dead times.
The diagram above shows the default setting with which the output is set when the "Exact stop
fine window" is reached (G601; default setting of G group 12). The punch initiation times t''1 and
t'1 are programmed by means of G602 and G603 (see table below).
Programming
Activation
Description
G603
Stop interpolation
The interpolation reaches the block end. In this case, the
axes continue to move until the overtravel has been
traversed, i.e. the signal is output at an appreciable in-
terval before the axes have reached zero speed (see t"1).
G602
Reach the coarse in-po-
The signal is output once the axes have reached the
sition window
coarse in-position window. If this criterion is selected for
stroke initiation output, then the instant of stroke initia-
tion can be varied through the size of interpolation win-
dow (see t'1).
G601
Reach the fine in-posi-
In this case, it can always be ensured that the machine
tion window
will have reached a standstill at the instant of punching
provided that the axis data are set appropriately.
However, this variant also results in a maximum dead
time (see t1).
Note
The initial setting of the G group with G601, G602 and G603 (G group 12) is defined via machine
data:
MD20150 $MC_GCODE_RESET_VALUES[11]
The default setting is G601.
G603
Depending on velocity and machine dynamics, approximately 3 - 5 interpolation cycles are
processed at the end of interpolation before the axes reach zero speed.
Technologies
244
Function Manual, 10/2020, 6FC5397-8GP40-0BA1
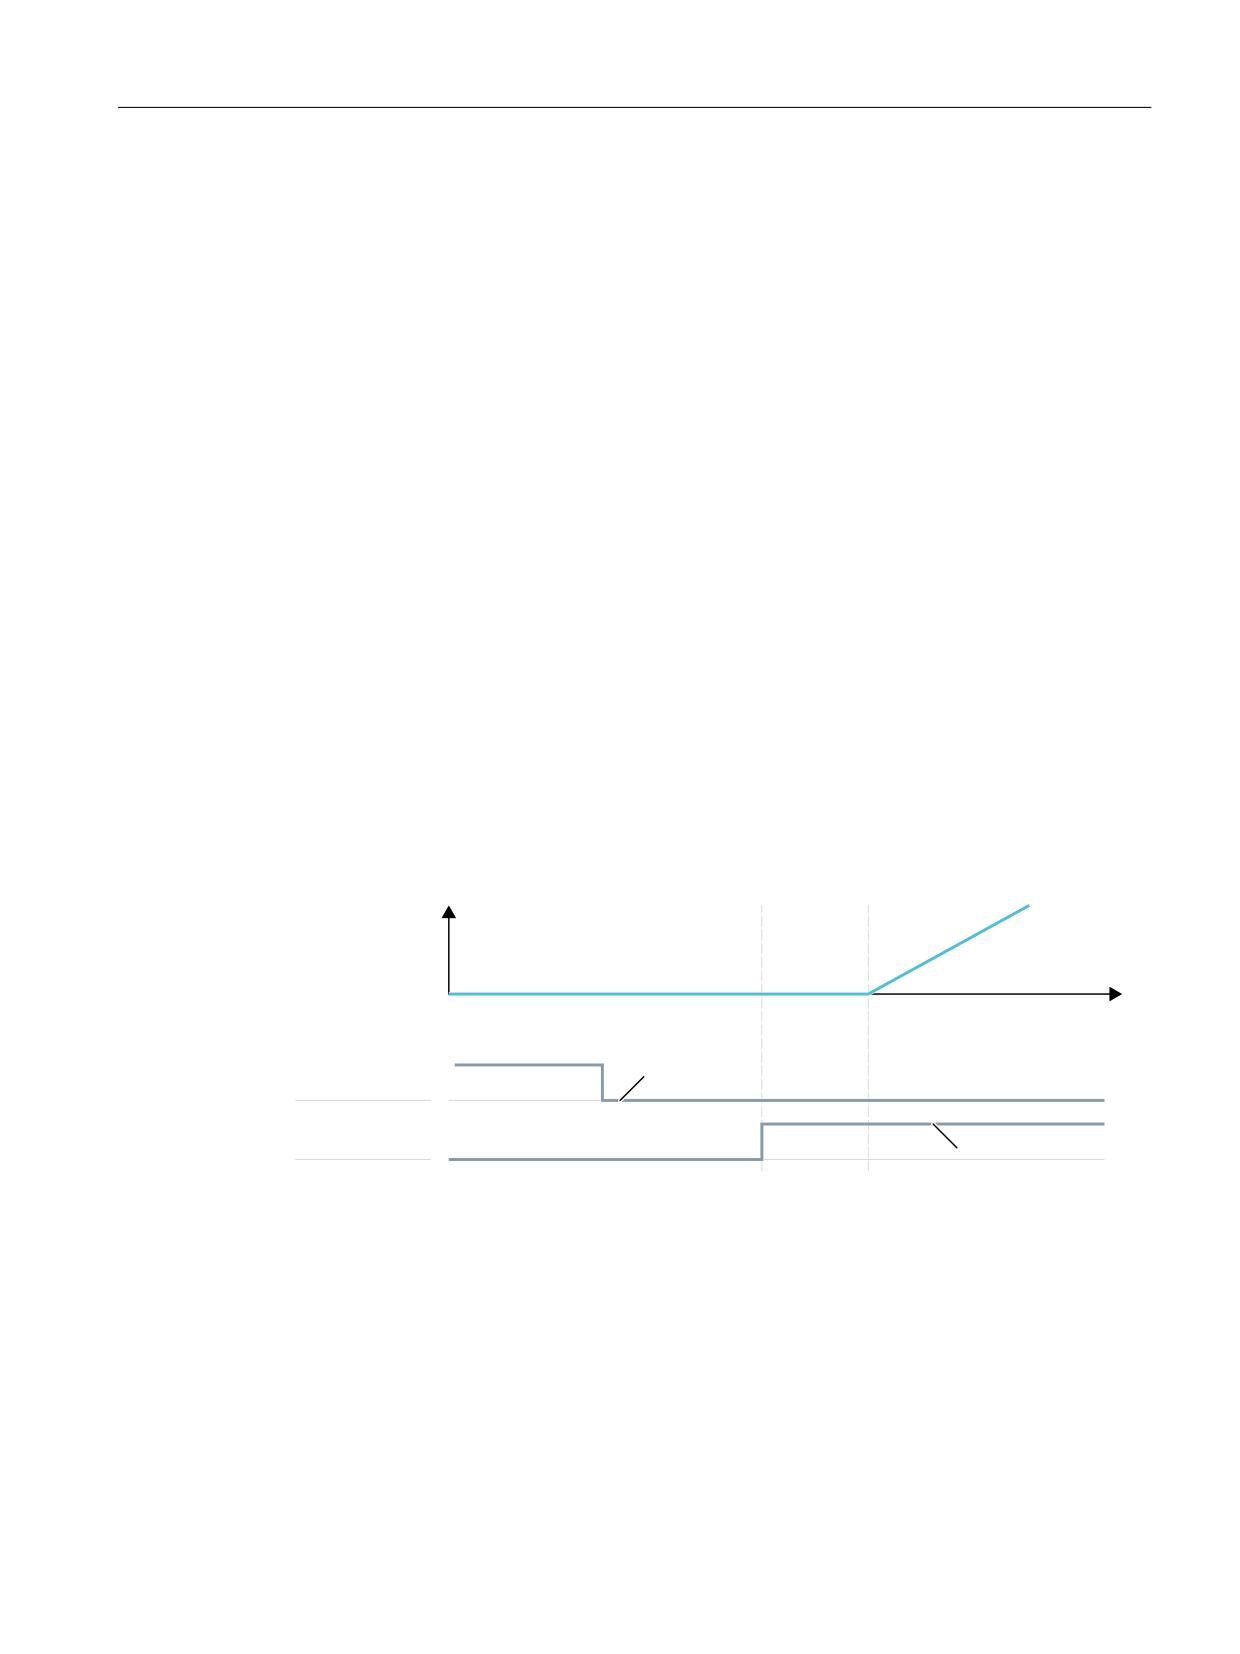
Punching and nibbling
12.2 Stroke control
MD26018 $MC_NIBBLE_PRE_START_TIME
In conjunction with the above machine data, it is possible to delay, and therefore optimize, the
instant between reaching the end of interpolation and setting the high-speed output for "Stroke
ON".
The following setting data is available in addition to MD26018:
SD42402 $SC_NIBPUNCH_PRE_START_TIME
SD42402 can be changed from the part program and therefore adapted to the punching process
depending on the progress of the part program run.
The following applies to the delay time:
MD26018 = 0
→ SD42402 is operative
MD26018 ≠ 0
→ MD26018 is operative
If the "Punching with dwell time, PDELAYON" is active, then the dwell time programmed in
connection with this function is active. Neither MD26018 nor SD42402 is operative in this case.
12.2.4
Axis start after punching
Input signal "Stroke ON"
The start of an axis motion after stroke initiation is controlled via input signal "Stroke ON".
Wಿ
W
Y
$[LV PRYHPHQW
RI WKH PDFKLQH
W
6WURNH LQLWLDWLRQ
$
6WURNH DFWLYH
(
Figure 12-3
Signal chart: Axis start after punching
In this case, the time interval between t4 and t'4 acts as a switching-time-dependent reaction
time. It is determined by the interpolation sampling time and the programmed punching/
nibbling mode.
PON/SON
When the punching unit is controlled via PON/SON, the maximum delay time is calculated to be:
|t'4 - t4| = 3 x interpolator clock cycle
Technologies
Function Manual, 10/2020, 6FC5397-8GP40-0BA1
245

Punching and nibbling
12.2 Stroke control
PONS/SONS
If the punch is controlled by PONS/SONS, the delay time is determined by:
|t'4 - t4| ≤ 3 x position controller cycles
Prerequisites: Stroke time (t4 - t2) > 4 interpolator clock cycles
12.2.5
PLC signals specific to punching and nibbling
Function
In addition to the signals used for direct stroke control, channel-specific PLC interface signals are
also available. These are used both to control the punching process and to display operational
states.
Signals
Signal
Activation
DB21, ... DBX3.0 (no stroke enable)
Prevents the NC from initiating a punching operation.
The NC waits until the enable signal is available before
continuing the part program.
DB21, ... DBX3.2 (stroke suppression)
Allows the part program to be processed without initiat-
ing a punching operation (dry run).
With active path segmentation, the axes traverse in
"Stop and go" mode.
DB21, ... DBX3.4 (delayed stroke)
Activates delayed stroke output if permitted
by PDELAYON.
DB21, ... DBX3.1 (manual stroke suppression)
Enables the operator to initiate a punching operation
(controlled via the PLC) without executing the part pro-
gram.
Manual stroke initiation is acknowledged with signal:
DB21, .. DBX38.1 (acknowledgement of manual stroke
initiation)
Technologies
246
Function Manual, 10/2020, 6FC5397-8GP40-0BA1
Punching and nibbling
12.3 Activation and deactivation
12.2.6
Punching and nibbling-specific reactions to standard PLC signals
DB21, ... DBX12.3 (feed stop)
With interface signal:
DB21, ... DBX12.3 (feed stop)
, the NC reacts in the following way with respect to the stroke control:
Signal is detected in advance of instant t1:
Stroke initiation is suppressed.
The next stroke is not initiated until the next start or until the
"Feed stop" signal has been canceled.
Machining is then continued as if there had been no inter-
ruption.
Signal is detected at instant t1:
The current stroke is executed to completion.
The NC then dwells in the state characterized by t4.
To allow it to respond in this manner, time monitoring of the
"Stroke active" and "Stroke initiation" signals is dispensed
with.
12.2.7
Signal monitoring
Oscillating signal
Owing to aging of the punch hydraulics, punch overshoot may cause the "Stroke active" signal
to oscillate at the end of a stroke.
In this case, an alarm can be generated (Alarm 22054 "undefined punching signal") as a function
of machine data:
MD26020 $MC_NIBBLE_SIGNAL_CHECK
Reset behavior
In the case of an NC reset, the interface signal:
DB21, ... DBX38.0 (stroke initiation active)
is canceled immediately without acknowledgement via the high-speed input.
A currently activated stroke cannot be suppressed.
12.3
Activation and deactivation
12.3.1
Language commands
Punching and nibbling functions are activated and deactivated via configurable language
commands. These replace the special M functions that were used in earlier systems.
Technologies
Function Manual, 10/2020, 6FC5397-8GP40-0BA1
247

Punching and nibbling
12.3 Activation and deactivation
For further information
Programming Manual Advanced
Groups
The language commands are subdivided into the following groups:
Group 35
The actual punching and nibbling-specific functions are activated and deactivated by means of the
following language commands:
PON
= punching ON
SON
= nibbling ON
PONS
= punching ON, activated in the position controller
SONS
= nibbling ON, activated in the position controller
SPOF
= punching/nibbling OFF
Group 36
This group includes the commands which have only a preparatory character and which determine the
real nature of the punching function:
PDELAYON
= punching with delay ON
PDELAYOF
= punching with delay OFF
Since the PLC normally needs to perform some preliminary tasks with respect to these preparatory
functions, they are programmed before the activating commands.
Group 38
This group contains the commands for switching over to a second punch interface. It can be used, for
example, for a second punching unit or set of hammer shears. A second I/O pair which can be used for
punching functionality is defined via machine data.
SPIF1
= first interface is active
SPIF2
= second interface is active
Note
Only one function at a time can be active within a G group (similar, for example, to the various
interpolation modes G0, G1, G2, G3, etc. which are also mutually exclusive).
SPOF
Punching and nibbling OFF
The SPOF function terminates all punching and nibbling functions. In this state, the NC responds
neither to the "Stroke active" signal nor to the PLC signals specific to punching and nibbling
functions.
If SPOF is programmed together with a travel command in one block (and in all further blocks
if punching/nibbling is not activated with SON or PON), the machine approaches the
Technologies
248
Function Manual, 10/2020, 6FC5397-8GP40-0BA1
Punching and nibbling
12.3 Activation and deactivation
programmed position without the initiation of a punching operation. SPOF deselects SON,
SONS, PON and PONS and corresponds to the Reset condition.
Programming example:
Program code
Comment
:
N20 G90 X100 SON
; Activate nibbling
N25 X50 SPOF
; Deactivate nibbling,
; Positioning without stroke initiation
:
SON
Nibbling ON
SON activates the nibbling function and deselects the other functions in G group 35 (e.g. PON).
In contrast to punching, the first stroke is made at the start point of the block with the activating
command, i.e. before the first machine motion.
SON has a modal action, i.e. it remains active until either SPOF or PON is programmed or until the
program end is reached.
The stroke initiation is suppressed in blocks without traversing information relating to the axes
designated as punching or nibbling axes (typically those in the active plane). If a stroke still
needs to be initiated, then one of the punching/nibbling axes must be programmed with a 0
traversing path. If the first block with SON is a block without traversing information of the type
mentioned, then only one stroke takes place in this block since the start and end points are
identical.
Programming example:
Program code
Comment
:
:
N70 X50 SPOF
; Positioning without punch initiation
N80 X100 SON
; Activate nibbling, initiate a stroke before the
; Motion (X=50) and at the end of the programmed
; motion (X=100)
:
:
SONS
Nibbling ON (in position control cycle)
SONS behaves in the same way as SON. The function is activated in the position control cycle,
thus allowing time-optimized stroke initiation and an increase in the punching rate per minute.
Technologies
Function Manual, 10/2020, 6FC5397-8GP40-0BA1
249
Punching and nibbling
12.3 Activation and deactivation
PON
Punching ON
PON activates the punching function and deactivates SON.
PON has a modal action like SON.
In contrast to SON, however, a stroke is not executed until the end of the block or, in the case of
automatic path segmentation, at the end of a path segment. PON has an identical action to SON
in the case of blocks which contain no traversing information.
Programming example:
Program code
Comment
:
N100 Y30 SPOF
; Positioning without punch initiation
N110 Y100 PON
; Activate punching, punch initiation at the end of the
; positioning operation (Y=100)
:
PONS
Punching ON (in position control cycle)
PONS behaves in the same way as PON. For explanation, please refer to SONS.
PDELAYON
Punching with delay ON
PDELAYON is a preparatory function. This means that PDELAYON is generally programmed
before PON. The punch stroke is output with a delay when the programmed end position is
reached.
The delay time in seconds is programmed in setting data:
SD42400 $SC_PUNCH_DWELLTIME
If the defined value cannot be divided as an integer into the interpolator clock cycle, then it is
rounded to the next divisible integer value.
The function has a modal action.
PDELAYOF
Punching with delay OFF
PDELAYOF deactivates punching with delay function, i.e. the punching process continues
normally. PDELAYON and PDELAYOF form a G group.
Programming example:
Technologies
250
Function Manual, 10/2020, 6FC5397-8GP40-0BA1
Punching and nibbling
12.3 Activation and deactivation
SPIF2 activates the second punch interface. This means that the stroke is controlled via the
second pair of high-speed I/Os (see Section "Channelspecific machine data (Page 278)",
MD26004 and MD26006).
Program code
Comment
:
N170 PDELAYON X100 SPOF
; Position without punch initiation, activate delayed
punch initiation
:
:
N180 X800 PON
; Activate punching. The punch stroke is output with a
delay when the end position is reached
:
:
N190 PDELAYOF X700
; deactivate punching with delay, normal punch initia-
tion on. End of programmed motion
:
SPIF1
Activation of first punch interface
SPIF1 activates the first punching interface. This means that the stroke is controlled via the
first pair of high-speed I/Os (see Section "Channelspecific machine data (Page 278)", MD26004
and MD26006).
The first punch interface is always active after a reset or control system power up. If only one
interface is used, then it need not be programmed.
SPIF2
Activation of second punch interface
SPIF2 activates the second punch interface. This means that the stroke is controlled via the
second pair of high-speed I/Os (see Section "Channelspecific machine data (Page 278)",
MD26004 and MD26006).
Programming example:
Program code
Comment
:
N170 SPIF1 X100 PON
; At the end of the block, a stroke is initiated at the
first fast output. The "Stroke active" signal is monitored
at the first input.
:
:
N180 X800 SPIF2
; The second stroke is initiated at the second fast output.
The "Stroke active" signal is monitored at the second input.
:
:
Technologies
Function Manual, 10/2020, 6FC5397-8GP40-0BA1
251

Punching and nibbling
12.3 Activation and deactivation
Program code
Comment
N190 SPIF1 X700
; All further strokes are controlled with the first inter-
face.
:
12.3.2
Functional expansions
Alternate interface
Machines that alternately use a second punching unit or a comparable medium can be switched
over to a second I/O pair.
The second I/O pair can be defined via the following machine data:
MD26004 $MC_NIBBLE_PUNCH_OUTMASK
MD26006 $MC_NIBBLE_PUNCH_INMASK
The interface is switched by command SPIF1 or SPIF2.
Full punching/nibbling functionality is available on both interfaces.
Example:
Hardware assignment for stroke control
Define the high-speed byte in each case on the CPU as a high-speed punch interface:
MD26000 $MC_PUNCHNIB_ASSIGN_FASTIN = 'H00030001' → Byte 1
MD26002 $MC_PUNCHNIB_ASSIGN_FASTOUT = 'H00000001'
Remark:
The first and second bits are inverted.
Screen form for high-speed input and output bits:
First interface output bit
MD26004 $MC_NIBBLE_PUNCH_OUTMASK[0]
= 1
→ Bit 1 SPIF1
Second interface output bit
MD26004 $MC_NIBBLE_PUNCH_OUTMASK[1]
= 2
→ Bit 2 SPIF2
First interface input bit
MD26006 $MC_NIBBLE_PUNCH_INMASK[0]
= 1
→ Bit 1 SPIF1
Second interface input bit
MD26006 $MC_NIBBLE_PUNCH_INMASK[1]
= 2
→ Bit 2 SPIF2
Automatically activated pre-initiation time
Dead times due to the reaction time of the punching unit can be minimized if the stroke can be
initiated before the interpolation window of the axes is reached. The reference time for this is the
interpolation end. The stroke is automatically initiated with G603 and delayed by the set value
in relation to the time that the end of interpolation is reached.
Technologies
252
Function Manual, 10/2020, 6FC5397-8GP40-0BA1