Motorcycle BMW R1150RT. Manual - part 29


  Index      motorcycles     Motorcycle BMW R1150RT - service repair manual 2001 year


Search            


Content   ..  27  28  29  30   ..


Motorcycle BMW R1150RT. Manual - part 29


11.51

11 11 

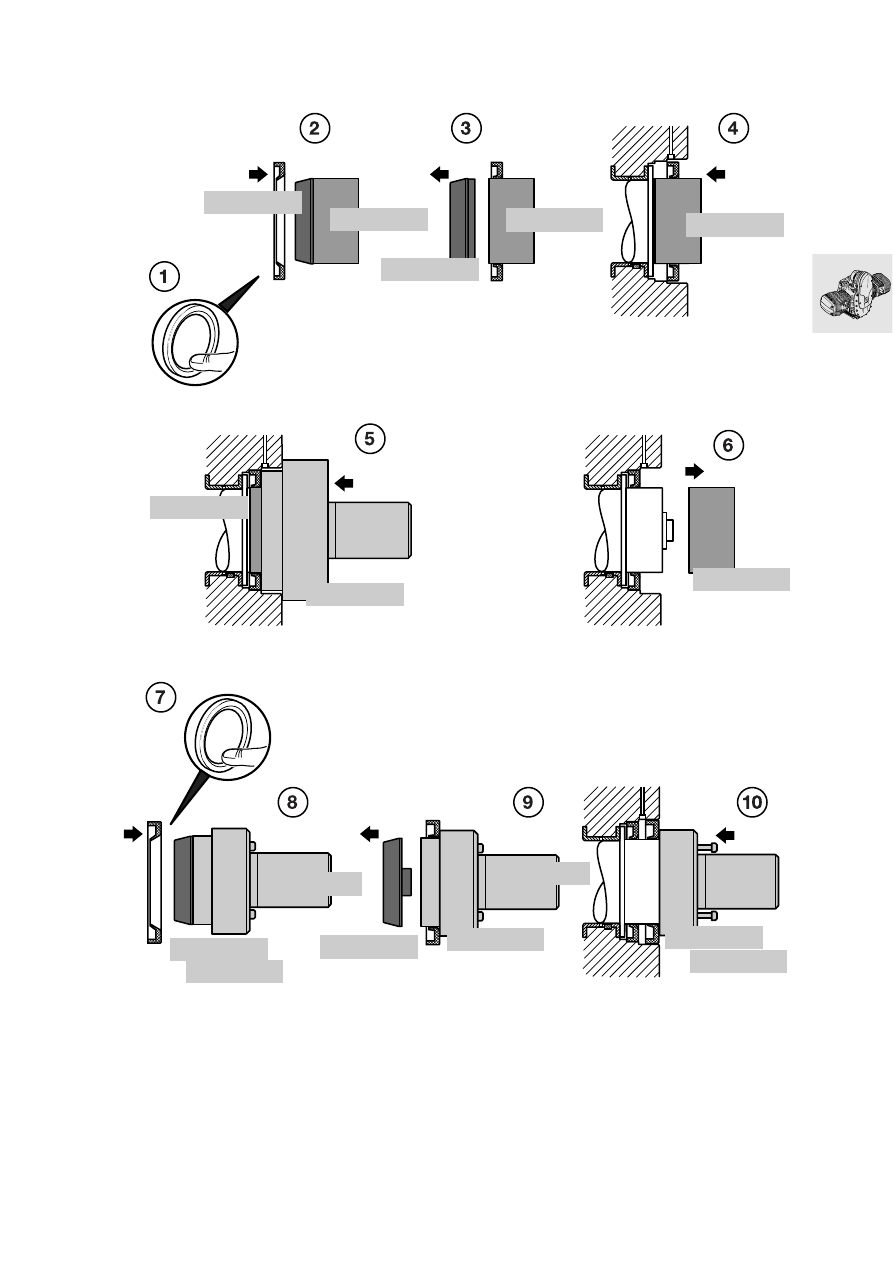
Installing radial shaft seals on crankshaft

11 5 702

00 5 500

11 5 661

11 5 662

11 5 701

11 5 703

11 5 702

11 5 703

11 5 703

11 5 703

11 5 703

11 5 662

00 5 500

00 5 500

11 5 661

11 5 661

11.52

11 11 Installing the crankshaft-end radial shaft 
seal

Shape the lip of the radial shaft seal carefully by 
hand (1).

Oil the radial shaft seal at the sealing/contact 
surface.

Using assembly sleeve, BMW No. 11 5 702
mount the radial shaft seal with the closed side 
toward the clutch onto sleeve, 
BMW No. 11 5 703, (2).

Remove assembly sleeve (3).

Mount sleeve complete with radial shaft seal on 
crankshaft (4).

Use drift, BMW No. 11 5 701, together with the 
sleeve (5) to drive the radial shaft seal onto the 
crankshaft.

Remove sleeve (6).

11 11 Installing the clutch-end radial shaft seal

Shape the lip of the radial shaft seal carefully by 
hand (7).

Oil the radial shaft seal at the sealing/contact 
surface.

Using assembly sleeve, BMW No. 11 5 662
mount the radial shaft seal with the closed side 
toward the clutch onto drift, BMW No. 11 5 661
with handle, BMW No. 00 5 500 (8).

Remove assembly sleeve (9).

Using the drift, drive home radial shaft seal (10).

11.53

21 21 105 

Installing clutch housing

e

 Attention:

Always use new screws for housing and cover.

Install clutch housing with mark (1) aligned with 
crankshaft mark (2).

Install locking device, BMW No. 11 5 640, to 
lock clutch housing. 

Insert all screws by hand and tighten.

Tightening torque:

Clutch housing to crankshaft 
(threads lightly oiled)..................................... 40 Nm 
Additional angle of rotation................................ 32°

S210010

11 5 640

2

1

11.54

11 41 000 

Installing oil pump

e

 Attention:

Oil the friction faces.

Install outer rotor (1) of oil pump in pump hous-
ing.

e

 Attention:

O-ring (3) must be in perfect condition.

Install oil pump housing with cooling oil pipe (2).

Install Woodruff key (4), outer rotor (5) and inner 
rotor (6) in cooling oil pump.

e

 Attention:

Note different lengths of screws.

Secure housing cover (7) to oil pump.

Tightening torque:

M 6 screw ...................................................... 9 Nm
Pressure-relief valve ..................................... 42 Nm
Oil-pressure switch ...................................... 30 Nm

RS110411

4

5

6

7

5

1

2

M6 x 50

M6 x 45

M6 x 45

M6 x 50

M6 x 45

3


Content   ..  27  28  29  30   ..