Motorcycle BMW R1150RT. Manual - part 27
 

  Index      motorcycles     Motorcycle BMW R1150RT - service repair manual 2001 year


Search            


Content   ..  25  26  27  28   ..


Motorcycle BMW R1150RT. Manual - part 27


11.43

11 41 

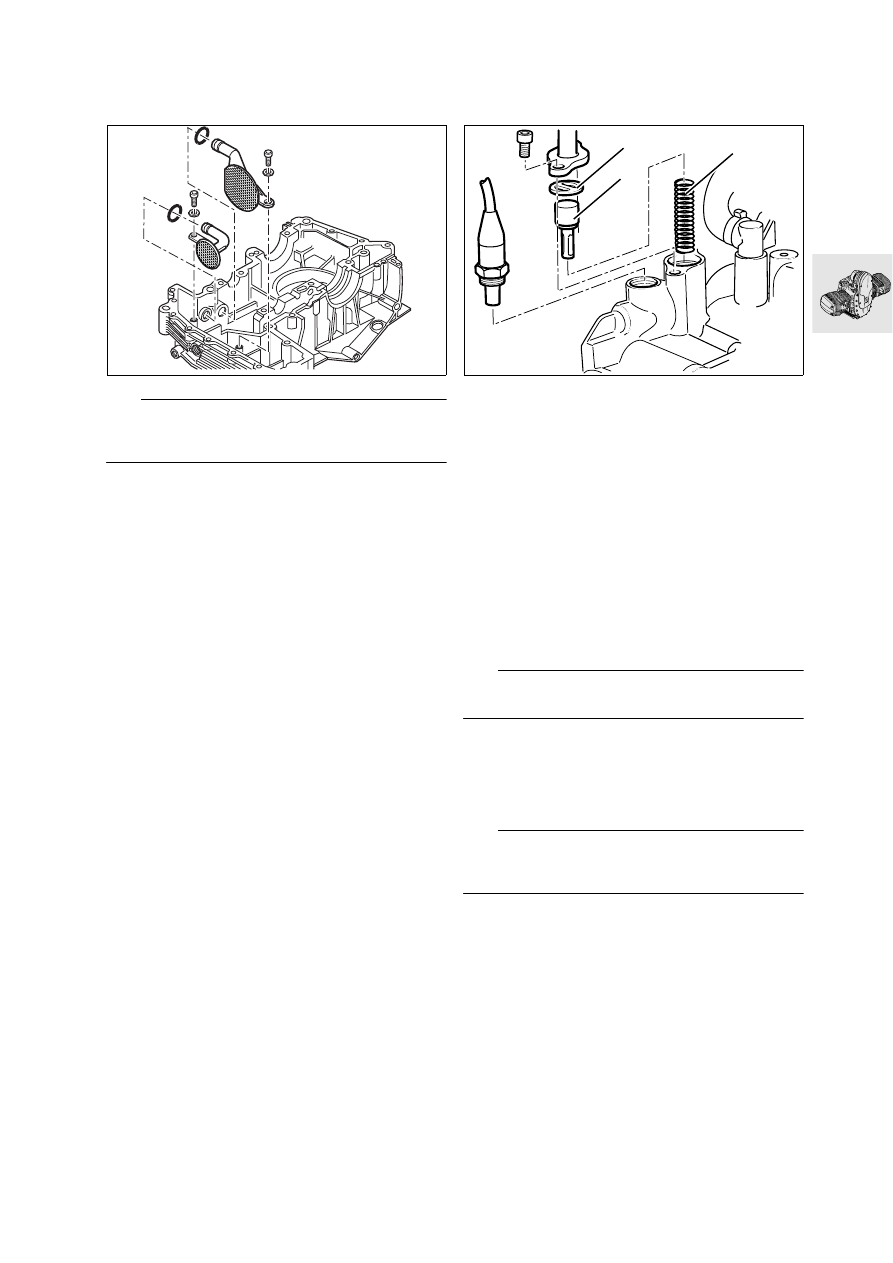
Removing and installing oil intake 

strainers

e

 Attention:

Ensure that the O-ring is in position and that it is not 
damaged.

X 

Tightening torque:

M 6 screw .................................................... 10 Nm

11 11 043 

Replacing oil level sight glass

•

Pierce the plastic disc with a large screwdriver 
and lever out the oil level sight glass.

•

Use thinners to remove all traces of oil from the 
seating face of the sight glass.

•

Coat the sealing face of the new oil level sight 
glass with tyre assembly paste and drive it in with 
drift, BMW No. 00 5 550.

17 21 

Removing and installing oil ther-

mostat

•

Remove screws securing oil cooler line to fairing 
bracket.

•

Disconnect the oil cooler line fitting from the en-
gine casing.

•

Remove support plate (1), control element (2) 
and spring (3).

•

Installation is the reverse of the removal proce-
dure.

X 

Tightening torque:

M 6 screw ...................................................... 9 Nm

11 24 043 

Removing conrods

•

Clamp crankshaft in a vise with protective jaws.

e

 Attention:

Do not mix up the conrods.

•

Remove connecting rods.

11 24 

Checking conrods 

•

Check conrod dimensions (

a

11.10).

e

 Attention:

Do not attempt to straighten the steel fracture-split 
conrods – risk of breakage.

S110060

S110070

2

1

3

11.44

11 21 

Measuring main bearing play

Measuring radial bearing play

•

Measure main bearing journal with an external 
micrometer in two planes, A and B, at right an-
gles to each other.

•

Enter measured values on record sheet 
(

a

11.9).

e

 Attention:

The crankshaft can only be reground in stage 0, and 
must be hardened and finished afterwards. Grinding 
stages are identified by a paint mark on the front 
crank web (

a

11.9). If the bearing shells have to be 

replaced, note coloured marks on crankpins and big 
end bearings.

RS110310

11.45

Installing main bearing

•

Insert tensioner rail/slide rail pivot pin (1) for 
centering purposes.

•

Tighten M 8 and M 10 crankcase screws.

X 

Tightening torque/tightening order:

1. M 10 screw (oiled) 

to initial torque ..... 25 Nm
Tightening angle ....... 90°

2. M 8 screw (oiled) ...................................... 22 Nm

•

Measure front and rear bearings in the load di-
rection.

•

Enter measured values on record sheet and cal-
culate main bearing play (

a

11.9).

Measuring axial bearing play

•

Place crankshaft in crankcase.

•

Insert tensioner rail/slide rail pivot pin (1) for 
centering purposes.

•

Tighten crankcase screws.

•

Secure measuring device, BMW No. 00 2 500, 
with dial gauge, BMW No. 00 2 510, in tapped 
hole for alternator mount cover.

•

Move crankshaft back and forth and read axial 
play from dial gauge (

a

11.9).

RS110320

1

00 2 500

RS110910

00 2 510

11.46

11 24 

Measuring big end bearing play

•

Measure crankpin with an external micrometer in 
the thrust direction and at right angles to the 
thrust direction.

•

Install bearing shells and assemble conrods.

•

Using tightening angle indicator, 
BMW No. 11 2 500, tighten the big end bolts.

X 

Tightening torque:

Big end bolts, oiled
Initial torque ................................................. 20 Nm
Tightening angle............................................... 80 °

•

Measure big end bearing with bore gauge in 
thrust direction.

•

Enter measured values on record sheet and cal-
culate big end bearing play (

a

11.10).

RS110340

11 2 500

RS110350

RS110360


Content   ..  25  26  27  28   ..