Dacia SuperNova (engine E7J). Manual - part 93


  Index      Dacia     Dacia SuperNova (engine E7J) - service repair manual 2004 year


Search            


Content   ..  91  92  93  94   ..


Dacia SuperNova (engine E7J). Manual - part 93


SIDE OPENINGS ELEMENTS MECHANISMS

51

51 - 4

DISMOUNTING

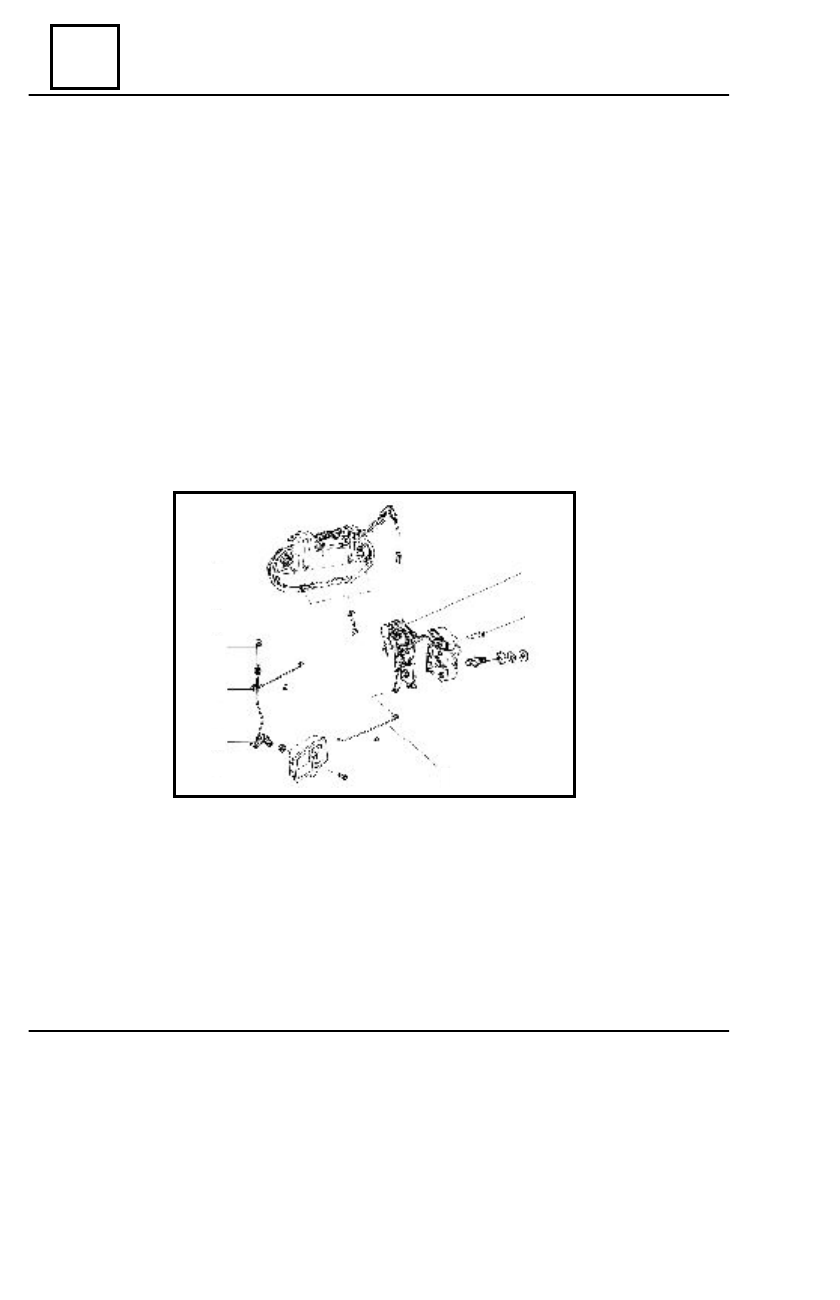
For the rear door lock dismounting and the outside opening mechanism, beforehand dis-

mount: the ash tray box by detaching from clips, the window regulator crank, the arm rest, the
inner opening mechanism (5), the door panel lower and upper ornament, the locking button (1),
the guiding case (2), the door panel.

Then dismount:

- the rear door lock attachment screws (2) on the door caisson, and then detach an end of

the locking control rod  (6)from the existing ball-joint on the lock, and the other end from the
direction change device;

- the direction change device (4), by releasing the nut and the attachment washer assembly

on the door’s caisson;

- the rear door opening rod (3) on the lock (8);
- the attachment screws (9) of the outside opening mechanism (10) on the rear door

outside panel.

REMOUNTING

Perform in reverse order the dismounting operations, taking into account the following rec-

ommendations:

- for the direction change device mounting (4), the lock rod will be placed in the position

where the lock is blocked;

- move the assembly so that free arm will be introduced on the control rod (5), and then

the control rod will be introduced through the caisson hole in the door panel guide;
mount the button (1) by self-threading on the rod.

10

9

1

2

3

4

5

8

7

6

REAR DOOR LOCK AND OUTSIDE

OPENING MECHANISM

LOCK AND REAR DOOR LOCK CYLINDER

SIDE OPENINGS ELEMENTS MECHANISMS

51

51 - 5

WINDOW AND FRONT DOOR WINDOW

REGULATOR (WITH CABLE)

DISMOUNTING

For the dismounting of the window and the regulator window assembly, perform the follow-

ing operations:

Remove the outside wiper of the window from its attachment clips, using a  common screw-

driver.

Dismount the attachment screw (2) of the regulator at the upper side and the attachment nut

(3) at the lower side.

Lift the window in the position P= 85 mm.
Dismount the attachment screws of the window base on the regulator slide, then remove the

window (together with the window base).
Dismount the attachment screws (4) of the activation mechanism (1) and then the regulator.

REMOUNTING

Fix the window outside wiper by means of

the five attachment clips.

Introduce the regulator in the caisson through

the technological opening (A) and fix it on the
caisson in the activation mechanism area (1), by
nuts (4).

Fix the regulator guiding system on the up-

per side by screw (2) and by nut (3) on the lower
side.

Introduce the window where beforehand was

mounted the window base and fix it on the slide
by two screws (5).

Check the regulator operation by rolling up

and down the window.

Mount the door panel by clipping.
Mount the regulator’s crank and the window

inside wiper.

3

SIDE OPENINGS ELEMENTS MECHANISMS

51

51 - 6

DISMOUNTING

For the dismounting of the window and the regulator window assembly, perform the following operations:
Remove the outside wiper of the window from its attachment clips, using  a common screwdriver.
Dismount the attachment screw (1) of the regulator at the upper side and the attachment nut

(3) at the lower side.

Dismount the attachment  screws (2) of the window base on the regulator slide and then

remove the window (together with the window base).

Dismount the nuts (4) from the activation mechanism bolts(5) and then the regulator.
Dismount the window guiding (7) and the fix window (9).

WINDOW AND REAR DOOR WINDOW REGULATOR

 (WITH CABLE)

REMOUNTING

For the remounting, perform the following operations:
Place on the window guide (7) the fix window (9) where beforehand was mounted the window gasket.
Fix the guide without tightening at the lower side on the caisson by means of the screw (6),

and on the upper part, on the back door frame, by means of the screw (8) and the fast nut (10).

Fix the window outside wiper in the attachment clips.
Introduce the regulator in the caisson through the technological opening (A).
Fix the regulator by nuts (4) in the activation mechanism area.
Mount the regulator attachment screw (1) on the upper side and the attachment nut (3) on the lower side.
Introduce the window in the caisson (where beforehand was mounted the window base) and

fix it on the slide by screws (2).

Check the regulator operation by rolling up and down the window.
Mount the door panel by clipping, the regulator’s crank and the window inside wiper.

5

4

1

2

3

6

7

8

9

10

  NON SIDE OPENINGS ELEMENTS MECHANISMS

52

52 - 1

1. Front hood locking system
2. Screw M8-25
3. Front hood opening control
4. Sleeve stopper
5. Cable attachment element
6. Spring
7. Screw M6-20
8. Lock assembly

THE COMPOSITION OF THE FRONT HOOD

LOCKING SYSTEM


Content   ..  91  92  93  94   ..