Honda Ridgeline. Manual - part 355
 

  Index      Honda     Honda Ridgeline - service repair manual 2006-2008 year


Search            


Content   ..  353  354  355  356   ..


Honda Ridgeline. Manual - part 355


01

02

SJC8AB9J34200000000FEAT00

Closing force: 200

290 N (20

30 kgf, 44

66 lbf)

20-58

Moonroof

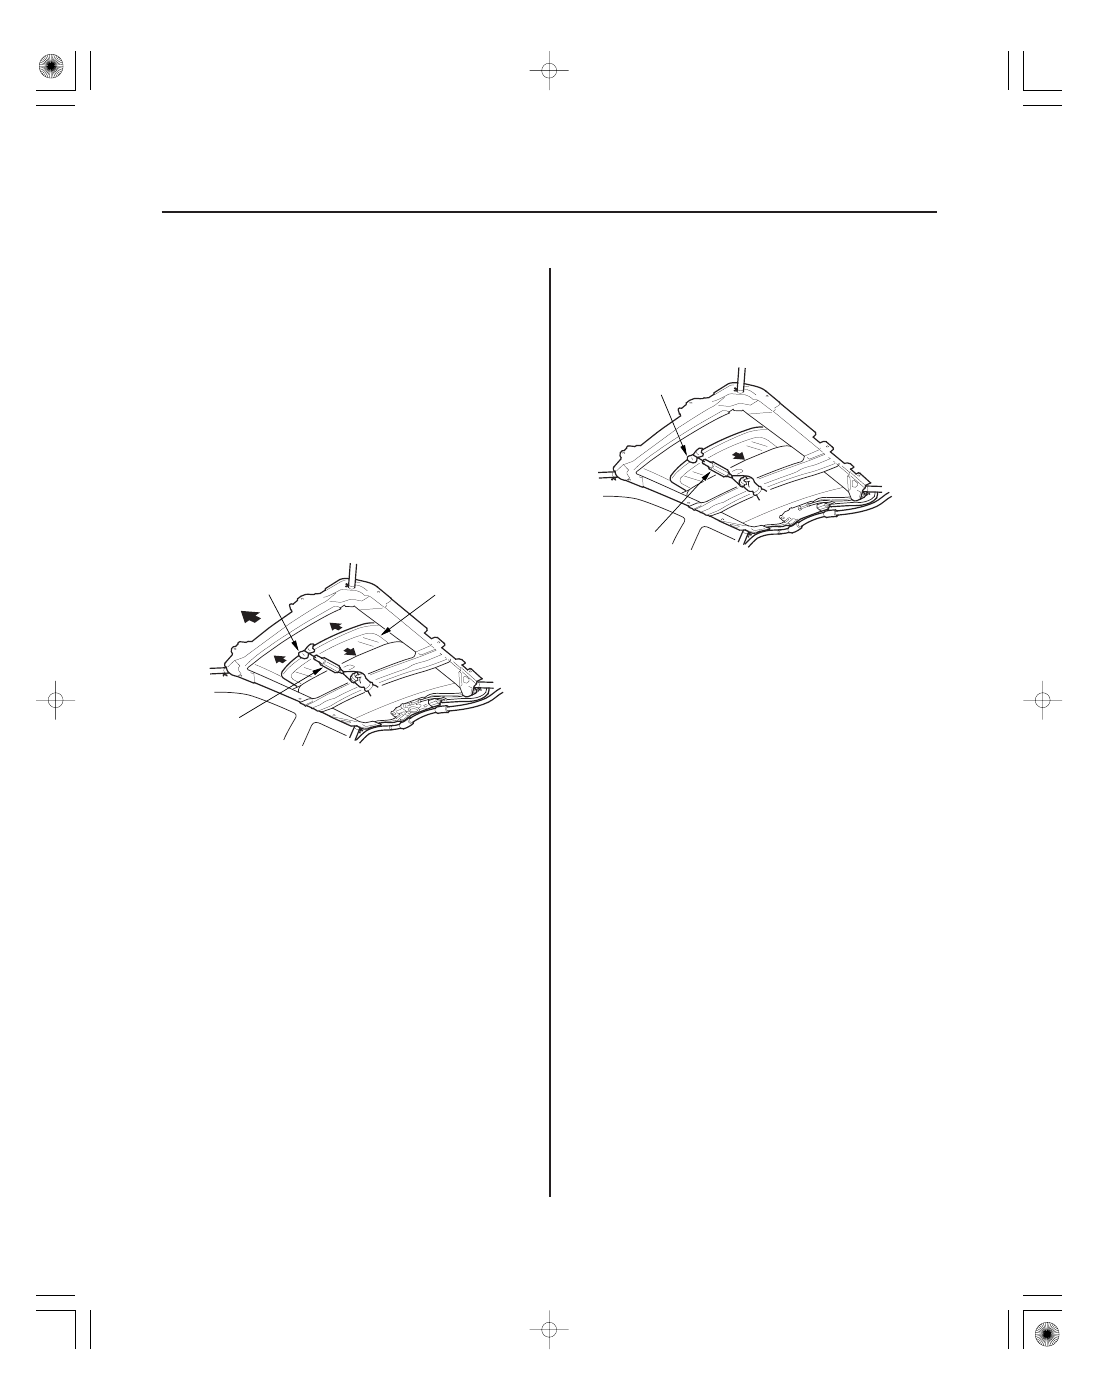
Closing Force and Opening Drag Check

A

B

C

B

A

1. Remove the headliner (see page 20-70).

2. Open the moonroof halfway.

3. Closing force check:

• With a shop towel (A) on the leading edge of the

glass (B), attach a spring scale (C) as shown.

• Have an assistant hold the switch to close the

glass while you measure the force required to
stop it.

• Read the force as soon as the glass stops moving,

then immediately release the switch and
carefully unload the spring scale.

4. If the force in not within specification, remove the

moonroof motor (see page 20-51), then check:

• The gear portion and the inner cable for breakage

and damage. If the gear portion is broken,
replace the motor. If the inner cable is damaged,
remove the frame (see page 20-52), and replace
the cable (see page 20-55).

• The moonroof motor (see page 22-279). If the

motor fails to run or doesn’t turn smoothly,
replace it.

• The opening drag. Go to step 5.

5. Opening drag check: Protect the leading edge of the

glass with a shop towel (A). Measure the effort
required to open the glass using a spring scale (B)
as shown.

6. If the load is over 40 N (4 kgf, 9 lbf), check:

• The side clearance and glass position adjustment

(see page 20-47).

• For broken or damaged sliding parts. If any

sliding parts are damaged, replace them.

*01

SJC8A00J26273400000DAAT00

20-59

Interior Trim

Component Location Index

HEADLINER

REAR SEAT SIDE TRIM

C-PILLAR TRIM

REAR DOOR OPENING TRIM

B-PILLAR UPPER TRIM

FRONT DOOR OPENING TRIM

A-PILLAR TRIM

B-PILLAR LOWER TRIM

REAR PANEL INSULATOR

CARPET

REAR DOOR SILL TRIM

KICK PANEL

FRONT THRESHOLD TRIM

FRONT DOOR SILL TRIM

REAR THRESHOLD TRIM

Removal/Installation, page 20-70

Removal/Installation, page 20-60

Removal/Installation, page 20-68

Removal/Installation, page 20-60

Removal/Installation, page 20-65

Removal/Installation, page 20-60

Removal/Installation, page 20-63

Removal/Installation, page 20-65

Replacement, page 20-65

Replacement, page 20-74

Removal/Installation, page 20-60

Removal/Installation,

page 20-60

Removal/Installation,

page 20-60

Removal/Installation,

page 20-60

Removal/Installation,

page 20-60

01

02

SJC8A00J26273400000KDAT11

Special Tools Required

Driver’s side

Passenger’s side

20-60

Interior Trim

Trim Removal/Installation - Door Areas

Fastener Locations

F

: Clip, 2

G

: Clip, 1

I

: Clip, 3

(White)

A

B

C

D

E

F

G

H

I

I

I

F

E

B

Fastener Locations

: Clip, 3

F

: Clip, 3

I

(White)

B

C

D

E

F

H

E

B

F

F

I

I

I

C

KTC trim tool set SOJATP2014

Available through the American Honda Tool and
Equipment Program; call 888-424-6857

NOTE:

• Put on gloves to protect your hands.
• Take care not to bend or scratch the trim and panels.
• Use the appropriate tool from the KTC trim tool set to

avoid damage when prying components.

1. Pull out the fuel fill door opener knob (A), and

detach the hooks (B) from the kick panel (C) and
B-pillar lower trim (D), and pull the front door sill
trim (E) up by hand to detach the clips (F) and a clip
(G) (driver’s), then remove it.

2. If necessary, pull the front threshold trim (H) up to

detach the clips (I), then remove the trim.

03

04

20-61

Fastener Locations (One each per kick panel)

: Clip, 2

D

: Clip, 2

E

(White)

Driver’s side

A

B

C

D

E

F

A

B

A

B

C

D

E

A

B

Passenger’s side

C

C

Fastener Locations

: Clip, 3

E

: Clip, 2

G

(White)

A

B

C

D

E

F

G

G

E

E

D

A

A

3. Remove the kick panel (A).

–1 Pull out the door opening trim (B) as needed

from the kick panel hooks (C) and the door
opening flange.

–2 Release the clip (D).
–3 Pull the panel out by hand to detach the clip (E),

then remove it. Driver’s: Pull the panel back to
release it from the hood release handle (F).

4. Detach the hooks (A) from the B-pillar lower trim

(B) and rear seat side trim (C), and pull the rear
door sill trim (D) up by hand to detach the clips (E),
then remove it.

5. If necessary, pull the rear threshold trim (F) up to

detach the clips (G), then remove the trim.

(cont’d)


Content   ..  353  354  355  356   ..