Great Wall Hover. Manual - part 55


  Index      Great Wall     Great Wall Hover - service repair manual


Search            copyright infringement  


Content   ..  53  54  55  56   ..


Great Wall Hover. Manual - part 55


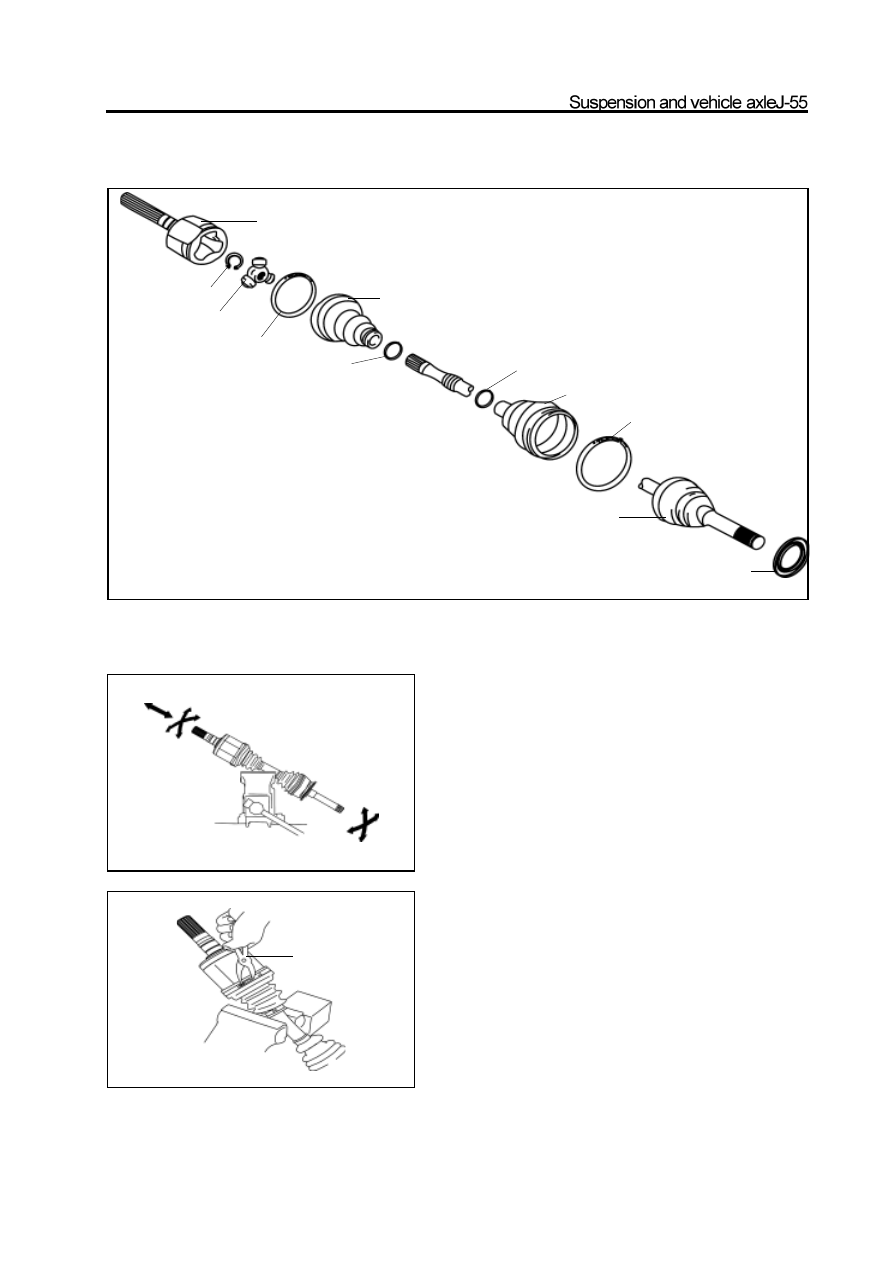
Constant-speed drive shaft assembly

pliers

Disassembly of constant-speed drive shaft

assembly

1. Check the front drive shaft assembly

a.  Check the inner trumpet connector; it could slide in axial

direction smoothly.

b. Check the universal-joint position; it should be without the

clear clearance in radius direction.

c. Check the inner and outer jacket for damage.

Caution: It should use the pad when clamp the front drive

shaft to avoid the damage of it.

2. Remove the large clip of inner jacket

Caution: Do not damage the inner and outer jacket

inner trumpet connector

circlip

three-pin section assembly

large clip of inner jacket

inner jacket

small clip of inner jacket

small clip of outer jacket

outer jacket

large clip of outer jacket

outer trumpet connector

dustproof cover

a. Make the assembly mark on the inner trumpet connector and

three-pin section assembly.

Caution: remove the grease in the connector before make the

mark and don’t make the mark by the hard object such as

punch.

b. Remove the inner trumpet connector.

4. Disassembly of three-pin section assembly

a. Use the circlip pliers to remove the circlip.

b. Use the adz and hand hammer to make the assembly mark on

the shaft and three-pin section assembly.

    c. Use the cooper bar and hand hammer to remove the three-pin

section.

Caution: Remove the cooper chip on the shaft or three-pin

section assembly if has.

5. Remove the inner jacket

a. Use the pliers to disassemble the small clip of inner jacket.

b. Pull out the inner jacket.

Caution: Remove the grease in the jacket and maintain the

clean field.

6. Use the straight screwdriver to disassemble the

large and small clip of outer jacket.

assembly mark

assembly mark

7. Remove the outer jacket

Caution: Clean the protective jacket and remove the grease on

the outer trumpet connector. Do not disassemble the outer

trumpet connector.

8. Use the screwdriver and hand hammer to remove

the dustproof cover.

Assembly of constant-speed drive shaft assembly

1. Use the hand hammer and screwdriver to install

the dustproof cover

Caution: The dustproof cover should be replaces when

itisdeformed heavily.

2. Install the large clip of outer jacket, outer jacket

and small clip of outer jacket.

Caution: The outer jacket should be replaced when it is

damaged or aged heavily and warp the end of the shaft with the

plastic band and coat with small grease before insert it.

3. Insert the small clip of inner jacket, inner jacket

and large clip of inner jacket.

Caution: The inner jacket should be replaced when it is

damaged or aged heavily.

4. Install the three-pin section assembly on the front

drive shaft.

a.Let the end of three-pin section assembly with chamfer faces the

   shaft inner direction.

Caution: The three-pin section assembly should be replaced if

its needle bearing position is damaged.

b.Align the assembly mark made before disassembly.

c. Use the hand hammer and copper bar to install the three-pin sec

    tion assembly to the front drive shaft.

d.Use the circlip pliers to install the new circlip.

5 Install the outer jacket on the outertrump  etconn

     ector.

       Fill the jacket with the grease supplied with the jacket before

       install the jacket.

       (Recommend used grease is CAPLEX or KY1)

       Grease using amount: About 110g

with chamfer


Content   ..  53  54  55  56   ..