Dodge Durango (HB). Manual - part 1555


  Index      Dodge     Dodge Durango (HB) - service repair manual 2005 year


Search            


Content   ..  1553  1554  1555  1556   ..


Dodge Durango (HB). Manual - part 1555


ASSEMBLY

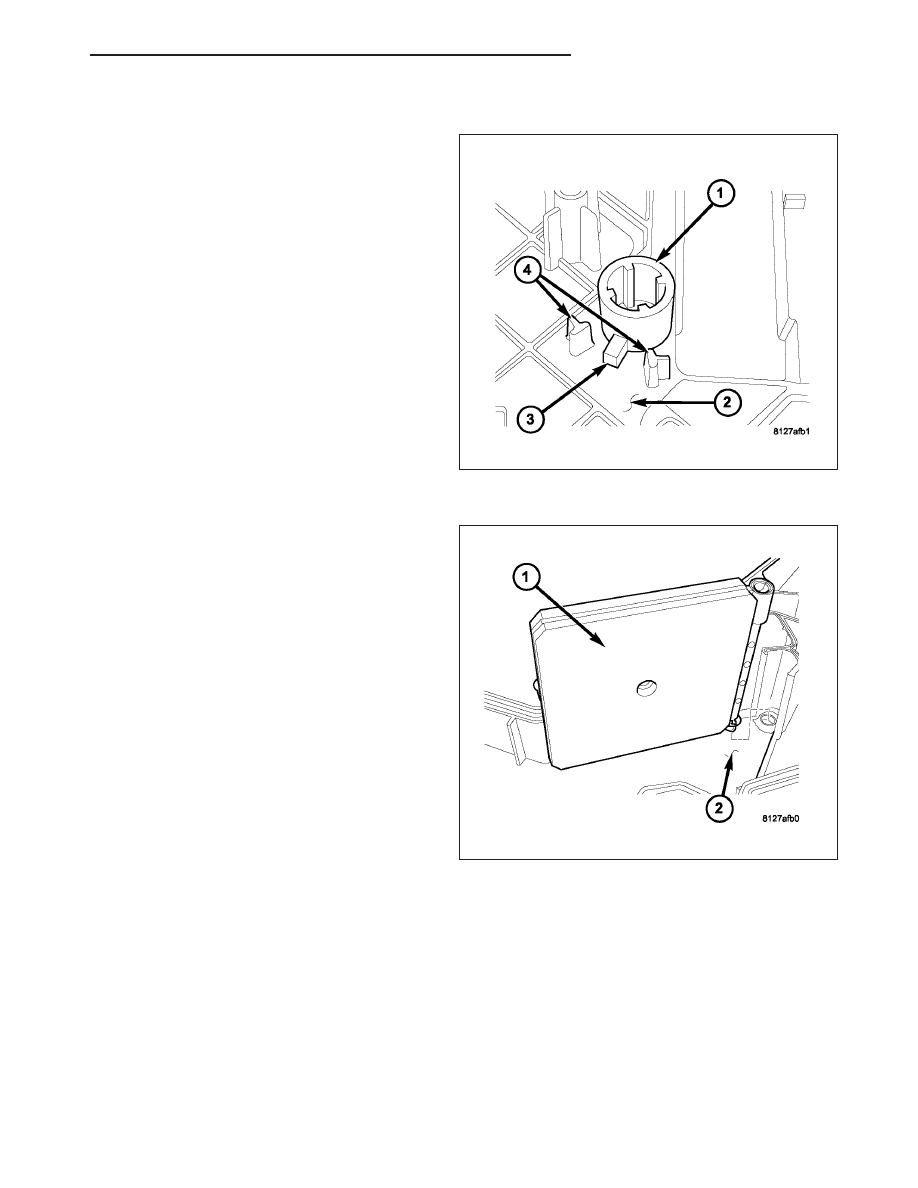
1. If removed, install the two actuator couplers (1) into

the rear HVAC housing. Be sure to install the cou-
plers with the coupler arm (3) located between the
two stop tabs (4) on the HVAC housing.

2. Install the blend-air door (1) and the mode-air door

into the rear HVAC housing (2).

HB

DISTRIBUTION - REAR

24 - 413

3. Align the pivot shafts of the blend-air door (4) and

the mode-air door (5) to the actuator couplers (6)
and install the two halves of the rear HVAC hous-
ing (2) together.

4. Install the screws (3) that secure the two halves of

the rear HVAC housing together. Tighten the
screws to 2 N·m (17 in. lbs.).

5. Install the HVAC wire harness (1). Make sure the

harness is routed through all wiring retainers.

6. Install the rear A/C evaporator (1), rear expansion

valve (2) and the rear extension line bracket (3) as
an assembly into the top of the rear HVAC housing
(4). Make sure that the evaporator drain is clean
and unrestricted and that the evaporator insulator
is properly installed.

24 - 414

DISTRIBUTION - REAR

HB

7. Install the two screws (6) that secure the rear

extension line flange bracket (7) to the bottom of
the rear HVAC housing (2). Tighten the screws to 2
N·m (17 in. lbs.).

8. Install the rear heater core (5) into the side of the

rear HVAC housing. Make sure that the insulator is
properly installed.

9. Install the rear heater core retaining bracket (4).

10. Install the screw (3) that secures the rear heater

core retaining bracket to the rear HVAC housing.
Tighten the screw to 2 N·m (17 in. lbs.).

11. Connect the condensate drain tube (1) to the rear

HVAC housing.

12. Install the outer halve of the rear heater core and

evaporator extension line flange (3).

13. Install the screws (2) that secure the two halves

of the rear heater core and evaporator extension
line flange together. Tighten the screws to 2 N·m
(17 in. lbs.).

14. Install the foam seal (1) to the rear heater core

and evaporator extension line flange.

HB

DISTRIBUTION - REAR

24 - 415

15. Install the blend door actuator (2) and the mode

door actuator (3) to the rear HVAC housing (4)
(Refer to 24 - HEATING & AIR CONDITIONING/
CONTROLS - REAR/ACTUATOR-BLEND DOOR
- INSTALLATION) and (Refer to 24 - HEATING &
AIR CONDITIONING/CONTROLS - REAR/AC-
TUATOR-MODE DOOR - INSTALLATION).

16. Connect the rear HVAC wire harness (1) to the

rear blend door actuator and mode door actuator.

17. Install the rear air inlet housing (6) onto the rear

HVAC housing (1).

18. Install the screws (5) that secure the rear air inlet

housing to the rear HVAC housing. Tighten the
screws to 2 N·m (17 in. lbs.).

19. If removed, install the rear blower motor resistor

(4) (Refer to 24 - HEATING & AIR CONDITION-
ING/CONTROLS

-

REAR/RESISTOR-BLOWER

MOTOR - INSTALLATION).

20. If removed, install the rear blower motor (3) (Refer

to 24 - HEATING & AIR CONDITIONING/DISTRI-
BUTION - REAR/MOTOR-BLOWER - INSTALLA-
TION).

21. Connect the rear HVAC wire harness (2) to the

rear blower motor and the rear blower motor
resistor.

22. Install the rear HVAC housing (Refer to 24 -

HEATING & AIR CONDITIONING/DISTRIBUTION
- REAR/HOUSING-HVAC - INSTALLATION).

24 - 416

DISTRIBUTION - REAR

HB


Content   ..  1553  1554  1555  1556   ..