Dodge Dakota (R1). Manual - part 721


  Index      Dodge     Dodge Dakota (R1) - service repair manual 2000 year


Search            


Content   ..  719  720  721  722   ..


Dodge Dakota (R1). Manual - part 721


TRANSMISSION SOLENOID/
TRS ASSEMBLY

DESCRIPTION

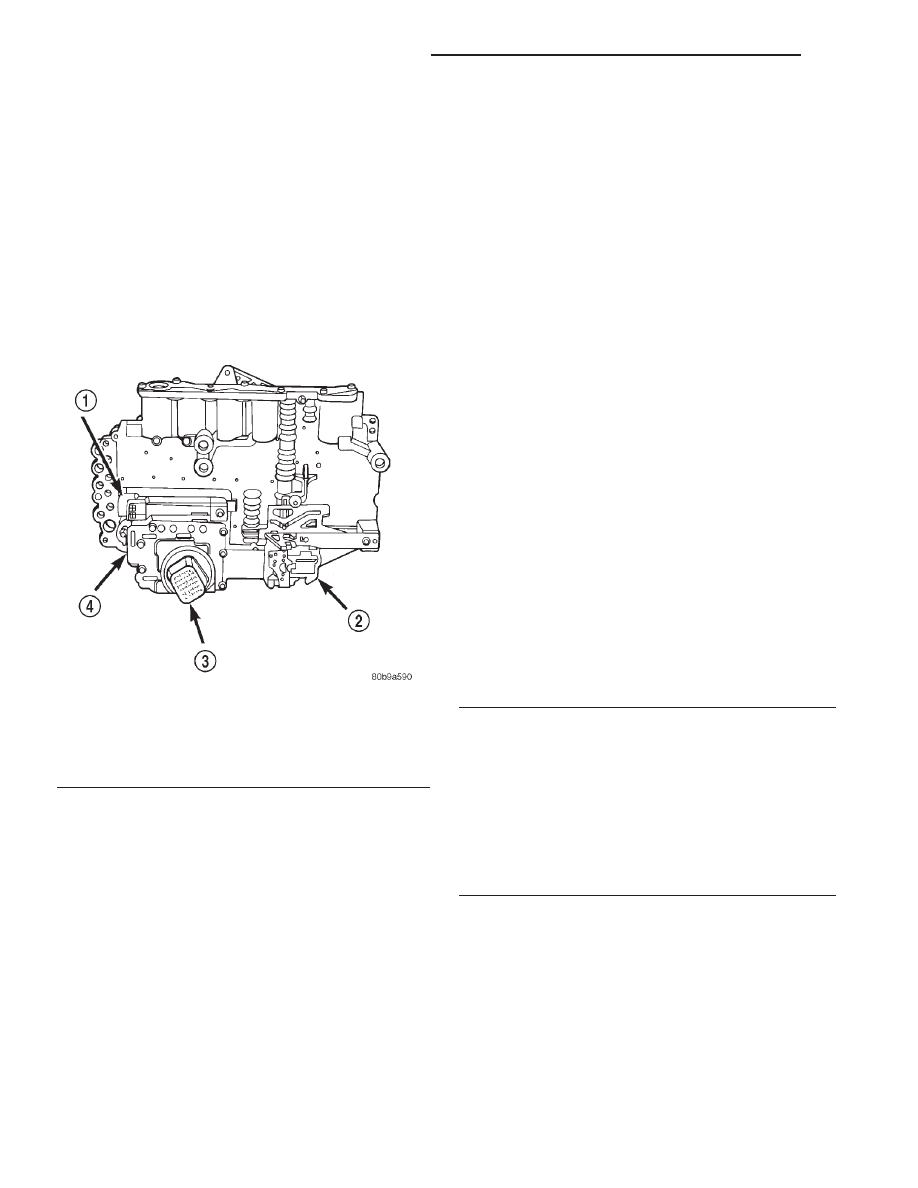
The transmission solenoid/TRS assembly is inter-

nal to the transmission and mounted on the valve
body assembly (Fig. 115). The assembly consists of
six solenoids that control hydraulic pressure to the
six friction elements (transmission clutches), and the
torque converter clutch. The pressure control sole-
noid is located on the side of the solenoid/TRS assem-
bly. The solenoid/TRS assembly also contains five
pressure switches that feed information to the TCM.

OPERATION

SOLENOIDS

Solenoids are used to control the L/R, 2C, 4C, OD,

and UD friction elements. The reverse clutch is con-
trolled by line pressure and the position of the man-
ual valve in the valve body. All the solenoids are
contained within the Solenoid and Pressure Switch
Assembly. The solenoid and pressure switch assembly
contains one additional solenoid, Multi-Select (MS),
which serves primarily to provide 2nd and 3rd gear
limp-in operation.

The solenoids receive electrical power from the

Transmission Control Relay through a single wire.
The TCM energizes or operates the solenoids individ-
ually by grounding the return wire of the solenoid as
necessary. When a solenoid is energized, the solenoid
valve shifts, and a fluid passage is opened or closed
(vented or applied), depending on its default operat-
ing state. The result is an apply or release of a fric-
tional element.

The MS and UD solenoids are normally applied to

allow transmission limp-in in the event of an electri-
cal failure.

The continuity of the solenoids and circuits are

periodically tested. Each solenoid is turned on or off
depending on its current state. An inductive spike
should be detected by the TCM during this test. If no
spike is detected, the circuit is tested again to verify
the failure. In addition to the periodic testing, the
solenoid circuits are tested if a speed ratio or pres-
sure switch error occurs.

PRESSURE SWITCHES

The TCM relies on five pressure switches to moni-

tor fluid pressure in the L/R, 2C, 4C, UD, and OD
hydraulic circuits. The primary purpose of these
switches is to help the TCM detect when clutch cir-
cuit hydraulic failures occur. The switches close at 23
psi and open at 11 psi, and simply indicate whether
or not pressure exists. The switches are continuously
monitored by the TCM for the correct states (open or
closed) in each gear as shown in the following chart:

GEAR

L/R

2C

4C

UD

OD

R

OP

OP

OP

OP

OP

P/N

CL

OP

OP

OP

OP

1ST

CL*

OP

OP

CL

OP

2ND

OP

CL

OP

CL

OP

2ND

PRIME

OP

OP

CL

CL

OP

D

OP

OP

OP

CL

CL

FOURTH

OP

OP

CL

OP

CL

*L/R is closed if output speed is below 100 rpm in

Drive and Manual 2. L/R is open in Manual 1.

A Diagnostic Trouble Code (DTC) will set if the

TCM senses any switch open or closed at the wrong
time in a given gear.

Fig. 115 Transmission Solenoid/TRS Assembly

1 - PRESSURE CONTROL SOLENOID
2 - TRANSMISSION RANGE SENSOR
3 - 23-WAY CONNECTOR
4 - SOLENOID PACK

21 - 528

AUTOMATIC TRANSMISSION - 45RFE

AN

REMOVAL

(1) Remove the valve body from the transmission

(Fig. 116).

(2) Remove the screws holding the transmission

solenoid/TRS assembly onto the valve body (Fig. 117).

(3) Separate the transmission solenoid/TRS assem-

bly from the valve body.

INSTALLATION

(1) Place TRS selector plate in the PARK position.
(2) Position the transmission solenoid/TRS assem-

bly onto the valve body. Be sure that both alignment
dowels are fully seated in the valve body and that
the TRS switch contacts are properly positioned in
the selector plate

(3) Install the screws to hold the transmission

solenoid/TRS assembly onto the valve body.

(4) Tighten the solenoid assembly screws adjacent

to the arrows cast into the bottom of the valve body
first. Tighten the screws to 5.7 N·m (50 in.lbs.).

(5) Tighten the remainder of the solenoid assembly

screws to 5.7 N·m (50 in.lbs.).

(6) Install the valve body into the transmission.

TRANSMISSION
TEMPERATURE SENSOR

DESCRIPTION

The transmission temperature sensor is a ther-

mistor that is integral to the Transmission Range
Sensor (TRS).

OPERATION

The transmission temperature sensor is used by

the TCM to sense the temperature of the fluid in the
sump. Since fluid temperature can affect transmis-
sion shift quality and convertor lock up, the TCM
requires this information to determine which shift
schedule to operate in.

Calculated Temperature

A failure in the temperature sensor or circuit will

result in calculated temperature being substituted for
actual temperature. Calculated temperature is a pre-
dicted fluid temperature which is calculated from a
combination of inputs:

• Battery (ambient) temperature

• Engine coolant temperature

• In-gear run time since start-up

Fig. 116 Valve Body Bolts

1 - VALVE BODY TO CASE BOLT (6)

Fig. 117 Ttransmission Solenoid/TRS Assembly

Screws

1 - SOLENOID PACK BOLTS (15)

AN

AUTOMATIC TRANSMISSION - 45RFE

21 - 529

TRANSMISSION SOLENOID/TRS ASSEMBLY (Continued)

VALVE BODY

DESCRIPTION

The valve body consists of a cast aluminum valve

body, a separator plate, and a transfer plate. The
valve body contains valves and check balls that con-
trol fluid delivery to the torque converter clutch,
bands, and frictional clutches. The valve body con-
tains the following components (Fig. 118) and (Fig.
119):

• Solenoid switch valve

• Manual valve

• Low/reverse switch valve

• 5 Accumulators

• 7 check balls

Fig. 118 Valve Body Components

1 - LOW/REVERSE ACCUMULATOR

6 - OVERDRIVE ACCUMULATOR

2 - LOW/REVERSE SWITCH VALVE

7 - UNDERDRIVE ACCUMULATOR

3 - UPPER VALVE BODY

8 - 4C ACCUMULATOR

4 - MANUAL VALVE

9 - 2C ACCUMULATOR

5 - SOLENOID SWITCH VALVE

Fig. 119 Check Ball Locations

21 - 530

AUTOMATIC TRANSMISSION - 45RFE

AN

OPERATION

NOTE: Refer to the Hydraulic Schematics for a
visual aid in determining valve location, operation
and design.

SOLENOID SWITCH VALVE

The Solenoid Switch Valve (SSV) controls the direc-

tion of the transmission fluid when the L/R-TCC sole-
noid is energized.

The Solenoid Switch Valve controls line pressure

from the LR-TCC solenoid. In 1st gear, the SSV will
be in the downshifted position, thus directing fluid to
the L/R clutch circuit. In 2nd, 3rd, and 4th gears, the
solenoid switch valve will be in the upshifted position
and directs the fluid into the torque converter clutch
(TCC) circuit.

When shifting into 1st gear, a special hydraulic

sequence is performed to ensure SSV movement into
the downshifted position. The L/R pressure switch is
monitored to confirm SSV movement. If the move-
ment is not confirmed (the L/R pressure switch does
not close), 2nd gear is substituted for 1st. A DTC will
be set after three unsuccessful attempts are made to
get into 1st gear in one given key start.

MANUAL VALVE

The manual valve is a relay valve. The purpose of

the manual valve is to direct fluid to the correct cir-
cuit needed for a specific gear or driving range. The
manual valve, as the name implies, is manually oper-
ated by the driver with a lever located on the top of
the valve body. The valve is connected mechanically
by a cable to the gearshift mechanism. The valve is
held in each of its positions by a roller detent spring
(Fig. 120) that engages the “roostercomb” of the TRS
selector plate.

LOW/REVERSE SWITCH VALVE

The low/reverse switch valve allows the low/reverse

clutch to be operated by either the LR/CC solenoid or
the MS solenoid.

REMOVAL

The valve body can be removed for service without

having to remove the transmission assembly.

The valve body can be disassembled for cleaning

and inspection of the individual components. (Refer
to 21 - TRANSMISSION/TRANSAXLE/AUTOMATIC
- 45RFE/VALVE BODY - DISASSEMBLY)

(1) Shift transmission into PARK.
(2) Raise vehicle.
(3) Disconnect wires at the solenoid and pressure

switch assembly connector.

(4) Position drain pan under transmission oil pan.

(5) Remove transmission oil pan.
(6) Remove the primary oil filter from valve body.

(Fig. 121)

Fig. 120 TRS Selector Plate and Detent Spring

1 - TRS SELECTOR PLATE
2 - DETENT SPRING
3 - CLUTCH PASSAGE SEALS

Fig. 121 Remove Primary Oil Filter

1 - PRIMARY OIL FILTER
2 - COOLER RETURN FILTER
3 - COOLER RETURN FILTER BYPASS VALVE
4 - VALVE BODY

AN

AUTOMATIC TRANSMISSION - 45RFE

21 - 531

VALVE BODY (Continued)


Content   ..  719  720  721  722   ..