BMW 3 (E46). Manual - part 144
 

  Index      BMW     BMW 3 (E46) - service repair manual 2006 year


Search            


Content   ..  142  143  144  145   ..


BMW 3 (E46). Manual - part 144


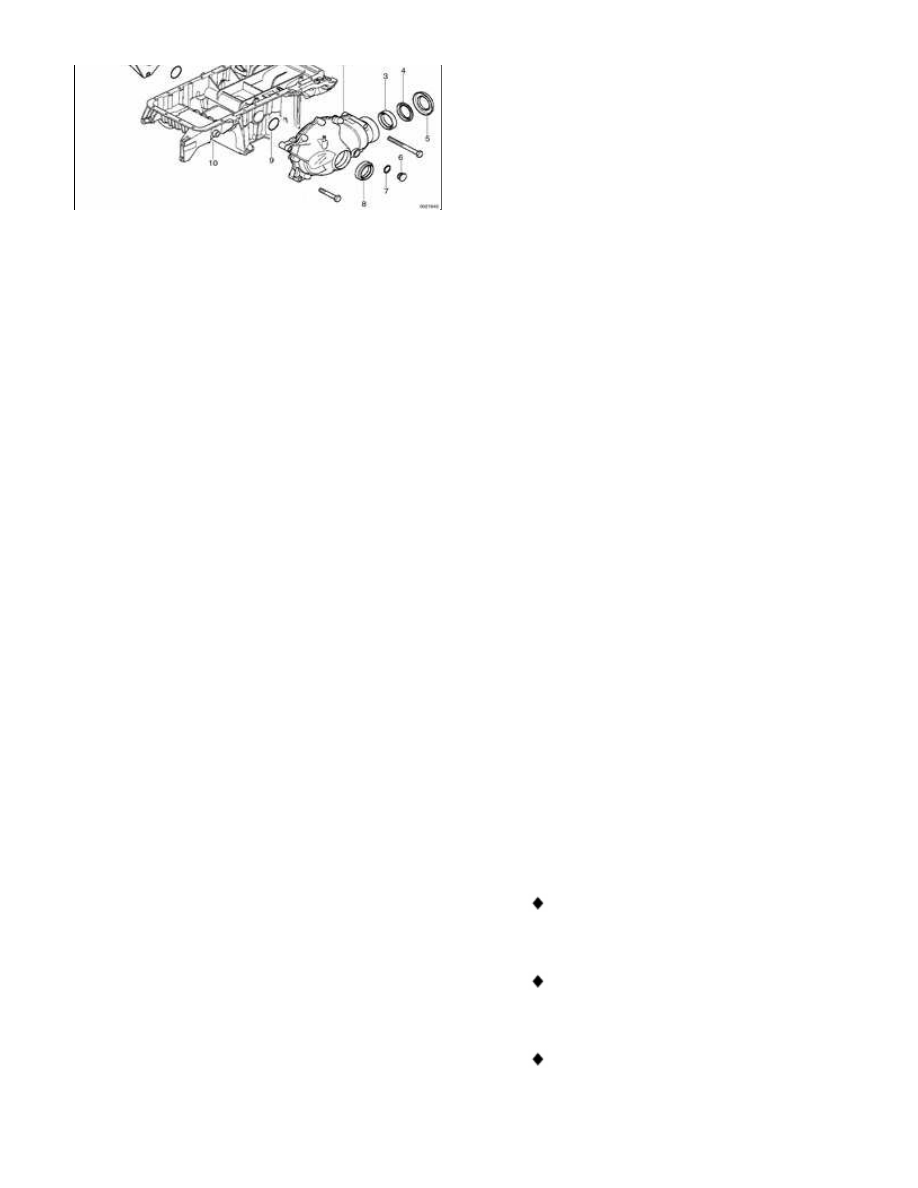
1 - Right axle bearing pedestal

2 - Front differential

3 - Input shaft seal

4 - Small dustcover

5 - Large dustcover

6 - Differential plug

7 - Plug sealing ring

8 - Drive axle radial seal with lock

ring, left

9 - O-ring

10 - Engine oil pan

11 - Drive axle radial seal with lock

ring, right

Note:

Remove protective sleeve from new
drive axle radial seal before installing
seal and save for use during drive axle
installation. Drive axle radial seal is
equipped with protective covering to
prevent sealing lip from damage during
installation.

 -

Using BMW special tool 31 5 130
or equivalent drift, drive radial seal
into differential housing or bearing
pedestal.

Coat sealing lip of radial seal with
transmission fluid.

Drive radial seal into differential or
bearing pedestal.

Insert protective sleeve into radial
seal.

Insert inboard end of drive axle
partially into differential housing or
bearing pedestal.

Withdraw protective sleeve from
sealing lip, cut protective sleeve
and remove sleeve.

Continue installing drive axle until
spring clip snaps audibly into
place.

Note:

Always replace spring clip on inboard
end of drive axle before reinstalling into
differential housing or bearing pedestal.

 -

Installation is reverse of removal,
noting the following:

Make sure inboard end of drive
axle audibly snaps into place.

Replace control arm bracket bolts.

Top up differential fluid. See 

Front differential oil, checking and
filling

Tightening torques

Inner ball joint
bracket to front
axle subframe

77 Nm (57 ft-lb)

Brake caliper to
steering arm

110 Nm (81

ft-lb)

Control arm
bracket to front
axle subframe
(replace bolts)

59 Nm (44 ft-lb)


Outer CV joint boot, replacing

Note:

When replacing CV boots, use
complete boot repair kits. A kit will
include a new boot, clamping bands,
special lubricant, and a new outer CV
joint axle circlip. A kit is available from
an authorized BMW dealer parts
department.

 -

Remove drive axle from vehicle as
described earlier.

 -

Release retaining clamps from
both ends of outer CV boot.

 -

Using a hammer, pound outer CV
joint off drive axle.

 -

Using a flat blade screw driver, pry
spring clip off drive axle splines.

 -

Clean all old lubricant off axle
splines.

Note:

To inspect a CV joint, clean away
grease and look for galling, pitting and
other signs of wear or physical damage.
Polished surfaces or visible ball tracks
alone are not necessarily cause for
replacement. Discoloration due to
overheating indicates lack of
lubrication.

 -

Place new clamping bands and
CV boot over drive axle.

 -

Replace spring clip on splined
end of drive axle.

 -

Apply Loctite® 270 or an
equivalent heavy-duty locking
compound to drive axle splines.

WARNING!

Do not let locking compound contact
balls in joint. Apply only a thin coat
to cover splines.

 -

Pack outer CV joint with fresh
grease. Tap CV joint onto splined
end of drive axle until spring clip
snaps audibly into place.

CV joint lubricant capacity

Outer CV joint

80 gram (2.8 oz.)

 -

Using clamp pliers, secure
retaining clamp into position
tightly sealing large end of boot
against CV joint.

Note:

Before installing each small boot clamp
be sure to "burp" boot by flexing CV
joint as far over as it will go. A small
screw-driver inserted between boot and
axle-shaft will help the process.

 -

With outer CV boot full of grease,
and any air eliminated from boot,
secure small end of CV boot onto
CV joint by securing clamp with
pliers.

 -

Installation is reverse of removal,
noting the following:

Make sure inboard end of drive
axle audibly snaps into place.


Content   ..  142  143  144  145   ..