Snowmobile Arctic Cat (2008 year). Manual - part 110


  Index      Snowmobiles / ATV     Snowmobile Arctic Cat - service manual 2008 year


Search            


Content   ..  108  109  110  111   ..


Snowmobile Arctic Cat (2008 year). Manual - part 110


6-84

Troubleshooting

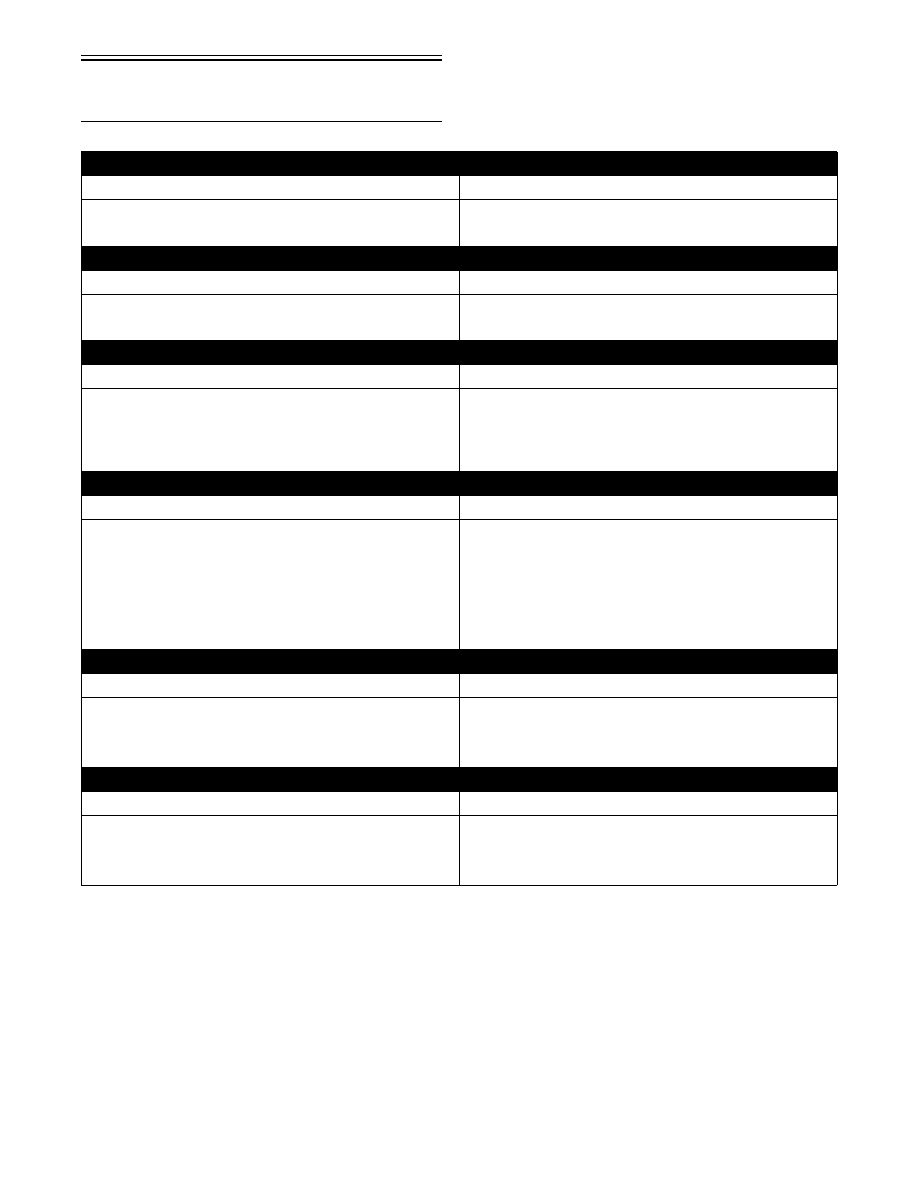
Hydraulic Brake System

Problem: Caliper Leaks

Condition

Remedy

1. Caliper O-ring deteriorated — severed

1. Replace O-ring

2. Piston — O-ring damaged

2. Repair piston — replace piston — O-ring

Problem: Lever Spongy — Bottoms Out

Condition

Remedy

1. Brake system air bubbles present

1. Bleed brake system

2. Master cylinder damaged — faulty

2. Replace master cylinder

Problem: Oscillation Feedback in Lever

Condition

Remedy

1. Brake pad residue present on brake disc

1. Replace pads — clean disc

2. Caliper loose

2. Tighten mounting bolts

3. Brake disc warped — cracked — damaged — mis-

aligned

3. Replace disc — driven shaft bearing

Problem: Loss of Brake

Condition

Remedy

1. Brake fluid overheated — contaminated

1. Replace fluid

2. Master cylinder damaged — faulty

2. Replace master cylinder

3. Caliper — brake hose leaking

3. Replace caliper O-ring — repair piston —replace pis-

ton — O-ring — brake hose

4. Air ducts obstructed — missing

4. Remove obstruction — replace air ducts

5. Brake lever linkage damaged

5. Repair — replace lever — mounting bolt

Problem: Brakes Drag

Condition

Remedy

1. Master cylinder damaged — faulty

1. Replace master cylinder

2. Brake disc warped — damaged — misaligned

2. Replace disc — driven shaft bearing

3. Brake pads worn — tapered

3. Replace pads

Problem: Snowmobile Won’t Stop — Have to Pull Too Hard on Lever

Condition

Remedy

1. Pads/brake disc glazed

1. Replace pads — clean disc

2. Brake lever binding

2. Loosen pivot bolt — replace master cylinder

3. Caliper pistons binding

3. Service caliper assembly

7-1

7

SECTION 7 — TRACK/REAR 

SUSPENSION

TABLE OF

CONTENTS

Track/Rear Suspension ........................................... 7-2
Understanding the Suspension ............................... 7-2
Suspension Setup Basics ....................................... 7-3
Chassis and Skid Frame 

Mounting Locations.............................................. 7-6

Servicing Chart ....................................................... 7-9

Repair Procedure 1.............................................. 7-9
Repair Procedure 2............................................ 7-41
Repair Procedure 3............................................ 7-72
Repair Procedure 4............................................ 7-90
Repair Procedure 5.......................................... 7-113

Drive Sprocket Locations .................................... 7-136
Servicing ACT Shock .......................................... 7-138
Servicing Position Sensitive Shock ..................... 7-141
Rebuilding/Recharging Fox Air Shocks ............... 7-146
Servicing Fox Zero Pro Shock Absorbers ........... 7-151
Shaft Eyelet ......................................................... 7-156
Pressurizing Rebuildable Shocks ........................ 7-156
Troubleshooting Track ......................................... 7-157

7-2

Track/Rear Suspension

SPECIAL TOOLS

A number of special tools must be available to the

technician when servicing the track and rear suspen-

sion.

„NOTE: Special tools are available from the Arc-
tic Cat Service Parts Department.

Understanding the 

Suspension

GENERAL

Quick acceleration and the ability to go through the

turns with power are the most important handling

qualities. This section explains how the skid frame

functions to provide these two important handling

qualities. Before proceeding, however, note these

terms.

Weight Transfer — A shift in the center of gravity in

any direction depends on the force applied.

Track Tension — The amount of tightness or loose-

ness of the track when correctly mounted in the chas-

sis.

Spring Tension — The amount of force exerted on the

spring by either fork tension adjustment or eyebolt

adjustment.

Ski Pressure — The amount of force exerted down-

ward on the skis.

Good weight transfer characteristics are needed for

fast acceleration (shift of weight from skis to track)

and for cornering (shift of weight back to skis to hold

the front end in turns). Effective weight transfer

depends on suspension tension, position of rider, and

the position of the front arm limiter.

To understand how the suspension system works, think

of the entire system in terms of three points; the skid

frame rear axle center, the skid frame front arm, and

the ski saddle center.

Assume that the front arm functions as a stationary

pivot point between the rear axle center and the ski

saddle center. Also assume that the ski saddle center is

the same height off the ground as the rear axle center.

This produces the standard position arrangement.

0728-180

Under acceleration when the center of gravity is trans-

ferred to the rear of the machine, the rear suspension

collapses slightly. This brings the rear arm point down-

ward and with the front arm stationary, the teeter-totter

effect reduces the pressure on the skis, position A.

However, for controlled cornering, more pressure is

needed on the skis. So when the driver decelerates com-

ing into a corner, the center of gravity is transferred for-

ward, putting the required pressure onto the skis and

reducing the pressure on the rear suspension, position C.

0728-181

This is essentially what weight transfer is all about —

the shift of weight to the rear of the machine for posi-

tive traction and good acceleration or to the front of the

machine for positive handling and cornering control.

Description

p/n

Shock Absorber Air Pump

2603-614

Floating Piston Installation/Location Tool Kit

0644-402

Idler Wheel Puller Kit 

0644-122

Floating Piston Removal Tool

0644-348

Inflation Needle

0744-020

Rear Suspension Spring Tool

0144-311

Gas Shock Rod/Body Clamping Tool

0644-425

Spanner Wrench - Fox Float Shock

0644-453

7-3

7

Suspension Setup 

Basics

FRONT ARM SPRING TENSION

„NOTE: Read the following information closely
as it pertains to all suspensions used in the last
several years.

It is desirable to run with very light front arm spring

tension. When riding in 4 in. or more of snow, the

machine will be quicker if the front spring tension is

adjusted lightly.

If the spring tension is adjusted too stiff, the track

angle at the front of the skid frame is steep. This steep

angle prevents the snowmobile from getting up on

plane and slows down by 5 to 8 mph.

When riding in sticky snow (springtime or warm days)

or hill climbing on hard snow, it may be desirable to

stiffen the front arm spring tension. When this is done,

weight is transferred back quicker. The problem with

too much front arm spring tension is that the feel of the

snowmobile becomes very short. The reason for this is

the front arm becomes the pivot point between the

spindles and rear of the snowmobile. With dominant

spring tension on the front arm, the suspension is basi-

cally contacting the snow from a point below the front

arm to the skis or the spindle pressure point. This

makes for a very short and darting snowmobile on the

trail. This is especially true when decelerating and the

center of gravity is transferred forward.

A good method for adjusting the front spring tension

follows.

„NOTE: On those models having a coil spring
over the front arm shock absorber, the spring ten-
sion should be set as soft as possible when oper-
ating on trails and in deep snow.

0729-662

FRONT ARM LIMITER STRAPS

Under no circumstances should the front arm limiter

strap be lengthened. If lengthened, it may cause shock

absorber travel problems.

The two limiter straps can be shortened if desired. This

adjustment must be made to suit driving style and some

test driving time. With the rear arm in its present mount-

ing location, no advantage has been noted from chang-

ing the strap length. If the front arm straps are

shortened, the result will be more ski pressure and

aggressive steering.

SKI SHOCK ABSORBER SPRINGS

The shock absorber springs have been matched to the

shock valving and rear suspension. These springs are

the result of hours of testing and comparison riding

trying many different combinations of springs and

shocks. If there is a need to make changes, there are

several spring and shock sizes to choose from. While

making these changes, keep the following points in

mind.

Heavier Or Stiffer Springs

1. These will require shocks with more rebound con-

trol, or the front end will become like a pogo stick.

2. With stiffer springs, the front end will become

more aggressive in the corners as more weight will

be transferred to the skis when decelerating. Also,

more weight is transferred to the rear on accelera-

tion and can cause the rear shocks and spring to

bottom out.

3. If the springs are too stiff for general riding condi-

tions and style, the ride comfort is gone.

Spring Tension Too Soft

1. Front end bottoms out; hard on front end parts.

2. Less aggressive steering in corners on decelera-

tion, and less weight is transferred to the skis

because of softer springs.

3. Less weight gets transferred to rear of the machine

upon acceleration.

„NOTE: When softening the ski springs, also
soften the rear to match entire suspension.

! CAUTION

If the ski shock spring is adjusted too loose, the
spring retainer may fall out. If the spring is adjusted
beyond specification, the spring will coil bind and
spring adjuster damage will occur.


Content   ..  108  109  110  111   ..