Volvo V70X, C70 (2010 year). Instruction - part 7


  Index      Volvo     Volvo V70X, C70 - instruction 2010 year in english


Search            


Content   ..  5  6  7  8   ..


Volvo V70X, C70 (2010 year). Instruction - part 7


03 Your driving environment

Parking brake 

03

114

Electric parking brake

An electric parking brake has the same func-
tion as a manual parking brake.

NOTE

A faint sound from the parking brake's
electric motor can be heard when the
parking brake is being applied. This
sound can also be heard during the
automatic function check of the parking
brake.

The brake pedal will move slightly when
the electric parking brake is applied or
released.

Low battery voltage

If the battery voltage is too low, the parking
brake cannot be applied or released. Connect
an auxiliary battery if the battery voltage is too
low, see page 105.

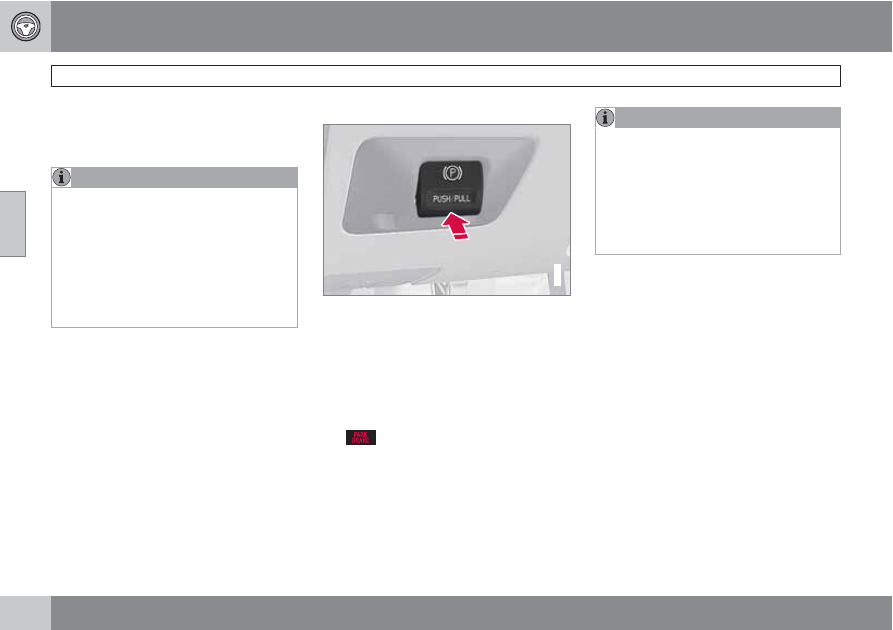
Applying the electric parking brake

G021354

Parking brake control

1.

Press firmly on the brake pedal.

2.

Push the control.

3.

Release the brake pedal and ensure that
the vehicle is at a standstill.

4.

When the vehicle is parked, the gear selec-
tor must be in position P.

The 

 symbol in the instrument panel

flashes while the parking bake is being applied,
and glows steadily when the parking brake has
been fully applied.

NOTE

In an emergency the parking brake can
be applied when the vehicle is moving
by holding in the control. Braking will be
interrupted when the accelerator pedal
is depressed or the control is released.

An audible signal will sound during this
procedure if the vehicle is moving at
speeds above 6 mph (10 km/h).

Parking on a hill

If the vehicle is pointing uphill, turn the front
wheels so that they point away from the
curb.

If the vehicle is pointing downhill, turn the
front wheels so that they point toward the
curb.

03 Your driving environment

 Parking brake

03

``

*


Option/accessory, for more information, see Introduction.

115

Releasing the electric parking brake

G021359

Parking brake control

Manual release

1.

Fasten the seat belt.

2.

Insert the remote key in the ignition slot.

3.

Press firmly on the brake pedal.

4.

Pull the parking brake control.

Vehicles with Keyless drive*

1.

Press the START/STOP ENGINE button.

2.

Press firmly on the brake pedal.

3.

Pull the parking brake control.

Automatic release

1.

Start the engine.

NOTE

For safety reasons, the parking brake is
only released automatically if the engine
is running and the driver is wearing a seat
belt.

The electric parking brake will be
released immediately when the acceler-
ator pedal is pressed and the gear selec-
tor is in position D or P.

2.

Fasten the seat belt

3.

Move the gear selector to position D or R
and press the accelerator pedal. The park-
ing brake will release when the vehicle
begins to move.

Heavy load uphill

A heavy load, such as a trailer, can cause the
vehicle to roll backward when the parking
brake is released automatically on a steep
incline. To help avoid this:

1.

Keep the electric parking brake lever
pushed in with the left hand while shifting
into Drive with the right.

2.

While pressing the throttle pedal to pull
away, release the parking brake lever only
after the vehicle begins to move.

Symbols

Symbol

Specification

Read the message in the infor-
mation display

A flashing symbol indicates that
the parking brake is being
applied. If the symbol flashes in
any other situation then this
means that a fault has arisen.
Read the message on the infor-
mation display.

Messages

G016556

Parking brake not fully released

 – A fault is

preventing the parking brake from being
released. Contact an authorized Volvo work-

03 Your driving environment

Parking brake 

03

116

shop. If you drive off with this error message
showing, a warning signal sounds.

Parking brake not applied

 – A fault is pre-

venting the parking brake from being applied.
Try to apply and release. Contact a Volvo work-
shop if the message remains.

Parking brake Service required

 – A fault has

arisen. Contact a Volvo workshop if the fault
remains.

WARNING

If the vehicle must be parked before the fault
has been corrected, always put the gear
selector in P and turn the wheels so that
they point away from the curb if the vehicle
is pointing uphill or toward the curb if it is
pointing downhill.

03 Your driving environment


03

117

G020908

118

*


Option/accessory, for more information, see Introduction.

Menus and messages........................................................................... 120

Climate system..................................................................................... 124

Audio system........................................................................................ 131

Bluetooth

®

 hands-free connection....................................................... 145

Trip computer........................................................................................ 151

Compass............................................................................................... 153

Stability system..................................................................................... 154

Active chassis system–Four C.............................................................. 156

Cruise control........................................................................................ 157

Collision warning with Auto-brake*....................................................... 159

Adaptive Cruise Control (ACC)*............................................................ 165

Distance alert ....................................................................................... 172

Driver Alert System* ............................................................................. 175

Park assist*........................................................................................... 180

Blind Spot Information System*............................................................ 183

Passenger compartment convenience................................................. 187

04

C O M F O R T   A N D   D R I V I N G   P L E A S U R E

04 Comfort and driving pleasure

Menus and messages 

04

120

*


Option/accessory, for more information, see Introduction.

Center console

Certain functions are controlled from the center
console via the menu system or from the key-
pad in the steering wheel. Each function is
described under its respective section.

The current menu level is shown at the top right
of display in the center console.

Center console controls

Center console with information display and con-
trols for menus

Navigation button – scrolls and selects
among menu options

ENTER – selects menu options

MENU – accesses the menu system

EXIT – leads back one step in the menu
structure. A long press exits the menu sys-
tem.

Steering wheel keypad

ENTER

EXIT

Navigation buttons.

Buttons (1-3) on the steering wheel keypad
have the same function as those in the center
console.

Search paths

Access to some functions is provided directly
via the function buttons and others are
accessed through the menu system.

Search paths to the menu system functions are
listed as follows: 

Car settings

Lock

settings

, if the following steps have been taken

first:

1.

Press MENU.

2.

Scroll to 

Menu

 and press ENTER.

3.

Scroll to 

Submenu

 and press ENTER.

The navigation button can be used instead of
ENTER and EXIT when navigating the menu
hierarchy. The right arrow is equal to ENTER
and the left arrow to EXIT.

The menu options are numbered and can also
be selected directly with the numerical keypad
(19 only).

Menu overview

NOTE

Menu selections will not be available (will be
"grayed out") when the vehicle is moving.

Car key memory

Seat & mirror positions

Car settings

Collision warning settings*

Light settings

Lock settings

Reduced guard

1

Tire pressure

04 Comfort and driving pleasure

 Menus and messages

04

``

*


Option/accessory, for more information, see Introduction.

121

Door mirror settings

Parking camera settings (accessory)

Lane departure warning*

Steering force level*

Information

Climate settings

Automatic blower adjust

Recirculation timer

Auto. rear defroster

Reset climate settings

Main menu AM

HD radio

Audio settings

2

Sound stage

Equalizer, front

Equalizer, rear

Auto. volume control

Resets all audio settings.

Main menu FM

HD radio

FM settings

Radio text

Advanced radio settings

Audio settings

Main menu CD

Random

Off

Folder

Disc

Single disc

All discs

CD settings

Track information*

Audio settings

Main menu AUX

Volume, AUX input

Audio settings

Main menu USB

USB settings

Audio settings

Track information*

Main iPod menu

iPod settings

Audio settings

Track information*

Main Bluetooth menu

Last 10 missed calls

Last 10 received calls

Last 10 dialled calls

Phone book

Search

Copy fr. mobile phone

Bluetooth*

Connect phone

Change phone

Remove phone

Phone settings

Call options

Sounds and volume

Synchronize phone book

1

Certain models

2

The menu option for audio settings is available in all audio sources.

04 Comfort and driving pleasure

Menus and messages 

04

122

Main instrument panel

G022908

Information display and menu controls

READ – access to the list of messages and
message confirmation.

Thumbwheel – browse among menus and
options in the list of functions.

RESET – reset the active function. Used in
certain cases to select/activate a function,
see the explanation under each respective
function.

The menus shown on the information displays
in the instrument panel are controlled with the
left lever. The menus shown depend on ignition
mode. Press READ to erase a message and
return to the menus.

Menu overview

Driving distance on current fuel reserve

Average

Instantaneous:

Average speed

Current speed in mph (Canadian models
only)

DSTC

Message

G028940

When a warning, information or indicator sym-
bol comes on, a corresponding message
appears on the information display. An error
message is stored in a memory list until the
fault is rectified.

Press READ to acknowledge and scroll among
the messages.

NOTE

If a warning message appears while you are
using the trip computer, the message must
be read and confirmed by pressing READ
before the previous activity can be
resumed.

Message

Description

Stop safely

Stop and switch off
the engine. Serious
risk of damage.
Contact an author-
ized Volvo work-
shop.

Stopping the
engine

Stop and switch off
the engine. Serious
risk of damage.
Contact an author-
ized Volvo work-
shop.

Service urgent

Have the vehicle
checked by an
authorized Volvo
workshop immedi-
ately.

04 Comfort and driving pleasure

 Menus and messages

04

123

Message

Description

Service required

Have the vehicle
checked by an
authorized Volvo
workshop as soon
as possible.

See manual

Read the owner's
manual.

Book time for
maintenance

Time to book service
at an authorized
Volvo retailer.

Time for regular
maintenance

Time for regular
service at an author-
ized Volvo work-
shop. The timing is
determined by the
number of miles
driven, number of
months since the
last service, engine
running time.

Message

Description

Maintenance over-
due

If the service inter-
vals are not fol-
lowed, the warranty
does not cover any
damaged parts.
Contact an author-
ized Volvo workshop
for service.

Temporarily OFF

A function has been
temporarily
switched off and is
reset automatically
while driving or after
starting again.

Power save mode

The audio system is
switched off to save
current. Charge the
battery.

04 Comfort and driving pleasure

Climate system 

04

124

*


Option/accessory, for more information, see Introduction.

Introduction

Air conditioning

The vehicle is equipped with Electronic Climate
Control (ECC). The climate control system
cools, heats or dehumidifies the air in the pas-
senger compartment.

NOTE

The air conditioning can be switched
off, but to ensure the best possible cli-
mate comfort in the passenger com-
partment and to prevent the windows
from misting, it should always be on.

In warm weather, a small amount of
water may accumulate under the car
when it has been parked. This water is
condensation from the A/C system and
is normal.

Sensor location

The sunlight sensor is located on the top
side of the dashboard.

NOTE

The sunlight sensor monitors which side of
the car that is most exposed to sunlight.
This can mean that the temperature may
differ between the right and left-side air
vents, even if the temperatures set for both
sides of the passenger compartment are the
same.

The temperature sensor for the passenger
compartment is located below the climate
control panel.

The outside temperature sensor is located
on the door mirror.

The humidity sensor* is located in the inte-
rior rearview mirror.

NOTE

Do not cover or block the sensors with
clothing or other objects.

Side windows and moonroof

To ensure that the air conditioning works opti-
mally, the side windows, and the optional
moonroof should be closed.

Fog on the inside of the windows

The defroster function should be used to
remove fog or mist from the inside of the win-
dows. Keeping the windows clean with a com-

mercially available window washing spray will
also help prevent fogging or misting.

Temporary shut-off of the air
conditioning

The air conditioning is momentarily disen-
gaged during full-throttle acceleration or when
driving uphill with a trailer. This may result in a
temporary increase in cabin temperature.

Ice and snow

Always keep the air intake grille at the base of
the windshield free of snow.

Climate system maintenance

Special tools and equipment are required to
maintain and carry out repairs on the climate
system. Work of this type should only be done
by a trained and qualified Volvo service tech-
nician.

Refrigerant

Volvo cares about the environment. The air
conditioning system in your car contains a
CFC-free refrigerant – R134a. This substance
will not deplete the ozone layer. The air condi-
tioning system contains 1.8 lbs (800 g) of
R134a. The systems uses PAG oil.

Passenger compartment filter

Replace the cabin air filter with a new one at
the recommended intervals. Please refer to

04 Comfort and driving pleasure

 Climate system

04

``

125

your Warranty and Service Records Informa-
tion booklet, or consult a trained and qualified
Volvo service technician for these intervals.
The filter should be replaced more often when
driving under dirty and dusty conditions. The
filter cannot be cleaned and therefore should
always be replaced with a new one.

NOTE

There are different types of cabin air filters.
Ensure that the correct type is installed.

Interior Air Quality System (IAQS)

A multifilter helps reduce gases and particles
in the incoming air, thereby reducing the levels
of odors and contaminants entering the vehi-
cle. The air quality sensor detects increased
levels of contaminants in the outside air. When
the air quality sensor detects contaminated
outside air, the air intake closes and the air
inside the passenger compartment is recircu-
lated, i.e. no outside air enters the vehicle. The
filter also cleans recirculated passenger com-
partment air.

NOTE

Contact your Volvo retailer for IAQS air filter
replacement intervals.

Menu settings

The default settings for three of the climate
system's functions can be changed in the
menu system, see page 120:

Blower speed in automatic mode, see
page 127.

Recirculation timer for passenger com-
partment air, see page 128.

Automatic rear window defrosting, see
page 97.

The functions can also be returned to factory
settings in the menu system.

Air distribution

G017699

The incoming air is distributed from 20 different
vents in the passenger compartment.

Air distribution is fully automatic in AUTO
mode.

If desired, air distribution can be controlled
manually, see page 130.

Air vents in the dashboard

G021367

Open

Closed

Horizontal airflow

Vertical airflow

Direct the outer air vents toward the side win-
dows to defrost.

04 Comfort and driving pleasure

Climate system 

04

126

*


Option/accessory, for more information, see Introduction.

Air vents in the door pillars

G021368

Open

Closed

Horizontal airflow

Vertical airflow

Direct the outer air vents toward the side win-
dows to defrost.

Direct the vents into the passenger compart-
ment to help maintain the desired temperature
in the rear seat.

Electronic climate control, ECC

Ventilated front driver's seat*

Blower

Heated front driver's seat*

Air distribution

Ventilated front passenger's seat*

Auto

Heated front passenger's seat*

Temperature control, passenger's side

A/C – On/Off

Heated rear window and door mirrors, see
page 97.

Defroster (maximum effect)

Recirculation/Air quality system

Temperature control, driver's side

Ventilated front seats*

The ventilation system consists of fans in the
seats and backrests that draw air through the
seat upholstery. The cooling effect increases
as the air in the passenger compartment
becomes cooler.

The ventilation is controlled by the ECC sys-
tem, which takes into account the seat tem-
perature, sunlight in the passenger compart-
ment, and the ambient temperature.

The ventilation can be used at the same time
as seat heating.

The ventilation system can be activated when
the engine is running. There are three comfort
levels that produce different cooling and dehu-
midification effects:

Level three: press the button once for
maximum output – three indicator lights
come on.

Level two: press the button twice for a
lower output – two indicator lights come
on.

04 Comfort and driving pleasure

 Climate system

04

``

*


Option/accessory, for more information, see Introduction.

127

Level one: press the button three times for
the lowest output – one indicator light
comes on.

Press the button a fourth time to switch off
the function – the indicator light will go out.

Blower control

Turn the control clockwise to
increase or counterclockwise
to decrease the blower
speed. Pressing the AUTO
switch will automatically reg-
ulate blower speed and over-
ride manual adjustment.

NOTE

If the blower is turned off completely, the air
conditioning is disengaged, which may
result in fogging on the windows.

Heated front seats*

Press the button once for the
highest heat level – three indi-
cator lights come on.

Press the button twice for a
lower heat level – two indica-
tor lights come on.

Press the button three times for the lowest heat
level – one indicator light comes on.

Press the button four times to switch off the
heat – no indicator lights come on.

Heated rear seats*

G021376

Heat control for the outboard seating positions
takes place in the same way as for the front
seat.

Air distribution

The figure consists of three
buttons. When the buttons
are pressed, an indicator light
in front of the respective part
of the figure illuminates and
shows which air distribution is
selected, see page 130.

Auto

The function automatically
regulates cooling, heating,
blower speed, recirculation,
and air distribution to main-
tain the chosen temperature.
If you select one or more man-
ual functions, the other func-

tions continue to be controlled automatically.
The air quality sensor is engaged and all man-
ual settings are switched off when AUTO is
pressed. The display shows 

AUTO

CLIMATE

.

Blower speed in automatic mode can be set
under 

Climate settings

Automatic blower

adjust

. Choose between 

Low

Normal

 or

High

.

NOTE

Selecting the lowest blower speed may
increases the risk of fog forming on the win-
dows.

For a description of the menu system, see
page 120.

04 Comfort and driving pleasure

Climate system 

04

128

Temperature control

The temperatures on the
driver and passenger sides
can be set independently.
When the vehicle is started,
the most recent setting is
resumed.

NOTE

Heating or cooling cannot be speeded up by
selecting a higher/lower temperature than
the actual temperature required.

A/C – ON/OFF

The air conditioning is con-
trolled automatically by the
system when the ON light is
on. This cools/heats and
dehumidifies the incoming air.
When the OFF light is on, the
air conditioning is always dis-

engaged. Other functions are still controlled
automatically. When defroster is selected, the
air conditioning system is set for maximum
blower speed and dehumidification.

Defroster

This function defrosts/de-ices
the windshield and front side
windows. The indicator light
in the defroster button lights
when the function is active.

Blower speed increases automatically and
the air conditioning will switch on (if not
already on and if the passenger compart-
ment blower is not turned off) to dehumid-
ify the air in the passenger compartment.
Air conditioning can be switched off by
pressing the AC button.

Recirculation will not function while defrost
is engaged.

The climate system will return to its previous
settings when the defroster function is
switched off.

Recirculation/air quality system

Recirculation

This function can be used to
shut out exhaust fumes,
smoke, etc from the passen-
ger compartment. The air in
the passenger compartment
is then recirculated, i.e., no air
from outside the car is taken

into the car when this function is activated. The
indicator light in the button will illuminate when
recirculation is selected.

If the air in the car recirculates for too long,
there is a risk of condensation forming on the
insides of the windows, especially in winter.

Timer

The timer function minimizes the risk of fog-
ging, or stale air when the recirculation function
is selected by automatically switching off the
function after a certain length of time, depend-
ing on the ambient temperature. Activate/
deactivate the function under 

Climate control

settings

Recirculation timer

. For a

description of the menu system, see
page 120.

NOTE

When Defroster is selected, recirculation is
always deactivated.

04 Comfort and driving pleasure

 Climate system

04

``

*


Option/accessory, for more information, see Introduction.

129

Interior Air Quality System–IAQS*

This system consists of a mul-
tifilter and an air quality sen-
sor. The filter helps remove
gases and particles from the
incoming air, thereby reduc-
ing the amounts of odors and
contaminants entering the

vehicle. The air quality sensor detects
increased levels of contaminants in the outside
air. When the air quality sensor detects conta-
minated outside air, the air intake closes and
the air inside the passenger compartment is
recirculated, i.e., no outside air enters the vehi-
cle. The filter also cleans recirculated passen-
ger compartment air. When the AUTO button
is depressed the air quality sensor is always
engaged.

Activating the air quality sensor

Switch between the three
functions by pressing the but-
ton repeatedly.

The left orange light comes on – the air
quality sensor is disengaged.

The center green light comes on – recircu-
lation not engaged, providing it is not
required for cooling in hot weather.

The right orange light comes on – recircu-
lation is engaged.

NOTE

The air quality sensor should always be
engaged in order to obtain the best air
in the passenger compartment.

Recirculation is limited in cold weather
to avoid fogging.

If the insides of the windows start fog-
ging, disengage the air quality sensor.
Use the defroster function to increase
airflow to the front, side, and rear win-
dows.


Content   ..  5  6  7  8   ..