Volkswagen Golf / Golf GTI / Golf Variant. Manual - part 934
 

  Index      Volkswagen     Volkswagen Golf / Golf GTI / Golf Variant - service repair manual 2013 year


Search            copyright infringement  


Content   ..  932  933  934  935   ..


Volkswagen Golf / Golf GTI / Golf Variant. Manual - part 934


– Remove the Left Tail Lamp 2 - MX5- -3- outward.
Installing
Install in the reverse order of removal while paying attention to

the following:
Make sure seal between body and tail lamp housing seals prop‐

erly.
The connector must lock into place.
– Pivot the Left Tail Lamp 2 - MX5- from the outside in the rear

lid opening.

– Align at the top and center.
– Starting at the top and then the bottom install the nuts on the

Left Tail Lamp 2 - MX5- and tighten.

– Perform a function test.
Tightening Specifications
♦ Refer to 

⇒ “4.2 Overview - Rear Lid Tail Lamps”, page 137

4.3.2

Rear Lid Tail Lamp, Removing and In‐

stalling, Wagon

The removal and installation is described for the left side. Re‐

moving and installing on the right side is identical.
Removing
– Turn off the ignition and all electrical equipment.
– Remove the ignition key, if equipped.

Caution

Risk of damaging the component surfaces.

♦ When positioning a prying tool, put for example commer‐

cially available adhesive tape over the component in the

visible area.

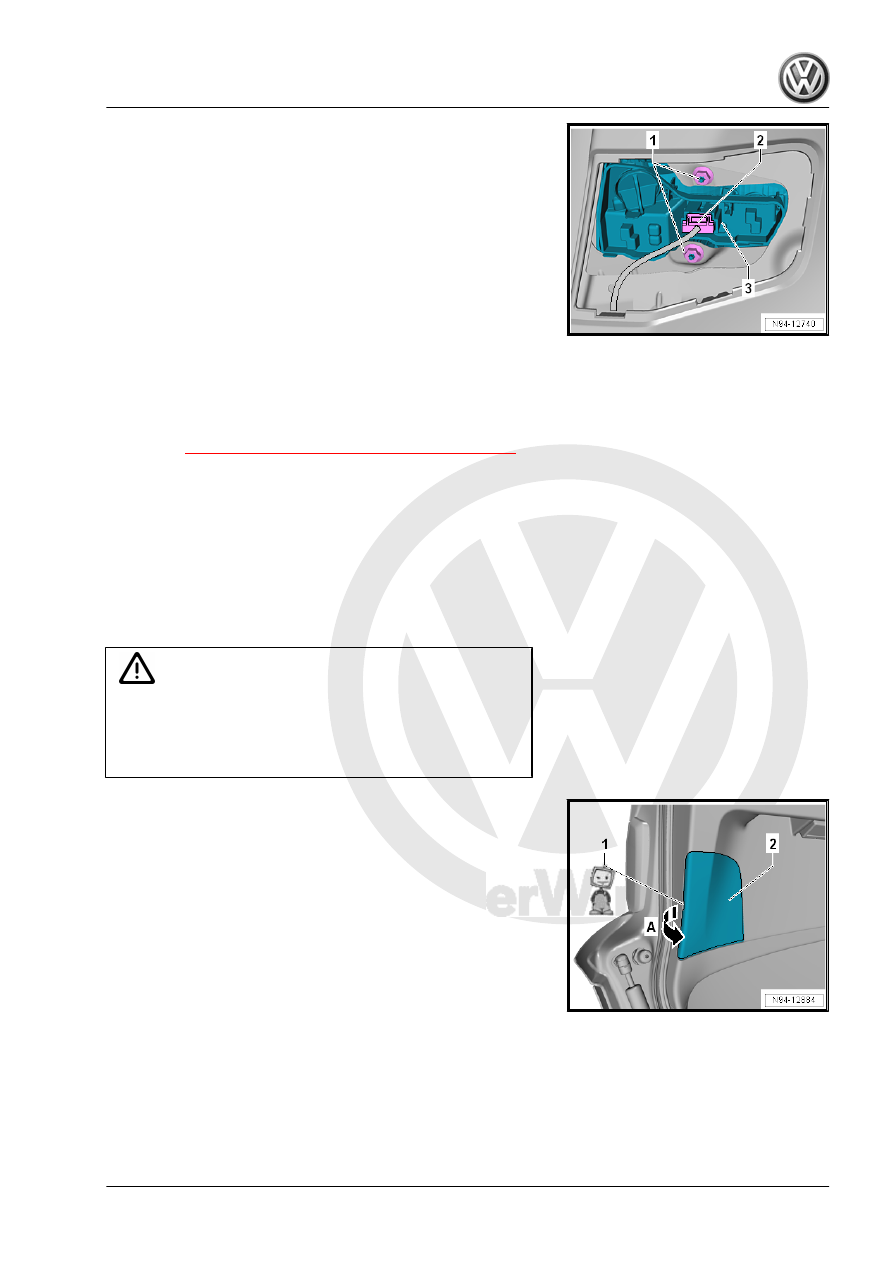
– If necessary insert a narrow screwdriver in the opening on the

side -1-.

– Remove the cover -2- in the direction of the -arrow A-.
– Disconnect the connector -2-.
– Remove the nuts -1-.

– Remove the Left Tail Lamp 2 - MX5- -3- outward.
Installing
Install in the reverse order of removal while paying attention to

the following:

Note

Make sure seal between body and tail lamp housing seals

properly.

The connector must lock into place.

– Pivot the Left Tail Lamp 2 - MX5- from the outside in the rear

lid opening.

– Align at the top and center.
– Starting at the top and then the bottom install the nuts on the

Left Tail Lamp 2 - MX5- and tighten.

– Perform a function test.
Tightening Specifications
♦ Refer to

⇒ “4.2.3 Overview - Rear Lid Tail Lamps, Wagon”, page 139

4.4

Tail Lamp, Correcting Installed Position

⇒ “4.4.1 Tail Lamp, Correcting Installed Position, Sedan”,

page 142
⇒ “4.4.2 Tail Lamp, Correcting Installed Position, Wagon”,

page 143

4.4.1

Tail Lamp, Correcting Installed Position,

Sedan

The removal and installation is described for the left side. Re‐

moving and installing on the right side is identical.
The installed position can only be corrected on the body tail lamp.
Procedure
– Turn off the ignition and all electrical equipment.
– Remove the ignition key, if equipped.
– Open the cover in the luggage compartment side trim panel.

– Loosen the fastening element -1- two turns.
– Insert a suitable screwdriver in the trim openings -2-.
The tail lamp -3- must be flush with the neighboring components.
– Adjust the installation position of the tail lamp by tightening and

loosening the adjuster.

– Tighten the fastening element -1-.
– Close the cover in the luggage compartment side trim panel.
Tightening Specifications
♦ Refer to 

⇒ “4.1 Overview - Body Tail Lamps”, page 133

4.4.2

Tail Lamp, Correcting Installed Position,

Wagon

The removal and installation is described for the left side. Re‐

moving and installing on the right side is identical.
The installed position can only be corrected on the body tail lamp.
Procedure
– Turn off the ignition and all electrical equipment.
– Remove the ignition key, if equipped.
– Remove the cover in the luggage compartment side trim pan‐

el.

– Loosen the fastening element -1- two turns.
– Insert a T10 screwdriver in the trim openings -2-.
The tail lamp -3- must be flush with the neighboring components.
– Adjust the installation position of the tail lamp by tightening or

loosening the adjuster.

– Tighten the fastening element -1-.

– Install the cover in the luggage compartment side trim panel.
Tightening Specifications
♦ Refer to

⇒ “4.1.3 Overview - Body Tail Lamps, Wagon”, page 136

4.5

Tail Lamp, Removing and Installing

⇒ “4.5.1 Tail Lamp, Removing and Installing, Sedan”, page 144
⇒ “4.5.2 Tail Lamp, Removing and Installing, Wagon”,

page 145

4.5.1

Tail Lamp, Removing and Installing, Se‐

dan

The removal and installation is described for the left side. Re‐

moving and installing on the right side is identical.
IF the LED is faulty, the tail lamp must be completely replaced.
Removing
– Turn off the ignition and all electrical equipment.
– Remove the ignition key, if equipped.
– Open the cover in the luggage compartment side trim panel.
– Disengage the connector and disconnect.
– Remove the fastening element -1-.
– Remove the tail lamp -2- in the direction of the -arrow A-.
Installing
Install in the reverse order of removal while paying attention to

the following:
– Perform a function test.
Tightening Specifications
♦ Refer to 

⇒ “4.1 Overview - Body Tail Lamps”, page 133


Content   ..  932  933  934  935   ..