Volkswagen Golf / Golf GTI / Golf Variant. Manual - part 931
3
Lamps in Exterior Rearview Mirror
⇒ “3.1 Overview - Lamps in Exterior Rearview Mirror”,
page 129
⇒ “3.2 Turn Signal, Removing and Installing”, page 130
⇒ “3.3 Exterior Rearview Mirror Entry Lamp, Removing and In‐
3.1
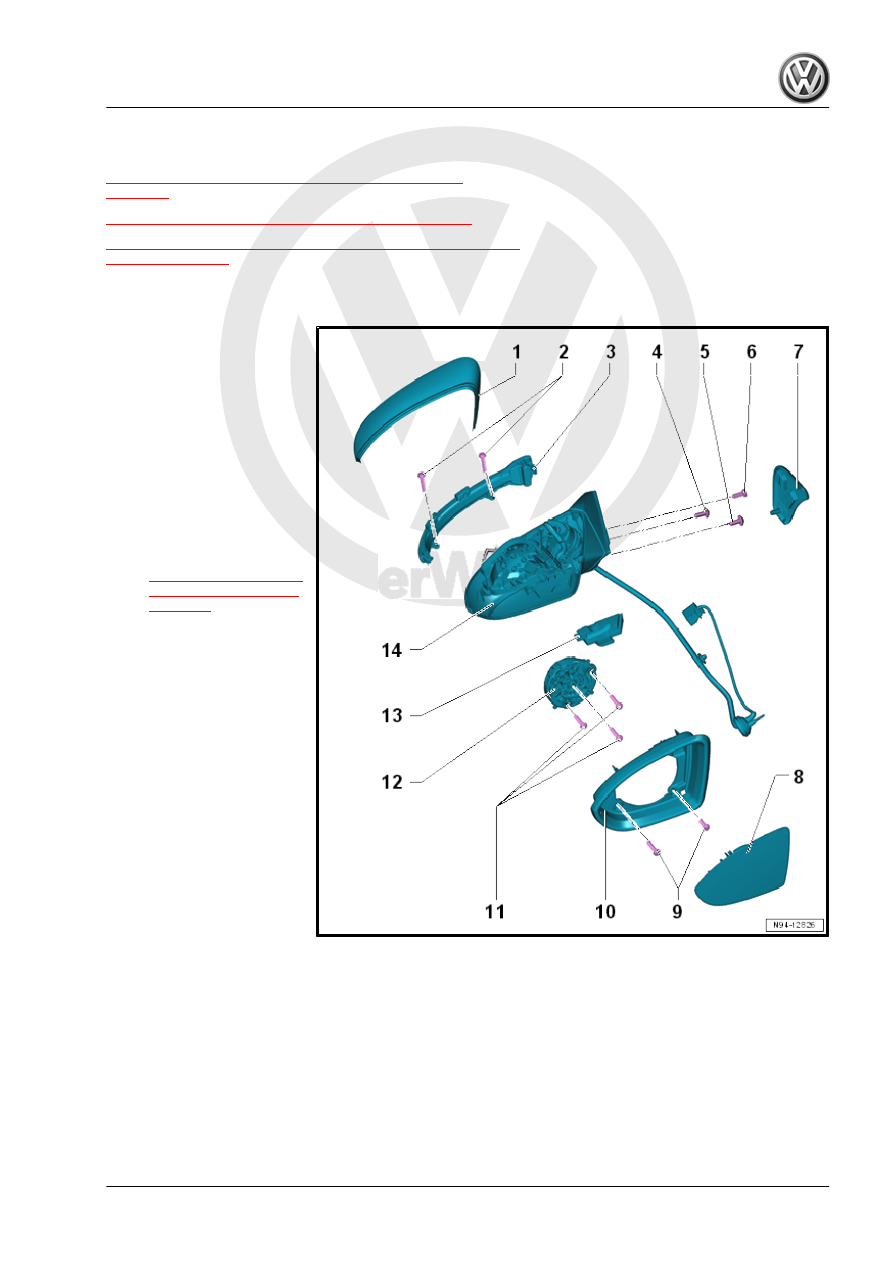
Overview - Lamps in Exterior Rearview Mirror
1 - Mirror Cap
❑ Removing and instal‐
ling. Refer to ⇒ Body
Exterior; Rep. Gr. 66 ;
Exterior Rearview Mir‐
ror; Mirror Cap, Remov‐
ing and Installing .
2 - Screw
❑ 1 Nm
❑ Quantity: 2
3 - Turn Signal
❑ Removing and instal‐
ling. Refer to
.
4 - Bolt
❑ 9 Nm
5 - Bolt
❑ 9 Nm
6 - Clip
7 - Cap
8 - Mirror Glass
❑ Removing and instal‐
ling. Refer to ⇒ Body
Exterior; Rep. Gr. 66 ;
Exterior Rearview Mir‐
ror; Mirror Glass, Re‐
moving and Installing .
9 - Bolt
❑ Quantity: 2
❑ Tightening specifica‐
tion. Refer to ⇒ Body Exterior; Rep. Gr. 66 ; Exterior Rearview Mirror; Overview - Exterior Rearview
Mirror .
10 - Mirror Trim
❑ Removing and installing. Refer to ⇒ Body Exterior; Rep. Gr. 66 ; Exterior Rearview Mirror; Mirror Trim,
Removing and Installing .
11 - Bolt
❑ Quantity: 3
❑ Tightening specification. Refer to ⇒ Body Exterior; Rep. Gr. 66 ; Exterior Rearview Mirror; Overview -
Exterior Rearview Mirror .