Volkswagen Golf / Golf GTI / Golf Variant. Manual - part 865


  Index      Volkswagen     Volkswagen Golf / Golf GTI / Golf Variant - service repair manual 2013 year


Search            copyright infringement  


Content   ..  863  864  865  866   ..


Volkswagen Golf / Golf GTI / Golf Variant. Manual - part 865


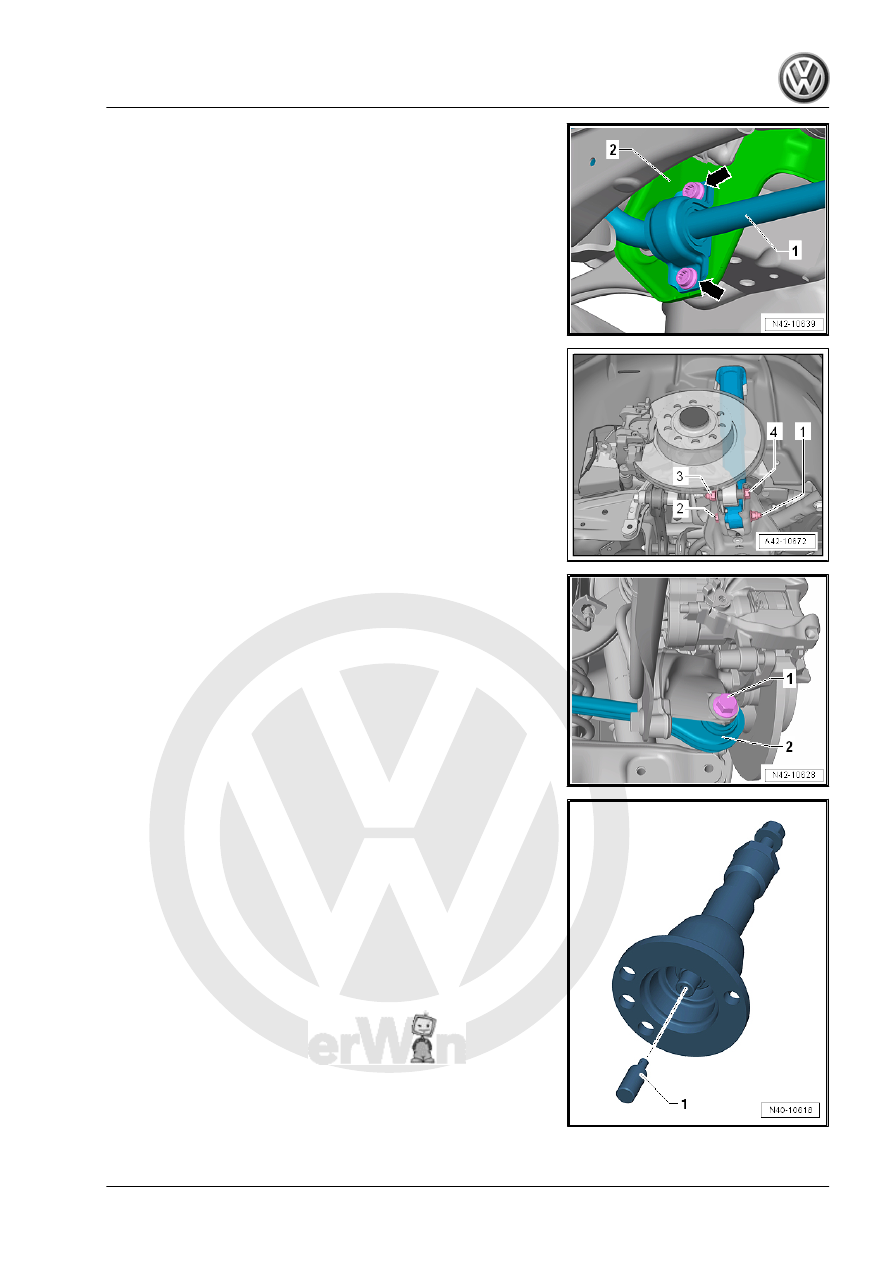
– Remove the bolts -arrows- for the stabilizer bar -1-
– Remove the stabilizer bar -1- from the subframe -2- and pivot

downward.

– Remove the nut -1- and then the bolt -2- for the shock absorber

threaded connection.

– Remove the nut -3- and then the bolt -4- for the wheel bearing

housing threaded connection.

– Remove the bolt -1- for the tie rod -2-.
– Remove the drive axle from the transmission flange.
– Tilt the wheel bearing housing outward and remove the drive

axle from the transmission flange.

If the drive axle cannot be pulled out of the wheel bearing, then

the drive axle can be pushed out of the wheel bearing using the

Drive Shaft Remover - T10520- .

Before using the Drive Shaft Remover - T10520- , make sure that

the thrust piece -1- is installed.

Using the Drive Shaft Remover - T10520- :
– Secure the Drive Shaft Remover - T10520- -1- with three

wheel bolts -2- on the wheel hub, so that the drive axle -3- can

be pressed out.

– Follow the specified sequence exactly.
I - Tighten the knurled nut -1- hand-tight.
II - Only turn the bolt -2- using a wrench and press out the drive

axle using the Drive Shaft Remover - T10520- .

Note

At the end of the tasks or to set back, the spindles must be brought

back into the original position so that the hydraulic operation can

be used.

– Pivot the drive axle downward and remove it from the wheel

bearing.

Installing
Install in reverse order of removal. Note the following:
• Only fasten the bolted connections on the wheel bearing hous‐

ing in the curb weight position.

• For vehicles with a vehicle level sensor, perform the basic set‐

ting for the wheel damping electronics. Refer to Vehicle Diag‐

nostic Tester .

• Lightly coat the splines on the outer joint with assembly paste

before installing the outer joint into the wheel hub. Refer to the

Parts Catalog.

Tightening Specifications
♦ Refer to 

⇒ “8.1 Overview - Drive Axle”, page 240

♦ Refer to

⇒ “5.1.2 Overview - Transverse Link, Multi-Link Suspension,

AWD”, page 183

♦ Refer to

⇒ “5.2.2 Overview - Tie Rod, Multi-Link Suspension, AWD”,

page 185

♦ Refer to

⇒ “6.1.2 Overview - Suspension Strut, Shock Absorber and

Spring, Multi-Link Suspension”, page 192

♦ Refer to

⇒ “2.2 Overview - Rear Level Control System Sensor”,

page 278

♦ Refer to

⇒ “8.2 Drive Axle Threaded Connection, Loosening and Tight‐

ening”, page 241

♦ Refer to

⇒ “1.1 Wheel Bolt Tightening Specifications”, page 286

• On vehicles with level control system sensor, perform head‐

lamp basic setting. Refer to ⇒  Electrical Equipment; Rep. Gr. 

94 ; Headlamp; Headlamp, Adjusting .

8.4

Drive Axle, Disassembling and Assem‐

bling

Special tools and workshop equipment required
♦ Press Plate - VW401-
♦ Press Plate - VW402-
♦ Press Piece - Rod - VW408A-

♦ Press Piece - Rod - VW411-
♦ Press Piece - 37mm - VW416B-
♦ Press Piece - Multiple Use - VW447H-
♦ Circlip Pliers - VW161A-
♦ Torque Wrench 1331 5-50Nm - VAG1331-
♦ Torque Wrench 1332 40-200Nm - VAG1332-
♦ Clamping Pliers - VAG1682A-
♦ Tripod Joint Tool - T10065-

Caution

This procedure contains mandatory replaceable parts. Refer

to component overview prior to starting procedure.

Mandatory Replacement Parts
♦ Clamps - CV Boot
Disassembling
Outer CV Joint, Pressing Off
– Secure the drive axle with protective covers in a vise clamp.
– Remove the clamp.
– Fold back boot.
– Drive CV joint from drive axle using a drift -A-.
The drift must be precisely positioned on the CV joint ball hub.
Driving Joint On

Installed Position, Plate Spring on the Outer Joint
1 - Plate Spring
– Insert a new circlip.
– Drive the joint onto the shaft using a plastic hammer until the

circlip locks into place.


Content   ..  863  864  865  866   ..