Volkswagen Golf / Golf GTI / Golf Variant. Manual - part 497


  Index      Volkswagen     Volkswagen Golf / Golf GTI / Golf Variant - service repair manual 2013 year


Search            copyright infringement  


Content   ..  495  496  497  498   ..


Volkswagen Golf / Golf GTI / Golf Variant. Manual - part 497


1.2

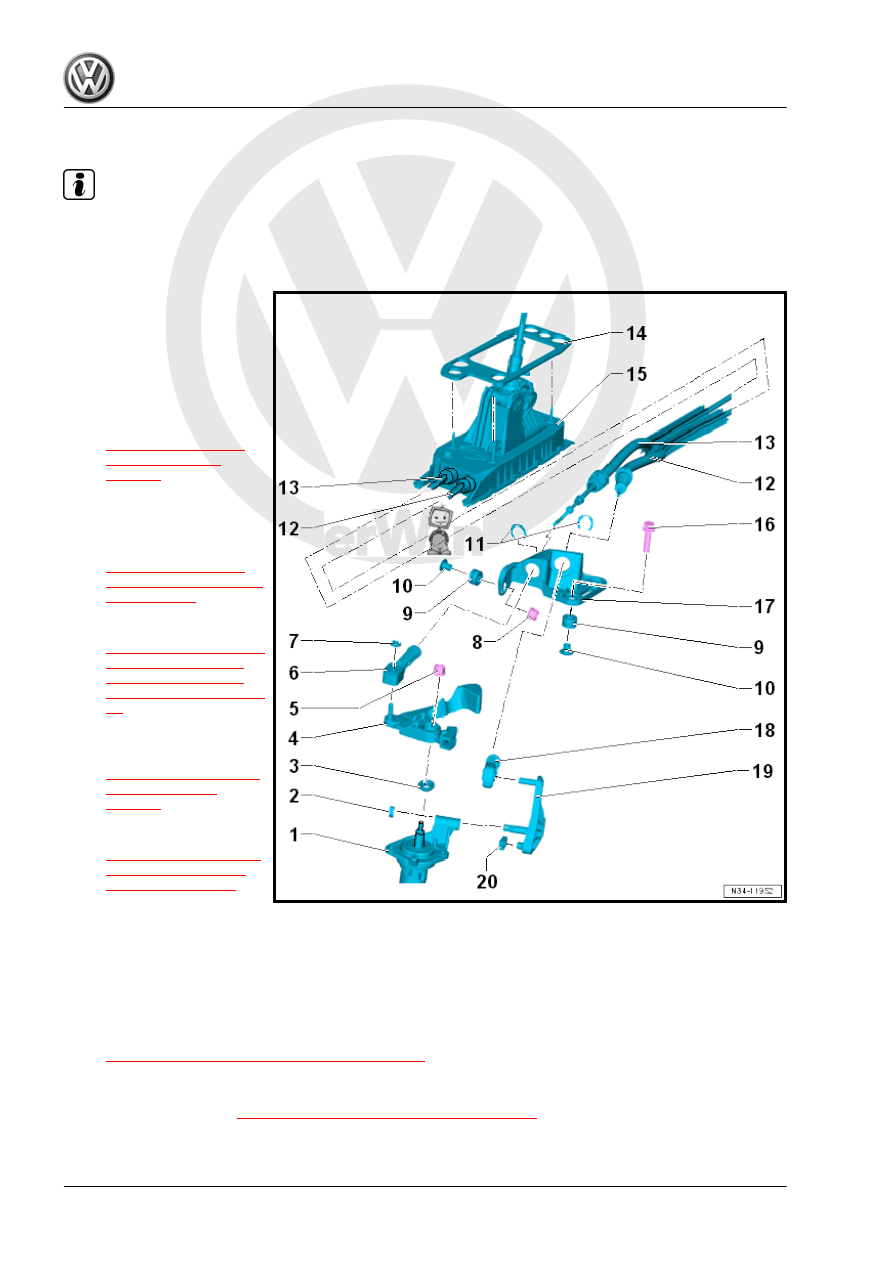
Overview - Selector Mechanism

Note

Lubricate the bearing areas and the sliding surfaces.

Grease allocation. Refer to the Parts Catalog.

1 - Shift Lever Shaft with Shift

Lever Cover
2 - Clip

❑ For the relay lever

3 - Selector Shaft Seal

❑ For the selector shaft
❑ Replacing. Refer to

⇒ “1.8 Selector Shaft

Seal, Replacing”,

page 74

 .

4 - Selector Lever

❑ Insert so that master

spline aligns with shift

rod. Refer to

⇒ Fig. ““Installing the

Transmission Shift Lev‐

er”“ , page 68

❑ To install, lubricate. Re‐

fer to

⇒ Fig. ““Relay Lever: Lu‐

bricate the Following

Areas Very Carefully

when Installing.”“ , page

69

❑ Adjust the shift lever

mechanism after instal‐

ling. Refer to

⇒ “1.6 Selector Mecha‐

nism, Adjusting”,

page 71

 .

❑ Installed position. Refer

to

⇒ Fig. ““Selector Lever/

Relay Lever Installed

Position”“ , page 68

 .

5 - Nut

❑ 25 Nm
❑ Replace after removing
❑ Self-locking

6 - Cable Retainer

❑ For attaching the shift cable to the transmission shift lever
❑ Adjust the shift lever mechanism after installing. Refer to

⇒ “1.6 Selector Mechanism, Adjusting”, page 71

 .

❑ Do not interchange, cable locking mechanisms for selector cable on linkage lever and for shift cable on

transmission shift lever are different

❑ Allocation. Refer to 

⇒ Fig. ““Cable Retainer Allocation”“ , page 68

7 - Lock Washer

❑ Replace after removing

8 - Nut

❑ 20 Nm
❑ For the cable bracket

9 - Grommet

❑ Quantity: 3
❑ Cable mounting bracket to transmission

10 - Spacer

❑ Quantity: 3

11 - Lock Washer

❑ Replace after removing
❑ Be careful not to damage the cables when removing them

12 - Selector Cable

❑ Attach to the cable retainer
❑ Installed position. Refer to 

⇒ “1.1 Selector Mechanism Installation Position”, page 59

 .

13 - Shift Lever Cable

❑ Attach to the cable retainer
❑ Installed position. Refer to 

⇒ “1.1 Selector Mechanism Installation Position”, page 59

 .

14 - Seal

❑ Between the shift lever housing and the underbody
❑ Replace after removing the shift lever housing
❑ Self-adhesive
❑ Affix to the shift lever housing

15 - Selector Housing
16 - Hex Bolt

❑ 20 Nm
❑ Quantity: 2
❑ For the cable bracket

17 - Cable Mounting Bracket

❑ Adjust after installing the selector mechanism. Refer to

⇒ “1.6 Selector Mechanism, Adjusting”, page 71

 .

18 - Cable Retainer

❑ For attaching the selector cable to the relay lever
❑ Adjust the shift lever mechanism after installing. Refer to

⇒ “1.6 Selector Mechanism, Adjusting”, page 71

 .

❑ Do not interchange, cable locking mechanisms for selector cable on linkage lever and for shift cable on

transmission shift lever are different

❑ Allocation. Refer to 

⇒ Fig. ““Cable Retainer Allocation”“ , page 68

❑ Remove from the relay lever. Refer to

⇒ Fig. ““With the Selector Relay Lever Removed: Pry the Selector Cable Retainer Out of the Selector

Relay Lever.”“ , page 67

❑ Press onto relay lever. Refer to

⇒ Fig. ““Installing the Selector Cable Retainer on the Relay Lever”“ , page 67

19 - Selector Relay Lever

❑ Allocation. Refer to the Parts Catalog.
❑ Lubricating. Refer to

⇒ Fig. ““Relay Lever: Lubricate the Following Areas Very Carefully when Installing.”“ , page 69

❑ Installed position. Refer to 

⇒ Fig. ““Selector Lever/ Relay Lever Installed Position”“ , page 68

 .

❑ Adjust the shift lever mechanism after installing. Refer to

⇒ “1.6 Selector Mechanism, Adjusting”, page 71

 .

❑ Relay lever and cable retainer, removing and installing. Refer to

⇒ Fig. ““Relay Lever with Cable Retainer, Removing and Installing”“ , page 66

20 - Sliding Shoe

1.3

Overview - Shift Lever Knob and Cover

1 - Shift Lever Housing with

Shift Lever
2 - Nut

❑ M6: 8 Nm
❑ M8: 25 Nm

3 - Bracket

❑ For the center console
❑ Overview. Refer to ⇒ 

Body Interior; Rep. Gr. 

68 ; Center Console;

Overview - Center Con‐

sole .

4 - Bracket

❑ For the center console
❑ Overview. Refer to ⇒ 

Body Interior; Rep. Gr. 

68 ; Center Console;

Overview - Center Con‐

sole .

5 - Noise Insulation
6 - Badge

❑ Can be carefully pried

off the plastic or leather

shift lever knob using

Trim Removal Wedge -

3409- .

7 - Gearshift Knob

❑ With boot
❑ Always replace together
❑ The shift knob and boot

cannot be separated

from each other.

❑ Removing and instal‐

ling. Refer to 

⇒ “1.4 Gearshift Knob, Removing and Installingg”, page 62

 .

8 - Center Console

❑ Overview. Refer to ⇒  Body Interior; Rep. Gr.  68 ; Center Console; Overview - Center Console .

9 - Clamp

❑ For securing the shift knob to the shift lever
❑ Replace after removing
❑ Secure on the shift lever knob using Hose Clamp Pliers - VAG1275- .

1.4

Gearshift Knob, Removing and Instal‐

lingg

Special tools and workshop equipment required

♦ Hose Clip Pliers - VAG1275A-
♦ Wedge Set - T10383-
♦ -T10383/1-
♦ or the equivalent equipment, Backrest Panel Tool - 3370-
Removing
– Use the -T10383/1- to carefully pry out the selector lever boot

from the center console insert in direction of -arrows-.

or

– Open the ashtray.
– Push the -3370- as illustrated, under the plastic frame for the

boot in the direction of -arrow 1- until stop.

– Remove boot with plastic frame from center console frame

-A- in the direction of -arrow 2-

– Roll the selector lever boot up over the shift lever knob.

– Open the clamp -arrow- and remove the shift lever knob with

the shift lever boot.

Installing
Install in reverse order of removal. Note the following:
– Press the shift lever knob and the selector lever boot all the

way up on the shift lever.

– Secure the gearshift knob on the gearshift lever with the clamp

-arrow-. Use the -VAG1275A- to do this.

1.5

Selector Mechanism, Removing and In‐

stalling

Special tools and workshop equipment required
♦ Torque Wrench 1331 5-50Nm - VAG1331-


Content   ..  495  496  497  498   ..