Volkswagen Golf / Golf GTI / Golf Variant. Manual - part 452


  Index      Volkswagen     Volkswagen Golf / Golf GTI / Golf Variant - service repair manual 2013 year


Search            copyright infringement  


Content   ..  450  451  452  453   ..


Volkswagen Golf / Golf GTI / Golf Variant. Manual - part 452


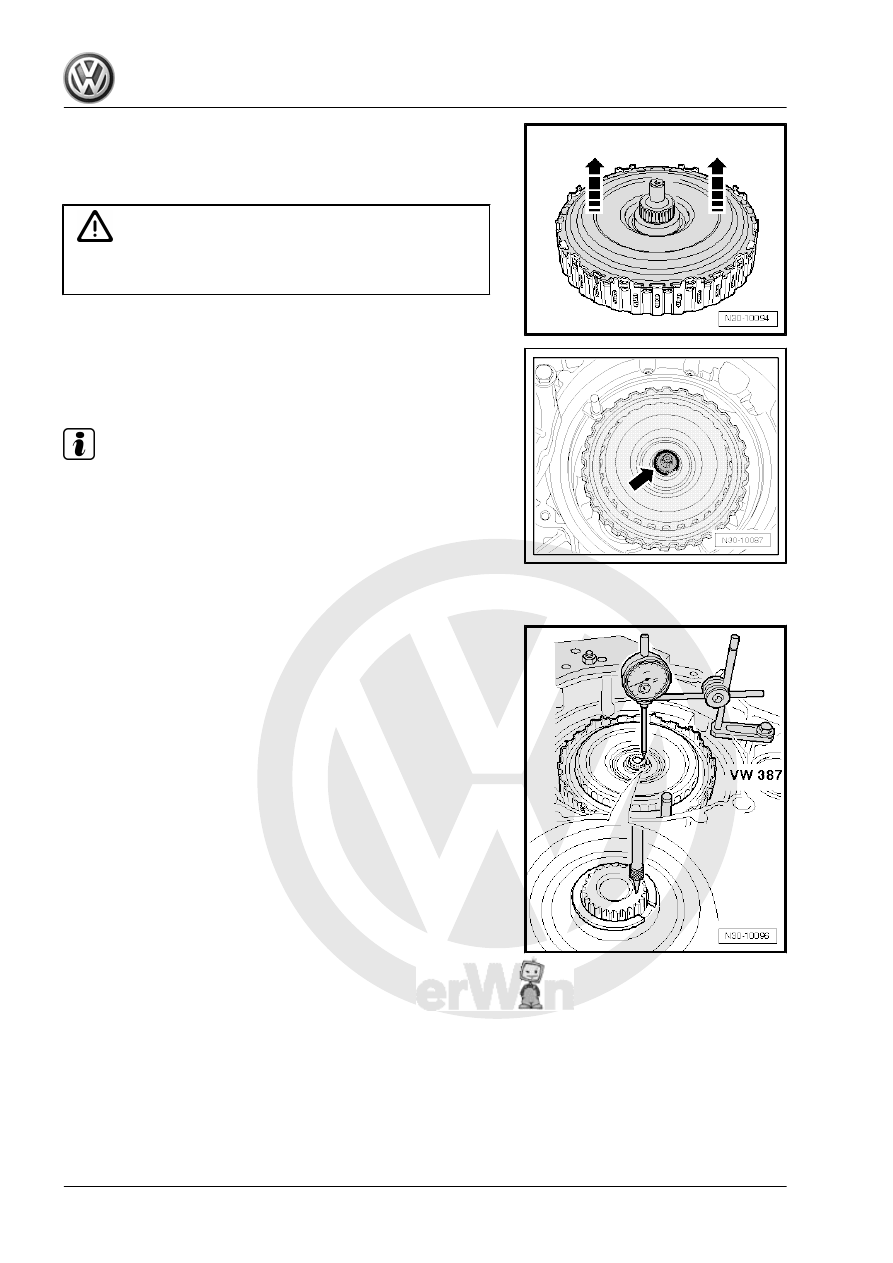
– Remove the drive plate from the installed clutch in the direction

of -arrows-, if necessary, use a screwdriver to carefully pry it

out of the teeth of the outer clutch pack carrier.

– Move the drive plate to the side.

Caution

Do not remove or lift the inner clutch pack carrier, under any

circumstances. The clutch discs could rotate themselves.

Identify the Circlip for the DSG

®

 Clutch

– Select the 2 mm thick ring from the circlips delivered and install

it -arrow-.

Note

This circlip is temporary installed for the measurement of the axial

play.

First Measurement:
• The Clutch Retaining Bar - T10303- remains installed.
– Install the Dial Gauge Holder - VW387- on the transmission

flange.

– Place the -dial gauge button- on input shaft.
– Adjust the -dial gauge- pretension to “0”.
– Raise the dual clutch up as far as the stop and note the meas‐

urement result.

Second Measurement:
• The Clutch Retaining Bar - T10303- remains installed.

– Place the gauge button

-on the hub of the large clutch pack carrier-.

• The tip of the dial may not be placed on the circlip.
– Adjust the -dial gauge- pretension again to »0«.
– Raise the clutch up as far as the stop again and note this

measurement as well

Now the Calculation Will Be Made to Determine Which of the Re‐

maining Nine Circlips Will Be Finally Installed:
The new circlip will be determined according to the following for‐

mula:

2nd Measured value – 1st Measured value + 1.85 mm = thick‐

ness of circlip to be installed

– Write down the result.
The remaining nine circlips are staggered in 0.1 mm increments.
– Measure all the circlips and determine the one that is the

closes match to the result

Determined Measurement for

the New Circlip

New Circlip

2.27 mm

2.3 mm

2.24 mm

2.2 mm

– Remove the 2 mm circlip and replace it with the circlip that was

measured.

– Dispose of all other rings remaining and the 2 millimeter thick

ring.

Note

Circlips must only be installed one time.

– Insert the pump shaft.

Note

The pump shaft must be slightly lifted and rotated in direction of

-arrow- in order for it to completely slide into the splines.

– Insert the drive plate into the DSG

®

 clutch.

• The protruding tab of the drive plate must be positioned be‐

tween the color-marked teeth of the outer clutch pack carrier.

Make note of markings that have been changed retrospec‐

tively.

Caution

Only the circlip removed beforehand from the »new« clutch

may be installed. Never install a »used« circlip.

– Install the “new” drive plate circlip.
• The circlip must be installed so that the tab of the drive plate

-arrow- and the color-marked teeth of the outer clutch pack

carrier are positioned between both ends of the circlip.

• The circlip must be completely engaged.
– Check the exact installation position of the circlip and that the

circlip is engaged using a screwdriver.

– Now remove the Clutch Retaining Bar - T10303- between the

DSG

®

 clutch and the housing.

– Install the clutch end cover. Refer to

⇒ “1.2 Clutch End Cover, Removing and Installing”, page 15

 .

2

Special Tools

Special tools and workshop equipment required
♦ Clutch Cover Plate Guide Sleeve - T10302-

♦ Clutch Retaining Bar - T10303-

♦ Dial Gauge - 0-10mm - VAS6079-

♦ Dial Gauge Holder - VW387-


Content   ..  450  451  452  453   ..