Volkswagen Golf / Golf GTI / Golf Variant. Manual - part 435


  Index      Volkswagen     Volkswagen Golf / Golf GTI / Golf Variant - service repair manual 2013 year


Search            copyright infringement  


Content   ..  433  434  435  436   ..


Volkswagen Golf / Golf GTI / Golf Variant. Manual - part 435


– Remove the pass-through cover frame.
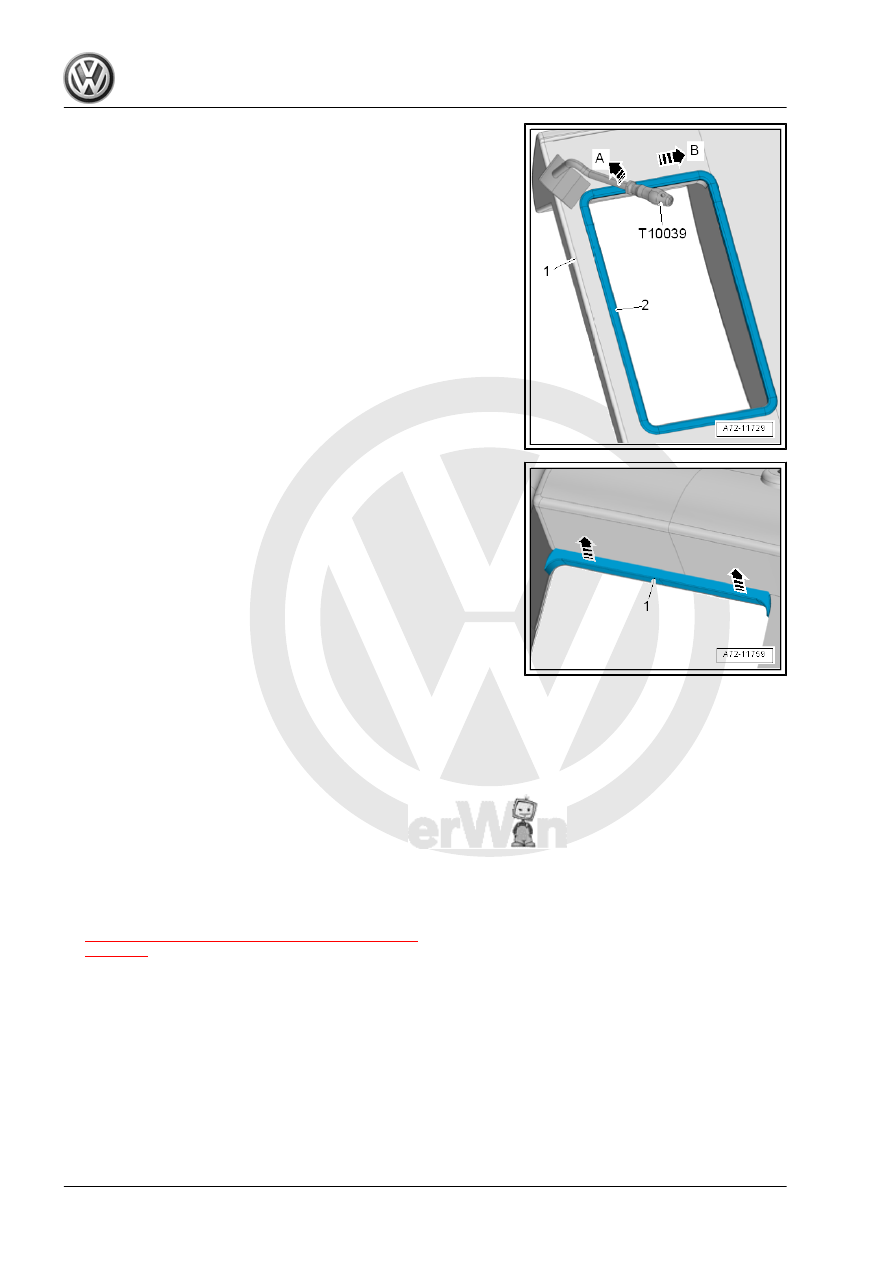
– Push the backrest cushion with backrest cover slightly aside,

and unclip the pass-through door stop strip -1- from the rear

seat backrest in direction of -arrows-.

– Remove the pass-through door stop strip.
Installing
Install in reverse order of removal.

3.12

Pass-Through Door, Removing and In‐

stalling

Special tools and workshop equipment required
♦ Torque Wrench 1410 - VAG1410-
Removing
– Fold down the center armrest and open the pass-through door.
– Remove the bolts -2-.
– Remove the center armrest with the cover -1- for the pass

through.

– Remove the center armrest. Refer to

⇒ “3.13 Center Armrest, Removing and Installing”,

page 389

 .

– Remove the lower center cushion. Refer to

⇒ “2.5 Center Cushion, Removing and Installing, Backrest with

Pass-Through”, page 422

 .

Installing
– Install the pass-through door -1- and the center armrest and

tighten the bolts hand tight.

– Close the pass-through door and align.
– Tighten the bolts -2- on the rear seat backrest.
Install in reverse order of removal.
Tightening Specifications
♦ Refer to 

⇒ “3.4 Overview - Center Armrest”, page 380

3.13

Center Armrest, Removing and Instal‐

ling

Special tools and workshop equipment required
♦ Torque Wrench 1410 - VAG1410-
Removing
– Open the pass through door -2- with the center armrest ap‐

proximately 

1

/3.

– Remove the bolts -arrows-.
– Remove the renter armrest -1- from the pass-through door.
Installing
Install in reverse order of removal.
Tightening Specifications
♦ Refer to 

⇒ “3.4 Overview - Center Armrest”, page 380

3.14

Headrest, Removing and Installing

Removing
– Press the height adjustment release button -3- on the headrest

guide -4- in direction of the -arrow-.

– At the same time, remove the headrest -1- all the way from the

rear seat backrest -2-.

– Using a small flat-head screwdriver, press the locking spring

as far as the stop through the opening -arrow- in the headrest

guide -1-.

Note

The position of the opening in the headrest guide -arrow- can ei‐

ther be in direction of travel »on the right« or »on the left side«.

– At the same time, remove the headrest -2- from the rear seat

backrest -3-.

Installing
Install in reverse order of removal.

3.15

Headrest Guide, Removing and Instal‐

ling

Note

Two commercially available screwdrivers are required for remov‐

al. Blade height: 0.4 mm, blade width: 8 mm.

Removing
– Remove the rear headrest. Refer to

⇒ “3.14 Headrest, Removing and Installing”, page 390

 .

– Press the backrest cover with backrest cushion -1- slightly

downward at the outer sides.

– Insert a screwdriver on each side of the headrest tube -3- up

to the height of the tabs in direction of -arrows- in the backrest.

Note

Place the two screwdrivers next to the retaining tabs so that the

flat side of the screwdriver blade contacts the retaining tab.

– Turn both screwdrivers 90°, which releases the headrest guide

retaining tabs.

– Carefully pry the headrest guide -2- out of the backrest using

a third screwdriver.

Installing
Install in reverse order of removal.

3.16

Side Cushion, Removing and Installing

Special tools and workshop equipment required
♦ Torque Wrench 1410 - VAG1410-
Removing

WARNING

Follow the General Safety Precautions when working with air‐

bags,  belt  tensioners  and  battery  cut-out  units  (pyrotechnic

components). 

Refer 

to

⇒ “1.2 Safety Precautions for Pyrotechnic Components”, page

3

 .

– Disconnect the battery. Refer to ⇒  Electrical Equipment; Rep.

Gr.  27 ; Battery; Battery, Disconnecting and Connecting .

– Remove the rear bench seat. Refer to

⇒ “3.7 Bench Seat/Single Seat, Removing and Installing”,

page 382

 .


Content   ..  433  434  435  436   ..