Volkswagen Golf / Golf GTI / Golf Variant. Manual - part 433


  Index      Volkswagen     Volkswagen Golf / Golf GTI / Golf Variant - service repair manual 2013 year


Search            copyright infringement  


Content   ..  431  432  433  434   ..


Volkswagen Golf / Golf GTI / Golf Variant. Manual - part 433


3.4

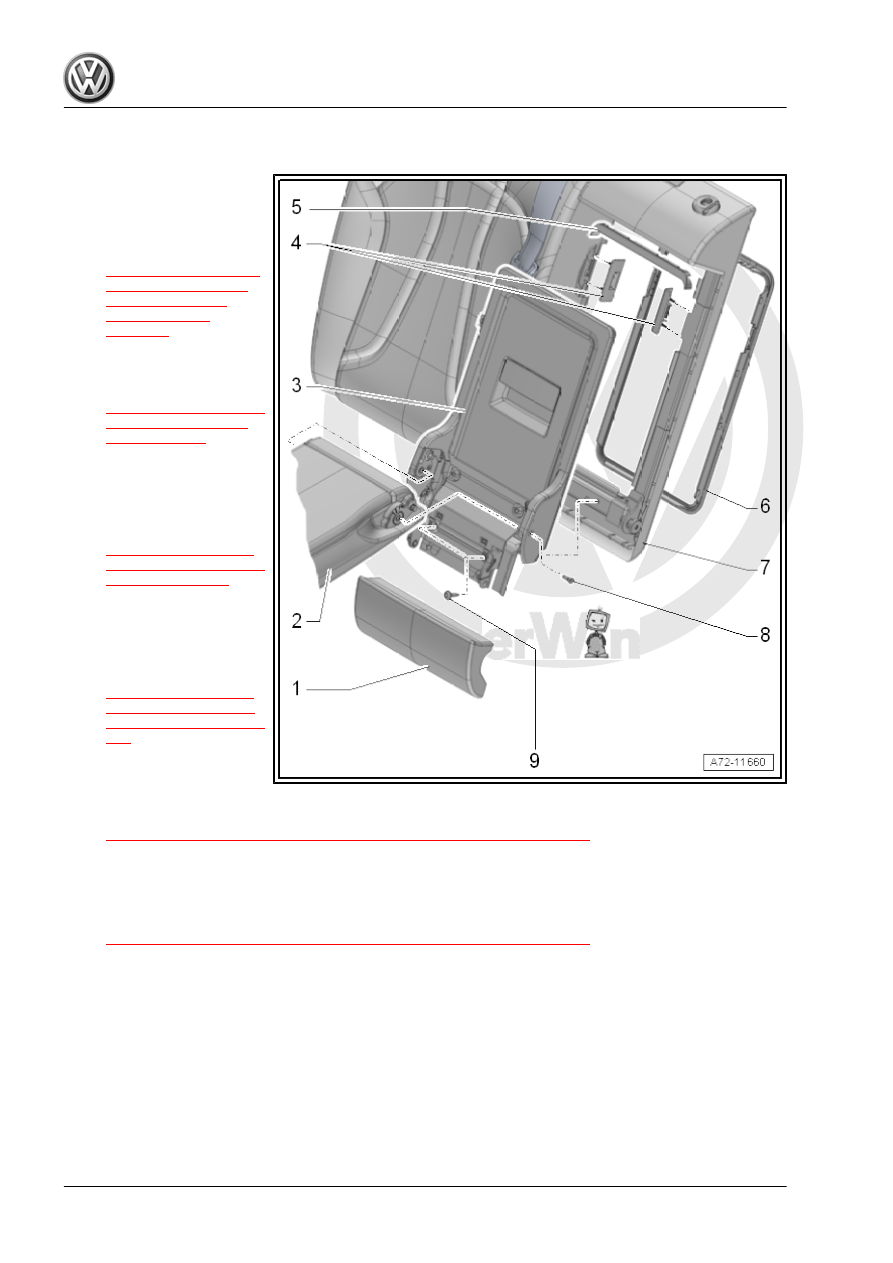
Overview - Center Armrest

1 - Center Cushion

❑ Allocation. Refer to the

Parts Catalog.

❑ Removing and instal‐

ling. Refer to

⇒ “2.5 Center Cushion,

Removing and Instal‐

ling, Backrest with

Pass-Through”,

page 422

 .

2 - Center Armrest

❑ Removing and instal‐

ling. Refer to

⇒ “3.13 Center Armrest,

Removing and Instal‐

ling”, page 389

 .

3 - Door

❑ For the pass-through

opening

❑ Removing and instal‐

ling. Refer to

⇒ “3.12 Pass-Through

Door, Removing and In‐

stalling”, page 388

 .

4 - Trim

❑ For the rear lid locking

mechanism

❑ Removing and instal‐

ling. Refer to

⇒ “3.11 Pass-Through

Cover Frame, Remov‐

ing and Installing”, page

387

 .

5 - Stop Strip

❑ Clipped into the rear

seat backrest

❑ Removing and installing. Refer to

⇒ “3.11 Pass-Through Cover Frame, Removing and Installing”, page 387

 .

6 - Cover Frame

❑ For the pass-through opening
❑ Clipped into the rear seat backrest
❑ Removing and installing. Refer to

⇒ “3.11 Pass-Through Cover Frame, Removing and Installing”, page 387

 .

7 - Right 2/3 Rear Seat Backrest

❑ With pass-through opening
❑ Allocation. Refer to the Parts Catalog.

8 - Screw

❑ 12 Nm
❑ Quantity: 2
❑ Self-tapping
❑ Replace after removing

9 - Screw

❑ 8 Nm

❑ Quantity: 2

3.5

Overview - Side Cushion

1 - Side Cushion

❑ Allocation. Refer to the

Parts Catalog.

❑ Removing and instal‐

ling. Refer to

⇒ “3.16 Side Cushion,

Removing and Instal‐

ling”, page 391

 .

2 - Mounting Grommet

❑ Clipped into the side

cushion bracket

❑ Replace if damaged

3 - Side Cushion Bracket
4 - Screw

❑ 8 Nm

5 - Nut

❑ 8 Nm

3.6

Overview - Backrest Remote Release

Note

The illustration shows the backrest remote release on the left

side. The right side is similar.

1 - Actuator for Backrest Re‐

mote Release

❑ Removing and instal‐

ling. Refer to

⇒ “3.18 Actuator for

Rear Seat Backrest Re‐

mote Release, Remov‐

ing and Installing”, page

394

 .

2 - Vehicle-Side Release Ca‐

ble

❑ Removing and instal‐

ling. Refer to

⇒ “3.19 Rear Seat Back‐

rest Remote Release

Cable, Removing and

Installing”, page 395

 .

3 - Connecting Part

❑ Release cable for back‐

rest remote release, dis‐

connecting and con‐

necting. Refer to

⇒ “3.17 Release Cable

for Rear Seat Backrest

Remote Release, Dis‐

connecting and Con‐

necting”, page 393

 .

4 - Seat-Side Release Cable

❑ Removing and instal‐

ling. Refer to

⇒ “3.19 Rear Seat Back‐

rest Remote Release

Cable, Removing and

Installing”, page 395

 .

5 - Rear Seat Backrest Locking

Mechanism

❑ Removing and instal‐

ling. Refer to 

⇒ “3.10 Rear Seat Backrest Locking Mechanism, Removing and Installing”, page 386

 .

3.7

Bench Seat/Single Seat, Removing and

Installing

Removing
– Move the front seats all the way forward.
– Unclip the guides -1- for the LATCH child seat anchor (quan‐

tity: 4) from the anchors. Refer to

⇒ “2.2 LATCH Child Seat Anchor Guide, Removing and In‐

stalling”, page 123

 .

– With both hands, grasp the rear bench seat under the seat

frame.

– Pull the rear bench seat -1- up forcefully with both hands in

direction of -arrows A- so the wire hooks -2- on the rear bench

seat release from the mounting grommet -3-.

– Repeat the procedure on the other side of the rear bench seat

in direction of -arrows B-.

– Gently lift the rear bench seat -1- at front and slide the wire

frame -2- out of the hook -3- toward the rear.

– Remove the rear bench seat from the vehicle.


Content   ..  431  432  433  434   ..