Volkswagen Golf / Golf GTI / Golf Variant. Manual - part 401


  Index      Volkswagen     Volkswagen Golf / Golf GTI / Golf Variant - service repair manual 2013 year


Search            copyright infringement  


Content   ..  399  400  401  402   ..


Volkswagen Golf / Golf GTI / Golf Variant. Manual - part 401


Removing
– Remove the instrument panel side cover. Refer to

⇒ “3.2 Instrument Panel Side Cover, Removing and Installing”,

page 211

 .

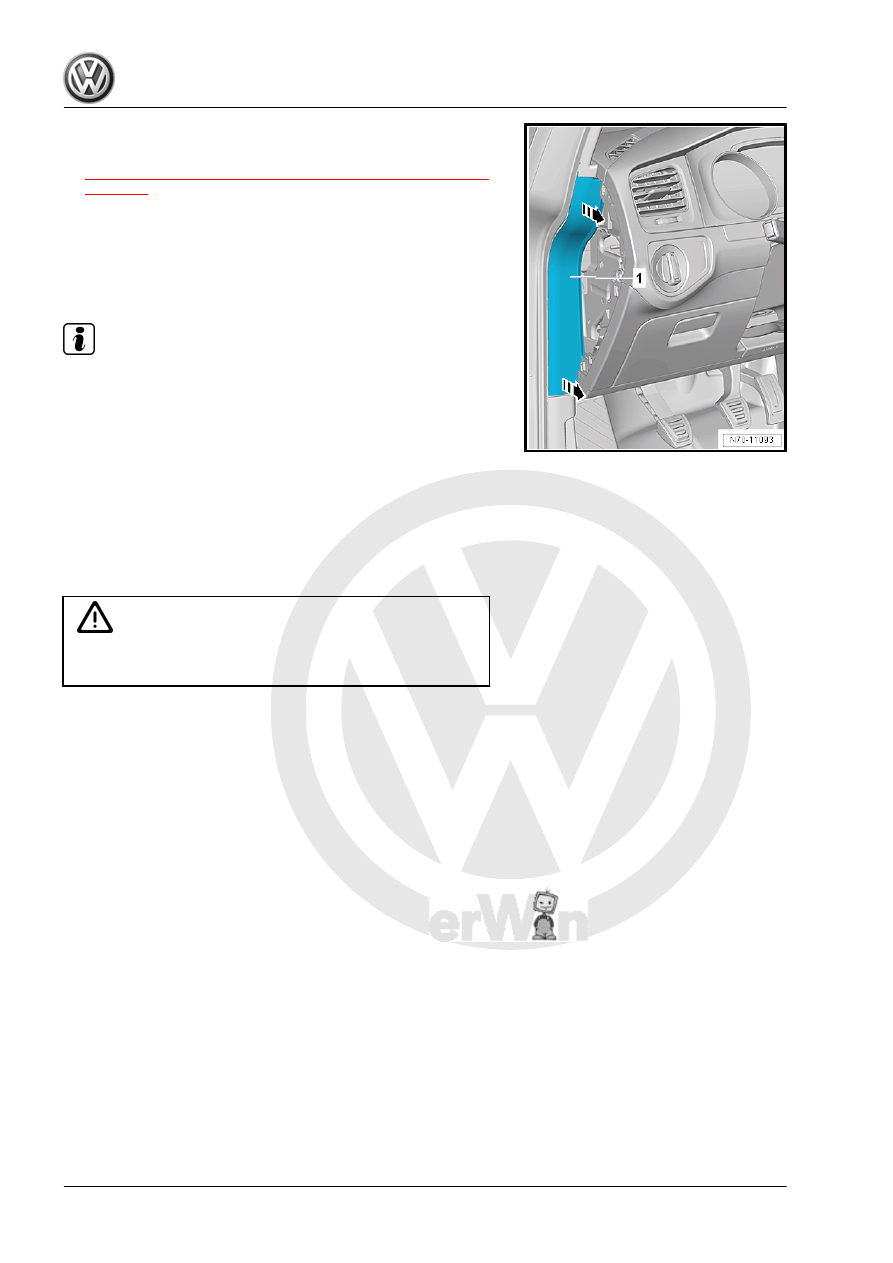
– Unclip the A-pillar gap cover -1- from the A-pillar upper trim

panel and A-pillar lower trim panel -arrows-.

– Loosen and remove the A-pillar gap cover -1- from the door

seal molding.

Installing

Note

Make sure that the A-pillar gap cover is inside the door seal mold‐

ing after installing.

Install in reverse order of removal.

5.12

A-Pillar Trim Panel, Removing and In‐

stalling

Special tools and workshop equipment required
♦ Trim Removal Wedge - 3409-
♦ Torque Wrench 1783 - 2-10Nm - VAG1783-

Caution

This procedure contains mandatory replaceable parts. Refer

to component overview prior to starting procedure.

Mandatory Replacement Parts
♦ Clips (Upper Clips (Qty. 2))

Removing
A-Pillar Upper Trim Panel

Note

The following describes the removing and installing on the left

side of the vehicle. Removing and installing on the right side is

identical.

– Detach the A-pillar upper trim panel -1- from the door seal

molding.

– Starting at the top, carefully loosen the upper A-pillar trim pan‐

el -1- up to the first retainer using the Trim Removal Wedge -

3409- in direction of -arrows A and B-.

Caution

It is theoretically possible to damage the head curtain airbag

during the following steps. Therefore proceed with great care

when bending the hooks.

– Slide a screwdriver between the body and the head curtain

airbag near the upper two clips.

– Using the screwdriver, bend the hooks of the upper two clips

until it is possible to remove the clips.

Caution

Always replace the upper two clips before installing.

– Raise the upper A-pillar trim panel -1- upward out of the in‐

strument panel in direction of -arrow C-.

– Disconnect the connector from the treble speaker and remove

the upper A-pillar trim panel -1-.

Triangular Window Trim Panel, Removing

Note

The following describes the removing and installing on the left

side of the vehicle. Removing and installing on the right side is

identical.

– Remove the upper A-pillar trim panel. Refer to 

⇒ page 253

 .

– Remove the A-pillar gap cover. Refer to

⇒ “5.11 A-Pillar Gap Cover, Removing and Installing”,

page 251

 .

– Loosen the triangular window trim panel -2- with the clip -1- in

direction of the -arrow A- from the body mount.

– Remove the triangular window trim panel -2- with the clip -1-

upward from the instrument panel in direction of -arrow B-.

Lower A-Pillar Trim Panel on the Driver Side, Removing
– Detach the sill panel from the body in the transition area to the

A-pillar lower trim panel. Refer to

⇒ “5.10 Sill Panel Strip, Removing and Installing”, page 249

 .

– Remove the A-pillar gap cover. Refer to

⇒ “5.11 A-Pillar Gap Cover, Removing and Installing”,

page 251

 .

– Remove the hood release lever -3-. Refer to ⇒  Body Exterior;

Rep. Gr.  55 ; Hood; Hood Release Lever, Removing and In‐

stalling .

– Remove the clip -2-.
– Loosen the lower A-pillar trim panel -1- from the body in the

direction of the -arrow B-. Loosen the lower A-pillar trim panel

from the door seal molding.

– Remove the lower A-pillar trim panel -1- from the mount di‐

rection of -arrow A-.

Lower A-Pillar Trim Panel on the Front Passenger Side, Remov‐

ing
– Detach the sill panel from the body in the transition area to the

A-pillar lower trim panel. Refer to

⇒ “5.10 Sill Panel Strip, Removing and Installing”, page 249

 .

– Remove the A-pillar gap cover. Refer to

⇒ “5.11 A-Pillar Gap Cover, Removing and Installing”,

page 251

 .

– Loosen the lower A-pillar trim panel -1- from the body in the

direction of the -arrow A-. Loosen the lower A-pillar trim panel

from the door seal molding.

– Remove the lower A-pillar trim panel -1- from the A-pillar in the

direction of the -arrow B-.


Content   ..  399  400  401  402   ..