Volkswagen Golf / Golf GTI / Golf Variant. Manual - part 399


  Index      Volkswagen     Volkswagen Golf / Golf GTI / Golf Variant - service repair manual 2013 year


Search            copyright infringement  


Content   ..  397  398  399  400   ..


Volkswagen Golf / Golf GTI / Golf Variant. Manual - part 399


5.5.2

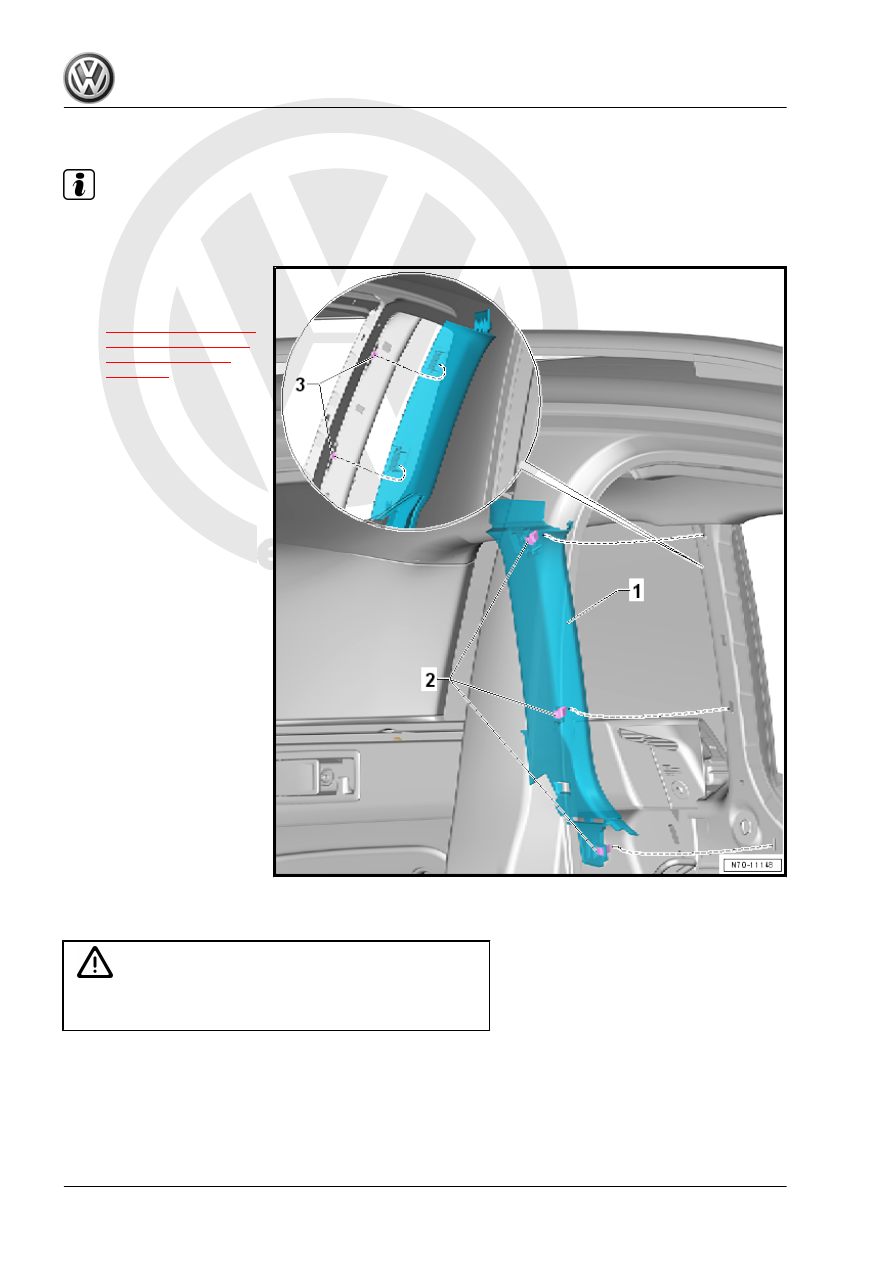
Overview - C-Pillar Trim Panel, Wagon

Note

The illustration shows the C-pillar trim panel on the left side. The right side is similar.

1 - C-Pillar Trim Panel

❑ Removing and instal‐

ling. Refer to

⇒ “5.14.2 C-Pillar-Trim

Panel, Removing and

Installing, Wagon”,

page 262

 .

2 - Clip

❑ Insert in the trim panel
❑ Remove the clips that

are still in the mounting

points on the body using

the Omega Clip Tool -

T40280-

❑ Replace damaged or

deformed retaining clips

3 - Clip

❑ Insert in the C-pillar
❑ Always replace the clips

5.6

Overview - D-Pillar Trim Panel

Caution

This procedure contains mandatory replaceable parts. Refer

to component overview prior to starting procedure.

Mandatory Replacement Parts
♦ Clips -3-

Note

The illustration shows the D-pillar trim panel on the left side. The right side is similar.

1 - D-Pillar Trim Panel

❑ Removing and instal‐

ling. Refer to

⇒ “5.15 D-Pillar Trim

Panel, Removing and

Installing”, page 264

 .

2 - Clip

❑ Insert in the trim panel
❑ Remove the clips that

are still in the mounting

points on the body using

the Omega Clip Tool -

T40280-

❑ Replace damaged or

deformed retaining clips

3 - Clip

❑ Insert in the D-pillar
❑ Always replace the clips

5.7

Overview - Side Trim Panel

Note

The illustration shows the side trim panel on the left side. The right side is similar.

1 - Side Trim Panel

❑ Removing and instal‐

ling. Refer to

⇒ “5.16 Side Trim Panel,

Removing and Instal‐

ling”, page 265

 .

2 - Clip

❑ Insert in the trim panel
❑ Replace damaged or

deformed clips

5.8

Overview - Wheel Housing Trim Panel

⇒ “5.8.1 Overview - Wheel Housing Trim Panel, 4-Door Sedan”,

page 246
⇒ “5.8.2 Overview - Wheel Housing Trim Panel, Wagon”,

page 247

5.8.1

Overview - Wheel Housing Trim Panel, 4-Door Sedan

Note

The illustration shows the wheel housing trim panel on the left side. The right side is similar.

I: Vehicles without Side Cushion
II: Vehicles with Side Cushion

1 - Wheel Housing Trim Panel

❑ Removing and instal‐

ling. Refer to

⇒ “5.17 Wheel Housing

Trim Panel, Removing

and Installing”,

page 267

 .

2 - Clip

❑ Insert in the trim panel
❑ Remove the clips that

are still in the mounting

points on the body using

the Omega Clip Tool -

T40280-

❑ Replace damaged or

deformed retaining clips

3 - Nut

❑ 3.5 Nm

4 - Wheel Housing Trim Panel

❑ Removing and instal‐

ling. Refer to

⇒ “5.17 Wheel Housing

Trim Panel, Removing

and Installing”,

page 267

 .

5 - Clip

❑ Insert in the trim panel
❑ Remove the clips that

are still in the mounting

points on the body using

the Omega Clip Tool -

T40280-

❑ Replace damaged or

deformed retaining clips

5.8.2

Overview - Wheel Housing Trim Panel, Wagon

Note

The illustration shows the wheel housing trim panel on the left side. The right side is similar.


Content   ..  397  398  399  400   ..