Volkswagen Golf / Golf GTI / Golf Variant. Manual - part 397


  Index      Volkswagen     Volkswagen Golf / Golf GTI / Golf Variant - service repair manual 2013 year


Search            copyright infringement  


Content   ..  395  396  397  398   ..


Volkswagen Golf / Golf GTI / Golf Variant. Manual - part 397


5.1.2

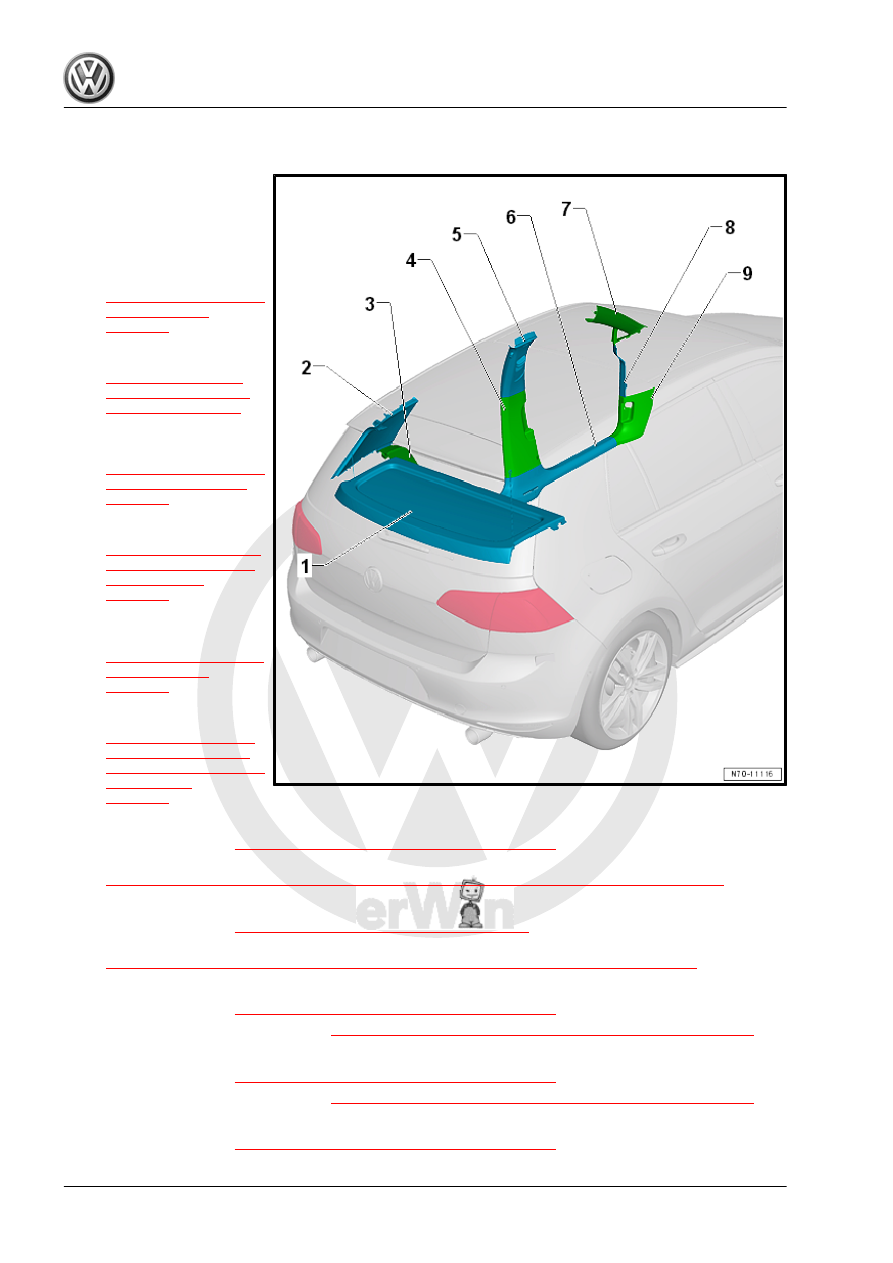
Component Location Overview - Vehicle Interior Trim Panel, 4-Door Sedan

1 - Rear Shelf

❑ Clipped in the mounts

for the rear shelf com‐

partment

2 - C-Pillar Trim Panel

❑ Overview. Refer to

⇒ “5.5 Overview - C-Pil‐

lar Trim Panel”,

page 242

 .

❑ Removing and instal‐

ling. Refer to

⇒ “5.14 C-Pillar Trim

Panel, Removing and

Installing”, page 261

 .

3 - Wheel Housing Trim Panel

❑ Overview. Refer to

⇒ “5.8 Overview - Wheel

Housing Trim Panel”,

page 246

 .

❑ Removing and instal‐

ling. Refer to

⇒ “5.17 Wheel Housing

Trim Panel, Removing

and Installing”,

page 267

 .

4 - B-Pillar Lower Trim Panel

❑ Overview. Refer to

⇒ “5.4 Overview - B-Pil‐

lar Trim Panel”,

page 240

 .

❑ Removing and instal‐

ling. Refer to

⇒ “5.13.2 B-Pillar Trim

Panel, Removing and

Installing, 4-Door Sedan

and Wagon”,

page 258

 .

5 - B-Pillar Upper Trim Panel

❑ Overview. Refer to 

⇒ “5.4 Overview - B-Pillar Trim Panel”, page 240

 .

❑ Removing and installing. Refer to

⇒ “5.13.2 B-Pillar Trim Panel, Removing and Installing, 4-Door Sedan and Wagon”, page 258

 .

6 - Sill Panel Strip

❑ Overview. Refer to 

⇒ “5.2 Overview - Sill Panel Strip”, page 238

 .

❑ Removing and installing. Refer to

⇒ “5.10.2 Sill Panel Strip, Removing and Installing, 4-Door Sedan and Wagon”, page 250

 .

7 - A-Pillar Upper Trim Panel

❑ Overview. Refer to 

⇒ “5.3 Overview - A-Pillar Trim Panel”, page 239

 .

❑ Removing and installing. Refer to 

⇒ “5.12 A-Pillar Trim Panel, Removing and Installing”, page 252

 .

8 - A-Pillar Gap Cover

❑ Overview. Refer to 

⇒ “5.3 Overview - A-Pillar Trim Panel”, page 239

 .

❑ Removing and installing. Refer to 

⇒ “5.11 A-Pillar Gap Cover, Removing and Installing”, page 251

 .

9 - A-Pillar Lower Trim Panel

❑ Overview. Refer to 

⇒ “5.3 Overview - A-Pillar Trim Panel”, page 239

 .

❑ Removing and installing. Refer to 

⇒ “5.12 A-Pillar Trim Panel, Removing and Installing”, page 252

 .

5.1.3

Component Location Overview - Passenger Compartment Trim, Wagon

1 - D-Pillar Trim Panel

❑ Overview. Refer to

⇒ “5.6 Overview - D-Pil‐

lar Trim Panel”,

page 244

 .

❑ Removing and instal‐

ling. Refer to

⇒ “5.15 D-Pillar Trim

Panel, Removing and

Installing”, page 264

 .

2 - C-Pillar Trim Panel

❑ Overview. Refer to

⇒ “5.5.2 Overview - C-

Pillar Trim Panel, Wag‐

on”, page 244

 .

❑ Removing and instal‐

ling. Refer to

⇒ “5.14.2 C-Pillar-Trim

Panel, Removing and

Installing, Wagon”,

page 262

 .

3 - B-Pillar Upper Trim Panel

❑ Overview. Refer to

⇒ “5.4 Overview - B-Pil‐

lar Trim Panel”,

page 240

 .

❑ Removing and instal‐

ling. Refer to

⇒ “5.13.2 B-Pillar Trim

Panel, Removing and

Installing, 4-Door Sedan

and Wagon”,

page 258

 .

4 - A-Pillar Upper Trim Panel

❑ Overview. Refer to

⇒ “5.3 Overview - A-Pil‐

lar Trim Panel”, page 239

 .

❑ Removing and installing. Refer to 

⇒ “5.12 A-Pillar Trim Panel, Removing and Installing”, page 252

 .

5 - A-Pillar Lower Trim Panel

❑ Overview. Refer to 

⇒ “5.3 Overview - A-Pillar Trim Panel”, page 239

 .

❑ Removing and installing. Refer to 

⇒ “5.12 A-Pillar Trim Panel, Removing and Installing”, page 252

 .

6 - A-Pillar Gap Cover

❑ Overview. Refer to 

⇒ “5.3 Overview - A-Pillar Trim Panel”, page 239

 .

❑ Removing and installing. Refer to 

⇒ “5.11 A-Pillar Gap Cover, Removing and Installing”, page 251

 .

7 - Sill Panel Strip

❑ Overview. Refer to 

⇒ “5.2 Overview - Sill Panel Strip”, page 238

 .

❑ Removing and installing. Refer to

⇒ “5.10.2 Sill Panel Strip, Removing and Installing, 4-Door Sedan and Wagon”, page 250

 .

8 - B-Pillar Lower Trim Panel

❑ Overview. Refer to 

⇒ “5.4 Overview - B-Pillar Trim Panel”, page 240

 .

❑ Removing and installing. Refer to

⇒ “5.13.2 B-Pillar Trim Panel, Removing and Installing, 4-Door Sedan and Wagon”, page 258

 .

9 - Wheel Housing Trim Panel

❑ Overview. Refer to 

⇒ “5.8.2 Overview - Wheel Housing Trim Panel, Wagon”, page 247

 .

❑ Removing and installing. Refer to

⇒ “5.17.2 Wheel Housing Trim Panel, Removing and Installing, Wagon”, page 269

 .

5.2

Overview - Sill Panel Strip

Note

The illustration shows the sill panel strip on the left side. The right side is similar.

I: Sill Panel Strip, 4-Door
II: Sill Panel Strip, 2-Door

1 - Sill Panel Strip

❑ Removing and instal‐

ling. Refer to

⇒ “5.10 Sill Panel Strip,

Removing and Instal‐

ling”, page 249

 .

2 - Clip

❑ Insert in the sill panel

strip

❑ Remove the clips that

are still in the mounting

points on the body using

the Omega Clip Tool -

T40280-

❑ Replace damaged or

deformed retaining clips

3 - Bracket

❑ Install inside the body

4 - Expanding Clip

5.3

Overview - A-Pillar Trim Panel

Note

The illustrations show the A-pillar trim panels on the left side. The right side is similar.

Upper A-Pillar Trim Panel and Triangular Window Trim Panel

1 - Triangular Window Trim

Panel

❑ Removing and instal‐

ling. Refer to

⇒ “5.12 A-Pillar Trim

Panel, Removing and

Installing”, page 252

 .

2 - Clips

❑ With hooks
❑ Insert in the trim panel
❑ Remove the clips that

are still in the mounting

points on the body using

the Omega Clip Tool -

T40280-

❑ Always replace the clips

3 - Clip

❑ Insert in the trim panel
❑ Remove the clips that

are still in the mounting

points on the body using

the Omega Clip Tool -

T40280-

❑ Replace damaged or

deformed retaining clips

4 - A-Pillar Upper Trim Panel

❑ Removing and instal‐

ling. Refer to

⇒ “5.12 A-Pillar Trim

Panel, Removing and

Installing”, page 252

 .

5 - Clip

❑ Remove and install to‐

gether with the triangu‐

lar window trim panel

❑ Insert in the trim panel
❑ Replace damaged or deformed clip

Lower A-Pillar Trim Panel and Gap Cover


Content   ..  395  396  397  398   ..