Volkswagen Golf / Golf GTI / Golf Variant. Manual - part 400


  Index      Volkswagen     Volkswagen Golf / Golf GTI / Golf Variant - service repair manual 2013 year


Search            copyright infringement  


Content   ..  398  399  400  401   ..


Volkswagen Golf / Golf GTI / Golf Variant. Manual - part 400


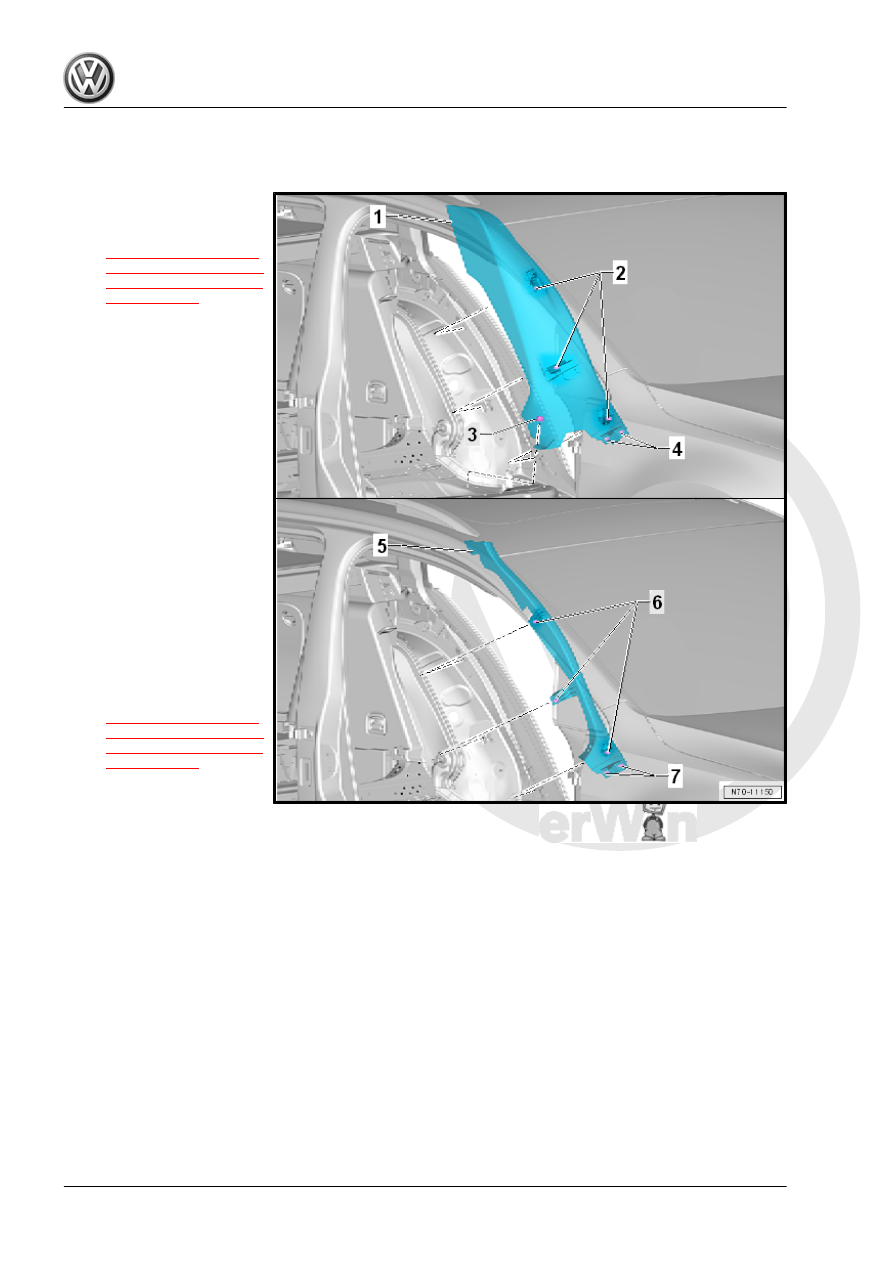
Upper Half of Image: Vehicles without Side Padding
Lower Half of Image: Vehicles with Side Padding

1 - Wheel Housing Trim Panel

❑ Removing and instal‐

ling. Refer to

⇒ “5.17.2 Wheel Hous‐

ing Trim Panel, Remov‐

ing and Installing, Wag‐

on”, page 269

 .

2 - Clip

❑ Insert in the trim panel
❑ Remove the clips that

are still in the mounting

points on the body using

the Omega Clip Tool -

T40280-

❑ Replace damaged or

deformed retaining clips

3 - Nut

❑ 3.5 Nm

4 - Clip

❑ For attaching the sill

panel strip

❑ Insert into the wheel

housing trim panel

❑ Replace damaged or

deformed retaining clips

5 - Wheel Housing Trim Panel

❑ Removing and instal‐

ling. Refer to

⇒ “5.17.2 Wheel Hous‐

ing Trim Panel, Remov‐

ing and Installing, Wag‐

on”, page 269

 .

6 - Clip

❑ Insert in the trim panel
❑ Remove the clips that are still in the mounting points on the body using the Omega Clip Tool - T40280-
❑ Replace damaged or deformed retaining clips

7 - Clip

❑ For attaching the sill panel strip
❑ Insert into the wheel housing trim panel
❑ Replace damaged or deformed retaining clips

5.9

Overview - Foot Rest and Carpet

1 - Footrest

❑ Removing and instal‐

ling. Refer to

⇒ “5.18 Foot Rest, Re‐

moving and Installing”,

page 271

 .

❑ Must engage complete‐

ly in the bracket

2 - Nut

❑ 2 Nm
❑ Quantity: 3

3 - Bracket

❑ Removing and instal‐

ling. Refer to

⇒ “5.18 Foot Rest, Re‐

moving and Installing”,

page 271

 .

4 - Carpet

❑ One piece
❑ Removing and instal‐

ling. Refer to

⇒ “5.19 Carpet, Remov‐

ing and Installing”, page

272

 .

5.10

Sill Panel Strip, Removing and Installing

⇒ “5.10.1 Sill Panel Strip, Removing and Installing, 2-Door Se‐

dan”, page 249
⇒ “5.10.2 Sill Panel Strip, Removing and Installing, 4-Door Sedan

and Wagon”, page 250

5.10.1

Sill Panel Strip, Removing and Instal‐

ling, 2-Door Sedan

Note

The following describes the removing and installing on the left

side of the vehicle. Removing and installing on the right side is

identical.

Special tools and workshop equipment required
♦ Wedge Set - T10383-

Removing
– Remove the rear bench seat. Refer to

⇒ “3.7 Bench Seat/Single Seat, Removing and Installing”,

page 382

 .

– Loosen the sill panel -1- from the side sill and door seal mold‐

ing using the Wedge Set - T10383- in direction of -arrows-.

– Remove the expanding clip -1-.
– Release the sill panel strip retaining tab -3- from the side trim

panel using the Wedge Set - T10383- in direction of

-arrow A-.

– Remove the sill panel strip -2- at the same time forward from

the side trim panel in direction of -arrow B-.

– Remove the sill panel strip.
Installing

Note

Check all the fasteners for damage and replace if necessary.

Remove any remaining clips in the body mounting points using

the Omega Clip Tool - T40280- . To install, insert into the sill

panel strip.

Make sure that the sill panel strip is inside the door seal mold‐

ing after installing.

Install in reverse order of removal.

5.10.2

Sill Panel Strip, Removing and Instal‐

ling, 4-Door Sedan and Wagon

Note

The following describes the removing and installing on the left

side of the vehicle. Removing and installing on the right side is

identical.

Special tools and workshop equipment required
♦ Wedge Set - T10383-
Removing
– Remove the rear bench seat. Refer to

⇒ “3.7 Bench Seat/Single Seat, Removing and Installing”,

page 382

 .

– Remove the expanding clip -1-.

– Release the sill panel strip retaining tabs -2- from the lower B-

pillar trim panel -3- using the Wedge Set - T10383- in direction

of -arrow A-.

– Loosen the sill panel -1- from the side sill and door seal mold‐

ing using the Wedge Set - T10383- in direction of -arrows-.

– Remove the sill panel strip -1- slightly forward at the same

time.

– Open the belt guide cover and guide the seat belt out.

– Remove the sill panel strip.
Installing

Note

Check all the fasteners for damage and replace if necessary.

Remove any remaining clips in the body mounting points using

the Omega Clip Tool - T40280- . To install, insert into the sill

panel strip.

Make sure that the sill panel strip is inside the door seal mold‐

ing after installing.

Install in reverse order of removal.

5.11

A-Pillar Gap Cover, Removing and In‐

stalling

Note

The following describes the removing and installing on the left

side of the vehicle. Removing and installing on the right side is

identical.

Special tools and workshop equipment required
♦ Trim Removal Wedge - 3409-


Content   ..  398  399  400  401   ..