Volkswagen Golf / Golf GTI / Golf Variant. Manual - part 285


  Index      Volkswagen     Volkswagen Golf / Golf GTI / Golf Variant - service repair manual 2013 year


Search            copyright infringement  


Content   ..  283  284  285  286   ..


Volkswagen Golf / Golf GTI / Golf Variant. Manual - part 285


Tightening Specifications

1.14

Roof Shade Control Module - J394- , Removing and Installing

Removing

– Remove the headliner. Refer to ⇒  Body Interior; Rep. Gr.  70 ;

Roof Trim Panels; Headliner, Removing and Installing

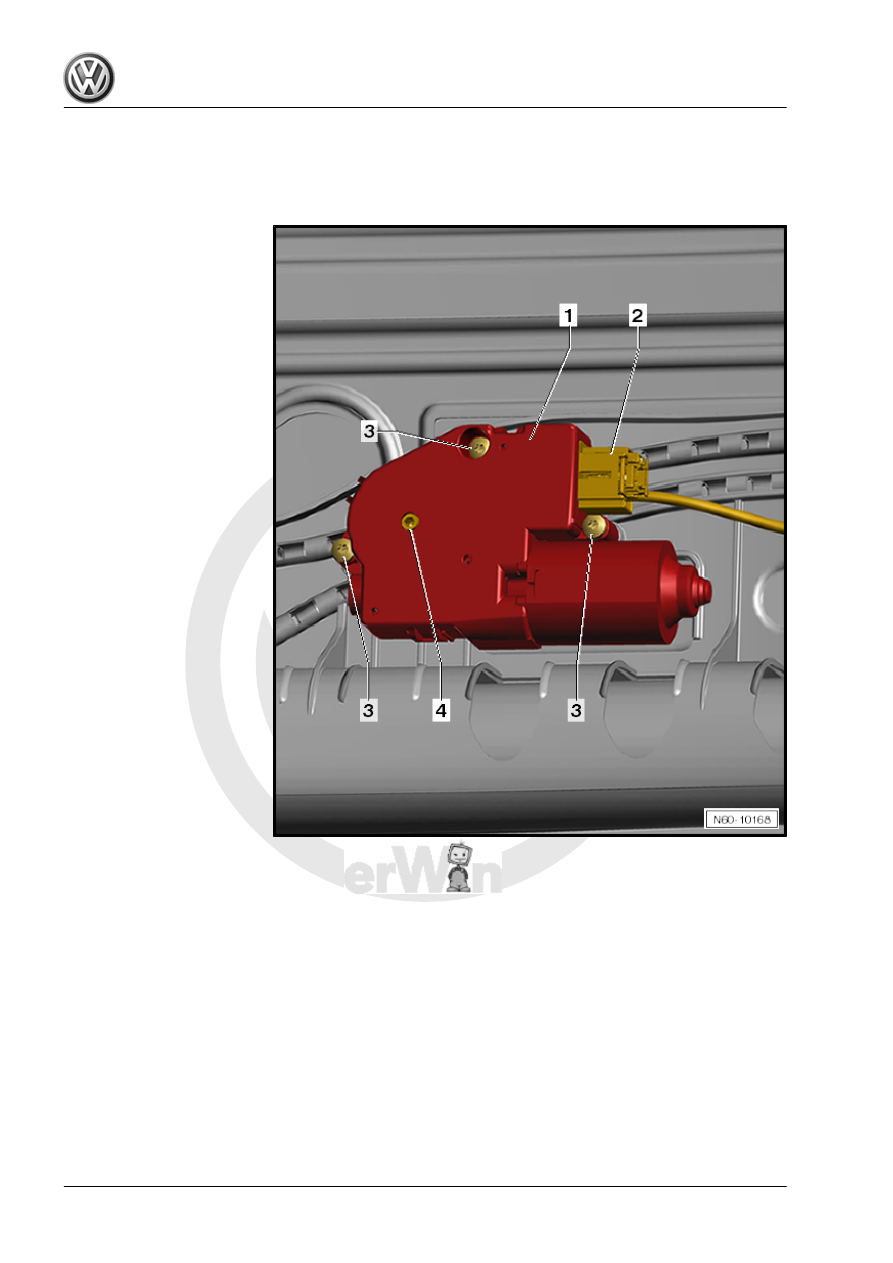
– Disconnect the harness connector -2- from the sun shade mo‐

tor -1-.

– Remove the bolts -3-.
– Remove the sun shade motor -1-.
Installing
Install in reverse order of removal. Note the following:
– Before installing the sun shade motor, the sun shade must be

aligned to be parallel.

– Measure and adjust the distance -dimension a- between the

shade arch -1- and the shade cartridge -2-.

– After completing all work steps, perform an adaptation on the

sun shade motor. Refer to

⇒ “1.18  Roof Shade Control Module J394 , Programming”,

page 298

 .

Tightening Specification
♦ Refer to 

⇒ “1.2.3 Overview - Sunroof, Wagon”, page 199

1.15

Sunroof Seals, Removing and Installing

⇒ “1.15.1 Sunroof Frame Seal, Removing and Installing, Sedan”,

page 273
⇒ “1.15.2 Glass Panel Seal, Removing and Installing, Sedan”,

page 275
⇒ “1.15.3 Sunroof Frame Seal, Removing and Installing, Wagon”,

page 276
⇒ “1.15.4 Glass Panel Seal, Removing and Installing, Wagon”,

page 278

1.15.1

Sunroof Frame Seal, Removing and In‐

stalling, Sedan

Caution

A visual inspection when the sliding sunroof is open on the

vehicle is essential to order the correct replacement part. Refer

to 

⇒ “1.1 Characteristics - Sliding Sunroof, Sedan”, page 193

Removing
– Remove the glass panel. Refer to

⇒ “1.6 Glass Panel, Removing and Installing”, page 223

 .

– Remove the seal -1- from the sunroof frame -2-.
Installing
– Align the inner seal -1- with the vulcanized point to the curve

on the sunroof frame -3- -a arrows-.

– The sealing lip -arrow b- must be aligned outward.
– Push the inner seal -1- evenly in the sunroof frame mount

-2-.

– Install the glass panel. Refer to

⇒ “1.6 Glass Panel, Removing and Installing”, page 223

 .

1.15.2

Glass Panel Seal, Removing and Instal‐

ling, Sedan

Caution

A visual inspection when the sliding sunroof is open on the

vehicle is essential to order the correct replacement part. Refer

to 

⇒ “1.1 Characteristics - Sliding Sunroof, Sedan”, page 193

Removing

– Open the glass panel.
– Remove the seal -2- from the glass panel -1-.
Installing
– Align the seal -2- at the outer edges of the glass panel -1-

-arrows-.

– Press the seal -2- into the mount on the glass panel -1-.


Content   ..  283  284  285  286   ..