Volkswagen Golf / Golf GTI / Golf Variant. Manual - part 258


  Index      Volkswagen     Volkswagen Golf / Golf GTI / Golf Variant - service repair manual 2013 year


Search            copyright infringement  


Content   ..  256  257  258  259   ..


Volkswagen Golf / Golf GTI / Golf Variant. Manual - part 258


– Switch off the ignition and all electrical equipment. Remove

the ignition key.

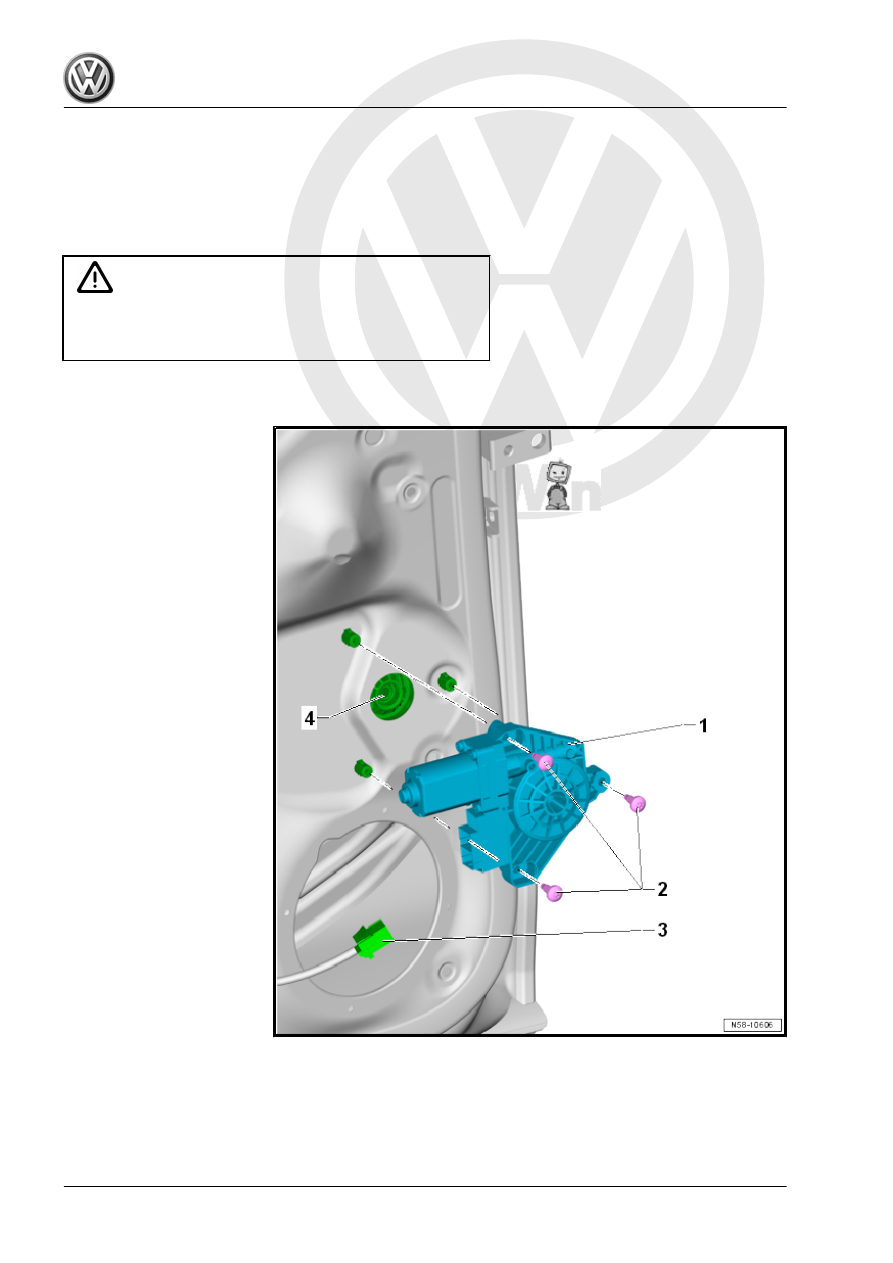
– Disconnect the connector -3-.
– Remove the bolts -2- (quantity: 3).
– Remove the window regulator motor -1- from the cable reel

mounts -4-.

WARNING

The additional functions and pinch protection must be coded

when a new window regulator motor (door control module) is

installed.

Installing

– Install the window regulator motor -1- on the cable reel mounts

-4-. Gently move the door window up and down so that the

splines between the window regulator motor and the cable reel

can mesh.

– Tighten the screws -2-.

– Connect the connector -3-.
– A new window regulator motor must be coded. Refer to Vehi‐

cle Diagnostic Tester .

– The work procedure and notes on the one-touch up/down and

pinch protection can be found in ⇒ Maintenance ; Booklet 

36.1 .

Installation is performed in reverse order of the removal.
Tightening Specifications

2.5

Window Regulator, Removing and In‐

stalling

Special tools and workshop equipment required
♦ Torque Wrench 1783 - 2-10Nm - VAG1783-

Note

The following describes the removal and installation of the left window regulator. Removing and installing the

right window regulator is identical.

Removing

– Remove the rear door trim panel. Refer to ⇒  Body Interior;

Rep. Gr.  70 ; Rear Door Trim Panels; Rear Door Trim Panel,

Removing and Installing .

– Loosen the door window from the window regulator, but do not

remove. Refer to

⇒ “5.5 Rear Door Window, Removing and Installing”,

page 387

 .

– Push the door window upward and secure.
– Remove the window regulator motor or the window crank. Re‐

fer to

⇒ “2.4 Window Regulator Motor, Removing and Installing”,

page 163

 or

⇒ “2.7 Window Crank, Removing and Installing”, page 168

 .

– Release the hooks on the cable reel -3- and push into the door.
– Remove the lower hex nut -2- and push the window regulator

threaded pin in the door.

– Loosen the upper hex nuts -2-, but do not remove.
– Slide the window regulator in the door slightly upward in di‐

rection of -arrow a- and guide it into the door in direction of

-arrow b-.

– Turn the window regulator -4- 90° and remove it through the

opening in the door in direction of -arrow c-.

Installing

– Guide the window regulator -4- through the opening into the

door in direction of -arrow a- and bring it into the installation

position.

– Push the window regulator threaded pin through the inner door

panel in direction of -arrow b- and push downward in direction

of -arrow c-.

– Tighten the hex nuts -2-.
– Push the cable reel against the door inner panel -3- until the

hooks engage audibly.

– Install the window regulator motor or window crank mecha‐

nism. Refer to

⇒ “2.4 Window Regulator Motor, Removing and Installing”,

page 163

 or

⇒ “2.7 Window Crank, Removing and Installing”, page 168

 .

– Install the door window. Refer to

⇒ “5.5 Rear Door Window, Removing and Installing”,

page 387

 .

– Install the rear door trim panel. Refer to ⇒  Body Interior; Rep.

Gr.  70 ; Rear Door Trim Panels; Rear Door Trim Panel, Re‐

moving and Installing .


Content   ..  256  257  258  259   ..