Volkswagen Golf / Golf GTI / Golf Variant. Manual - part 243
 

  Index      Volkswagen     Volkswagen Golf / Golf GTI / Golf Variant - service repair manual 2013 year


Search            copyright infringement  


Content   ..  241  242  243  244   ..


Volkswagen Golf / Golf GTI / Golf Variant. Manual - part 243


– Install the door window. Refer to

⇒ “5.4 Front Door Window, Removing and Installing”,

page 382

 .

– Install the front door trim panel. Refer to ⇒  Body Interior; Rep.

Gr.  70 ; Front Door Trim Panels; Front Door Trim Panel, Re‐

moving and Installing .

Tightening Specifications

2.6

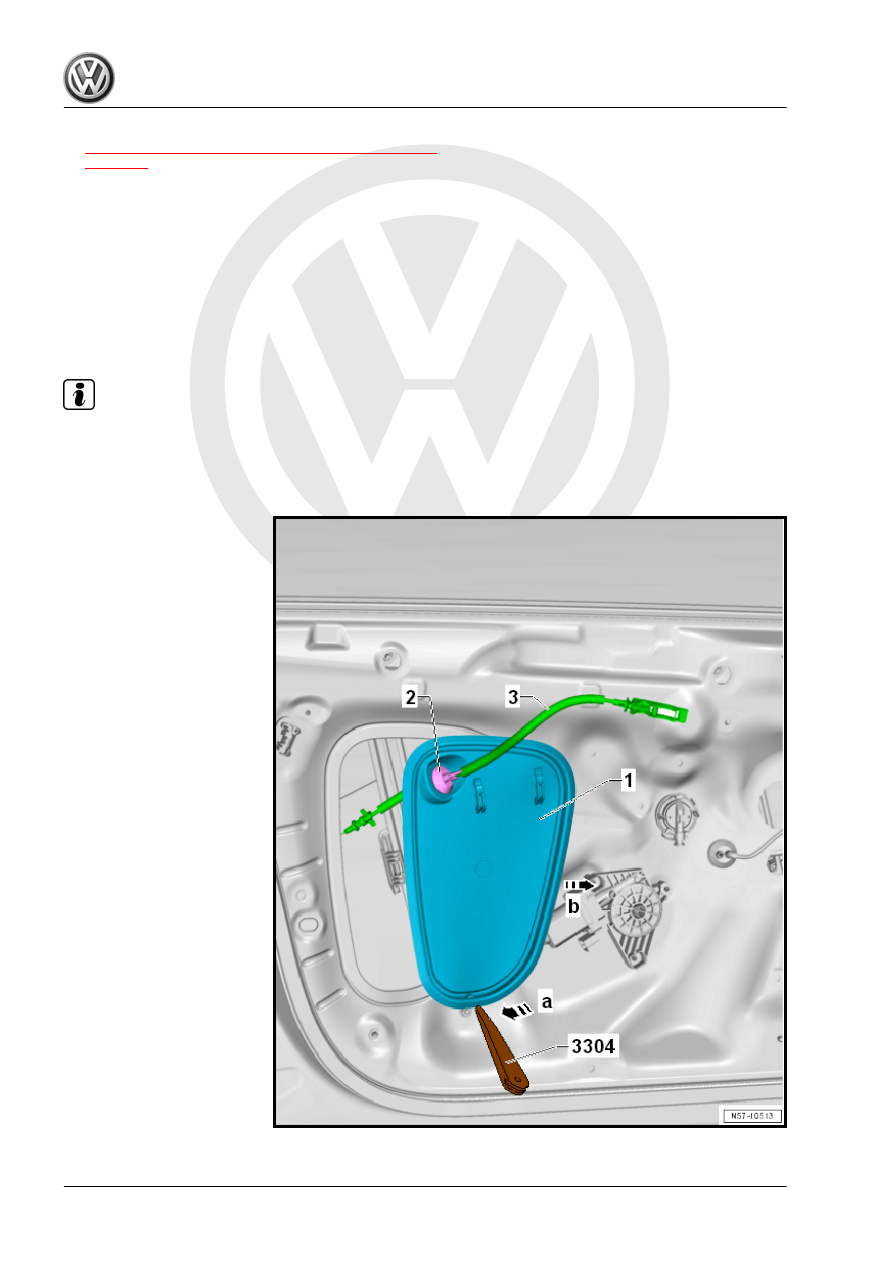
Door Inner Cover, Removing and Instal‐

ling

Special tools and workshop equipment required
♦ Trim Removal Wedge - 3409-

Note

The following describes removing and installing the left cover only on a 4-door vehicle. The right side and 2-

door vehicles are identical.

Removing

– Remove the front door trim panel. Refer to ⇒  Body Interior;

Rep. Gr.  70 ; Front Door Trim Panels; Front Door Trim Panel,

Removing and Installing .

– If necessary, remove the wire from the cover -1-.
– Lift the cover -1- at the bottom in direction of -arrow a-.
– Remove the cover -1- forward out of the door in direction of

-arrow b-.

Note

If it is necessary for the following work steps, remove the release cable -3- with the grommet -2- from the cover

-1-. If equipped, disconnect the connector from the grommet.

Installing

– Guide the release cable -3- with the grommet -2- into the cover

-1-.

– Install the grommet -2- into the cover -1-.
– Install the cover -1- in the door in direction of -arrow a-.
– Engage the cover -1- all around in direction of -arrow b-.

Note

Check the cover by running one's fingers along the edge.

– If equipped, install the wire on the cover -1-.
– Install the front door trim panel. Refer to ⇒  Body Interior; Rep.

Gr.  70 ; Front Door Trim Panels; Front Door Trim Panel, Re‐

moving and Installing .

2.7

Catch, Removing and Installing

Special tools and workshop equipment required
♦ Torque Wrench 1331 5-50Nm - VAG1331-
♦ Cylinder Head Bolt Socket - 3410-

Note

The following describes the removal and installation of the right

catch. The left side is identical.

Removing
– Remove the bolts -2- and the catch -1-.

Installing

Note

A catch with a curve must be installed.

– Place the catch -1- with the curve facing inward on the B-pillar

-3-. Tighten the bolts -2-.

– Adjust the catch. Refer to 

⇒ “1.6 Catch, Adjusting”, page 91

 .

Tightening Specifications

Component

Tightening Specification

Striker pin to the body

20 Nm

2.8

Lock Cylinder Cap, Removing and Installing

Note

♦

When removing the lock cylinder cap, do not turn the screwdriver and do not use prying motions.

♦

The lock cylinder and lock cylinder cap are only installed on the driver side.

Removing

– Remove the door handle from the door.
– Gently push a small screwdriver -3- in direction of -arrow a-

into the opening on the bottom of the lock cylinder cap.

– Using the screwdriver, gently remove the lock cylinder cap

-1- from the door in direction of -arrow b- at the bottom.

– Push the cap -1- upward from the lock cylinder -2-.
Installing


Content   ..  241  242  243  244   ..