Volkswagen Golf / Golf GTI / Golf Variant. Manual - part 242


  Index      Volkswagen     Volkswagen Golf / Golf GTI / Golf Variant - service repair manual 2013 year


Search            copyright infringement  


Content   ..  240  241  242  243   ..


Volkswagen Golf / Golf GTI / Golf Variant. Manual - part 242


Removing
– Remove the front door trim panel. Refer to ⇒  Body Interior;

Rep. Gr.  70 ; Front Door Trim Panels; Front Door Trim Panel,

Removing and Installing .

– Secure the door window with adhesive tape to prevent it from

falling down.

– Switch off the ignition and all electrical equipment. Remove

the ignition key.

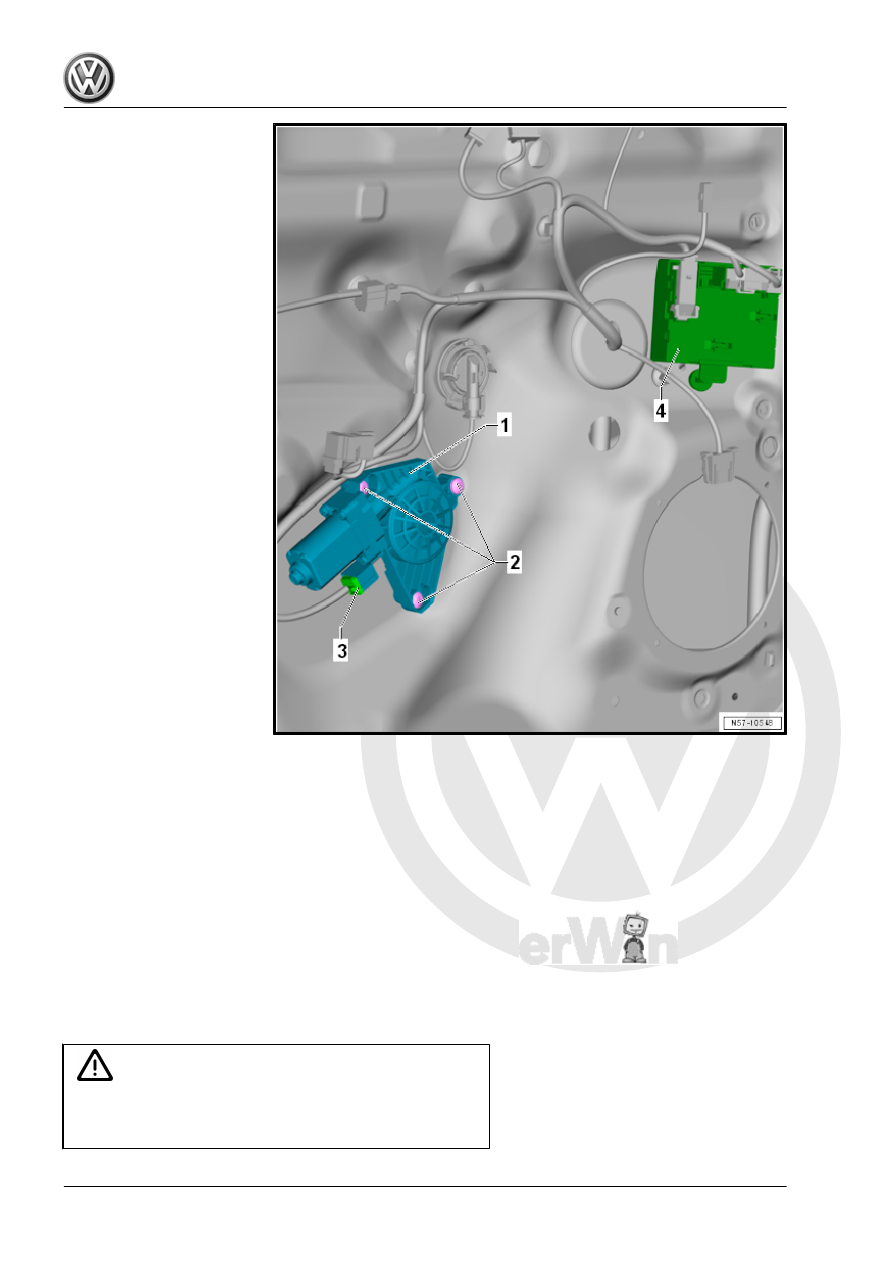
– Disconnect the connector -3-.
– Remove the bolts -2- (quantity: 3).
– Remove the power window motor -1- from the cable reel

mounts.

Installing

WARNING

The additional functions and pinch protection must be coded

when a new power window motor (door control module) is in‐

stalled.

– Install the window regulator motor -1- on the cable reel

mounts. Gently move the door window up and down so that

the splines between the window regulator motor and the cable

reel can mesh.

– Connect the connector -3-.
– The work procedure and notes on the one-touch up/down and

pinch protection can be found in ⇒ Maintenance ; Booklet 

36.1 .

Installation is performed in reverse order of the removal.
Tightening Specifications

2.5

Window Regulator, Removing and In‐

stalling

Special tools and workshop equipment required
♦ Torque Wrench 1783 - 2-10Nm - VAG1783-

Note

The following describes the removal and installation of the left window regulator. Removing and installing the

right window regulator is identical.

Removing

– Remove the front door trim panel. Refer to ⇒  Body Interior;

Rep. Gr.  70 ; Front Door Trim Panels; Front Door Trim Panel,

Removing and Installing .

– Remove the door window. Refer to

⇒ “5.4 Front Door Window, Removing and Installing”,

page 382

 .

– Remove the window regulator motor. Refer to

⇒ “2.4 Window Regulator Motor, Removing and Installing”,

page 99

 .

– Release the cable reel hooks -4- and slide into the door.
– Remove the hex nuts -5- and push the window regulator threa‐

ded pin in the door.

– Loosen the hex nuts -2-, but do not remove.

– Slide the window regulator in the door slightly upward in di‐

rection of -arrow a- and guide it into the door in direction of

-arrow b-.

– Turn the window regulator -1- 90° and remove it through the

opening in the door in direction of -arrow c-.

Installing

– Guide the window regulator -1- through the opening in the door

in direction of -arrow a- and bring it into the installation position.

– Push the window regulator threaded pin through the inner door

panel in direction of -arrow b- and push downward in direction

of -arrow c-.

– Push the threaded pin from below in the window regulator and

tighten the nuts -5-.

– Tighten the hex nuts -2-.
– Push the cable reel against the door inner panel until the hooks

-4- engage audibly.

– Install the window regulator motor. Refer to

⇒ “2.4 Window Regulator Motor, Removing and Installing”,

page 99

 .


Content   ..  240  241  242  243   ..